Power Steering Pump Replacement 4.3L, 5.0L, 5.7L
Removal Procedure
Tools Required
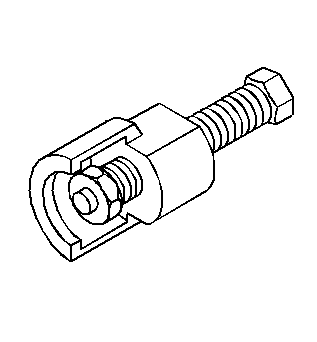
J 25034-C Power Steering Pulley Remover
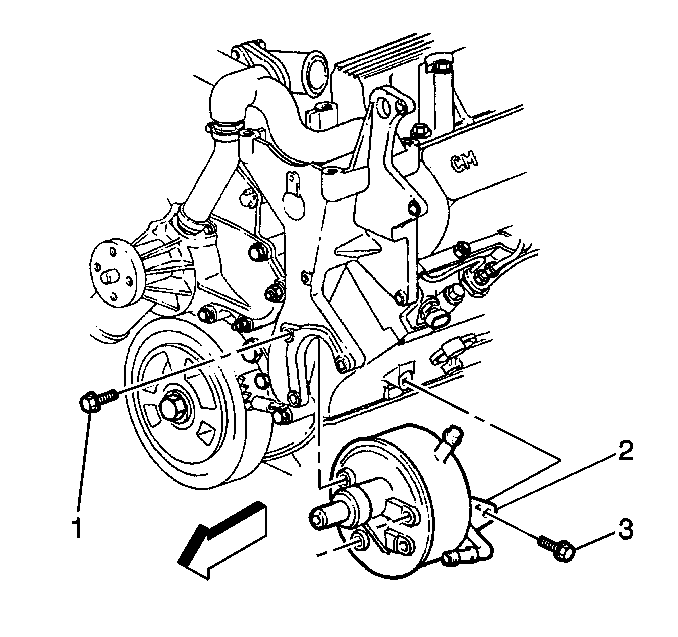
- Place a drain pan below the pump (2).
- Remove the pump drive belt. Install a 3/8 inch drive ratchet on the tensioner arm and rotate the arm counterclockwise.
- Disconnect the hoses at the pump.
- Cap the ends of the hose and the pump in order to prevent the entrance of dirt.
- Disconnect the reservoir hose at the pump.
- Cap the pump fittings.
- Remove the pulley from the pump.
- Install the J 25034-C .
- Turn the nut to the top of the pilot bolt in order to ensure that the pilot bolt bottoms in the pump shaft.
- Hold the pilot bolt.
- Turn the nut counterclockwise.
- Remove the remaining pump line.
- Cap the connection.
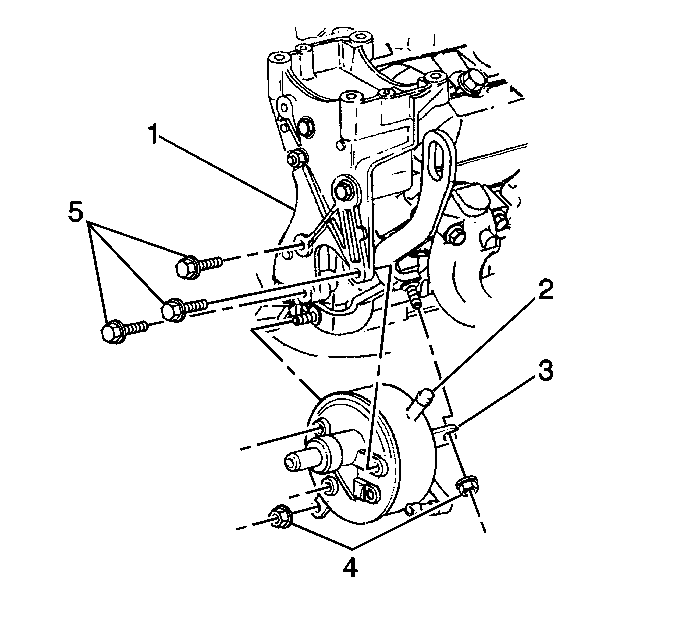
- Remove the following parts:
- Remove the pump from the vehicle.
Raise the hose up in order to prevent drainage of the oil.
| • | The adjusting bolts (5) |
| • | The nuts (4) |
| • | The brackets (1, 3) |
Installation Procedure
Tools Required
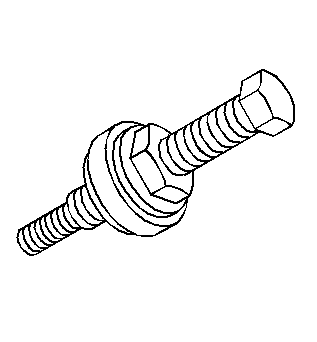
J 25033-C Power Steering Pump Pulley Installer
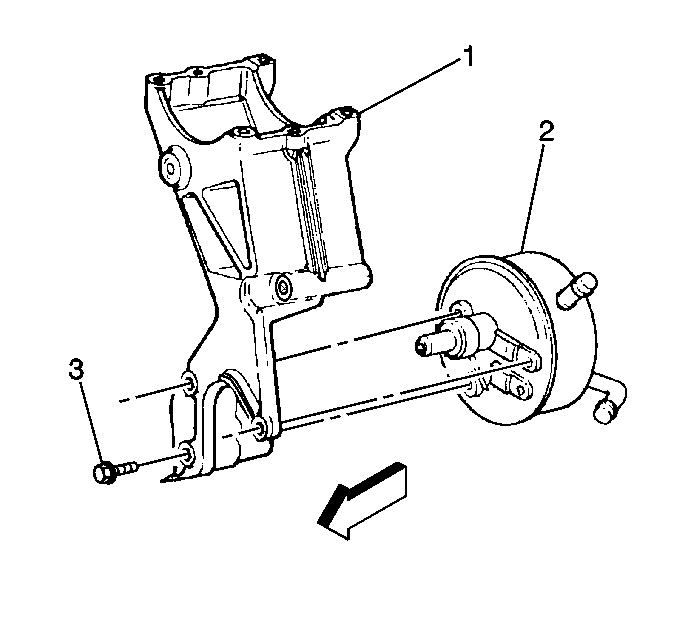
- Install the brackets (1, 3) to the pump (2).
- Place the pulley on the end of the pump shaft.
- Install the J 25033-C .
- Turn the nut to the top of the pilot bolt in order to ensure that the pilot bolt bottoms in the pump shaft.
- Hold the pilot bolt.
- Turn the nut clockwise.
- Prior to mounting the pump, fill the pump housing with as much fluid as possible.
- Loosely install the pump assembly to the engine using the bolts (5) and the nuts (4).
- Connect the power steering hoses to the pump. .
- Fill the reservoir.
- Turn the pulley counterclockwise as viewed from the front in order to bleed the pump in order to bleed the pump.
- Tighten the steering pump mounting bolts.
- Install the pump drive belt. Install a 3/8 inch drive ratchet on the tensioner arm and rotate the arm counterclockwise.
- Fill the system with power steering fluid.
- Bleed the system. Refer to Power Steering System Bleeding .
Important:
• Improperly installed hoses are subject to chafing and other abuses
during sharp turns. • Do not start the engine with any disconnected power steering hoses.
When the power steering hoses are connected, ensure that the hoses and the
drive belt, the sheet metal, and any other components have clearance in order
to avoid chafing or interference.
Tighten
Tighten the hose fittings to 27N·m (20 lb ft).
Cease turning the pulley when air bubbles no longer appear.
Notice: Use the correct fastener in the correct location. Replacement fasteners must be the correct part number for that application. Fasteners requiring replacement or fasteners requiring the use of thread locking compound or sealant are identified in the service procedure. Do not use paints, lubricants, or corrosion inhibitors on fasteners or fastener joint surfaces unless specified. These coatings affect fastener torque and joint clamping force and may damage the fastener. Use the correct tightening sequence and specifications when installing fasteners in order to avoid damage to parts and systems.
Tighten
Tighten the bolts to 50 N·m (37 lb ft).
Power Steering Pump Replacement 7.4L
Removal Procedure
Tools Required
J 25034-C Power Steering Pulley Remover
- Place a drain pan below the pump.
- Remove the pump drive belt. Install a 3/8 inch drive ratchet on the tensioner arm and rotate the tensioner arm counterclockwise.
- Remove the remaining pump line.
- Cap the connection.
- Remove the following parts:
- Remove the pump (2) from the vehicle.
- Disconnect the hoses at the pump.
- Cap the ends of the hose and the pump in order to prevent the entrance of dirt.
- Disconnect the reservoir hose at the pump.
- Cap the pump fittings.
- Remove the pulley from the pump.
- Install the J 25034-C .
- Turn the nut to the top of the pilot bolt in order to ensure that the pilot bolt bottoms in the pump shaft.
- Hold the pilot bolt.
- Turn the nut counterclockwise.
| • | The adjusting bolts (3) |
| • | The bracket (1) |
Raise the hose up in order to prevent drainage of the oil.
Installation Procedure
Tools Required
J 25033-C Power Steering Pump Pulley Installer
- Install the bracket (1) to the pump (2).
- Place the pulley on the end of the pump shaft.
- Install the J 25033-C .
- Turn the nut to the top of the pilot bolt in order to ensure that the pilot bolt bottoms in the pump shaft.
- Hold the pilot bolt.
- Turn the nut clockwise.
- Prior to mounting the pump, fill the pump housing with as much fluid as possible.
- Loosely install the pump assembly to the engine using the bolts (2).
- Connect the power steering hoses to the pump.
- Fill the reservoir.
- Turn the pulley counterclockwise as viewed from the front in order to bleed the pump in order to bleed the pump.
- Tighten the steering pump mounting bolts.
- Install the pump drive belt. Install a 3/8 inch drive ratchet on the tensioner arm and rotate the arm counterclockwise.
- Fill the system with power steering fluid.
- Bleed the system. Refer to Power Steering System Bleeding .
Important:
• Improperly installed hoses are subject to chafing and other abuses
during sharp turns. • Do not start the engine with any disconnected power steering hoses.
When the power steering hoses are connected, ensure that the hoses and the
drive belt, the sheet metal, and any other components have clearance in
order to avoid chafing or interference.
Tighten
Tighten the hose fittings to 27N·mN·m(20 lb ft).
Cease turning the pulley when air bubbles no longer appear.
Notice: Use the correct fastener in the correct location. Replacement fasteners must be the correct part number for that application. Fasteners requiring replacement or fasteners requiring the use of thread locking compound or sealant are identified in the service procedure. Do not use paints, lubricants, or corrosion inhibitors on fasteners or fastener joint surfaces unless specified. These coatings affect fastener torque and joint clamping force and may damage the fastener. Use the correct tightening sequence and specifications when installing fasteners in order to avoid damage to parts and systems.
Tighten
Tighten the bolts to 50 N·m (37 lb ft).
Power Steering Pump Replacement 6.5L
Removal Procedure
Tools Required
J 25034-C Power Steering Pulley Remover
- Place a drain pan below the pump (2).
- Remove the pump drive belt. Install a 3/8 inch drive ratchet on the tensioner arm and rotate the arm counterclockwise.
- Disconnect the hoses at the pump.
- Cap the ends of the hose and the pump in order to prevent the entrance of dirt.
- Disconnect the reservoir hose at the pump.
- Cap the pump fittings.
- Remove the pulley from the pump.
- Install the J 25034-C .
- Turn the nut to the top of the pilot bolt in order to ensure that the pilot bolt bottoms in the pump shaft.
- Hold the pilot bolt.
- Turn the nut counterclockwise.
- Remove the remaining pump line.
- Cap the connection.
- Remove the following parts:
- Remove the pump from the vehicle.
Raise the hose up in order to prevent drainage of the oil.
| • | The adjusting bolts (1, 3) |
| • | The brackets (2) |
| • | The nuts |
Installation Procedure
Tools Required
J 25033-C Power Steering Pump Pulley Installer
- Install the brackets (2) to the pump.
- Place the pulley on the end of the pump shaft.
- Install the J 25033-C .
- Turn the nut to the top of the pilot bolt in order to ensure that the pilot bolt bottoms in the pump shaft.
- Hold the pilot bolt.
- Turn the nut clockwise.
- Prior to mounting the pump, fill the pump housing with as much fluid as possible.
- Loosely install the pump assembly to the engine using the bolts (1, 3).
- Connect the power steering hoses to the pump.
- Fill the reservoir.
- Turn the pulley counterclockwise, as viewed from the front, in order to bleed the pump.
- Tighten the steering pump mounting bolts.
- Install the pump drive belt. Install a 3/8 inch drive ratchet on the tensioner arm and rotate the arm counterclockwise.
- Fill the system with power steering fluid.
- Bleed the system. Refer to Power Steering System Bleeding .
Important:
• Improperly installed hoses are subject to chafing and other abuses
during sharp turns. • Do not start the engine with any disconnected power steering hoses.
When the power steering hoses are connected, ensure that the hoses and the
drive belt, the sheet metal, and any other components have clearance in
order to avoid chafing or interference.
Tighten
Tighten the hose fittings to 27N·m (20 lb ft).
Cease turning the pulley when air bubbles no longer appear.
Notice: Use the correct fastener in the correct location. Replacement fasteners must be the correct part number for that application. Fasteners requiring replacement or fasteners requiring the use of thread locking compound or sealant are identified in the service procedure. Do not use paints, lubricants, or corrosion inhibitors on fasteners or fastener joint surfaces unless specified. These coatings affect fastener torque and joint clamping force and may damage the fastener. Use the correct tightening sequence and specifications when installing fasteners in order to avoid damage to parts and systems.
Tighten
Tighten the bolts to 50 N·m (37 lb ft).
