Technical-Engine Oil Leak (Replace Engine Oil Cooler Lines)

| Subject: | Engine Oil Seepage (Replace Engine Oil Cooler Lines) |
| Models: | 1996-2002 Chevrolet and GMC G2500/3500 Series Full Size Vans |
| with 4.3L V6 Gas, 5.7L V8 Gas or 6.5L Diesel Engine (VINs W, R, F -- RPOs L35, L31, L65) and Engine Oil Cooler (RPOs KC4, V16) |
Condition
Some customers may comment on an engine oil seepage.
Correction
Notice: The engine oil cooler lines should be inspected at regular service intervals. The oil cooler lines should be replaced at the first sign of an oil seepage in order to prevent the possibility of oil loss which in time could cause damage to the engine.
Inspect the engine oil cooler lines for signs of oil seepage.
If the inspection indicates an oil seepage condition from the engine oil cooler lines, follow the service procedure below to correct the condition.
Service Procedure for 4.3L V6 Gasoline Engine
- Locate the two engine oil engine cooler lines on the left hand side of the radiator.
- Slide back the plastic retaining clip protectors.
- Remove the engine oil cooler line retaining clips and discard the clip.
- Remove the engine oil cooler lines from the fitting by pulling the lines out of the fittings.
- Raise the vehicle. Refer to Lifting and Jacking the Vehicle in the Service Manual (SI Document ID #482514).
- Remove the retaining clip bracket nut.
- Remove the retaining clip bracket.
- Remove the engine oil cooler line retaining bolt from the oil filter adapter.
- Remove and discard the engine oil cooler line.
- Position the new line, P/N 15074204, into position.
- Install two new seals, P/N 15701719, on the new engine oil cooler line at the filter adapter end.
- Reinstall the engine oil cooler line to oil filter adapter bolt.
- Install the engine oil cooler line retainer and tighten the nut.
- Lower the vehicle.
- DO NOT install the new retaining clip onto the fitting by pushing the retaining clip down over the fitting.
- Install the new retaining clip, P/N 15724727, by hooking the one open end of the retaining clip in one of the slots in the quick connect fitting.
- Rotate the retaining clip around the fitting until the retaining clip is positioned with all three ears through the three slots on the fitting. Ensure the retaining clip moves freely on both of the fittings.
- Install the lines into the fittings by pushing the line into the fitting.
- Install the plastic retaining clip protectors over the retaining clip and fitting.
- Start the engine and inspect for seepage.
- Shut off the engine and verify the engine oil level. Add oil if necessary.
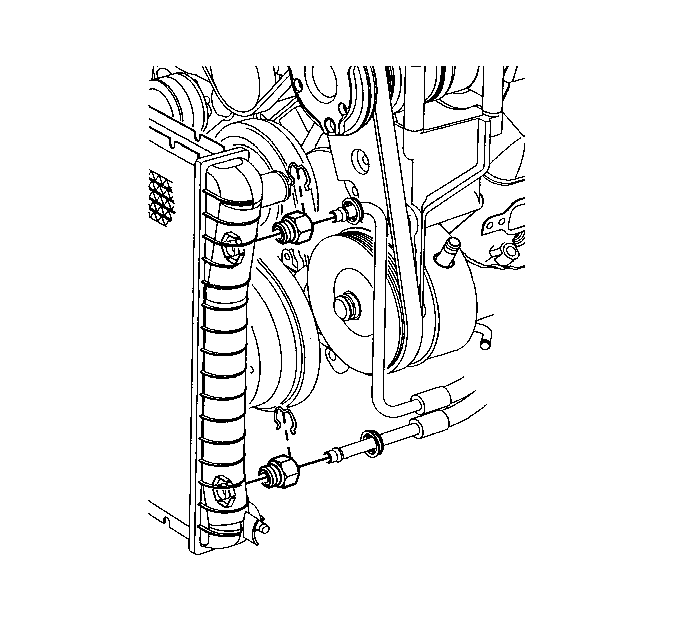
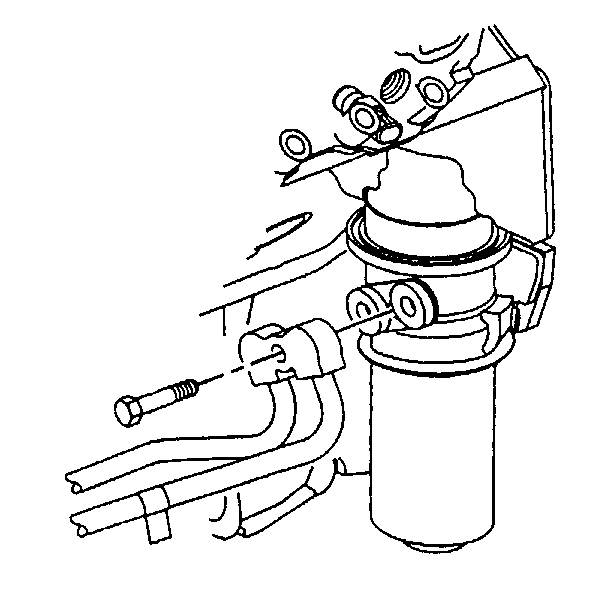
Tighten
Tighten the engine oil cooler line bolt to 35 N·m (26 lb ft).
Tighten
Tighten the nut to 12 N·m (106 lb in).
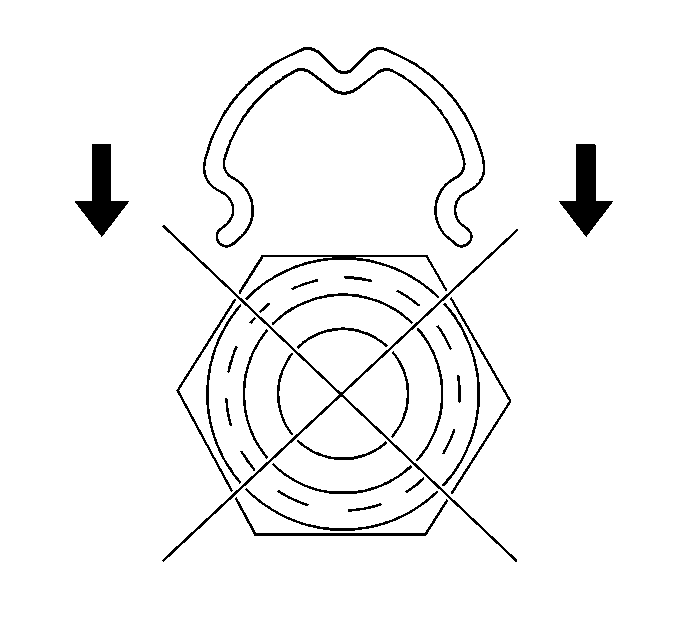
Important:
• DO NOT REUSE any of the existing retaining clips. • Retaining clips are NOT REUSABLE. • Ensure the following procedures are performed when installing the new
retaining clips onto the fittings.
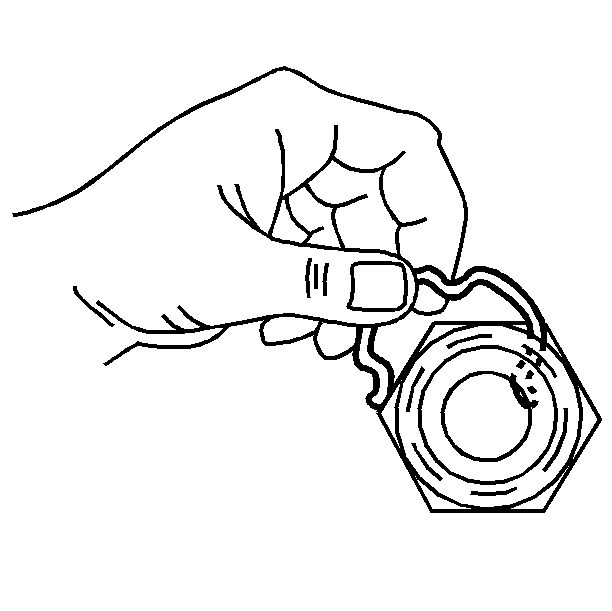
Important: Pull back on the engine oil cooler line to ensure the engine oil cooler line is properly seated.
Service Procedure for 5.7L V8 Gasoline Engine
- Locate the two engine oil cooler lines on the left hand side of the radiator.
- Slide back the plastic retaining clip protectors.
- Remove the engine oil cooler line retaining clips and discard the clip.
- Remove the engine oil cooler lines from the fitting by pulling the lines out of the fittings.
- Raise the vehicle. Refer to Lifting and Jacking the Vehicle in the Service Manual (SI Document ID #482514).
- Remove the retaining clip bracket nut.
- Remove the retaining clip bracket.
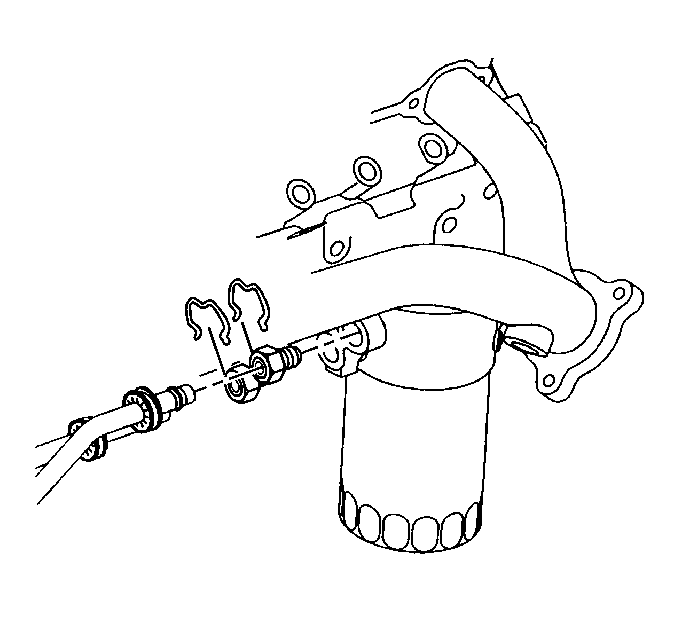
- Slide back the plastic retaining clip protectors from the engine oil filter adapter.
- Remove the engine oil cooler line retaining clips and discard the clips.
- Remove the engine oil cooler lines from the fitting by pulling the lines out of the fittings. Discard the two old lines.
- DO NOT install the new retaining ring onto the fitting by pushing the retaining ring down over the fitting.
- Install the new retaining clips, P/N 15724727, by hooking the one open end of the retaining clip in one of the slots in the quick connect fitting.
- Rotate the retaining clip around the fitting until the retaining clip is positioned with all three ears through the three slots on the fitting. Ensure the retaining clip moves freely on both of the fittings.
- Position the two new engine oil cooler lines, P/N's 15074199 and 15074201, into position.
- Connect the lines to the engine oil filter adapter by pushing the lines into the fittings.
- Install the plastic retaining clip protectors over the retaining clip and fitting.
- Install the engine oil cooler line retainer and tighten the nut.
- Lower the vehicle.
- Repeat steps 11 through 14 on the radiator oil cooler line fittings.
- Install the engine oil cooler lines into the fittings on the radiator by pushing the lines into the fittings.
- Install the plastic retaining clip protectors over the retaining clip and fitting.
- Start the engine and inspect for seepage.
- Shut off the engine and verify the engine oil level. Add oil if necessary.


Important:
• DO NOT REUSE any of the existing retaining clips. • Retaining clips are NOT REUSABLE • Ensure the following procedures are performed when installing the new
retaining clips onto the fittings.

Important: Pull back on the engine oil cooler line to ensure the engine oil cooler line is properly seated.
Tighten
Tighten the nut to 12 N·m (106 lb in).
Important: Pull back on the engine oil cooler line to ensure the engine oil cooler line is properly seated.
Service Procedure for 6.5L V8 Diesel Engine
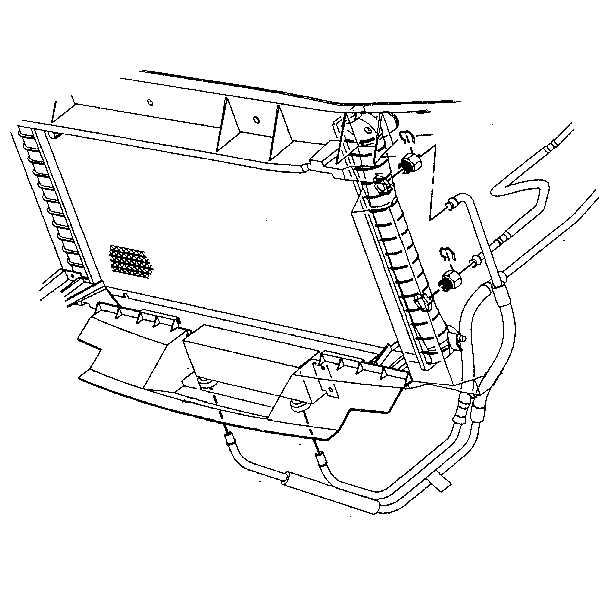
- Locate the upper engine oil engine cooler line on the left hand side of the radiator.
- Slide back the plastic retaining clip protectors.
- Remove the upper engine oil cooler line retaining clip and discard the clip.
- Pull the upper engine oil cooler line out of the fitting.
- Raise the vehicle. Refer to Lifting and Jacking the Vehicle in the Service Manual (SI Document ID #482514).
- Remove the bolt and retainer securing the engine oil coolers.
- Slide back the two plastic retaining clip protectors from the auxiliary engine oil cooler.
- Remove the engine oil line retaining clips from the auxiliary cooler and discard the clips.
- Remove the engine oil cooler lines from the fittings by pulling on the lines.
- Slide back the plastic retaining clip protector from the lower radiator fitting.
- Remove the engine oil line cooler clip from the lower radiator fitting and discard the clip.
- Remove the engine oil cooler line from the fitting by pulling on the line.
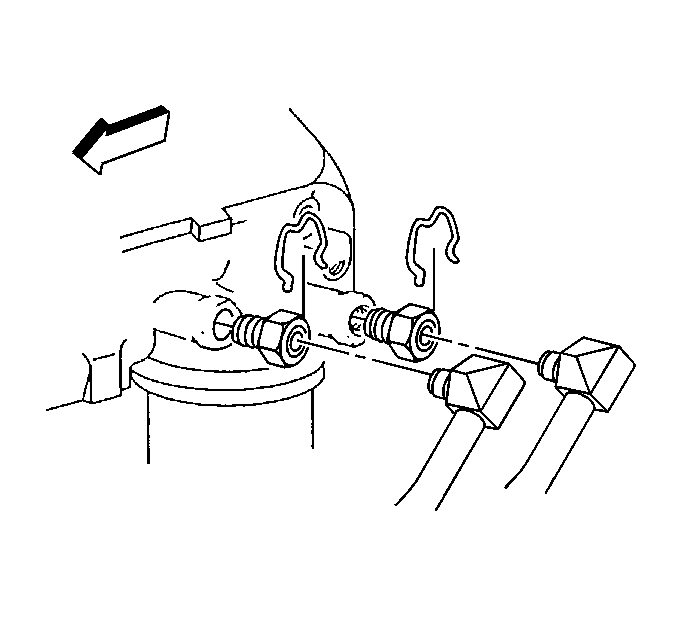
- Slide back the plastic retaining clip protectors from the engine oil filter adapters.
- Remove the two retaining clips from the oil adapters and discard the clips.
- Remove the engine oil cooler lines from the fittings by pulling on the lines.
- Remove and discard all three engine oil cooler lines.
- DO NOT install the new retaining ring onto the fitting by pushing the retaining ring down over the fitting.
- Install the new retaining clips, P/N 88986349, on the two auxiliary cooler fittings, the lower radiator fitting and the two oil filter adapter fittings by hooking the one open end of the retaining clip in one of the slots in the quick connect fitting.
- Position the three new engine oil cooler lines, P/N's 15096844,15096851 and 15096854, into position.
- Install the lines into the two auxiliary cooler fittings, the lower radiator fitting and the two oil filter adapter fittings.
- Slide all of the plastic clip retainers over the fittings.
- Reinstall the engine oil cooler line retaining clip and bolt.
- Lower the vehicle.
- Repeat steps 17 through 19 and install a new retaining clip, P/N 88986349, to the upper radiator fitting.
- Slide the plastic clip retainer over the fitting.
- Start the engine and inspect for seepage.
- Shut off the engine and verify the engine oil level. Add oil if necessary.

Important:
• DO NOT REUSE any of the existing retaining clips. • Retaining clips are NOT REUSABLE • Ensure the following procedures are performed when installing the new
retaining clips onto the fittings.

Important: Pull back on the engine oil cooler lines to ensure the engine oil cooler lines are properly seated.
Tighten
Tighten the bolt to 12 N·m (106 lb in).
Parts Information
Part Number | Description | Qty |
|---|---|---|
15074199 | Hose Asm-Eng Oil Clr (5.7L/L31) | 1 |
15074201 | Hose Asm-Eng Oil Clr (5.7L/L31) | 1 |
15074204 | Hose Asm-Eng Oil Clr (4.3L/L35) | 1 |
15096844 | Hose Asm-Eng Oil Clr (6.5L/L65) | 1 |
15096851 | Hose Asm-Eng Oil Clr (6.5L/L65) | 1 |
15096854 | Hose Asm-Eng Oil Clr (6.5L/L65) | 1 |
15701719 | Seal, Eng Oil Clr (4.3L/L35) | 2 |
15724727 | Retainer, Eng Oil Clr (4.3L/L35) | 2 |
Retainer, Eng Oil Clr (5.7L/L31) | 4 | |
88986349 | Retainer, Eng Oil Clr (6.5L/L65) | 6 |
Parts are expected to be available 4-23-2002 from GMSPO.
Warranty Information
For vehicles repaired under warranty, use:
Labor Operation | Description | Labor Time |
|---|---|---|
J3175 | Line and/or Hose, Engine Oil Cooler Asm - Replace (4.3L Engine Only) | 0.6 hr |
J3177 | Line and/or Hose, Engine Oil Cooler (Both) - Replace (5.7L Engine Only) | 0.6 hr |
J3169 | Hose and/or Line, Engine Oil Cooler (All) - Replace (6.5L Engine Only) | 0.9 hr |
