Radio/Audio System Operation-Cassette Tape Player without SCV
Playing the Radio
AM/FM Stereo with Cassette Tape Player
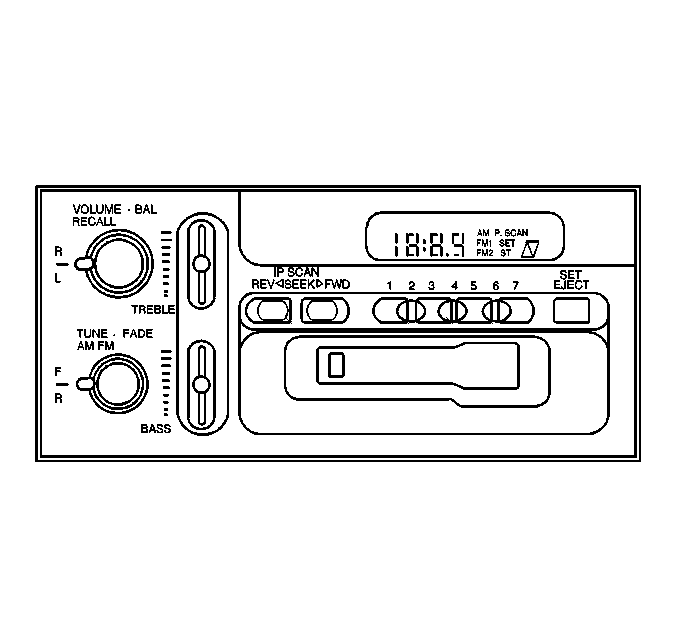
VOLUME - BAL
| • | The ignition switch must be in the ACCESSORY or RUN position to operate the radio. |
| • | The radio power switch is integral with the volume control knob. |
| • | Use the volume control knob in order to turn the system ON and OFF and to control the volume. |
| • | Turn the volume control knob clockwise in order to turn the system ON or to increase the volume. |
| • | Turn the volume control knob counterclockwise in order to turn the system OFF or to decrease the volume. |
RECALL
- The RECALL function can only be preformed with the radio ON.
- Press the volume control knob to toggle the display between the time of day or the radio frequency.
- Press the volume control knob to briefly display the time of day while the radio is turned OFF.
Finding a Station
AM-FM
Press the tune knob in order to change the radio band between AM and FM. The display will indicate the current band and the last radio frequency that was selected on that band.
TUNE
- Rotate the TUNE knob clockwise in order to increase the AM or FM frequency.
- Rotate the TUNE knob counterclockwise in order to decrease the AM or FM frequency.
SEEK
- Press the right arrow button in order to tune into the next station higher in frequency.
- Press the left arrow button in order to tune into the next station lower in frequency.
P-SCAN
- Press both SEEK buttons in order to activate the SCAN mode.
- SCAN will appear on the display and the radio will stop at every station for a few seconds.
- Press the right arrow button in order to tune into the next higher station
- Press the left arrow button in order to tune into the next lower station.
- Press VOLUME or both SEEK buttons to stop scanning.
PUSH BUTTONS
Up to 14 stations can be preset into the radio's memory using the numbered push buttons (1,3,5, and 7). In order to preset 4 AM and 4 FM stations, perform the following steps:
- Tune to the desired radio station.
- Press the SET push button. SET will appear on the display.
- Press and hold a numbered push button until the SET display goes off. The radio will tune to the preset station the next time the same push button is pressed.
In order to preset 3 additional AM and 3 additional FM stations perform the following steps:
- Tune to the desired radio station.
- Press the SET push button. SET will appear on the display.
- Press and hold two adjacent push buttons (1 and 3) until the SET display goes off. The radio will tune to the preset station the next time both push buttons are pressed.
- Repeat the first two steps for each remaining pair of push buttons (3 and 5, or 5 and 7).
Setting the Tone
BASS
- Slide the BASS lever up in order to increase the bass response.
- Adjust the BASS lever down in order to decrease the bass response.
TREB
- Slide the TREB level up in order to increase the treble response.
- Slide the TREB lever down in order to reduce the noise if the station is weak or noisy.
Adjusting the Speakers
BAL
- Turn the BAL control knob behind the VOLUME knob to select more or less sound, distributed between the left or the right speakers.
- The middle position will deliver an equal balance of sound between the left and right speakers.
FADE
- Turn the FADE control knob behind the TUNE knob to select more or less sound, distributed between the front and rear speakers.
- The middle position will deliver an equal balance of sound between the front and rear speakers.
Playing a Cassette Tape
- In order to play a tape, the ignition switch must be in the ACCESSORY or RUN position and the receiver must be turned ON.
- Insert the tape squarely through the door, exposed tape side of the cassette facing to the right.
- When the tape is fully inserted, the AM/FM portion of the radio will turn off and the tape will begin playing.
- The tape player works best with tapes that are 30-45 minutes long on each side.
- Once the tape is playing, the volume, balance and fade knobs operate the same as with the radio.
Tapes are end-loaded into the cassette player.
Longer running tapes may not work well in these players because they are usually too thin.
An arrow indicates which side of the tape is being played.
FWD
- Press the SEEK right arrow key in order to fast forward the tape.
- Press the SEEK left arrow key in order to stop the fast forward operation.
REV
- Press the SEEK left arrow key in order to rewind the tape.
- Press the SEEK right arrow key in order to stop rewinding the tape.
RECALL
Press the volume control knob to change from one side of the tape to the other.
EJECT
Press the EJECT push button in order to remove the tape or in order to stop the tape and switch to the radio.
CLN
- If CLN appears on the display, the cassette player needs to be cleaned in order to prevent damage to the tape player.
- After cleaning the tape player, press and hold the EJECT button for 5 seconds in order to reset the CLN indicator.
- The radio displays "- - -" in order to show that the indicator has been reset.
Radio/Audio System Operation-Cassette Tape Player with SCV
Playing the Radio
AM/FM Stereo Cassette Player with Automatic Tone Control
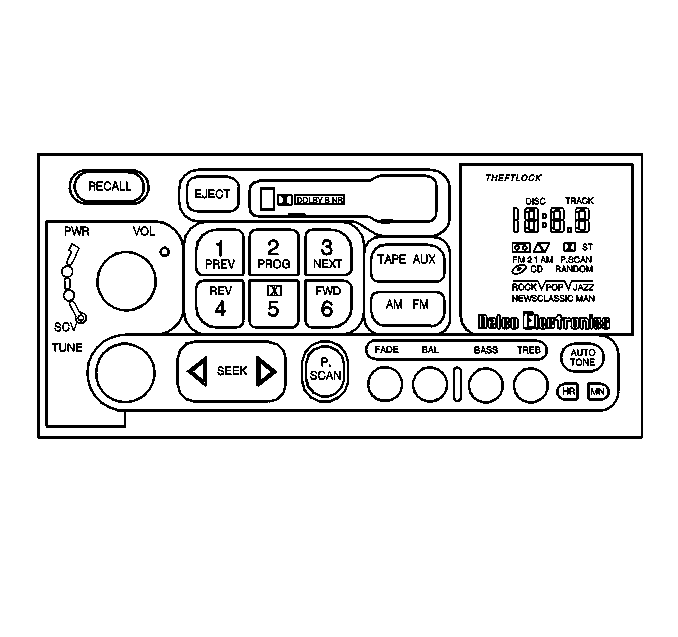
PWR-VOL
- Push the PWR-VOL knob in order to turn the radio ON and OFF.
- Rotate the volume control clockwise in order to increase the volume.
- Rotate the volume control counterclockwise in order to decrease the volume.
RECALL
| • | The RECALL function can only be preformed with the radio ON. |
| • | Press the RECALL push button to toggle the display between the time of day or the radio frequency. |
| • | Press the RECALL push button to briefly display the time of day while the radio is turned OFF. |
Speed Control Volume (SCV)
| • | The AM/FM stereo with Integral Cassette Tape Player (UM) features Speed Control Volume (SCV). |
| • | In order to use the SCV, adjust the volume to the listening level you want and move the control ring behind the PWR-VOL knob to adjust the SCV. |
| • | The volume level automatically adjusts to compensate for road and wind noise as you drive. |
| • | As you drive, the volume level will change in order to compensate for the noise present at any particular speed. |
| • | Each detent on the SCV allows for more compensation at a faster rate. |
Finding a Station
AM-FM
- Press the AM/FM push-button to switch between AM, FM1, and FM2.
- The display indicates the current band.
TUNE
- Press lightly on the TUNE control in order to release the tune control from the tune control's recessed position.
- Rotate the TUNE knob to the right in order to increase the frequency.
- Rotate the TUNE knob to the left in order to decrease the frequency.
- Push the TUNE control back in order to store the frequency setting while not tuning.
SEEK
- Press the right arrow key in order to tune into the next higher frequency.
- Press the left arrow key in order to tune into the next lower frequency.
Audio is muted during the SEEK operation.
SCAN
- Press and hold SEEK for 2 seconds. SCAN will appear on the display.
- Use SCAN in order to listen to each radio station for a few seconds.
- Press SEEK again in order to stop scanning.
PUSH BUTTONS
Up to 18 stations (6 AM, 6 FM1, and 6 FM2) can be preset into the radio's memory using the six numbered push buttons.In order to preset a station in memory, perform the following steps:
- Press AM-FM in order to select the band.
- Tune to the desired station, using the TUNE knob or SEEK.
- Press AUTO TONE in order to select the setting that you prefer.
- Press and hold one of the 6 push buttons until audio returns (approximately 2 seconds).
- Whenever you press that push button, the preset station will return.
The AUTO TONE that you selected will also be automatically selected for that push button.
P.SCAN
- Any stations already stored in preset memory can be sampled by the PSCAN mode.
- In order to use PSCAN, press the PSCAN push button.
- Press PSCAN or another pushbutton in order to stop scanning to listen to a specific station.
PSCAN will scan each of the presets and stop for a few seconds.
PSCAN appears in the display whenever the tuner is in the PSCAN mode.
If 1 of the stations stored on a pushbutton is weak, the radio display shows the channel number (P1-P6) for several seconds before advancing to the next preset station.
Setting the Tone
AUTO TONE
- The automatic tone control (ATC) feature tailors the equalization to the type of broadcast being received.
- Press AUTO TONE in order to step through the six preset equalization settings of CLASSIC, NEWS, ROCK, POP, JAZZ, or C/W (Country Western).
- 1 or more presses of the AUTO TONE push-button brings up manual (MAN) and return the control of tone back to the TREB and BASS controls.
- Any time that a BASS or TREBLE control rotates, the tone automatically sets to MAN.
Note the graph and words in the display for each press of the push button.
BASS
- Depress the BASS control in order to remove the control from the recessed position.
- Rotate the BASS control to the right in order to increase the bass response.
- Rotate the BASS control to the left in order to decrease the bass responce.
- Operation of this control will switch the radio's AUTO TONE feature to MAN.
- Push the control knob back in to store when not in use.
TREBLE
- Depress the TREB control in order to remove the control from the recessed position.
- Pull the TREB control out to a fully extended position in order to make TREB adjustments.
- Rotate the TREB control to the right in order to increase the treble response.
- Rotate the TREB control to the left in order to decrease the treble responce.
- Operation of this control will switch the radio's AUTO TONE feature to MAN.
- Push the control knob back in to store when not in use.
Adjusting the Speakers
BALANCE
- Depress the BAL control in order to remove the control from the recessed position.
- Rotate the balance to the right in order to adjust the sound to the right speakers.
- Rotate the balance to the left in order to adjust the sound to the left speakers.
- Push the control knob back in to store when not in use.
FADE
- Depress the FADE control in order to remove the control from the recessed position.
- Rotate the FADE control knob to the right in order to adjust the sound to the front speakers.
- Rotate the FADE control knob to the left in order to adjust the sound to the rear speakers.
- Push the control knob back in order to store when not in use.
Playing a Cassette Tape
- Tapes may be played with the ignition ON or OFF.
- Tapes are end-loaded into these players. Insert the tape squarely through the door, exposed tape side of the cassette facing the right.
- When the tape is fully inserted, the AM/FM portion of the radio will turn OFF and the tape will begin playing.
- The tape player works best with tapes that are 30 to 45 minutes long on each side. Longer tapes may not work well in the cassette player because the tapes are so thin.
- To load a cassette with the ignition in the OFF position, press EJECT or RECALL.
- Insert the cassette.
- If the ignition is in the ON position and the radio is in the OFF position, the tape will begin to play.
- The player automatically senses the tape cartridge for metal or Cr02 tape media and presets the pre-emphasis.
- Any time a tape is playing, use the volume, balance, fade, treble, and bass just as with the radio.
- When you insert a tape, the top of the cassette plays first.
If the ignition is ON but the radio is OFF, the tape will begin playing.
A tape symbol, accompanied by tape direction arrows, is shown in the center of the graphic display whenever a tape is playing.
For metal tapes, "DD" will be displayed.
An arrow indicates which side of the tape is being played.
PREV
- Press the PREV or the SEEK left arrow push button in order to search for the previous selection.
- A minimum 3 second blank gap is required for proper operation.
- Audio is muted during SEEK.
The tape direction arrow blinks during SEEK operation.
PROG
Press the PROG push button in order to switch from one side of the tape to the other.
NEXT
- Press the NEXT or the SEEK right arrow push button in order to search for the next selection.
- A minimum of a 3 second gap is required for the player to stop at the beginning of a selection.
- The tape direction arrow will blink during the SEEK operation.
REV
- Press REV in order to rewind the tape. The tape rapidly reverses to the beginning of the cassette or until you press the REV push-button a second time.
- The tape direction arrow blinks during REV operation.
The radio plays the last selected station during the REV operation.
DOLBY®
- Press the Dolby push-button in order to reduce cassette tape noise.
- The "DD" Dolby® symbol will appear in the display.
- Dolby Noise Reduction is manufactured under a license from Dolby Laboratories Licensing Corporation.
- Dolby® and the "DD" symbol are trademarks of Dolby Laboratories Licensing Corporation.
FWD
- Press FWD in order to fast-forward the tape. The tape rapidly advances to the end of the tape or until you press the FWD push-button again.
- The radio will play the last selected station during the FWD operation.
- The tape direction arrow blinks during FWD operation.
AM-FM
Press the AM-FM button in order to switch from tape to radio.
TAPE AUX
- Press TAPE AUX in order to return to the tape player.
- The lighted arrow appears and shows the direction of play when a tape is in the active mode.
EJECT
- In order to remove the tape, press EJECT.
- EJECT may be activated with either the ignition or the radio OFF.
- Cassettes may be loaded with the radio OFF by pressing EJECT before loading the cassette tape.
CLN
- If CLN appears on the display, the cassette player needs to be cleaned in order to prevent damage to the tape player.
- After cleaning the tape player, press and hold EJECT for 5 seconds in order to reset the CLN indicator.
- The radio displays "- - -" in order to show that the indicator reset.
