Removal Procedure
Caution: Refer to Brake Dust Caution in the Preface section.
Caution: Refer to Brake Fluid Irritant Caution in the Preface section.
Notice: Refer to Brake Fluid Effects on Paint and Electrical Components Notice in the Preface section.
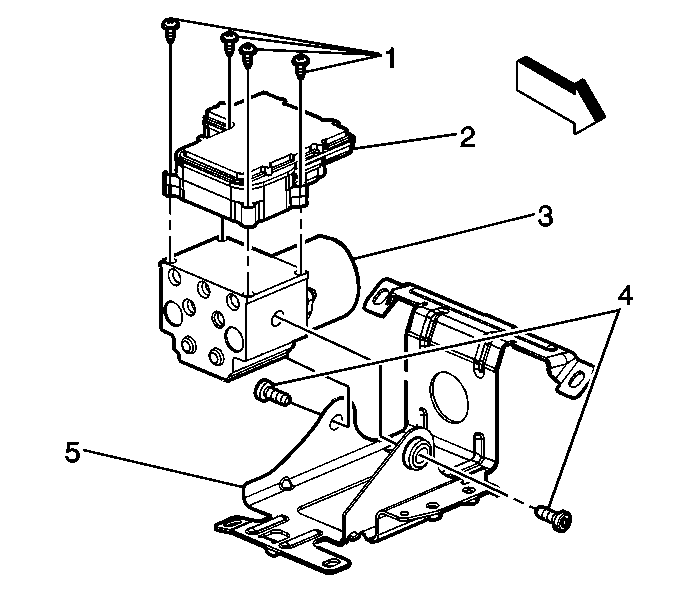
- Disconnect the two electrical harness connectors from the EBCM (2).
- Disconnect the 5 brake lines from the BPMV (3).
- Remove 2 bolts (4) securing the BPMV mounting bracket (5) to the BPMV (3).
- Disconnect the 2 way ABS pump motor connector.
- Remove the four T-25 TORX® screws (1) from the EBCM (2).
- Remove the EBCM (2) from the BPMV (3). Removal may require a light amount of force.
- Clean the EBCM (2) to BPMV (3) mounting surfaces with a clean cloth.
Important: Thoroughly wash all contaminants from around the EHCU. The area around the EHCU must be free from loose dirt to prevent contamination of disassembled ABS components.
Important: Make sure that brake lines are tagged and kept in order for proper reassembly.
Important: Do not use a tool to pry the EBCM or the BPMV. Excessive force will damage the EBCM.
Important: Do not reuse the EBCM mounting bolts. Always install new bolts.
Installation Procedure
- Install EBCM (2) onto BPMV (3).
- Install the four EBCM bolts.
- Connect the 2 way ABS pump motor connector to the EBCM (2).
- Install BPMV (3) to EHCU bracket (5).
- Connect the two electrical harness connectors to the EBCM (2).
- Install the 5 brake pipes to the BPMV (3).
- Bleed the brake system. Refer to Antilock Brake System Automated Bleed Procedure .
Important: Do not use RTV or any other type of sealant on the EBCM gasket or mating surfaces.
Notice: Use the correct fastener in the correct location. Replacement fasteners must be the correct part number for that application. Fasteners requiring replacement or fasteners requiring the use of thread locking compound or sealant are identified in the service procedure. Do not use paints, lubricants, or corrosion inhibitors on fasteners or fastener joint surfaces unless specified. These coatings affect fastener torque and joint clamping force and may damage the fastener. Use the correct tightening sequence and specifications when installing fasteners in order to avoid damage to parts and systems.
Important: Do not reuse the old mounting bolts. Always install new bolts with the new BPMV.
Tighten
Tighten the four bolts to 5 N·m (39 lb in) in an
X-pattern.
Important: The brake pipes are held in the proper place by a frame mounted plastic bracket. Make sure that the brake pipes stay in the correct place for proper reassembly.
Tighten
Tighten the brake pipe fittings to 30 N·m (22 lb ft).
