Removal Procedure
- Unlock the steering column so the steering linkage is free to move.
- Raise the vehicle. Refer to Lifting and Jacking the Vehicle in General Information.
- Place jack stands or utility stands (such as GMDE 123-B67313) at the rear end of the vehicle.
- Remove the front tire and wheel assemblies. Refer to Tire and Wheel Removal and Installation in Tires and Wheels.
- Remove the steering linkage shield. Refer to Steering Linkage Shield Replacement in Steering Linkage.
- Remove the differential carrier shield (if equipped). Refer to Shield Replacement .
- Drain the front drive axle. Refer to Lubricant Change .
- Remove the lower part of shock absorber bolt and nut. Refer to Shock Absorber Replacement in Front Suspension.
- Remove the wheel drive shafts. Refer to Wheel Drive Shaft Replacement in Wheel Drive Shafts.
- Remove the front propeller shaft. Refer to Front Propeller Shaft Replacement .
- Remove the steering relay rod from the idler and pitman arms. Refer to Relay Rod Replacement in Steering Linkage.
- Disconnect the electrical connector from the four-wheel drive indicator switch.
- Disconnect the clutch cable from the differential carrier assembly. Refer to Clutch Cable Replacement - Front Drive Axle .
- Disconnect the vent hose from the differential carrier assembly.
- Attach a transmission jack to the differential carrier assembly.
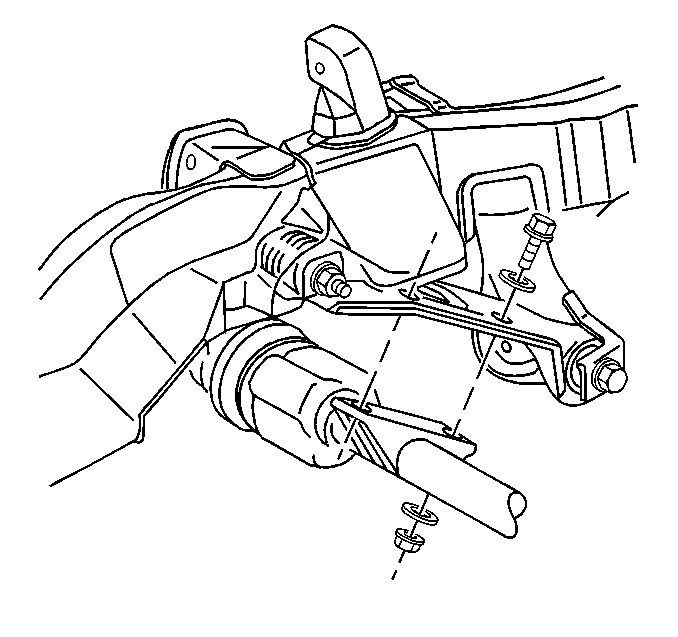
- Remove the inner axle shaft housing to frame bracket bolts, nuts and washers.
- Remove the lower differential carrier assembly mounting bolt and the nut.
- Remove the upper differential carrier assembly mounting bolt and the nut.
- Remove the differential carrier assembly by rolling the carrier counterclockwise while lifting up to gain clearance from the mounting ears.
Installation Procedure
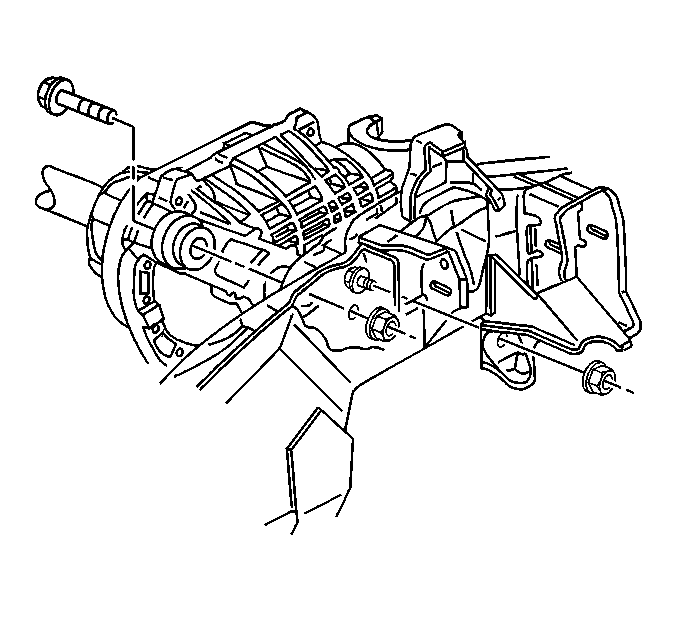
- Install the differential carrier assembly to the vehicle.
- Install the upper differential carrier assembly mounting bolt, the washer, and the nut.
- Install the inner axle housing to frame bolts, the washers, and the nuts.
- Install the clutch cable to the differential carrier assembly. Refer to Clutch Cable Replacement - Front Drive Axle .
- Connect the vent hose to the differential carrier assembly.
- Install the electrical connector to the four-wheel drive indicator switch.
- Install the relay arm to the idler and pitman arms. Refer to Relay Rod Replacement in Steering Linkage.
- Install the front propeller shaft. Refer to Front Propeller Shaft Replacement .
- Install the wheel drive shafts. Refer to Wheel Drive Shaft Replacement in Wheel Drive Shafts.
- Install the lower part of shock absorber bolt and nut. Refer to Shock Absorber Replacement in Front Suspension.
- Inspect the axle lubricant level and add, if necessary. Refer to Lubricant Level Check .
- Install the steering linkage shield. Refer to Steering Linkage Shield Replacement in Steering Linkage.
- Install the differential shield, if equipped. Refer to Shield Replacement .
- Install the front tire and wheel assemblies. Refer to Tire and Wheel Removal and Installation in Tires and Wheels.
- Remove the jack stands or utility stands.
- Lower the vehicle.
Notice: Use the correct fastener in the correct location. Replacement fasteners must be the correct part number for that application. Fasteners requiring replacement or fasteners requiring the use of thread locking compound or sealant are identified in the service procedure. Do not use paints, lubricants, or corrosion inhibitors on fasteners or fastener joint surfaces unless specified. These coatings affect fastener torque and joint clamping force and may damage the fastener. Use the correct tightening sequence and specifications when installing fasteners in order to avoid damage to parts and systems.
Install the lower differential carrier assembly mounting bolt, the washer, and the nut.
Tighten
Tighten the differential carrier assembly bolts to 103 N·m
(76 lb ft).
Tighten
Tighten the inner axle housing nuts to 98 N·m (72 lb ft).
