Erratic or Inaccurate Compass Operation with Use of Power Sunroof (Replace Compass Sensor Mounting Bracket and Calibrate Compass)

| Subject: | Erratic or Inaccurate Compass Operation with Use of Power Sunroof (Replace Compass Sensor Mounting Bracket and Calibrate Compass) |
| Models: | 1999-2004 Chevrolet Blazer |
| 1999-2004 GMC Jimmy |
| 1999-2001 Oldsmobile Bravada |
| with Roof, Sun, Glass Sliding, Electric (RPO CF5) and Console Roof Interior, Custom, Compass and Outside Temperature (RPO DK7) or Console Roof Interior, Deluxe (RPO DK8) |
This bulletin is being revised to include additional model years. Please discard Corporate Bulletin Number 03-08-49-008 (Section 08 -- Body and Accessories).
Condition
Some customers may comment that the compass is intermittently erratic or inaccurate while operating the power sunroof. The compass may stay erratic or inaccurate while the power sunroof is open.
Cause
The sunroof module cable may become magnetized with the operation of the sunroof, producing a false signal to the compass sensor.
Correction
DO THIS | DON'T DO THIS |
|---|---|
Replace the Compass Sensor Mounting Bracket and Recalibrate the Compass. | DO NOT Replace the Rear View Mirror Assembly. |
Follow the service procedure below to relocate the compass sensor by replacing the compass sensor bracket.
Compass Sensor Mounting Bracket Replacement Procedure
- Remove the rearview mirror. Refer to SI Document ID #389821.
- Remove the sunshades and the retainers. Refer to Sunshade Replacement (SI Document ID #390111).
- Remove the right front assist handle. Refer to Assist Handle Replacement (SI Document ID #390104).
- Remove the windshield garnish moldings. Refer to Garnish Molding Replacement - Windshield Pillar (SI Document ID #390114).
- Remove the body lock pillar trim panels. Refer to Garnish Molding Replacement - Side Door Lock Pillar (SI Document ID #390112).
- Remove the screw at the front of the console.
- Pull downward on the rear of the console in order to remove the sunroof console from the roof.
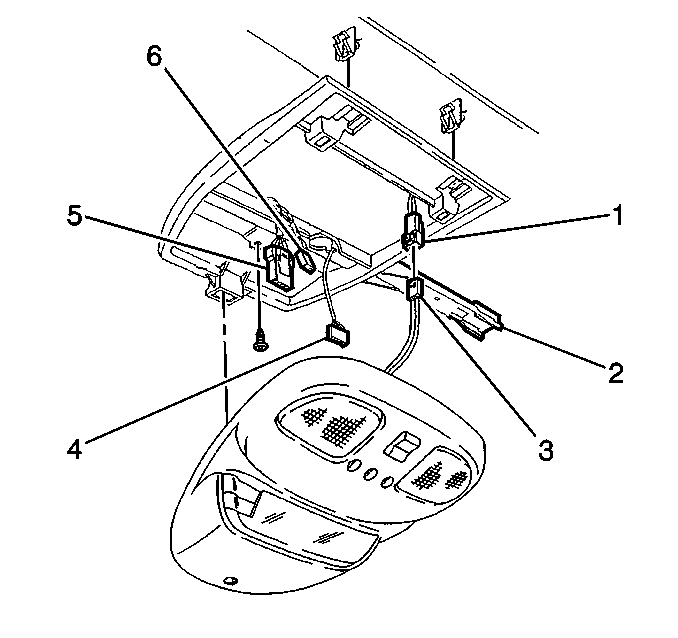
- Disconnect the electrical connectors (1, 5, 6) as needed.
- Remove the sunroof console.
- Reposition the front of the headliner down and out of the way of the compass mounting bracket.
- Remove the screw that retains the sunroof console mounting bracket to the roof.
- Remove the compass sensor mounting bracket from the vehicle.
- Remove the front center clip-in retainer from the compass sensor mounting bracket.
- Install the clip-in retainer on the new compass sensor mounting bracket, P/N 15106819.
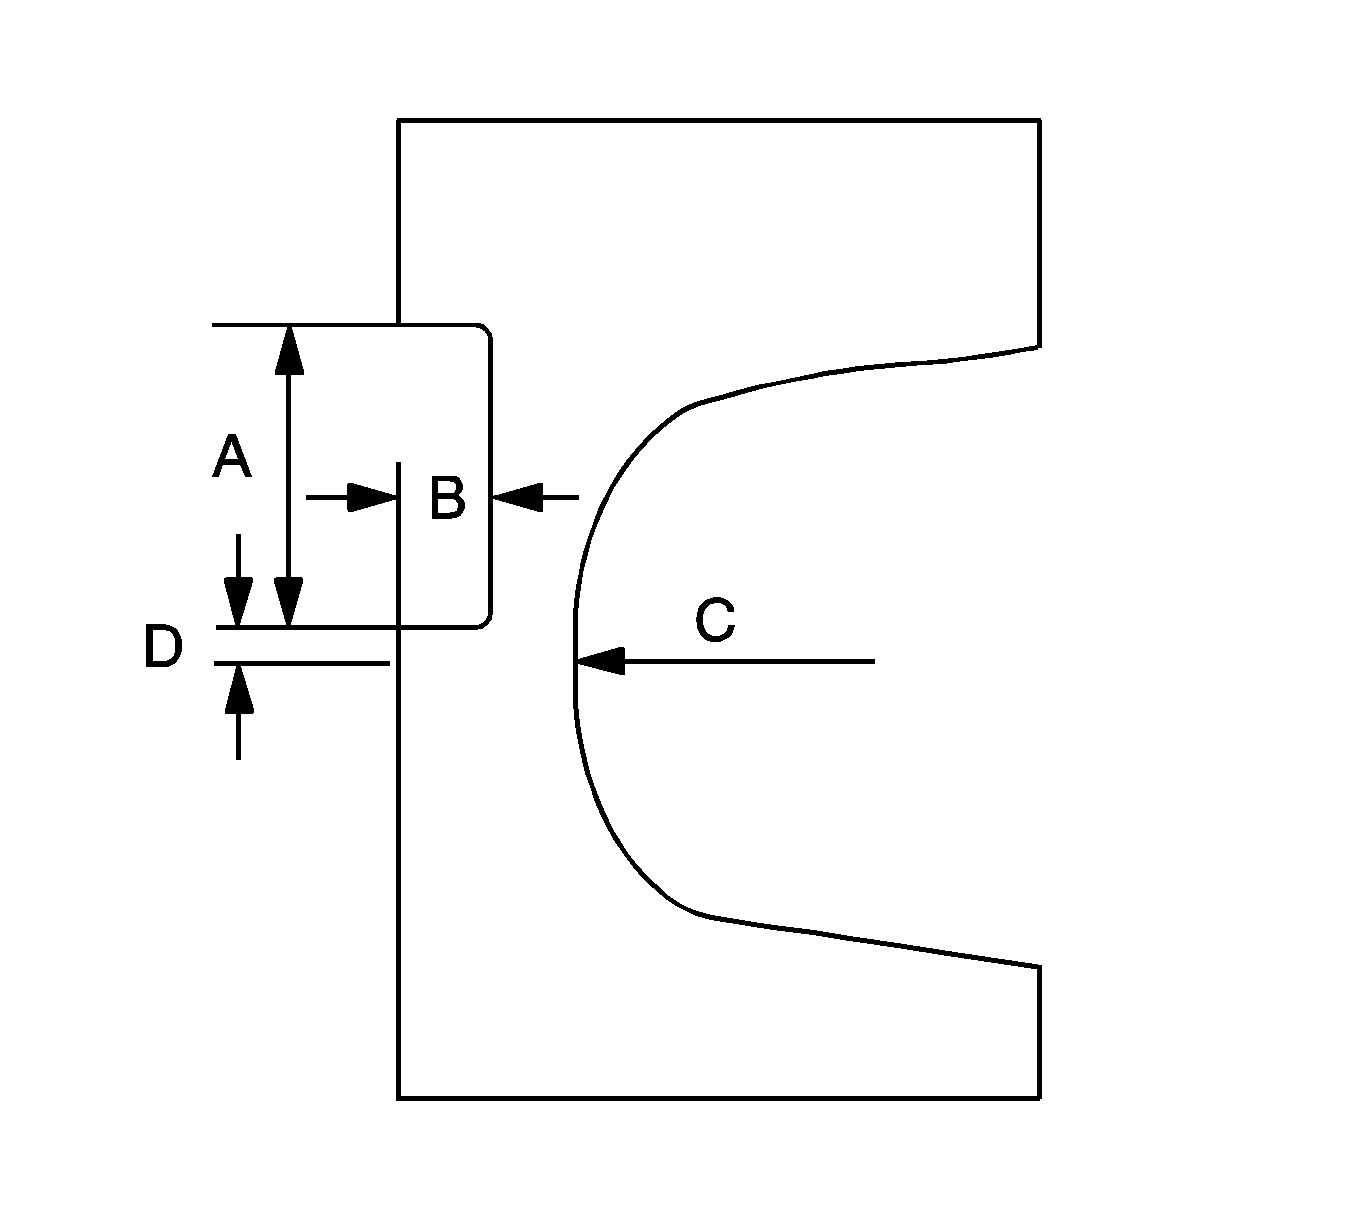
- Trim the headliner as shown above in order to allow clearance for the new compass mounting sensor bracket. Follow the dimensions below for the trimming of the sensor bracket.
- Install the new compass mounting bracket.
- Install the compass mounting bracket screw.
- Connect the console electrical connectors.
- Insert the console mounting tabs into the mounting bracket and push upward on the rear of the console in order to install the console.
- Install the screw at the front of the console.
- Calibrate the compass. Refer to Electronic Compass Operation (SI Document ID #388667).

Notice: Use caution not to damage or crease the headliner while repositioning.

| • | A = 71 mm (2.8 in) |
| • | B = 19 mm (0.75 in) |
| • | C = Center line of headliner |
| • | D = 9.5 mm (0.375 in) |
Tighten
Tighten the screw to 1.9 N·m (17 lb in).
Tighten
Tighten the screw to 1.9 N·m (17 lb in).
Parts Information
Part Number | Description |
|---|---|
15106819 | Bracket, Compass Sensor Mounting |
Parts are currently available from GMSPO.
Warranty Information
For vehicles repaired under warranty, use:
Labor Operation | Description | Labor Time |
|---|---|---|
C2868 | Plate, Roof Console Backing - Replace | 0.7 hr |
