SPARE TIRE CARRIER RATTLE SERVICE PROCEDURE

SUBJECT: SPARE TIRE CARRIER RATTLE (SERVICE PROCEDURE)
VEHICLES AFFECTED: 1986-91 S/T UTILITY VEHICLES WITH SPARE TIRE CARRIER (RPO P-16)
Owners of some 1986 through 1991 Jimmy's equipped with factory installed spare tire carriers (RPO P-16) may comment on a rattle condition coming from the spare tire carrier area. The latch system used on 1986-91 S/T utility vehicle spare tire carrier consists of a double latch mechanism and functions similar to the double latch employed on hood assemblies. The initial latch provides for a backup should the main latch become disengaged. However, the vehicle is intended to be operated with the spare tire carrier locked in place by the main latch. Concerns of spare tire carrier rattle may be caused due to the carrier assembly not being completely closed, but rather engaged by the initial latch only.
IMPORTANT: Prior to attempting any repairs, and before proceeding with this bulletin, technicians should open and then firmly close the spare tire carrier, verifying that the main latch is fully engaged. If necessary, road test the vehicle to confirm that a rattle condition still exists before proceeding with this bulletin.
If the spare tire carrier rattle completely closed and the rattle condition persists, the rattle may result from vehicle and road vibration which are transmitted through the vehicle to the spare tire carrier region. This vibration changes to a rattle in any of the following three locations.
TAILGATE
Mode of vibration is a side to side motion of the tailgate and is caused by the tailgate not being properly aligned into the opening when closed.
SPARE TIRE CARRIER
This second form of vibration occurs in a forward and backward motion relative to the vehicle. Again, this is due to the tire carrier not being tightly held in place. This motion creates a rattle between the striker assembly and the carrier latch, and/or the carrier arm and the striker plate.
WINDOW LATCH
This third form of vibration can occur in the window latch region. This rattle noise is caused by the vibrations mentioned above and occurs as the window guide vibrates in the guide bushing, as shown in Figure 6.
The following four procedures can be done in any order as a single or as a multiple repair.
SERVICE PROCEDURE 1
Before beginning this procedure make sure that the spare tire carrier striker latch is double latched in order to assure that the following check is accurate. Grasp the carrier arm where the release handle is located and move the arm in a forward and backward direction relative to the vehicle. If a metallic sound is heard or if the arm moves easily, reconfirm that the spare tire carrier is locked then replace the striker plate with a new revised striker plate P/N #15659235. This new striker plate has a thickened rubber bumper to reduce the movement of the carrier arm as well as an additional reinforcement bracket to absorb the additional force on the striker as a result of the thickened bumper. Old and new bumper sizes as well as the reinforcement bracket are shown in Figure 1.
NOTE: If the subject vehicle was manufactured after the following break-points then Service Procedure 1 will note be required as the latest design striker was used in Production.
Shreveport: GMC - 1GKCT18Z7M8501914 CHEVROLET - 1GNCT18Z9M8104384
Pontiac West: GMC - IGKCT18ZlM0500739 CHEVROLET - 1GNCT18Z4M0103321
Moraine: GMC - 1GKDT13Z2M2503438 CHEVROLET - 1GNDT13Z6M2115163
SERVICE PROCEDURE 2
Open the carrier and swing it out of the way. Lower the tailgate window and grab hold of the tailgate. If there is any movement fore or aft or play other than normal tailgate flex, then perform the following service procedure. If there is no play in the tailgate then continue on to Service Procedure 3.
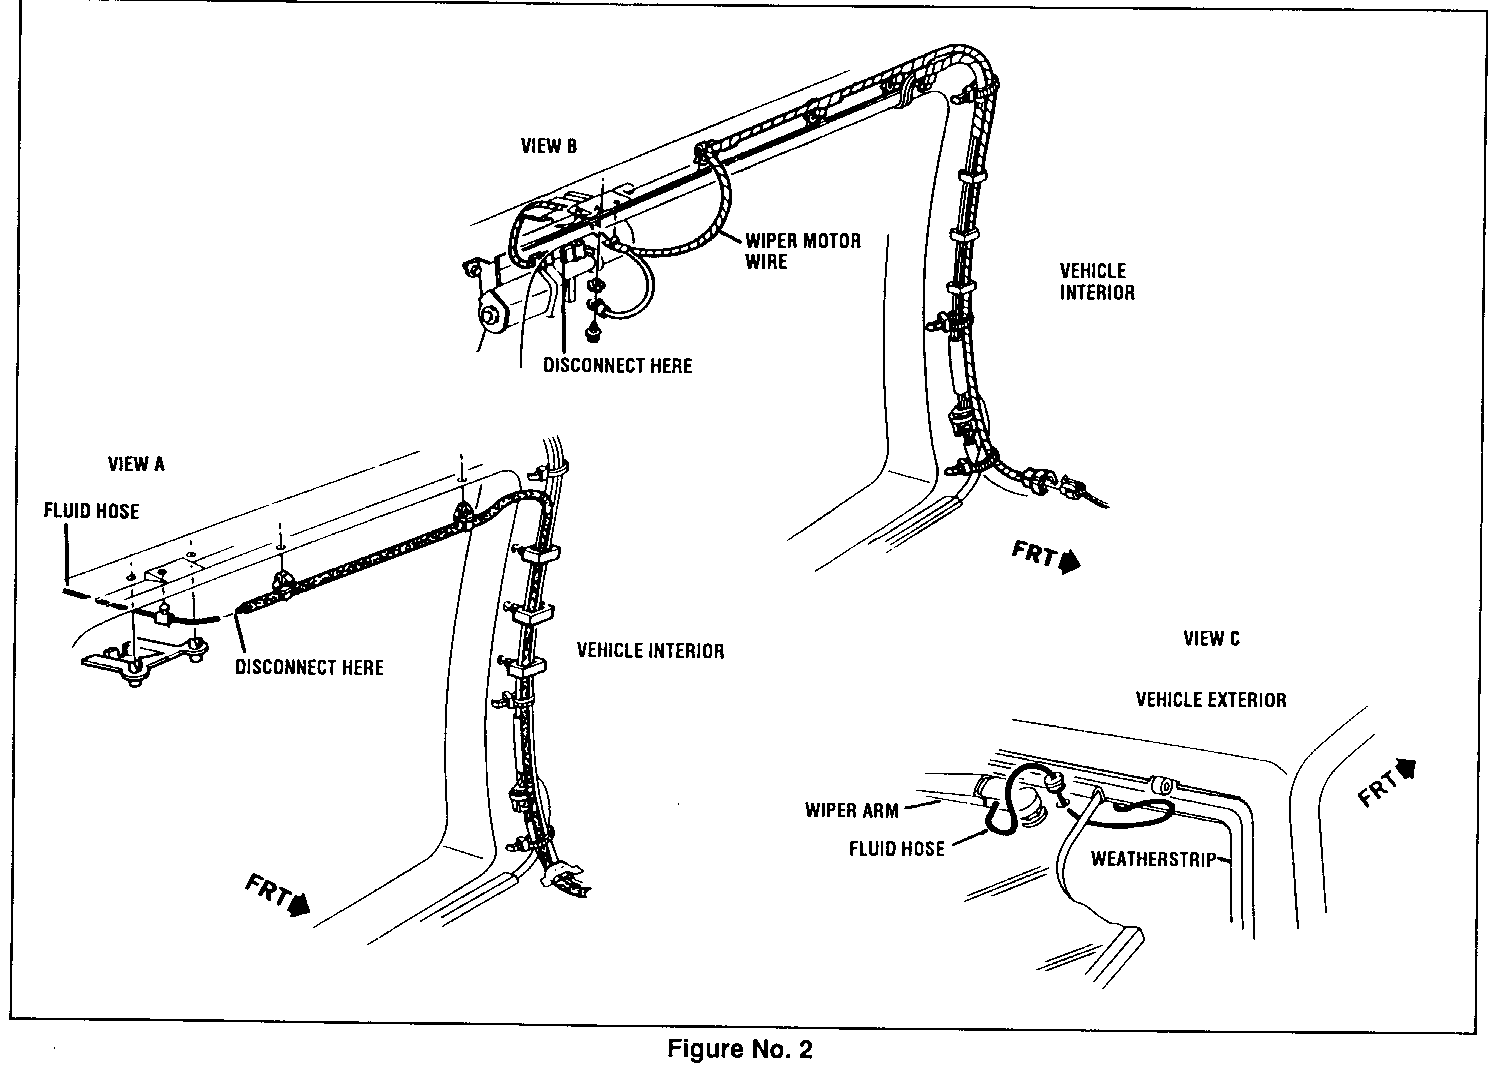
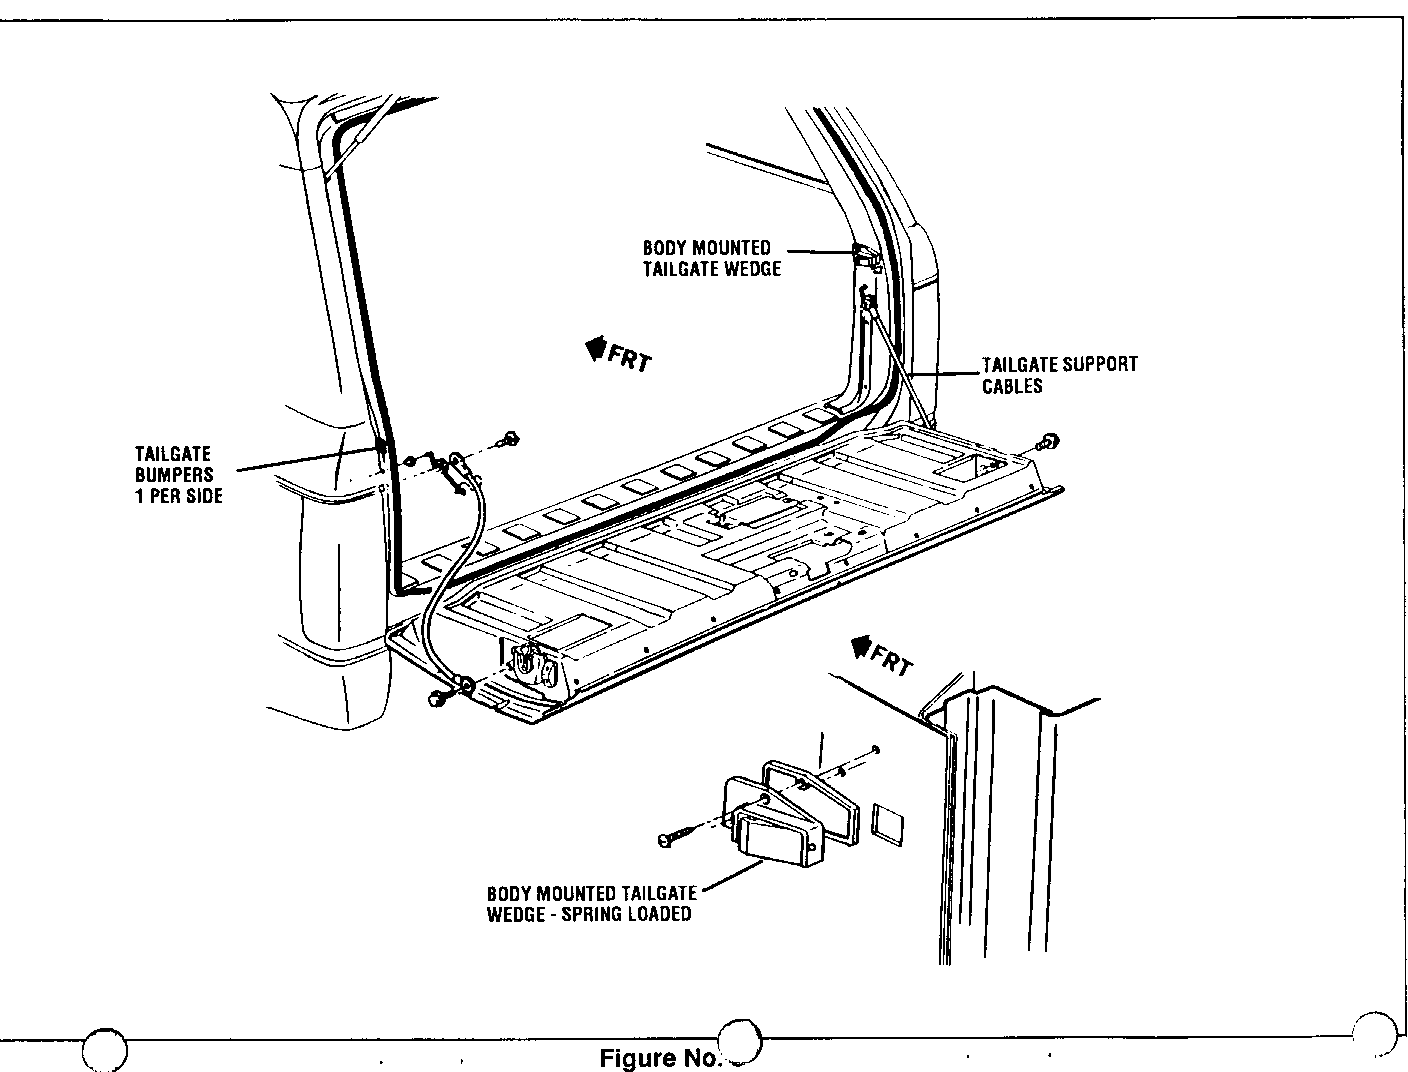
1. Disconnect wiper motor wire, wiper fluid hose (if so equipped) and the two tail-gate supports. Refer to Figures 2 and 3 for disconnection areas.
2. Remove tailgate bumpers shown in Figure 3. Seal the holes in the body with a clear RTV sealer (Permatex C6B or equivalent.
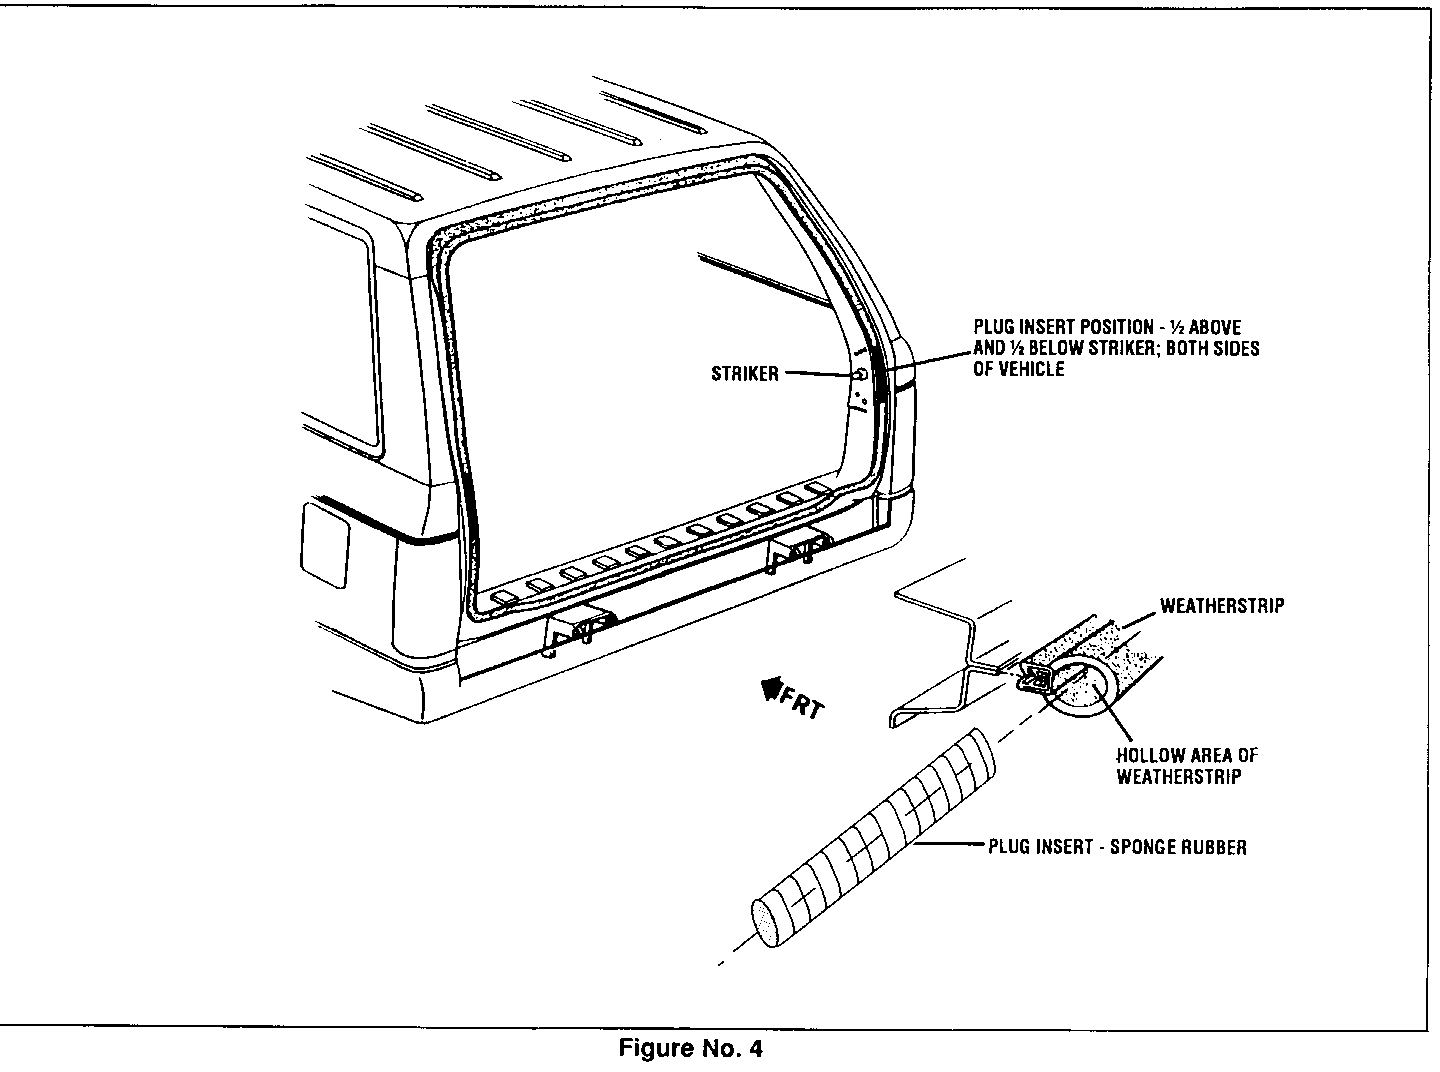
3. Remove existing weatherstrip and replace with revised weatherstrip P/N #15659207. The revised weatherstrip will have plugs inserted inside of it. When installing the weatherstrip align these plugs so that half of the plug is above the striker and half is below, as shown in Figure 4. This is a friction fit, therefore, no adhesive is required.
NOTE: If the subject vehicle was manufactured after the following break points then Service Procedure 2 will not be required as the material called out was incorporated in Production.
Shreveport: GMC - 1GKCS18Z0L8513131 CHEVROLET - 1GNCS18Z2L8144761
Pontiac West: GMC - 1GKCT18Z9L0508571 CHEVROLET - 1GNCT18Z7L0122931
Moraine: GMC - 1GKDT13Z2M2503438 CHEVROLET - 1GNDT13Z6M2115163
SERVICE PROCEDURE 3
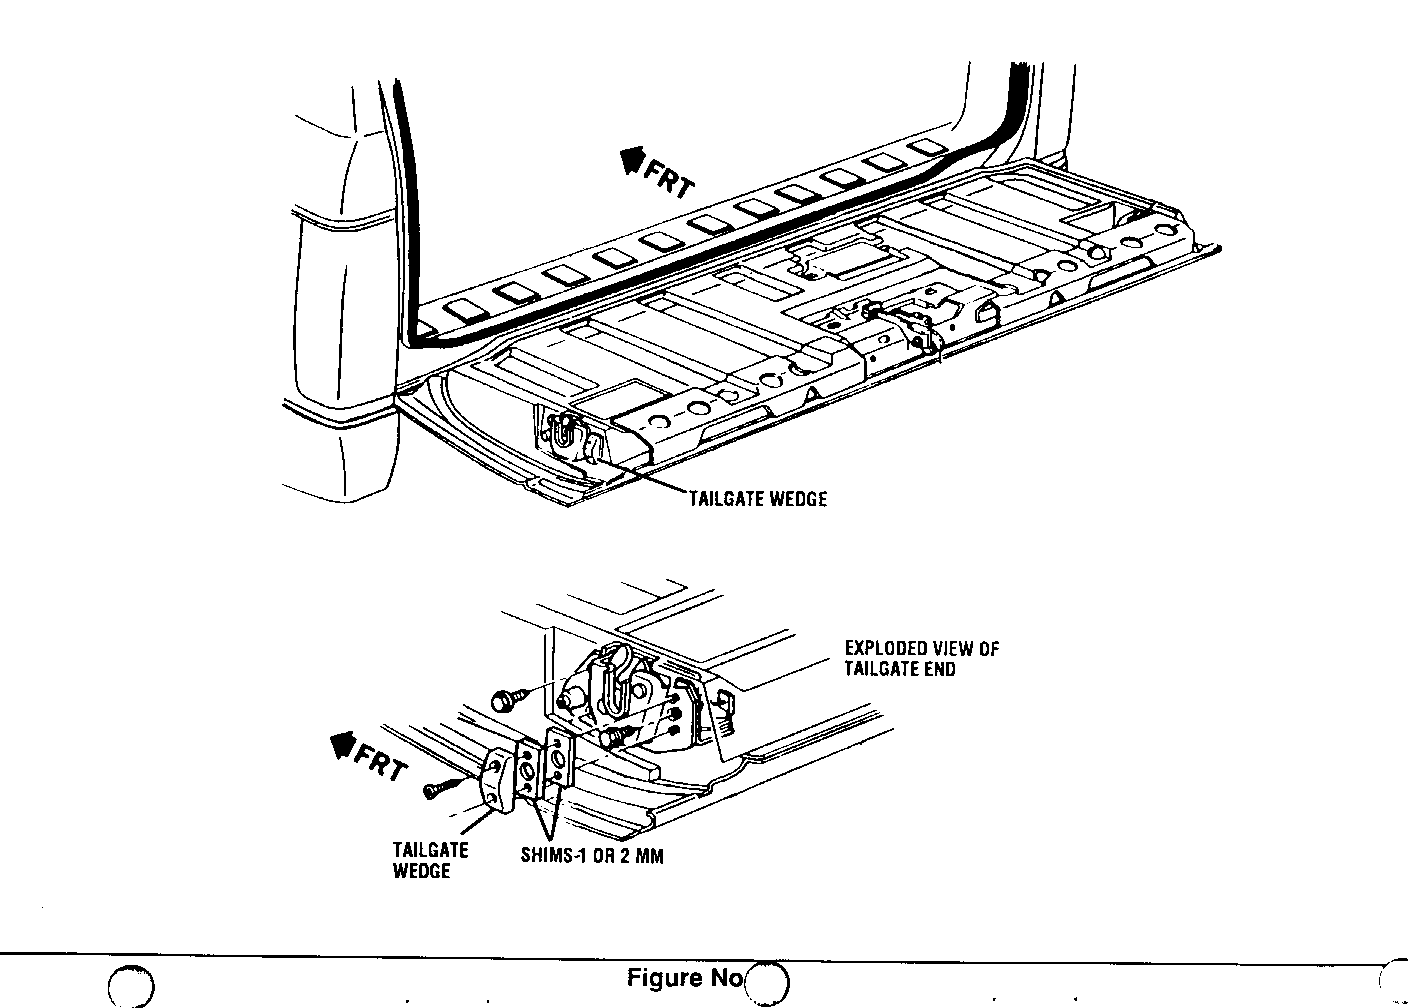
With the tailgate closed and the tailgate window lowered. look down the vertical side of the tailgate on both ends. What you should see is the tailgate wedges, shown in Figure 5, displacing the spring loaded body mounted wedges shown in Figure 3. If one or both of the body mounted wedges are not displaced, shim the tailgate mounted wedge(s) with 1mm or 2mm P/N #15659205 1mm, P/N #20093974 2mm. If both spring loaded wedges are displaced then do nothing to this area.
To shim the wedges:
1. Locate the wedges shown on Figure 5.
2. Remove the wedges and retain existing shims. Begin with 1mm shims to prevent excess shimming and insert the width of shims necessary to slightly displace wedge(s).
SERVICE PROCEDURE 4
With tailgate window closed, grab handle and attempt to move it forward and backward in a quick motion. If the window creates a glassy sounding rattle then perform the following service procedure.
1. Remove trim panel by taking out the eight fastening screws and sliding the panel rearward.
2. Locate the guide bushing shown in Figure 6.
3. Remove guide bushing and place a bead of Black RTV P/N #1052917 around the perimeter of the guide bushing hole and reinstall the bushing. Allow RTV to cure with the window open.
The RTV absorbs the vibration of the guide against the bushing and then ultimately between the bushing and the metal.
If, after going through the initial checks, you have completed the above service procedures, test drive the vehicle to see if the rattle condition has been eliminated. If noise persists, continue with the following procedure.
SERVICE PROCEDURE 5
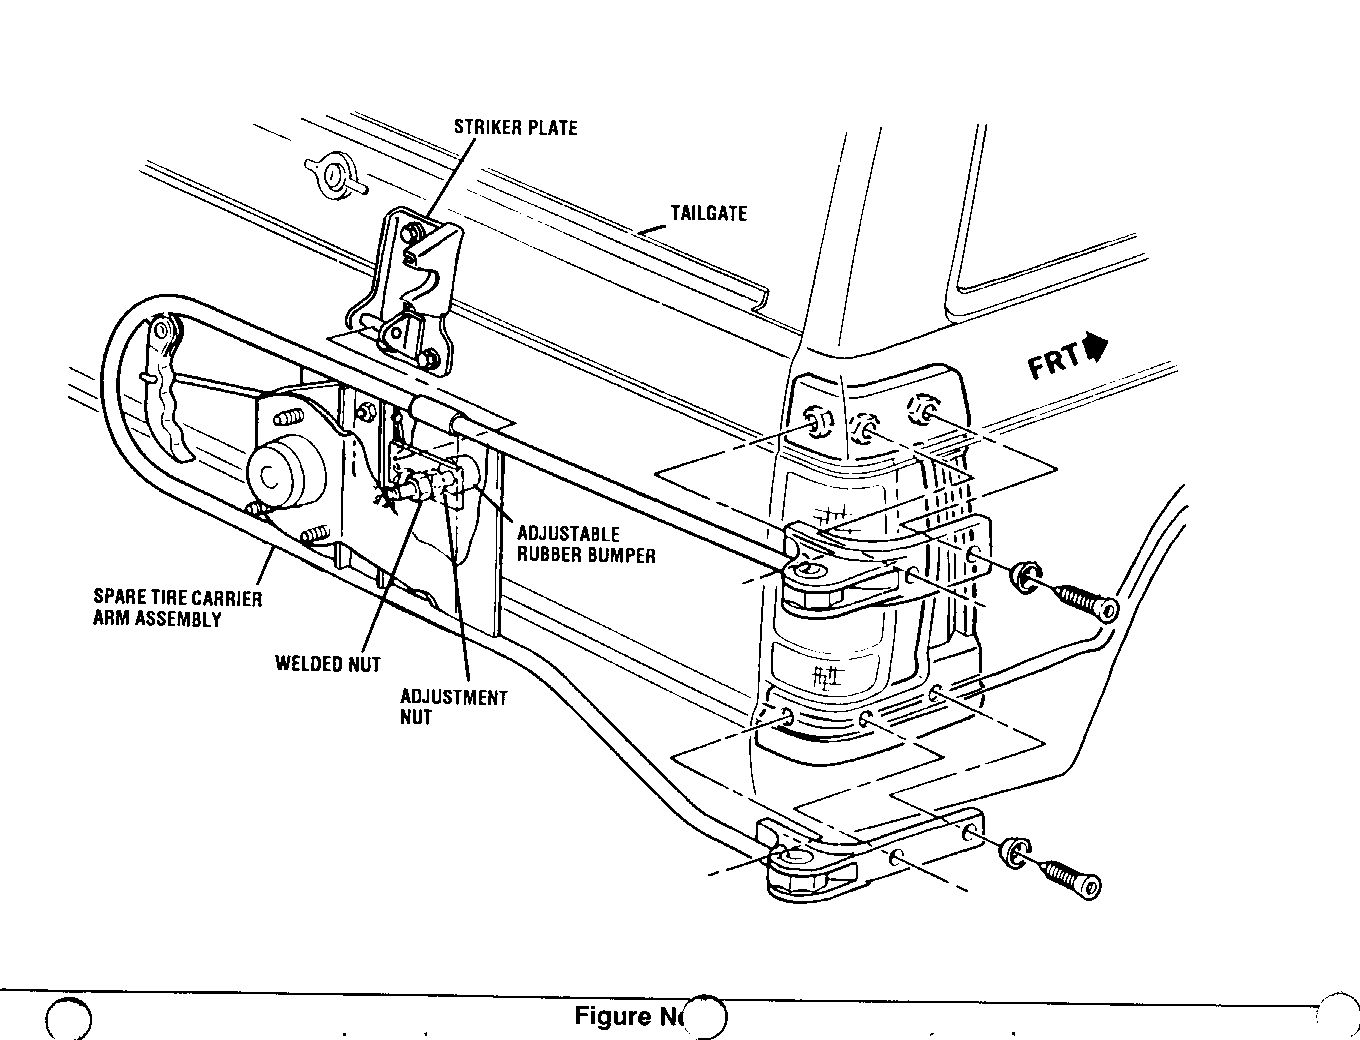
1) Replace the Spare Tire carrier with P/N #15659234. This arm has a new adjustable bumper that will take up the addition play that the striker assembly could not remove, as shown in Figure 7.
2) If the striker, shown in Figure 1, was not replaced during service Procedure 1 then do so now. This is done because the adjustment outlined below will push the spare tire carrier arm away from the smaller rubber bumper on the old style striker plate. The resultant gap will continue to allow a rattle condition.
3) To adjust the rubber bumper begin by removing the spare tire and closing the spare tire carrier. Loosen the adjustable nut shown in Figure 7. Turn the bumper screw until the bumper contacts the surface of the tailgate. Open the carrier arm and turn the bumper screw 1 and 1/2 turns to the left (counterclockwise). This will move the rubber bumper closer to the striker plate. Tighten adjustable nut and close carrier making sure that latching mechanisms are securely latched. Check to be sure that carrier arm sleeve rest against the striker plate's rubber bumper. If this is not the case then move the adjustable rubber bumper until contact results.
IMPORTANT: Prior to adjusting the rubber bumper, assure that the new arm is fully engaged in the main latch mechanism. Failure to have the carrier locked in the main latch will result in an improper adjustment to the bumper.
IMPORTANT: The rubber bumper will cause the.spare tire carrier to close hard for a couple of weeks. Eventually the rubber will take a permanent set and the carrier will close with a reasonable effort.
NOTE: If the subject vehicle was manufactured after the following break points then Service Procedure 5 will not be required as the material called out was incorporated in Production.
Shreveport: GMC - 1GKCT18Z6M8501693 CHEVROLET - 1GNCS18ZXM8104025
Pontiac West: GMC - 1GKCT18Z4MO500511 CHEVROLET - 1GNCT18ZOM0101419
Moraine: GMC - 1GKDT13Z2M2503438 CHEVROLET - 1GNDT13Z6M2115163
PARTS INFORMATION:
Part Number Description ------------- ------------- 15659205 Shim - 1 mm 20093974 Shim - 2 mm 14062340 Spacer - Wedge Plate 15659207 Weatherstrip 15659235 Striker Assembly 15659234 Carrier Arm Assembly 1052917 RTV - black 66B (Permatex (R) RTV - clear or equivalent
Use the most applicable Labour Operation and Time from the Canadian Labour Time Guide.


General Motors bulletins are intended for use by professional technicians, not a "do-it-yourselfer". They are written to inform those technicians of conditions that may occur on some vehicles, or to provide information that could assist in the proper service of a vehicle. Properly trained technicians have the equipment, tools, safety instructions and know-how to do a job properly and safely. If a condition is described, do not assume that the bulletin applies to your vehicle, or that your vehicle will have that condition. See a General Motors dealer servicing your brand of General Motors vehicle for information on whether your vehicle may benefit from the information.
