Product Safety - Stop Lamps/Hazard Lamps Inoperative

| Subject: | 01073B -- Stop Lamps/Hazard Lamps Inoperative |
| Models: | 2000-2001 Chevrolet Blazer, TrailBlazer (Classic) |
| 2002 Chevrolet Blazer |
| 2000-2001 GMC Jimmy, Envoy (Classic) |
| 2002 GMC Jimmy, Envoy (Classic) |
| 2000-2001 Oldsmobile Bravada (Classic) |
This bulletin is being revised to include additional population. The appropriate breakpoints have been revised. Please discard all copies of bulletin 01073A, issued July 2002.
Condition
General Motors has decided that a defect, which relates to motor vehicle safety, exists in certain 2000-2001 Chevrolet Blazer, TrailBlazer (Classic); 2002 Chevrolet Blazer; 2000-2001 GMC Jimmy, Envoy (Classic); 2002 GMC Jimmy, Envoy (Classic); 2000 -2001 Oldsmobile Bravada (Classic) vehicles. The multifunction switch may develop an open circuit condition with the bottom contact in the hazard switch carrier that results in the stop lamps and hazard lamps becoming inoperative. The center high mounted stop lamp (CHMSL) and turn signal functions are not affected. The loss of stop lamps and rear hazard lamps could fail to warn a following driver that the vehicle is braking and/or is stopped and could lead to a vehicle accident.
Correction
Dealers are to replace the hazard warning flasher switch.
Vehicles Involved
Involved are certain 2000-2001 Chevrolet Blazer, TrailBlazer (Classic); 2002 Chevrolet Blazer; 2000-2001 GMC Jimmy, Envoy (Classic); 2002 GMC Jimmy, Envoy (Classic); 2000 -2001 Oldsmobile Bravada (Classic) vehicles built within these VIN breakpoints:
Year | Division | Model | From | Through |
|---|---|---|---|---|
2000 | Chevrolet | S/T | Y2154437 | Y2407270 |
2000 | Chevrolet | S/T | YK111960 | YK301161 |
2001 | Chevrolet | S/T | 12100001 | 12231466 |
2001 | Chevrolet | S/T | 1K100001 | 1K266855 |
2002 | Chevrolet | S/T | 2K100001 | 2K121464 |
2000 | GMC | S/T | Y2155085 | Y2407254 |
2000 | GMC | S/T | YK113618 | YK301121 |
2001 | GMC | S/T | 12100006 | 12230790 |
2001 | GMC | S/T | 1K100012 | 1K266829 |
2002 | GMC | S/T | 2K100020 | 2K119371 |
2000 | Oldsmobile | S/T | Y2155766 | Y2407250 |
2001 | Oldsmobile | S/T | 12100010 | 12230516 |
Important: Dealers are to confirm vehicle eligibility prior to beginning repairs by using the GM Vehicle Inquiry System (GMVIS). Not all vehicles within the above breakpoints may be involved.
For dealers with involved vehicles, a listing with involved vehicles containing the complete vehicle identification number, customer name, and address information has been prepared and will be provided through the applicable system listed below. Dealers will not have a report available if they have no involved vehicles currently assigned.
- US dealers - GM DealerWorld Recall Information
- Canadian dealers - GMinfoNet Recall Reports
- Export dealers - sent directly to dealers
The listing may contain customer names and addresses obtained from Motor Vehicle Registration Records. The use of such motor vehicle registration data for any purpose other than follow-up necessary to complete this recall is a violation of law in several states/provinces/countries. Accordingly, you are urged to limit the use of this report to the follow-up necessary to complete this recall.
Parts Information
Parts required to complete this recall are to be obtained from General Motors Service and Parts Operations (GMSPO). Please refer to your "involved vehicles listing" before ordering parts. Normal orders should be placed on a DRO = Daily Replenishment Order. In an emergency situation, parts should be ordered on a CSO = Customer Special Order.
Part Number | Description | Qty/ Vehicle |
|---|---|---|
15174447* | Switch, Hazard Wrng (Hazard Warning Flasher Switch) | 1 (If Required) |
15177379* | Switch, Hazard Wrng (Hazard Warning Flasher Switch) | 1 (If Required) |
26100837** | Switch, T/Sig & Hdlp D/Sw & Wsw & Wswa - (With Cruise & Tilt) (Multifunction Switch) | 1 (If Required) |
26100838** | Switch, T/Sig & Hdlp D/Sw & Wsw & Wswa - (Without Cruise & Tilt) (Multifunction Switch) | 1 (If Required) |
12355066 | Strap, Plastic Adj Tie | 2 (If Multifunction Switch Replaced) |
* Perform inspection procedure to determine correct hazard warning switch to be used.
** It is estimated that less than 1% of involved vehicles will require the replacement of part numbers 26100837 and 26100838. Please order parts accordingly.
Service Procedure
The following procedure describes how to inspect and replace the hazard warning flasher switch, OR inspect and replace the multifunction (turn signal, headlamp dimmer, and windshield wiper/washer) switch assembly. The part that you replace will be determined during the inspection portion of this procedure. Do NOT replace any parts until after performing the inspection procedure.
Inspection Procedure
- From inside the vehicle, depress the hazard warning flasher switch located on the top of the steering column.
- Depress the hazard warning flasher switch again.
| • | If the hazard warning flasher switch did not stick in either the up or down position, proceed to the section titled "Replacing the Hazard Warning Flasher Switch." Do not order any replacement parts until instructed to in the additional inspection procedure included in that section. |
| • | If the hazard warning flasher switch is sticking in either the up or down position, replace the MULTIFUNCTION switch. Proceed to the section titled "Replacing the Multifunction Switch." |
Replacing the Hazard Warning Flasher Switch
This procedure describes how to replace ONLY the hazard warning flasher switch assembly. The procedure includes information on how to remove the original switch, where to apply the lubricant on the new switch, and how to install the new switch.
DO NOT use this procedure if the inspection above indicates that the multifunction switch requires replacement.
Contained in this procedure are unique steps to address features or options, such as cruise control, standard or tilt column, and a column mounted automatic transmission lever.
- Turn the ignition switch to the OFF position.
- Remove the fuse block cover from the end of the instrument panel (I/P) on the driver's side and remove the SIR fuse.
- Remove the screws attaching the driver's side sound insulator underneath the I/P and reposition the insulator panel out of the way.
- Locate the driver's side yellow 2-way air bag electrical connector at the base of the steering column and remove the connector position assurance (CPA) from the connector.
- Disconnect the yellow 2-way electrical connector.
- If equipped, remove the tilt steering column lever.
- Remove the screws that attach the knee bolster trim panel to the I/P and lower the panel.
- Remove the screws attaching the lower steering column cover to the steering column.
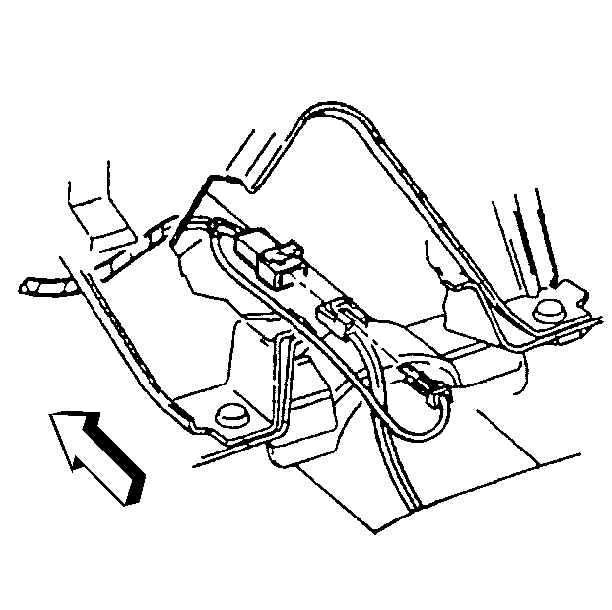
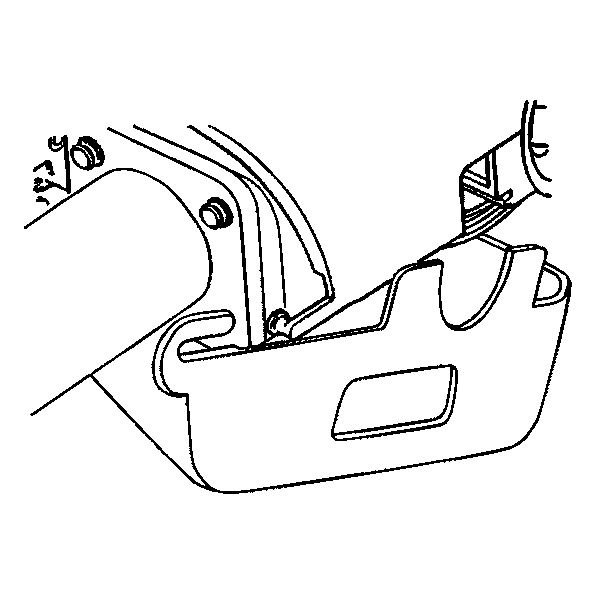
- Remove the lower steering column cover by tilting the rearward portion down and then move the cover forward to release the hooks as shown in the illustration.
- On vehicles equipped with a column mounted automatic transmission shift lever, remove the shifter boot from the upper column cover.
- Remove the screw attaching the upper steering column cover to the steering column and remove the upper cover.
- Inspect the part number (1) on the multifunction switch at the location shown in the illustration.
- Insert a small, pocket-sized, flat bladed screwdriver (2) into the small space between the hazard warning flasher switch housing (1) and the multifunction switch (3).
- Carefully tilt the screwdriver handle towards the instrument cluster. This will cause the blade of the screwdriver to pry open the space between the hazard warning flasher switch housing and the multifunction switch.
- While the space is pried open, pull the hazard warning flasher switch out of the multifunction switch. Discard the hazard warning flasher switch.
- Remove the rubber band and protective plastic wrapping from the new hazard warning flasher switch.
- Open the container of special grease included in the kit and apply it to the surfaces of the three triangle-shaped electrical contacts (1) on the side of the new hazard waning flasher switch. When properly applied, the surfaces of the three triangle-shaped electrical contacts must be completely covered and there should be no grease left in the container. Do NOT put any grease in the opening that contains the small metal return spring.
- Insert the hazard warning flasher switch into the opening of the multifunction switch and press down until it locks into place.
- Remove any excess grease that may appear around the base of the hazard flasher switch. Proceed to the next section "Reassemble Vehicle."
Important: Do not disconnect the courtesy light or hood release cable in the next step.
Important: Some of the illustrations included in this procedure show the steering column removed from the vehicle. Those illustrations are for reference purposes only. DO NOT remove the steering column from the vehicle to perform this repair procedure.
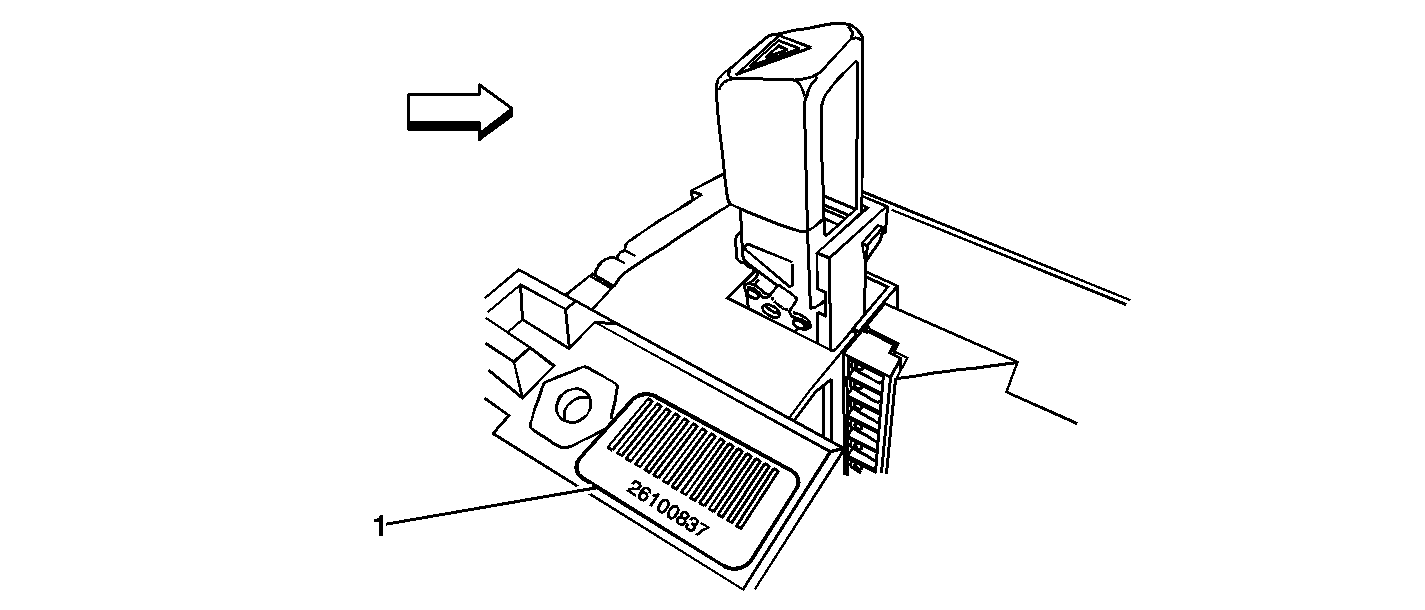
| • | If the part number is 26100837 or 26100838, no repair is required. Proceed to the section titled "Reassemble Vehicle." |
| • | If there is NO part number or barcode on the switch, or if the part number is 26083635 or 26083636, proceed to the next step and replace the hazard warning flasher switch using part number 15174447. |
| • | If the part number or barcode on the switch is 26090641, 26090642, 26096832, or 26096833, proceed to the next step and replace the hazard warning flasher switch using part number 15177379 |
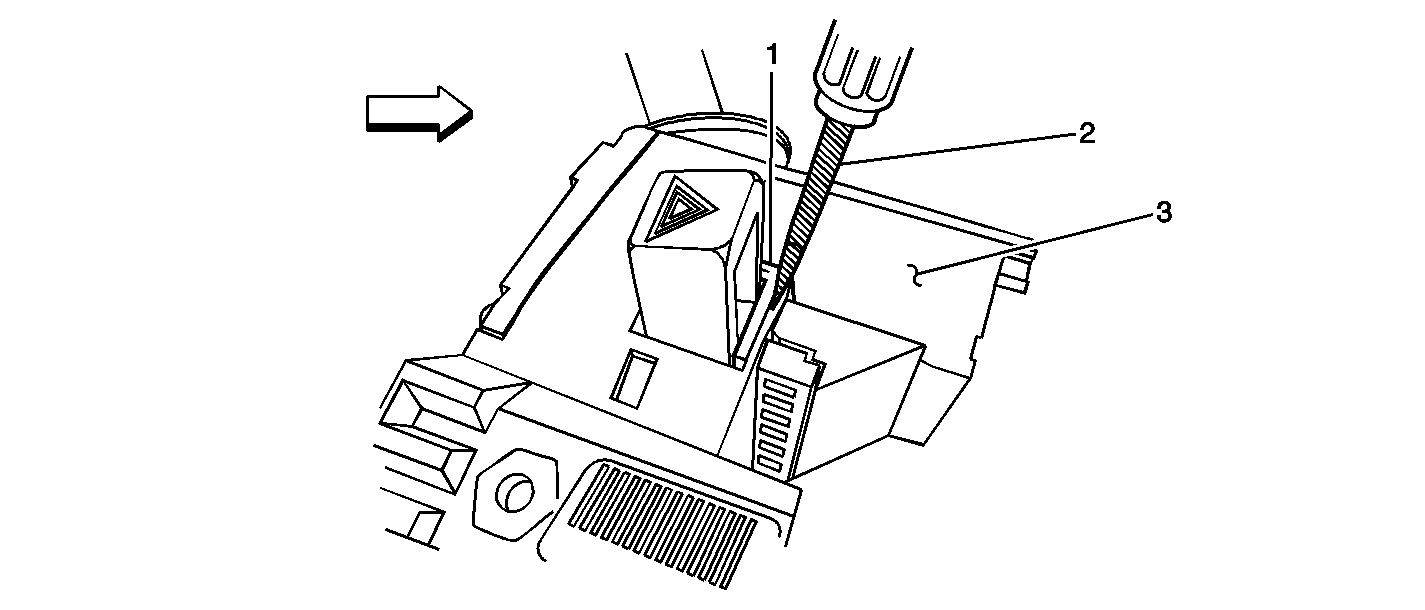
Important: Carefully review the above illustration to determine the exact location to insert the screwdriver in the next step.
Important: When removing the hazard warning flasher switch in the next step, the horn may sound momentarily.

Important: Do not touch the three triangle-shaped electrical contacts (1) on the side of the switch when removing the protective packaging, handling or applying grease to the new hazard warning flasher switch in the next steps.
Important: The electrical contacts on the new hazard warning flasher switch require a special lubricant, which is included in the kit. Only apply this special lubricant as instructed in the next step. Do NOT use any other type of grease or lubricant.
Important: When installing the hazard warning flasher switch in the next step, the horn may sound momentarily.
Reassemble Vehicle
- Install the upper steering column cover and attaching screw.
- On vehicles equipped with an automatic transmission shift lever that is mounted on the steering column, install the shifter boot to the upper column cover.
- Install the lower steering column cover and the screws.
- Position the knee bolster trim panel to the I/P and install the attaching screws.
- If equipped, install the tilt steering column lever.
- Connect the yellow 2-way electrical connector at the base of the steering column and install the CPA.
- Reposition the driver's side sound insulator panel underneath the I/P and install the attaching screws.
- Install the SIR fuse and install the fuse block cover.
- Install the GM Recall Identification Label.
Tighten
Tighten the screw to 1.5 N·m (13 lb in).
Tighten
Tighten the screws to 3.5 N·m (31 lb in).
Tighten
Tighten the screws to 1.9 N·m (17 lb in).
Tighten
Tighten the screws to 1.9 N·m (17 lb in).
Replacing the Multifunction Switch
This procedure describes how to replace ONLY the multifunction switch assembly. The new multifunction switch assembly will come complete with a new hazard warning flasher switch already installed.
DO NOT use this procedure if the results of the inspection procedure indicate that only the hazard warning switch requires replacement.
Contained in this procedure are unique steps to address features or options such as cruise control, standard or tilt column, and a column-mounted automatic transmission lever.
- Turn the steering wheel to the straight-ahead position and turn the ignition switch to the OFF position.
- Remove the fuse block cover from the end of the instrument panel (I/P) on the driver's side and remove the SIR fuse.
- Remove the screws attaching the driver's side sound insulator underneath the I/P and reposition the insulator panel out of the way.
- Locate the driver's side yellow 2-way air bag electrical connector at the base of the steering column and remove the connector position assurance (CPA) from the connector.
- Disconnect the yellow 2-way electrical connector.
- If equipped, remove the tilt steering column lever.
- Remove the screws that attach the knee bolster trim panel to the I/P, remove the screw attaching the courtesy lamp, separate the hood release cable at the grommet/bracket under the I/P, and remove the panel.
- Remove the nuts that attach the knee bolster to the column support and remove the knee bolster.
- Remove the screws attaching the lower steering column cover to the steering column.
- Remove the lower steering column cover by tilting the rearward portion down and the move the cover forward to release the hooks as shown in the above illustration.
- On vehicles that have the automatic transmission shift lever mounted on the steering column, remove the shifter boot from the upper column cover.
- Remove the screw attaching the upper steering column cover the steering column and remove the upper cover.
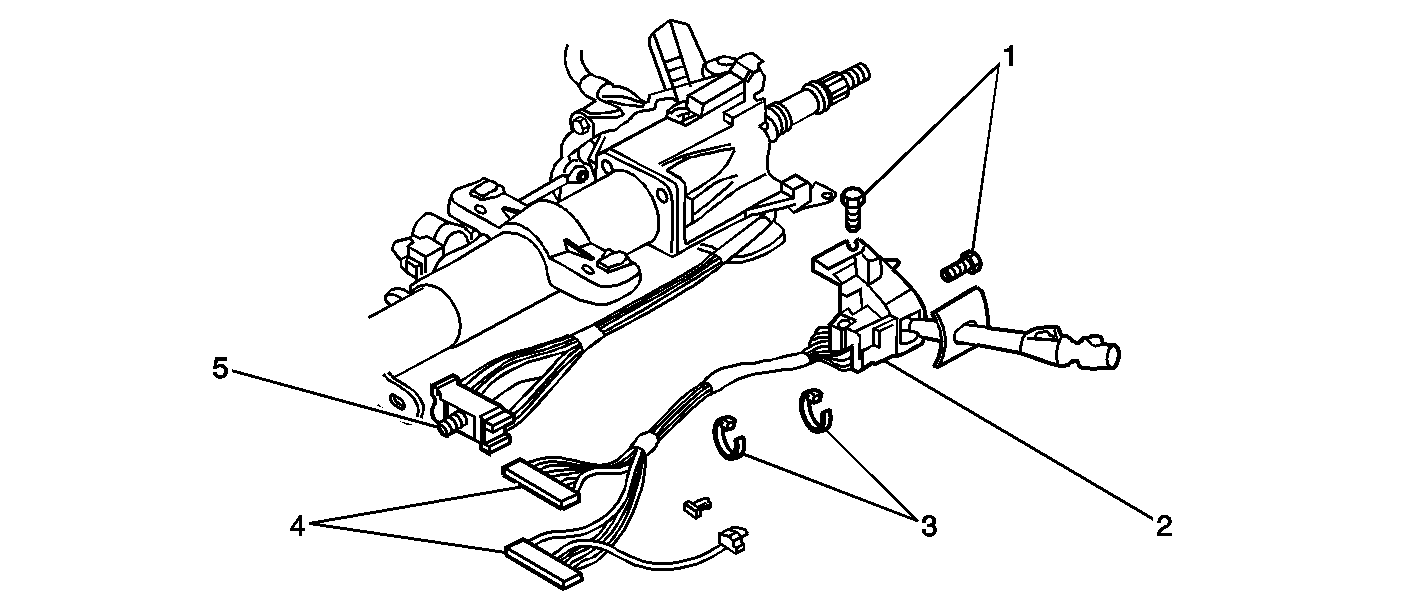
- At the base of the steering column, disconnect the bulkhead electrical connector (5) from the vehicle wiring harness.
- Cut and remove the plastic tie strap (3) that attach the multifunction switch wiring harness to the steering column harness. Also release the wiring harness from the larger plastic tie strap.
- Remove the protective cloth sleeve from the wiring harness.
- Disconnect the multifunction switch gray and black electrical connectors (4) from the column bulkhead electrical connector.
- If equipped, remove the CPA from the in-line connector and disconnect the connector.
- Turn the ignition switch to unlock the steering wheel.
- Turn the steering wheel 1/4 turn to the left to improve access to the lower multifunction attaching screw.
- Remove the screws (1) attaching the multifunction switch (2) to the steering column.
- On vehicles with the automatic transmission lever mounted on the column, remove the two nuts attaching the steering column to the column support and lower the steering column.
- On vehicles with the automatic transmission lever mounted on the column, disconnect the small green electrical connector going from the multifunction switch to the switch on the column.
- Remove the multifunction switch form the steering column.
- Position the new multifunction switch to the steering column.
- On vehicles with the automatic transmission lever mounted on the column, connect the small green electrical connector going from the multifunction switch to the switch on the column.
- On vehicles with the automatic transmission lever mounted on the column, raise the steering column to the column support and install the two attaching nuts.
- Install the multifunction switch attaching screws.
- Install the multifunction switch gray and black electrical connectors to the column bulkhead electrical connector.
- If equipped, connect the in-line connector and install the CPA.
- Connect the bulkhead electrical connector to the vehicle wiring harness.
- Install the cloth protective sleeve to the wiring harness and secure with two new plastic tie bands. Do not replace the other plastic tie bands that were removed.
- Install the upper steering column cover and attaching screw.
- On vehicles with the automatic transmission shift lever mounted on the column, install the shifter boot to the upper column cover.
- Install the lower steering column cover and screws.
- Install the knee bolster to the column support and install the attaching nuts.
- Position the knee bolster trim panel, connect the hood release cable, attach the courtesy lamp, and install the panel to the I/P with the attaching screws.
- If equipped, install the tilt steering column lever.
- Connect the yellow 2-way electrical connector at the base of the steering column and install the CPA.
- Reposition the driver's side sound insulator panel underneath the I/P and install the attaching screws.
- Install the SIR ruse and install the fuse block cover.
- Install the GM Recall Identification Label.

Important: Some of the illustrations included in this procedure show the steering column removed from the vehicle. Those illustrations are for reference purposes only. DO NOT remove the steering column from the vehicle to perform this repair procedure.
Important: DO NOT turn the ignition switch to the ON position in the next step.
Tighten
Tighten the nuts to 30 N·m (22 lb ft).
Tighten
Tighten the screws to 7 N·m (62 lb in).
Tighten
Tighten the retaining screws to 6 N·m (53 lb in).
Tighten
Tighten the screw to 1.5 N·m (13 lb in).
Tighten
Tighten the screws to 3.5 N·m (31 lb in).
Tighten
Tighten the nuts to 10 N·m (89 lb in).
Tighten
Tighten the screws to 1.9 N·m (17 lb in).
Tighten
Tighten the screws to 1.9 N·m (17 lb in).
Customer Reimbursement - For GM US
All customer requests for reimbursement of previously paid repairs for the recall condition will be handled by the Customer Assistance Center, not by dealers.
A General Motors Customer Reimbursement Procedure and Claim Form is included with the customer letter.
Important: (For GM US Only) Refer to the GM Service Policies and Procedures Manual, section 6.1.12, for specific procedures regarding customer reimbursement and the form.
Customer Reimbursement - For Canada and Export
Customer requests for reimbursement of previously paid repairs for the recall condition are to be submitted to the dealer by June 30, 2009.
All reasonable customer paid receipts should be considered for reimbursement. The amount to be reimbursed will be limited to the amount the repair would have cost if completed by an authorized General Motors dealer.
When a customer requests reimbursement, they must provide the following:
| • | Proof of ownership at time of repair. |
| • | Original paid receipt confirming the amount of repair expense(s) that were not reimbursed, a description of the repair, and the person or entity performing the repair. |
Claims for customer reimbursement on previously paid repairs are to be submitted as required by WINS.
Important: Refer to the GM Service Policies and Procedures Manual, section 6.1.12, for specific procedures regarding customer reimbursement verification.
Claim Information
Submit a Product Recall Claim with the information indicated below:
Repair Performed | Part Count | Part No. | Parts Allow | CC-FC | Labor Op | Labor Hours | Net Item |
|---|---|---|---|---|---|---|---|
Inspection Only - No Further Action Required | 0 | N/A | N/A | MA-96 | V0841 | 0.6 | N/A |
Inspect & Replace Hazard Warning Flasher Switch | 1 | -- | * | MA-96 | V0842 | 0.6 | N/A |
Inspect & Replace Multifunction Switch | 1 | -- | * | MA-96 | V0843 | 0.9 | *** |
Customer Reimbursement**** | 0 | N/A | N/A | MA-96 | V0844 | 0.2 | **** |
* The "Parts Allowance" should be the sum total of the current GMSPO Dealer net price plus applicable Mark-Up or Landed Cost Mark-Up (for Export) for the parts needed to complete the repair. ** The amount identified in the "Net Item" column should represent the sum total of the current GMSPO Dealer net price plus applicable Mark-Up or Landed Cost Mark-Up (for Export) for the two tie straps needed to complete the repair. *** If the customer’s paid receipt shows that part number 26100837 or 26100838 has been installed on the vehicle, no further action is required. Submit a claim using the labor code for the customer reimbursement, this will close the recall. If the repair order shows anything other than one of the two parts listed above, reimburse the customer and perform the service procedure listed in this bulletin. **** The amount identified in the "Net Item" column should represent the dollar amount reimbursed to the customer. | |||||||
Refer to the General Motors WINS Claims Processing Manual for details on Product Recall Claim Submission.
Customer Notification -- For US and Canada
Customers will be notified of this recall on their vehicles by General Motors (see copy of customer letter included with this bulletin).
Customer Notification -- For Export
Letters will be sent to known owners of record located within areas covered by the US National Traffic and Motor Vehicle Safety Act. For owners outside these areas, dealers should notify customers using the attached suggested dealer letter.
Dealer Recall Responsibility -- FOR US AND IPC (US States, Territories, and Possessions)
The US National Traffic and Motor Vehicle Safety Act provides that each vehicle which is subject to a recall of this type must be adequately repaired within a reasonable time after the customer has tendered it for repair. A failure to repair within sixty days after tender of a vehicle is prima facie evidence of failure to repair within a reasonable time. If the condition is not adequately repaired within a reasonable time, the customer may be entitled to an identical or reasonably equivalent vehicle at no charge or to a refund of the purchase price less a reasonable allowance for depreciation. To avoid having to provide these burdensome remedies, every effort must be made to promptly schedule an appointment with each customer and to repair their vehicle as soon as possible. In the recall notification letters, customers are told how to contact the US National Highway Traffic Safety Administration if the recall is not completed within a reasonable time.
Dealer Recall Responsibility -- All
All unsold new vehicles in dealers' possession and subject to this recall MUST be held and inspected/repaired per the service procedure of this recall bulletin BEFORE customers take possession of these vehicles.
Dealers are to service all vehicles subject to this recall at no charge to customers, regardless of mileage, age of vehicle, or ownership, from this time forward.
Customers who have recently purchased vehicles sold from your vehicle inventory, and for which there is no customer information indicated on the dealer listing, are to be contacted by the dealer. Arrangements are to be made to make the required correction according to the instructions contained in this bulletin. This could be done by mailing to such customers a copy of the customer letter accompanying this bulletin. Recall follow-up cards should not be used for this purpose, since the customer may not as yet have received the notification letter.
In summary, whenever a vehicle subject to this recall enters your vehicle inventory, or is in your dealership for service in the future, please take the steps necessary to be sure the recall correction has been made before selling or releasing the vehicle.
Dear General Motors Customer:
This notice is sent to you in accordance with the requirements of the National Traffic and Motor Vehicle Safety Act.
General Motors has decided that a defect that relates to motor vehicle safety exists in certain 2000-2001 Chevrolet Blazer, TrailBlazer (Classic); 2002 Chevrolet Blazer; 2000-2001 GMC Jimmy, Envoy (Classic); 2002 GMC Jimmy, Envoy (Classic); and 2000 -2001 Oldsmobile Bravada (Classic) vehicles. As a result, GM is conducting a safety recall. We apologize for this inconvenience. However, we are concerned about your safety and continued satisfaction with our products.
Important:
• Your vehicle is involved in safety recall 01073. • Schedule an appointment with your GM dealer. • This service will be performed for you at no charge
.
Why is your vehicle being recalled?
The multifunction switch in your vehicle may develop an open circuit condition with the bottom contact in the hazard switch carrier that results in the stop lamps and hazard lamps becoming inoperative. The center high mounted stop lamp and turn signal functions are not affected. The loss of stop lamps and rear hazard lamps could fail to warn a following driver that the vehicle braking and/or is stopped and could lead to a vehicle accident.
What will we do?
Your GM dealer will replace the hazard switch carrier. This service will be performed for you at no charge . Because of service scheduling requirements, it is likely that your dealer will need your vehicle longer than the actual service correction time of approximately 40 to 55 minutes.
What should you do?
You should contact your GM dealer to arrange a service appointment as soon as possible. Bring the enclosed customer reply form with you when you visit your dealer. The form identifies the repairs required. If you no longer own this vehicle, please let us know by completing the form and mailing it back to us.
Did you already pay for this repair?
The enclosed form explains what reimbursement is available and how to request reimbursement if you have paid for repairs for the recall condition.
Do you have questions?
If you have questions or concerns that your dealer is unable to resolve, please contact the appropriate Customer Assistance Center at the number listed below. More information about this recall can be found at the Owner Center at MyGMLink, http://www.gm.com/recall
Division | Number | Deaf, Hearing Impaired, or Speech Impaired* |
|---|---|---|
Chevrolet | 1-800-630-2438 | 1-800-833-2438 |
GMC | 1-800-996-9463 | 1-800-462-8583 |
Oldsmobile | 1-800-630-6537 | 1-800-833-6537 |
Guam | 1-671-648-8450 |
|
Puerto Rico - English | 1-800-496-9992 |
|
Puerto Rico - Español | 1-800-496-9993 |
|
Virgin Islands | 1-800-496-9994 |
|
If after contacting your dealer and the Customer Assistance Center, you are still not satisfied we have done our best to remedy this condition without charge and within a reasonable time, you may wish to write the Administrator, National Highway Traffic Safety Administration, 1200 New Jersey Avenue, SE, Washington DC 20590, or call the toll-free Vehicle Safety Hotline at 1.888.327.4236 (TTY 1.800.424.9153), or go to http://www.safercar.gov.
Federal regulation requires that any vehicle lessor receiving this recall notice must forward a copy of this notice to the lessee within ten days.
Scott Lawson
General Director,
Customer and Relationship Services
Enclosure
01073
