NO START/VEHICLE BATTERY DEAD PARASITIC CURRENT DRAIN TEST

SUBJECT: NO START CONDITION, VEHICLE BATTERY DEAD DUE TO EXCESSIVE CURRENT DRAW
MODELS: 1980-91 LIGHT AND MEDIUM DUTY TRUCKS
If the battery and charging system are functioning normally, an unusual current draw may have discharged the battery, resulting in the no start. The following procedure has been developed using the parasitic draw test switch, tool J 38758.
Past service procedures do not address solid state failures that may not immediately reappear once the battery has been disconnected and reconnect- ed. Utilizing tool J 38758, allows the vehicle to be started, driven, and all electrical system items cycled, without interrupting electrical system conti- nuity. The following procedure supersedes all past "Battery Electrical Drain Test Procedures."
PARASITIC CURRENT DRAIN PROCEDURE
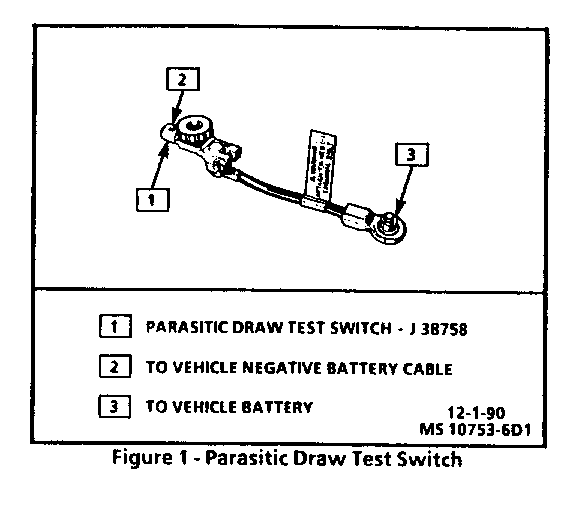
Tools needed: - J 38758 Parasitic Draw Test- Switch (Figure 1) - Ammeter with at least 10 amp measurement capabilities
[!] Important
The switch knob on J 38758 is marked "ON" and "OFF'. When the switch knob is in the "ON" position the circuit is closed and electrical current may pass through the switch. When the switch knob is in the "OFF" position, the circuit is open and electrical current may not pass through the switch.
NOTICE: The parasitic draw test switch should never be turned to the "OFF" position with the engine running or damage could occur to the attached ammeter or the vehicle electrical system.
1. Remove battery cable from battery negative terminal.
2. Install the parasitic draw test switch male-end, to negative battery terminal.
3. Turn test switch knob to the "OFF" position.
4. Install negative battery cable to female end of the test switch tool.
5. Turn the test switch tool knob to the "ON" position.
6. Road test vehicle while activating all accessories (radio, A/C etc.).
7. Turn ignition switch to the "Locked" position and remove ignition key.
8. Set the ammeter to the 10 amp scale and connect it to the pin terminals on the test switch tool.
NOTICE: Make sure all electrical accessories have been turned "OFF" (I.E. interior lights, underhood lamp, trunk light, illuminated entry, etc.) before turning the test switch knob to the "OFF" position to avoid damaging the ammeter or an incorrect current reading.
9. Turn test switch tool knob to the "OFF" position to allow current to flow through the ammeter.
NOTE: If current reading shows in the negative range, turn the test switch tool knob to "ON" reverse the ammeter probes on the test switch terminals, and turn the test switch tool knob to "OFF "
10. Check current reading. If current reading is at or below two amps, turn the test tool knob to the "ON" position (to maintain continuity in the electrical system) and switch down to the two amp scale for a more accurate reading when drain test tool knob is turned "OFF".
[!] Important
Always turn the test switch tool knob to the "ON" position before removing each fuse to maintain continuity in the electrical system and to avoid damaging the ammeter due to accidental overloading (I.E. opening door to change fuse, etc.).
If the vehicle is equipped with Electronic Level Control, allow for the built-in time delay which can be as long as 10 minutes.
11. If current draw is above the specifications listed in section 6D-1 of the service manual (current drain test), when available, or is unusually high for the vehicles overall electrical content, remove system fuses one fuse at a time until the current draw returns to an acceptable value. Perform steps 8 through 10 each time a fuse is removed. Refer to the ELECTRICAL DIAGNOSIS section for specific circuit schematics.
[!] Important
On future model trucks, which may be vehicles equipped with a CCM (Central Control Module) or BCM (Body Control Module), check current load readings in "awake" and "asleep" states. Refer to the CCM or BCM Service Manual sections for more information on "awake" and "asleep" states.
12. When cause of excessive current draw has been located and repaired, remove current drain test tool and connect negative battery cable to negative battery terminal.
Please include this procedure in your Service Manuals under Section 6D1- Battery.
General Motors bulletins are intended for use by professional technicians, not a "do-it-yourselfer". They are written to inform those technicians of conditions that may occur on some vehicles, or to provide information that could assist in the proper service of a vehicle. Properly trained technicians have the equipment, tools, safety instructions and know-how to do a job properly and safely. If a condition is described, do not assume that the bulletin applies to your vehicle, or that your vehicle will have that condition. See a General Motors dealer servicing your brand of General Motors vehicle for information on whether your vehicle may benefit from the information.
