LEAD WHILE BRAKING-INSTALL NEW CALIPERS, PADS/BURNISH BRAKES

MODELS: 1984-86 K1-2 AND 1987-88 V1-2
A condition described as directional lead (either right or left) while braking may be addressed on the models listed above by careful inspection, adjustment or repair of the vehicle's tires, suspension, steering or brake components. The following procedures have been developed to systematically address the area(s) that should be inspected and adjusted. Evaluation of a vehicle's brake performance is not intended to be made with the vebicle operator's hands removed from the steering wheel. Vehicles tbat exbibit directional bias under these conditions are not considered to exhibit brake lead. Before road testing tbe vehicle, perform the following services:
NOTICE: Follow the service procedures in the 1988 Light Duty Service Manual X-8832 unless noted differently.
Preliminary Inspection:
- Inspect tires for excessive, uneven wear - replace if necessary.
- Equalize tire pressures.
- Torque leaf spring-to-axle U-bolts to high limit of specification (150 lbs/ft or 203 Nm). See Section 3C for tightening order.
* Equalize parking brake adjustment.
- Adjust rear service brakes to .030" running clearance.
- Inspect and record front end alignment readings - adjust total toe to specifications (.0" to .14").
- Inspect caliper brake line bolt (#34, page 5A8, Figure 4, 1988 Service Manual X-8832) for mislocation of orifice. The orifice should be lo- cated in the unthreaded part of the bolt. If the orifice is located in a threaded portion of the bolt, then the bolt must be replaced.
NOTICE: After the preceding inspections and/or adjustments have been made, the vehicle should be road tested to determine if a lead still exists. Vehicles that lead may lead either right or left when the brakes are applied. Make all stops on a dry, level (no crown), clean roadway.
EACH APPLICABLE STEP MUST BE THOROUGHLY COMPLETED TO EFFECT A LASTING REPAIR. FAILURE TO COMPLETE THE PROCEDURE EXACTLY AS WRITTEN MAY RESULT IN AN UNSATISFACTORY REPAIR.
Conduct a series of 5 stops from 55 MPH bringing vehicle to a stop in 5 seconds (15 FPS Sq.). Record amount and direction of lead. Do not shade or lock wheels.
* FPS Sq or Ft/Sec2 is the measurement used for calculating the deceleration rate with a decelerometer.
Use of decelerometer, when available, is the prefered method.
PROCEDURE A
Right or left lead ---------|-------- | Remove and discard the brake calipers and pads -------------------|--------------------------- | Refinish brake rotors per Chart 1 (or replace brake rotors if they cannot be brought into spec.) -----------|------------------ | Inspect and/or adjust front wheel bearing per the procedure in Service Manual Section 3C -----------|---------------- | Install new Delco Moraine brake calipers See Parts Information for part numbers -----------------|--------------------- | Install new Delco Moraine brake pads See Parts Information ---------|----------- | Bleed front brakes --------|---------
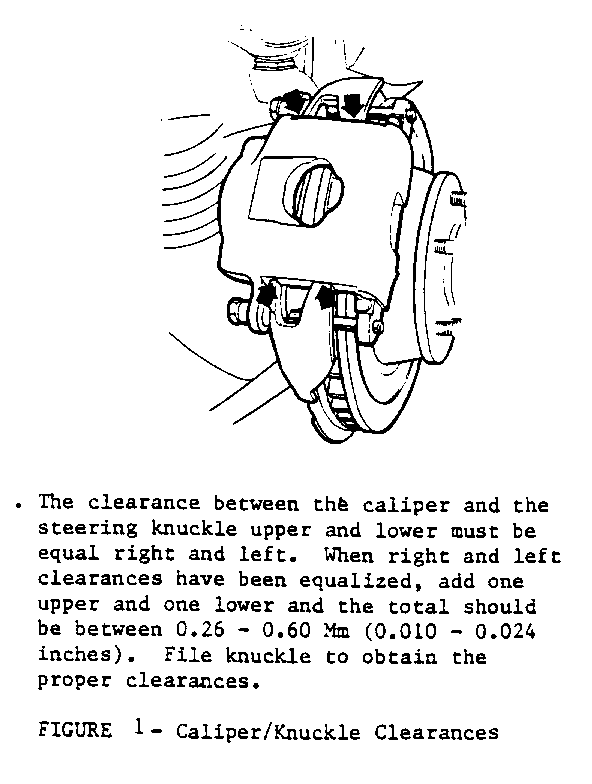
Inspect caliper to knuckle clearance. It should be between .010" - .024" in total. If necessary, file the knuckle to obtain dearances. Equalize all upper and lower clearances per Figure No. 1.
Perform 12 stop burnish procedure. Burnish procedure is mandatory.
12 Stop burnish procedure
1st Stop From 40 MPH taking 6 seconds to stop (10 FPS SQ)* 2nd Stop to 11th Stop From 55 MPH taking 5 seconds to stop (15 FPS SQ)* 12th Stop From 40 MPH taking 6 seconds to stop (10 FPS SQ)*
Drive 1/2 (0.5) miles between burnish stops.
Drive 4 miles after 12th stop to cool system. --------------------------------|----------------------------------------- | To confirm if vehicle is repaired, conduct series of 5 stops from 55 mph bringing vehicle to stop ------- No Lead in 5 seconds (15 FPS SQ.) and ------- compare to initial stops. --------------|-------------------------- | Lead ----
If the lead condition still exists, perform the following procedure:
PROCEDURE B:
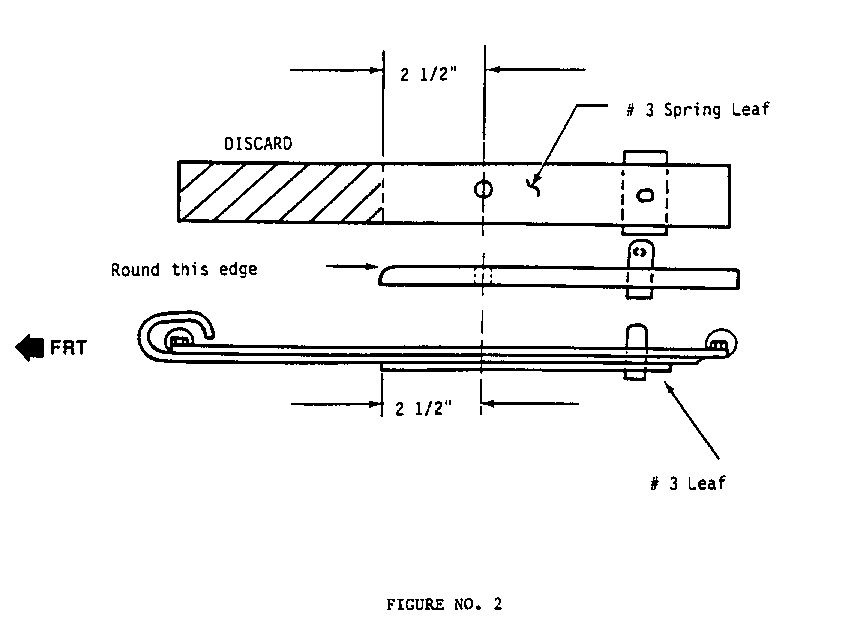
Inspect front spring bushings for visible deterioration. Replace as necessary. ---------------|------------------- | Install a modified #3 spring leaf (P/N 460359) on vehicles currently equipped with two leaf springs as follows:
From the middle of the center bolt hole in the new #3 spring leaf, measure forward approximately 2-1/2 inches. Mark this point and cut using a suitable tool such as a panel cutter. Remove any roughness from the cut end of the spring and "round" the upper cut edge with a die grinder. Install the springs under the second leaf where a third leaf would normally be located. See Figure No. 2. ------------------------------------|-------------------------------------- | Refer to the alignment specifications previously recorded and increase caster angle to + 10.0 degree s using the proper steel caster wedge (P/N provided in Parts Information). Install the steel caster wedge between the axle pad and the spring pad. The thicker end of the wedge should be positioned toward rear of the vehicle. ------------------------------------|-------------------------------------- | Disconnect tie rod ends. Measure Ball Joint turning effort and correct as required. See Figure No. 3 and accompanying instructions. -------------------------------------|-------------------------------------- | Reconnect tie rod, torque to spec. 40 Lbs/Ft (55 Nm). ---------------------------|------------------------- | Position front wheels straight ahead ------------------|----------------- | Disconnect drag link at steering gear ------------------|------------------ | Center steering gear using procedure specified in Section 3B. --------------------------|---------------------------------- | Adjust drag link to reconnect to steering gear ---------------------|------------------------ | To confirm vehicle is repaired, conduct series of 5 stops from 55 mph bringing vehicle to stop in 5 seconds (15 ----- No Lead FPS SQ.) and compare to initial stops. ---------------------|------------------------------------ | Lead
If the lead condition still exists, perform the following:
PROCEDURE C
Replace rotors if not replaced in Procedure A. If rotors were replaced in Procedure A rotate them from side to side. ---------------------------|----------------------------- | Make a series of 5 stops from 55 mph bringing vehicle to a stop in 5 seconds. (15 FPS SQ.) Record findings. ----------------------------------------------------------
PARTS INFORMATION
Parts are currently available from GMSPO.
Part Number Model Model Yr. Description Quantity ------ ----- -------- ----------- -------- 18015381 K-1 84-86 Brake caliper left 1 18015381 V-1 87-88 Brake caliper left 1 18015382 K-1 84-86 Brake caliper right 1 18015382 V-1 87-88 Brake caliper right 1 18015385 K-2 84-86 Brake caliper left 1 18015385 V-2 87-88 Brake caliper left 1 18015386 K-2 84-86 Brake caliper right 1 18015386 V-2 87-88 Brake caliper right 1 12321435 K-1 84-86 Brake pads 1 Set 12321435 V-1 87-88 Brake pads 1 Set 12321446 K-2 84-86 Brake pads 1 Set 12321446 V-2 87-88 Brake pads 1 Set
5468226 K-1,2 84-88 Caliper Bolt 2 Per caliper 5468226 V-1,2 84-88 Caliper Bolt 2 Per caliper 460359 K-1,2 84-86 #3 spring leaf 2 460359 V-1,2 87-88 #3 spring leaf 2
379397 K-1,2 84-86 U Bolt 3 379397 V-1,2 87-88 U Bolt 3
379398 K-1,2 84-86 U Bolt 1 379398 V-1,2 87-88 U Bolt 1
3979879 K-1,2 84-86 Center Bolt 2 3979879 V-1,2 87-88 Center Bolt 2
CASTER WEDGES (SHIMS)
NOTICE: To obtain +10.0 caster, use the appropriate caster wedge.
Caster Wedges In Degrees Part Number Quantity ---------- ----------- -------- 2 15624676 2 per vehicle 3 15624677 2 per vehicle 4 15624678 2 per vehicle
Warranty labor operation and labor time information:
T7720 Preliminary inspection and adjustments including verification road test 1.2 Hrs. Add: To adjust "toe" setting .3 Hr.
T7725 Preliminary inspection and adjustments, repair procedure "A", indudes two road tests 3.7 Hrs. Add: To adjust "toe" setting .3 Hr. To reface rotors .8 Hr. To replace rotors .5 Hr.
T7730 Preliminary inspection, adjustments, repair procedures "A:' and "B", includes three road tests 6.3 Hrs. Add: To adjust "toe" setting .3 Hr. To reface rotors .8 Hr. To replace rotors (during Procedure "A") .5 Hr. To replace rotors (Including road test) 2.7 Hrs. in Procedure C To rotate rotors from side to side (Including road test) in Procedure C 2.2 Hrs.
CHART 1
Good contact is important between the friction surfaces of the brake system. With semi-metalic linings, it is important to have good refinished rotor surfaces. A poor finish on one rotor can result in reduced brake effectiveness. This may result in a brake lead condition if installed opposite a properly finished rotor. The original equipment new disc brake rotors have an initial surface finish of 20 to 60 micro inches and all have a non-directional swirl pattern.
SERVICE RECOMMENDATION
- Rotor refinish requires a micro-inch surface refinish equivalent to the new vehicle rotor specification.
- The recommended procedure for obtaining this finish is as follows:
Rough cut Finish Cut
Spindle Speed 20ORPM 20O RPM Depth of cut per side .005" .002" Tool Cross Feed Per Rev. .006" - .010" .002" Max. Vibration Dampener Yes Yes Swirl Pattern - 120 GRIT No Optional*
*Duplication of new rotor and smoother finish for best initial brake effectiveness.
When installing new rotor from service stock "do not" refinish the surface as these parts are to recommended finish.
When refinishing brake rotors the following is important:
- The brake lathe must be in good working order and have capability to produce the intended surface finish.
- Use correct tool feed and arbor speeds. Too fast a speed or too deep a cut can result in a rough finish.
- Cutting tools must be sharp.
- Adapters must be clean and free of nicks.
- Lathe finish cuts should be further improved and made nondirectional by dressing rotor surface with a sanding disc power tool (AMMCO Model 8350 Safe Swirl Disc Rotor Grinder or equivalent).
- Rotor surfaces are to be refinished to 20 to 60 micro-inch.
To become familar with the required surface finish, drag a fingenail over the surface of a new rotor from parts stock or one on a new vehicle. If your brake equipment cannot produce this smooth a finish when correctly used, contact the equipment manufacturer for corrective instructions.
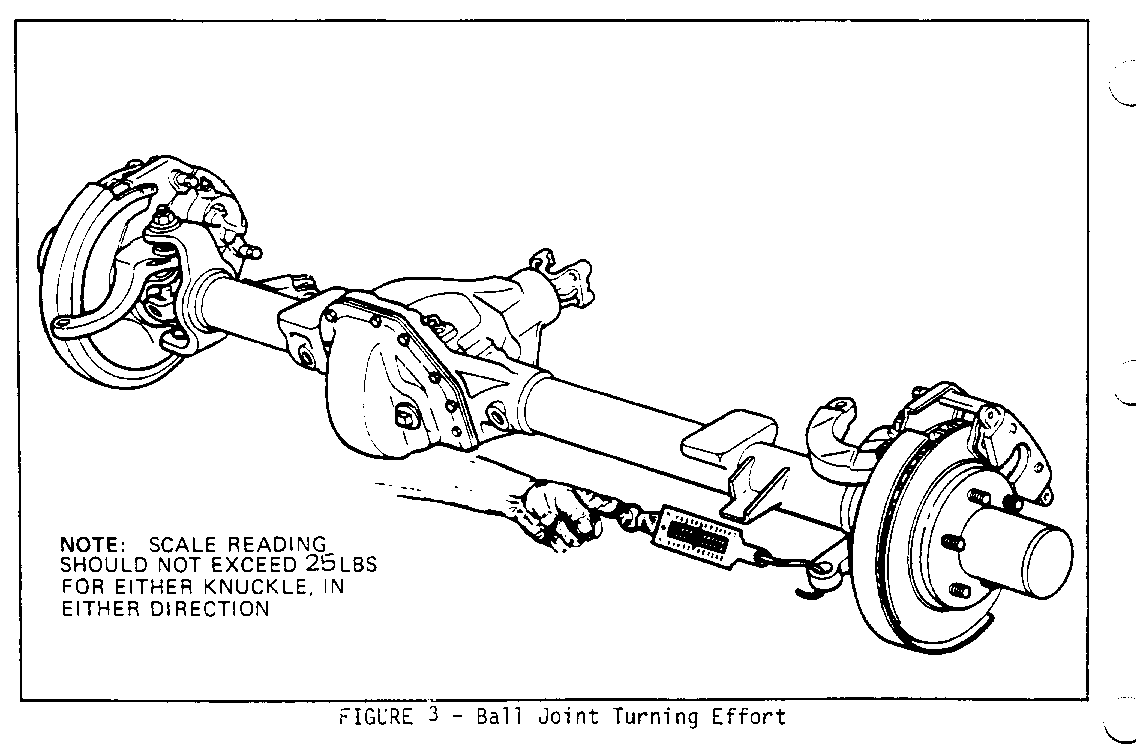
CHECKING BALL JOINT TURNING EFFORT (K-V 10, K-V20)
Front axle ball joint adjustment is generally necessary only when there is excessive play in steering, irregular wear on tires or persistent loosening of the tie rod is observed.
1. Raise vehicle on hoist then place jack stands just inside of front springs.
2. Disconnect connecting rod and tie rod to allow independent movement of each steering knuckle.
3. Apply a fish-scale to the tie rod mounting hole of the steering knuckle arm. With the knuckle assembly in the straight-ahead position, determine tbe right angle pull required to keep the knuckle assembly turning after initial break-away. This pull should not exceed 25 lbs for each knuckle assembly in either direction.
4. If the turning effort exceeds 25lbs. in either direction, adjustment or replacement will be necessary. Follow the procedure in Section 3C of the 1988 Light Duty Service Manual X-8832.
General Motors bulletins are intended for use by professional technicians, not a "do-it-yourselfer". They are written to inform those technicians of conditions that may occur on some vehicles, or to provide information that could assist in the proper service of a vehicle. Properly trained technicians have the equipment, tools, safety instructions and know-how to do a job properly and safely. If a condition is described, do not assume that the bulletin applies to your vehicle, or that your vehicle will have that condition. See a General Motors dealer servicing your brand of General Motors vehicle for information on whether your vehicle may benefit from the information.
