FRONT DOOR WIND NOISE (DIAG./ INSTALL REDESIGNED PARTS)

SUBJECT: FRONT DOOR WIND NOISE (DIAGNOSE/INSTALL REDESIGNED PARTS AS INDICATED)
VEHICLES AFFECTED: 1988-92 "C/K" TRUCKS
Owners of some 1988-1992 C/K Vehicles, may comment on unacceptable front door wind noise. Multiple root causes may contribute to the customer's perception of front door wind noise, such as:
0 Improper front door alignment.
0 Gaps between the window and the door.
0 Inadequate sealing between the door and the cab.
0 Inadequate sealing within the mirror area.
Changes are currently being made to repair front door wind noise. The following bulletin is divided into the following two sections.
I. Wind noise diagnosis and testing.
II. Repair of the below locations:
a. Door alignment. b. Door glass sealing. c. A-pillar sealing.
SERVICE PROCEDURE:
The first step of the repair process in correcting wind noise is to identify the main cause(s). A determination must be made as to whether the cause of the noise is air escaping from the vehicle or outside air turbulence.
I. WIND NOISE DIAGNOSIS ----------------------- Suggested below are a number of diagnostic techniques that could be used to help isolate the main cause(s) of the wind noise condition.
CUSTOMER WRITE UP:
Answers to the following questions should be obtained from the customer:
1. What specific noise is objectionable?
A. Whistle B. Flutter C. Rush of air
2. At what speed does the noise occur?
3. Is the heater/AC blower motor'ON'or'OFF'?
4. In what general area does the noise appear to originate?
5. Does the vehicle have a bug deflector or roof rack?
VISIBLE INSPECTION:
1. Inspect the vehicle for:
a. Misaligned components. b. Torn weatherstrips. c. Broken weld joints. d. Sealer and/or adhesive skips.
These indicators could be the cause of air leakage, repair if necessary before proceeding with the bulletin.
2. Measure the door's fit (refer to the appropriate Service Manual section, 1OA1 "Door Adjustment", for door fit specifications).
ROAD TEST:
1. The vehicle should be driven under the conditions described by the customer in the "customer write up" section in order to hear the wind noise. Safe legal speeds should never be exceeded.
2. While driving the vehicle, place a stethoscope around the sealed areas of the door and glass.
3. Temporarily repair the leakage area by sealing the area with masking tape.
4. Continue to test drive the vehicle to determine if the wind noise has been eliminated or if other leaks exists.
DOLLAR BILL TEST:
1. Place a dollar bill or similar size piece of paper between the primary weatherstrip and seal surface and close the door.
2. Slowly withdraw the paper and check the amount of pressure on the weatherstrip. There should be some resistance to ensure a positive seal.
3. Continue around the entire seal. If there is little or no resistance, it indicates that there is insufficient contact to form a good seal. This test may indicate that the door, glass, or weatherstrip is out of alignment.
COMPRESSED AIR AND SOAPY WATER TEST:
1. Apply a mixture of liquid soap and water or foamy type glass cleaner directly to the exterior surface of the suspected leak area.
2. Apply approximately 30 psi (205 kPa) of compressed air to the suspected area from inside the vehicle.
3. Large bubbles appearing will reveal the exact leak point.
CHALK OR TRACING POWDER TEST:
1. Spray powder or apply chalk to the weatherstrip contact surface. This test is best suited for checking weatherstrip contact to the seal surface.
2. Close the door gently.
3. Open the door and check the weatherstrip seal surface for unbroken areas of powder or chalk. Areas that have an 1/8 in. (3mm) skip in the powder or chalk should be considered leak areas.
4. When the suspected wind noise locations have been diagnosed, refer to the following sections of this bulletin for the proper repair procedure of that area.
II. REPAIR OF DOOR LOCATIONS ---------------------------- Repair of door locations is divided into the following three sections.
0 Door alignment 0 Door glass sealing 0 A-pillar sealing
Proceed to the applicable section.
DOOR ALIGNMENT:
If the diagnostic test above demonstrates that the primary weatherstrip does not provide a uniform contact seal along its entire length and the door requires alignment, adjust the door and the weatherstrip pinch weld flange as necessary.
DOOR GLASS SEALING:
NOTE: For 1992 vehicles built before June, after removing the door trim panel (Step #1), perform steps #3, #4, and #5 then proceed to step #13. The parts involved with these steps (mirror gaskets and outer belt seals) were not placed onto 1992 production vehicles until June.
1. Remove the door trim panel (refer to section 1OA1 "DOOR TRIM PANEL REPLACEMENT" in the appropriate service manual).
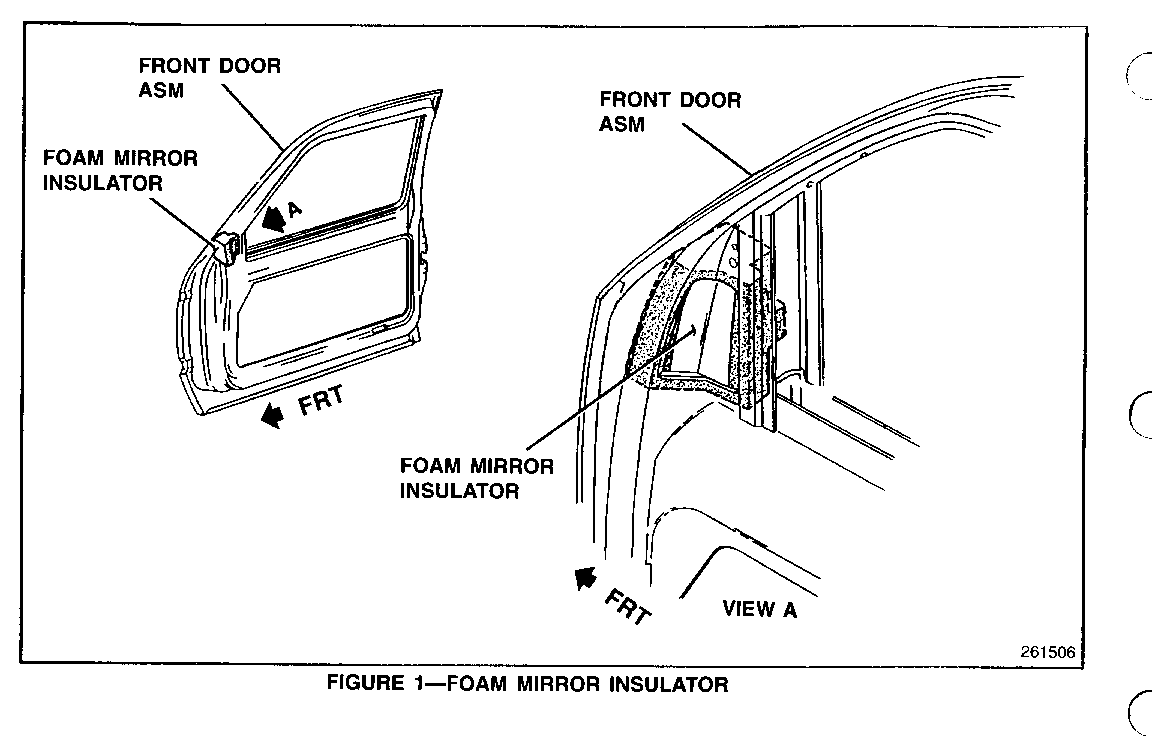
2. Remove the foam insulator behind the outside mirror (Figure 1).
3. Remove the outside mirror.
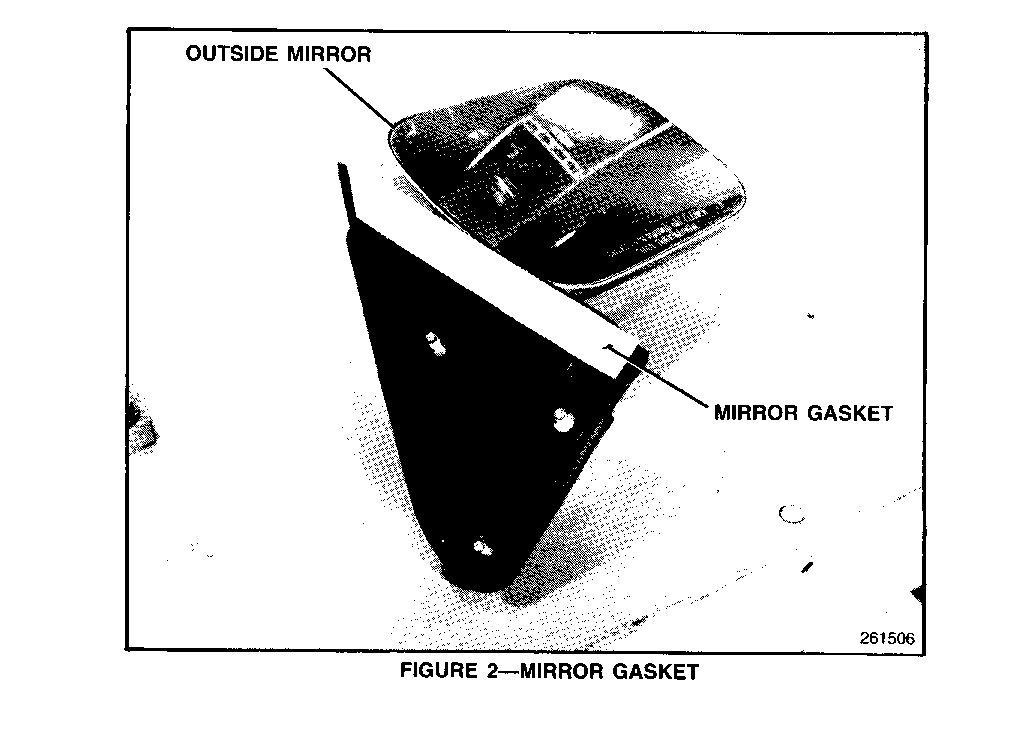
4. Install a new mirror gasket (P/N 15697341 (RH) and 15697342 (LH). See Figure 2.
5. Install the outside mirror.
6. Install an enlarged foam mirror insulator (P/N 15682331 (LH) and 15682332 RH).
7. Remove the staples from the inner belt seal by cutting the staples in half with a side-cutter.
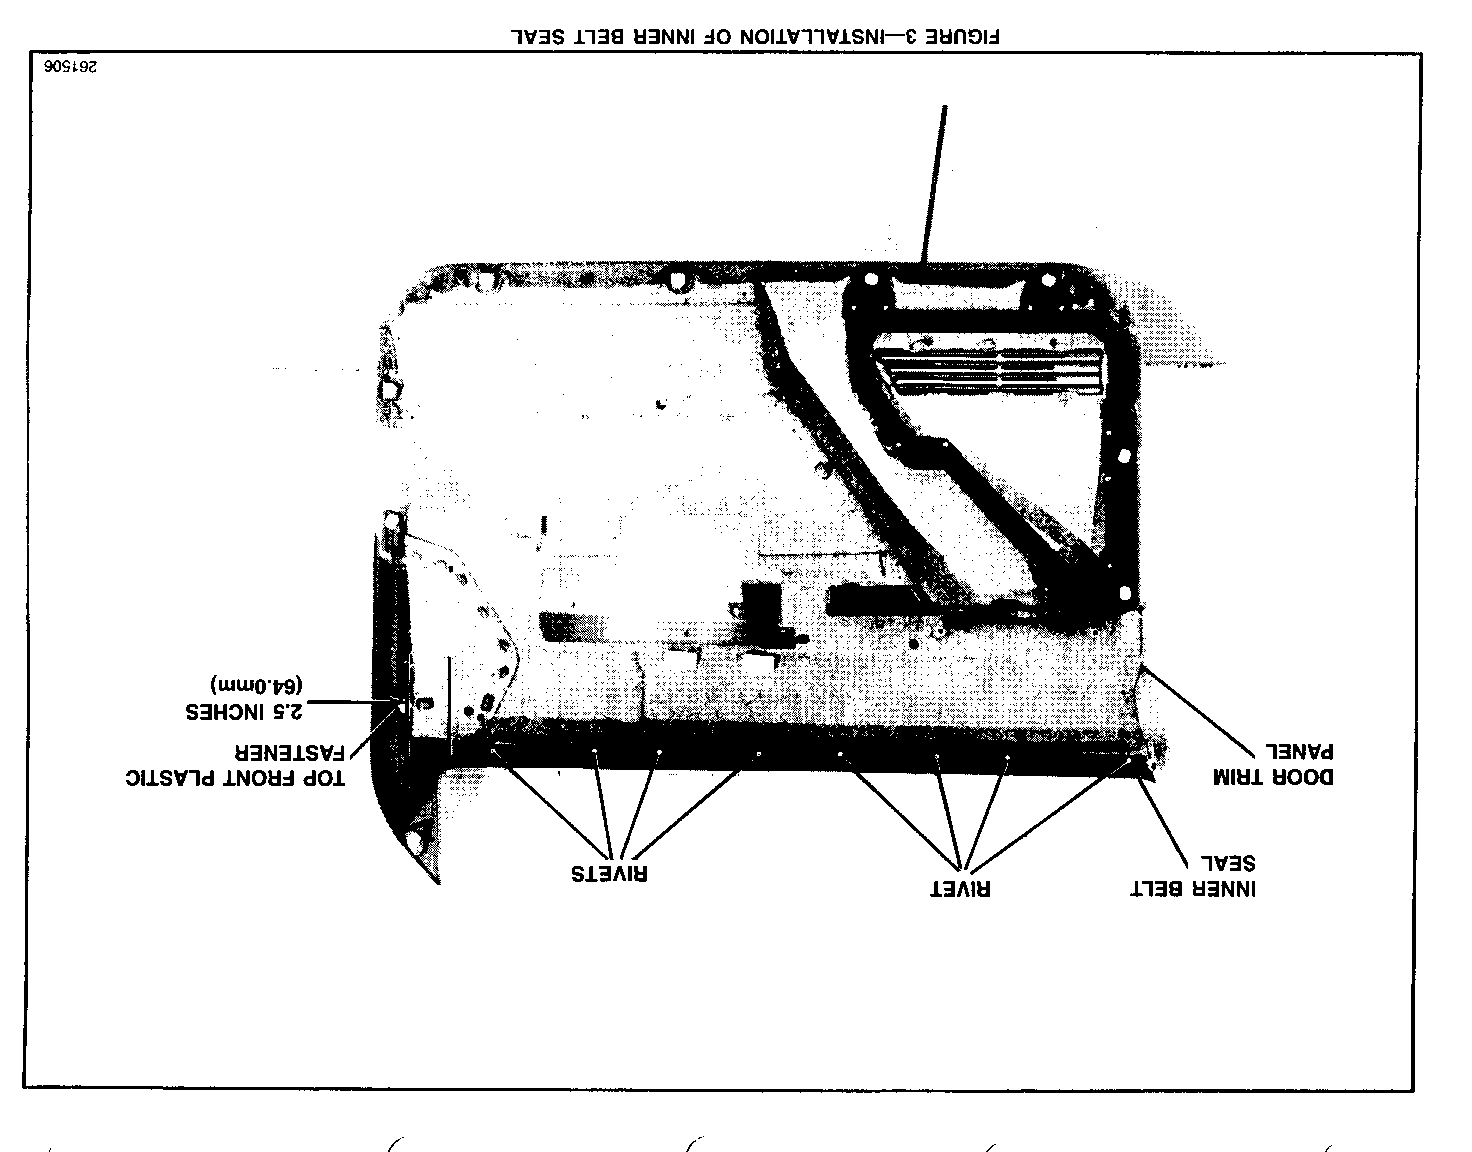
8. Position the redesigned inner belt seal (P/N 15690807) with the extended lips 2.5 inches (64.Omm) behind the top-front plastic fastener on the door trim panel (Figure 3).
9. Use four "C" clamps to hold the inner belt seal in place.
10. Drill a 1/8 inch hole for each location where a staple was removed.
11. Install eight aluminum pop rivets (1 /8 X 1/4 button head) obtained locally to the pre-drilled holes.
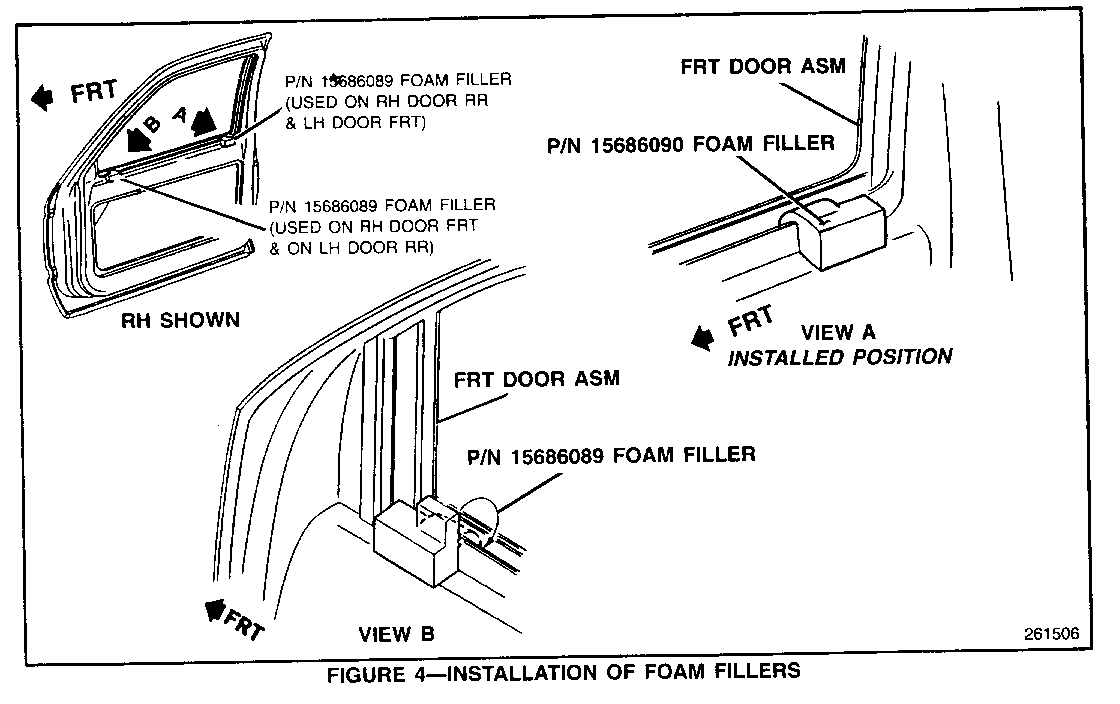
12. Install the foam fillers (P/N 15686089 (Front on RH or Rear on LH) and 15686090 (Rear on RH or Front on LH) to the front and the back of the glass area on the door panel with the small tail folded in between the inner and the outer door panel (Figure 4).
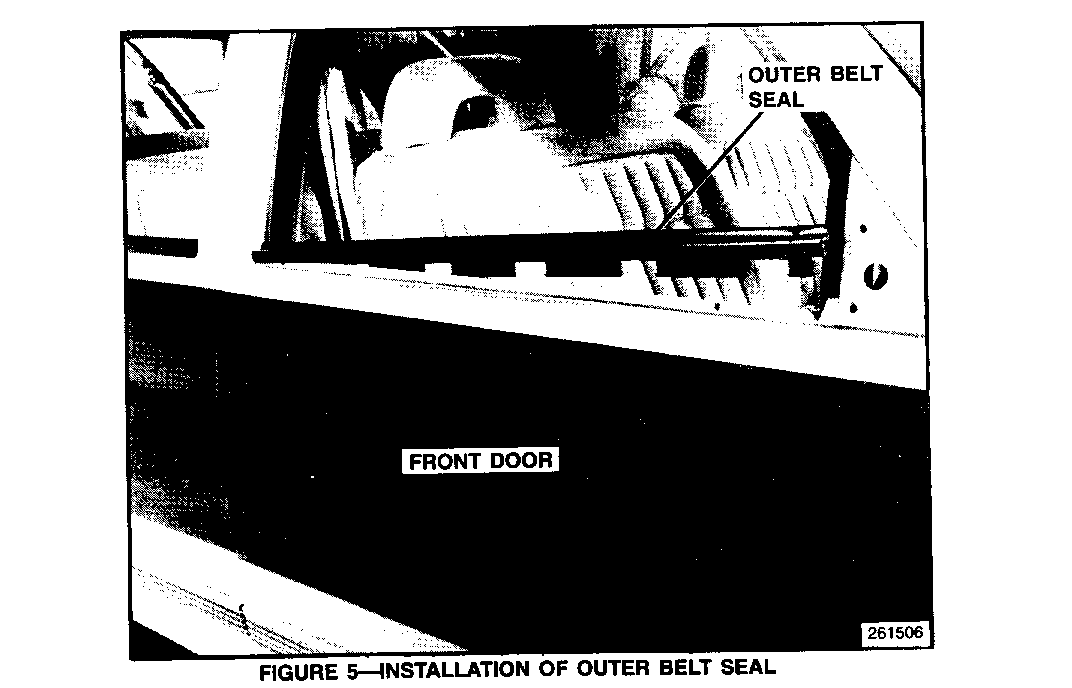
13. For C/K Pickups and Utilities, remove the front door outer belt seal by prying the clips from the door frame.
14. For C/K Suburbans and Crew Cabs, remove the front and rear door outer belt seals by prying the clips from the door frame.
15. Install a redesigned front door outer belt seal (P/N 15697276 (LH) or 15697277 (RH)) by sliding the back' end of the seal on an angle towards the back corner of the door glass and then securing the seal into place (Figure 5).
For C/K Suburbans and Crew Cabs, install the redesigned rear door outer belt seal (P/N 15697008) by securing the outer belt seal to the outer door panel.
Note: For C/K Suburbans and Crew Cabs: If a redesigned outer belt seal is installed on the front door, a new seal must also be installed on the rear door since there is a slight appearance change between the old and the new parts.
16. Install the door trim panel (refer to the appropriate Service Manual section 1OA1 "Door Trim Panel Replacement" for installation instructions.
A-PILLAR SEALING:
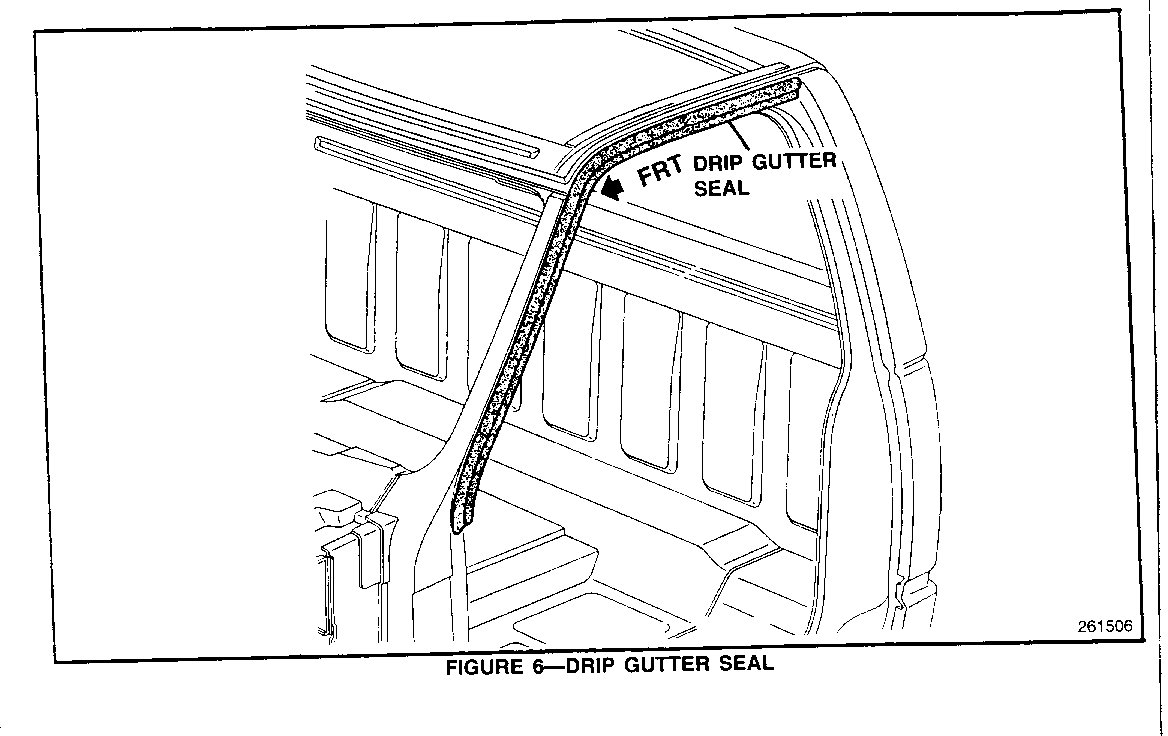
1. Remove the drip gutter seal (secondary door weatherstrip) by pulling the weatherstrip from its flange (Figure 6).
2. Install a redesigned drip gutter seal (For C/K pickups and C/K utilities: P/N 15694749 (LH) or 15694750 (RH) and for C/K Suburbans and Crew Cabs P/N 15959423 (LH) or 15959422 (RH).
SERVICE PARTS INFORMATION:
PART NUMBER DESCRIPTION QTY/VEH ----------- ----------- ------- 15682331 Mirror Insulator (LH) 1 15682332 Mirror Insulator (RH) 1 15697341 Mirror Gasket (RH) 1 15697342 Mirror Gasket (LH) 1 15690807 Seal Asm. - Front Door Inner Belt (LH & RH) 1 15686089 Foam Filler - Door Trim Panel (Rear/LH or Front/RH) 1 15686090 Foam Filler - Door Trim Panel (Front/LH or Rear/RH) 1 15697276 Seal Asm. - Front Door Outer Belt (RH) 1 15697277 Seal Asm. - Front Door Outer Belt (LH) 1 15697008 Seal Asm. - Rear Door Outer Belt (LH & RH) 1 15694749 Weatherstrip - Front, Drip Gutter (LH) 1 15694750 Weatherstrip - Front, Drip Gutter (RH) 1
For C/K Suburbans and C/K Crew Cabs:
15959423 Weatherstrip - Front, Drip Gutter (LH) 1 15959422 Weatherstrip - Front, Drip Gutter (RH) 1
WARRANTY INFORMATION:
For vehicles repaired under warranty use:
DESCRIPTION LABOUR TIME ----------- ----------- Front Door, Align (RH) 0.3 hrs. Front Door, Align (LH) 0.3 hrs. Door Glass Sealing 0.6 hrs
Add: 0. 1 hrs for A pillar sealing
General Motors bulletins are intended for use by professional technicians, not a "do-it-yourselfer". They are written to inform those technicians of conditions that may occur on some vehicles, or to provide information that could assist in the proper service of a vehicle. Properly trained technicians have the equipment, tools, safety instructions and know-how to do a job properly and safely. If a condition is described, do not assume that the bulletin applies to your vehicle, or that your vehicle will have that condition. See a General Motors dealer servicing your brand of General Motors vehicle for information on whether your vehicle may benefit from the information.
