Engine Replacement 4.8L, 5.3L, and 6.0L Engines
Tools Required
Removal Procedure
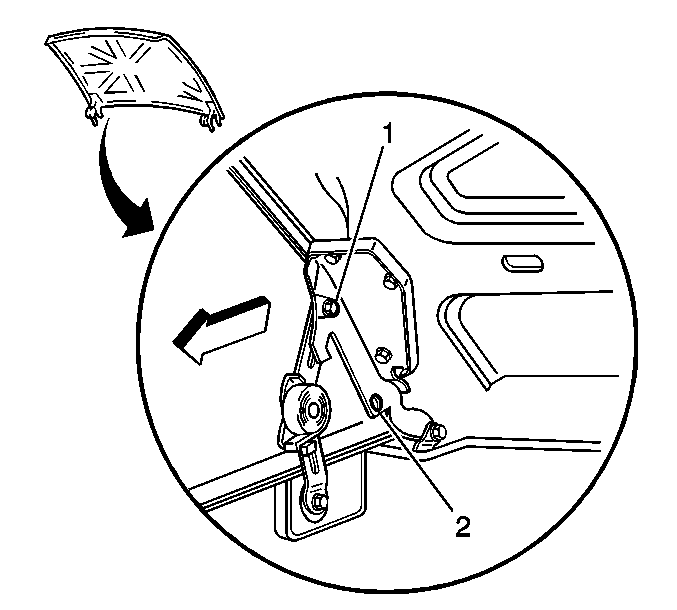
- Open the hood.
- Place the fender covers over both fenders.
- Raise the hood to the service position and perform the following:
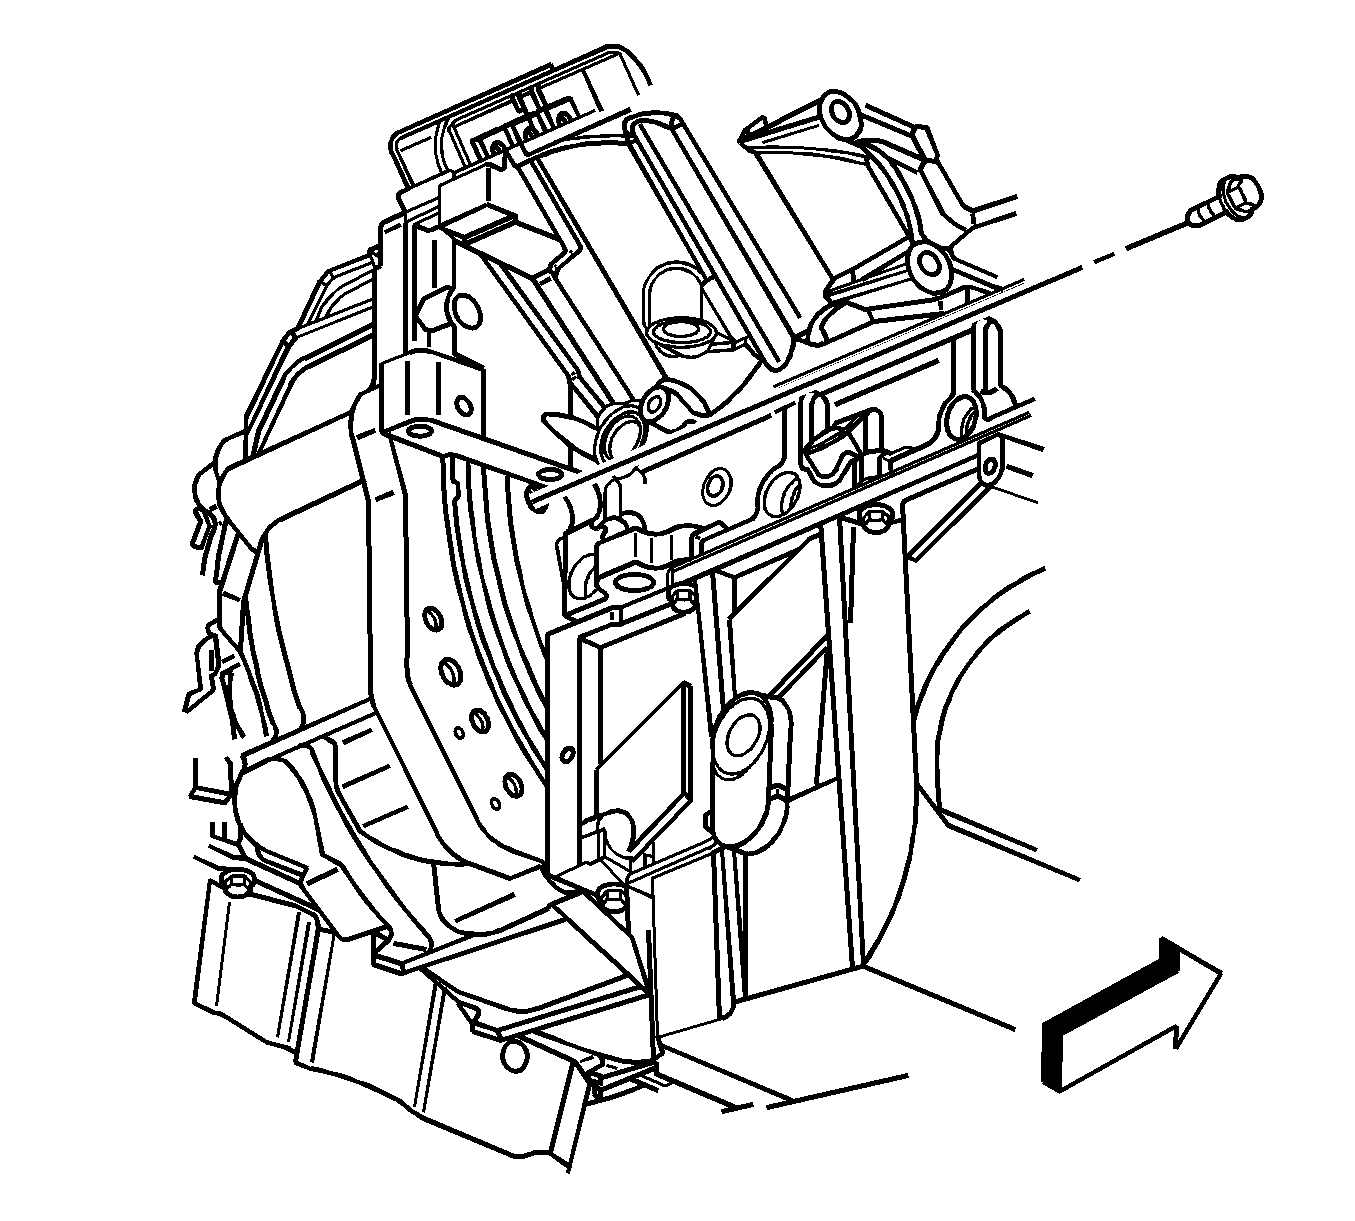
| 3.1. | Remove the hood hinge bolts (1). |
| 3.2. | Raise the hood until vertical. |
| 3.3. | Install the hood hinge bolts until snug in the service position (2). |
- Remove the air conditioning (A/C) compressor. Refer to
Air Conditioning Compressor Replacement
.
- Remove the radiator support. Refer to
Radiator Support Replacement
.
- Remove the engine sight shield. Refer to
Upper Intake Manifold Sight Shield Replacement
.
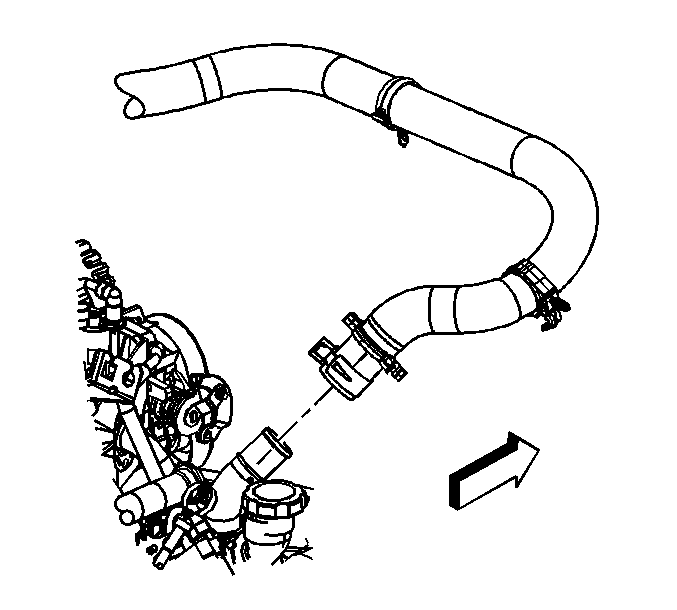
- Open the hose clamp and remove the radiator inlet hose from the water pump.
- Open the hose clamp and remove the radiator outlet hose from the water pump.
- Remove the heater hoses. Refer to
Heater Inlet Hose Replacement
and
Heater Outlet Hose Replacement
.
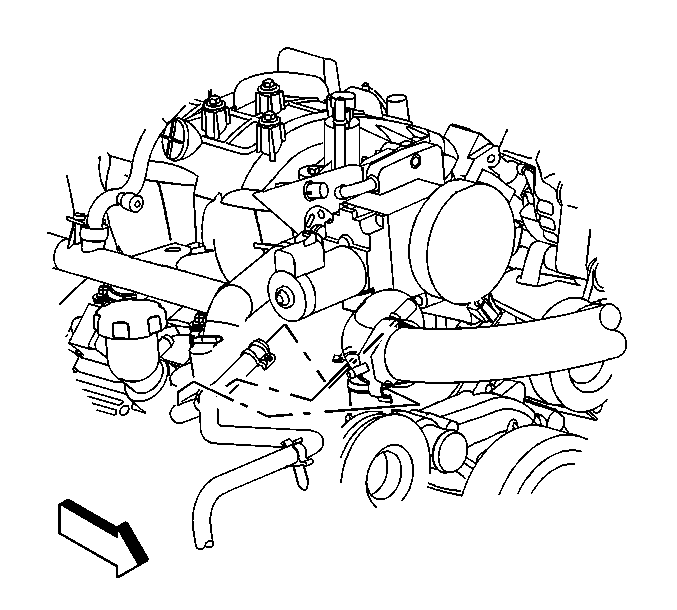
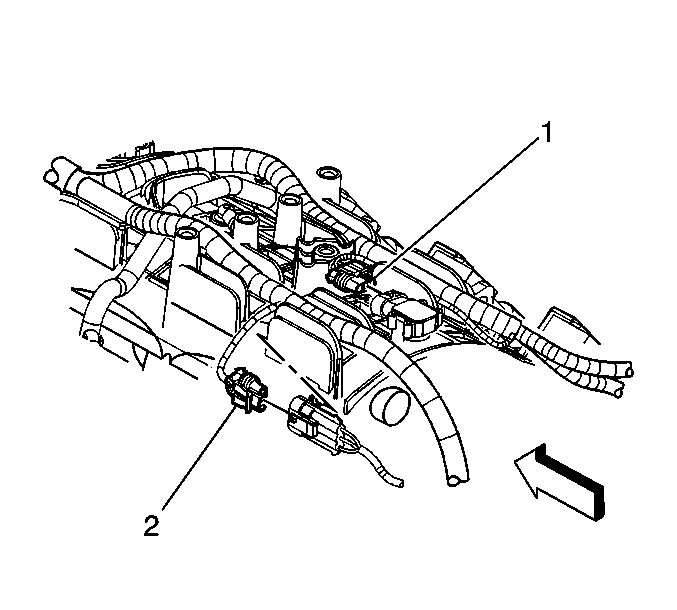
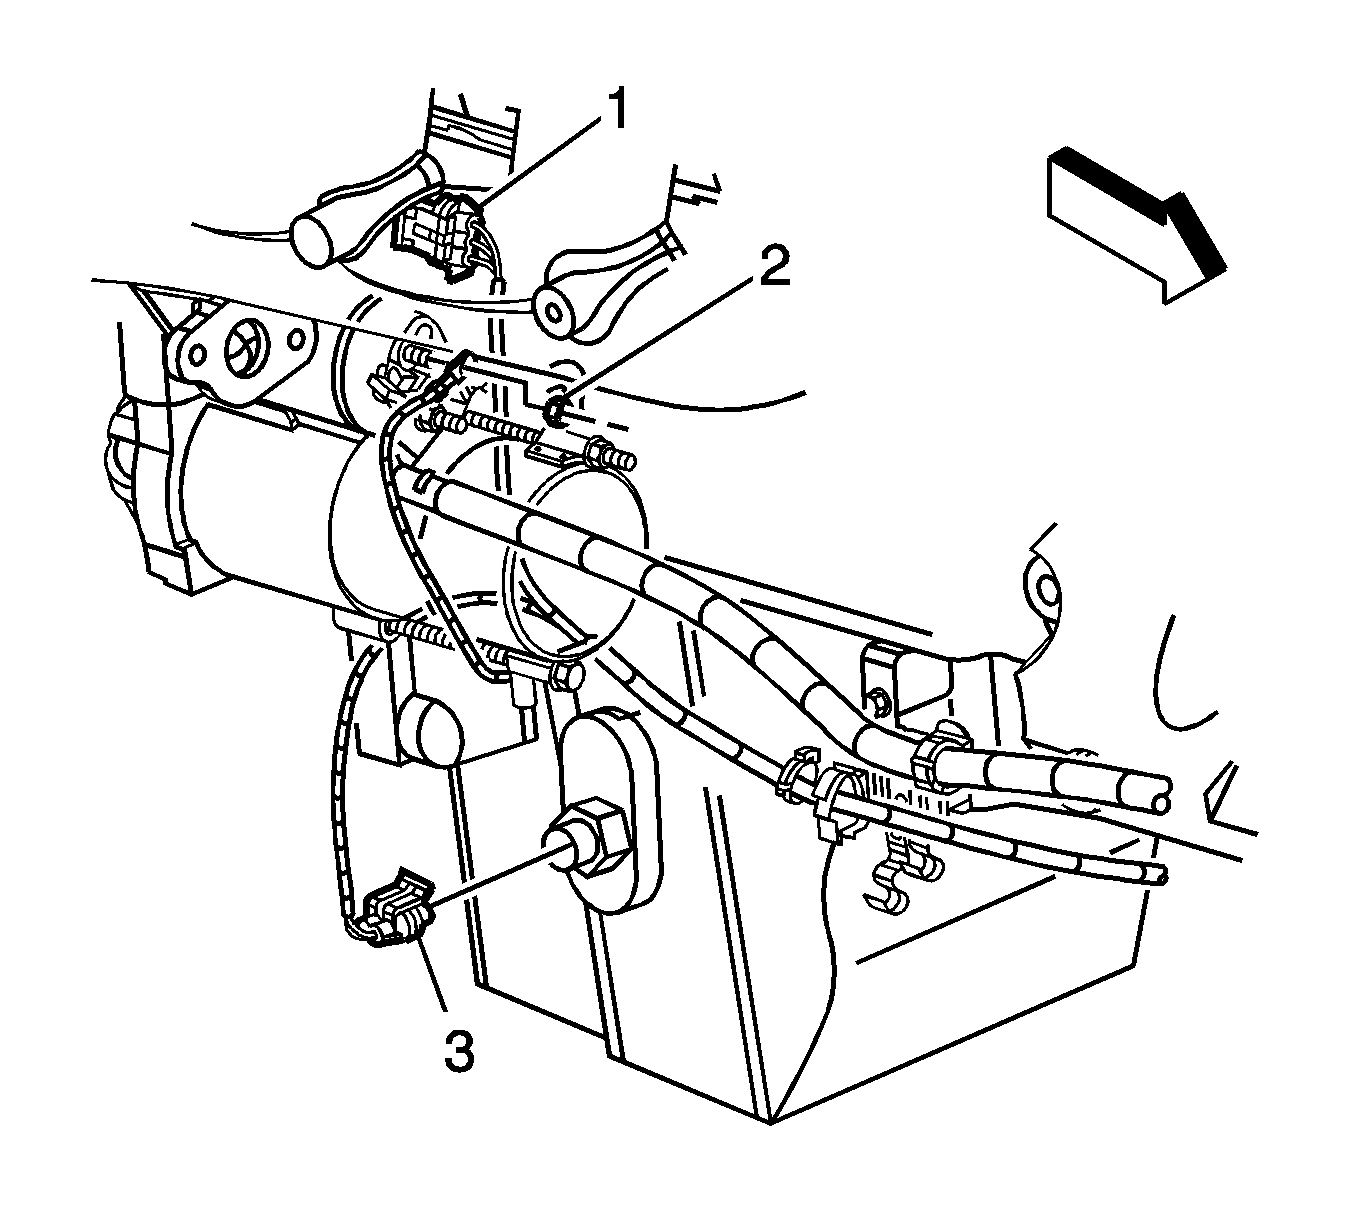
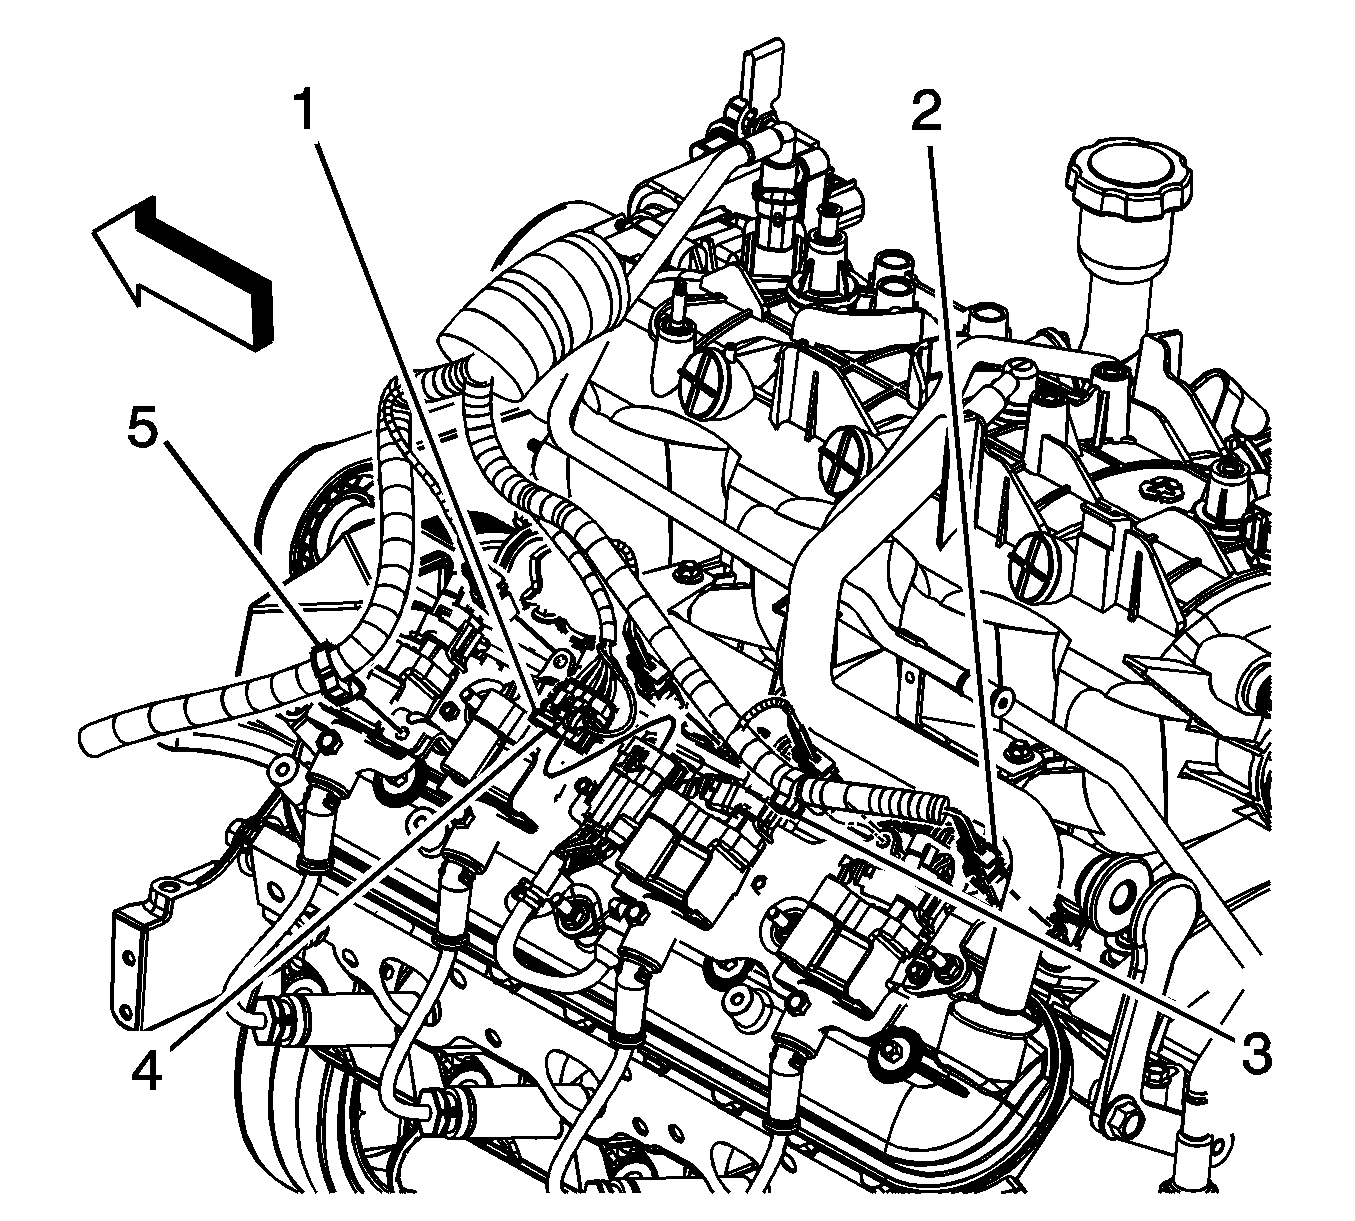
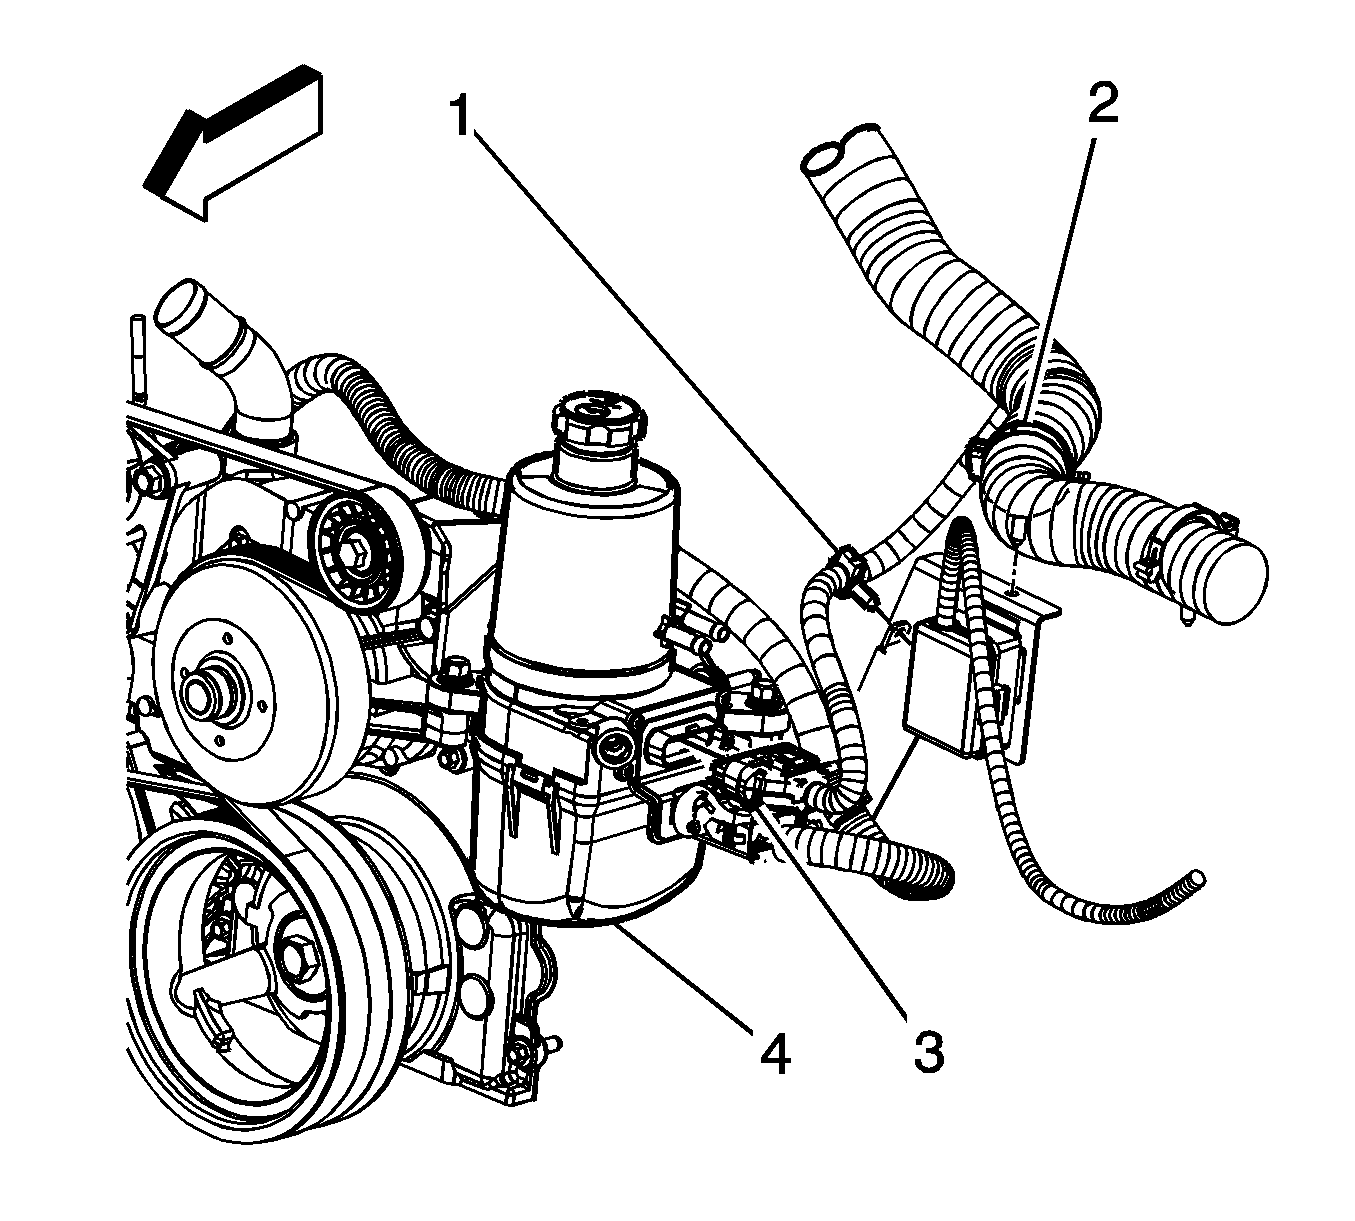
- Disconnect the following electrical connectors:
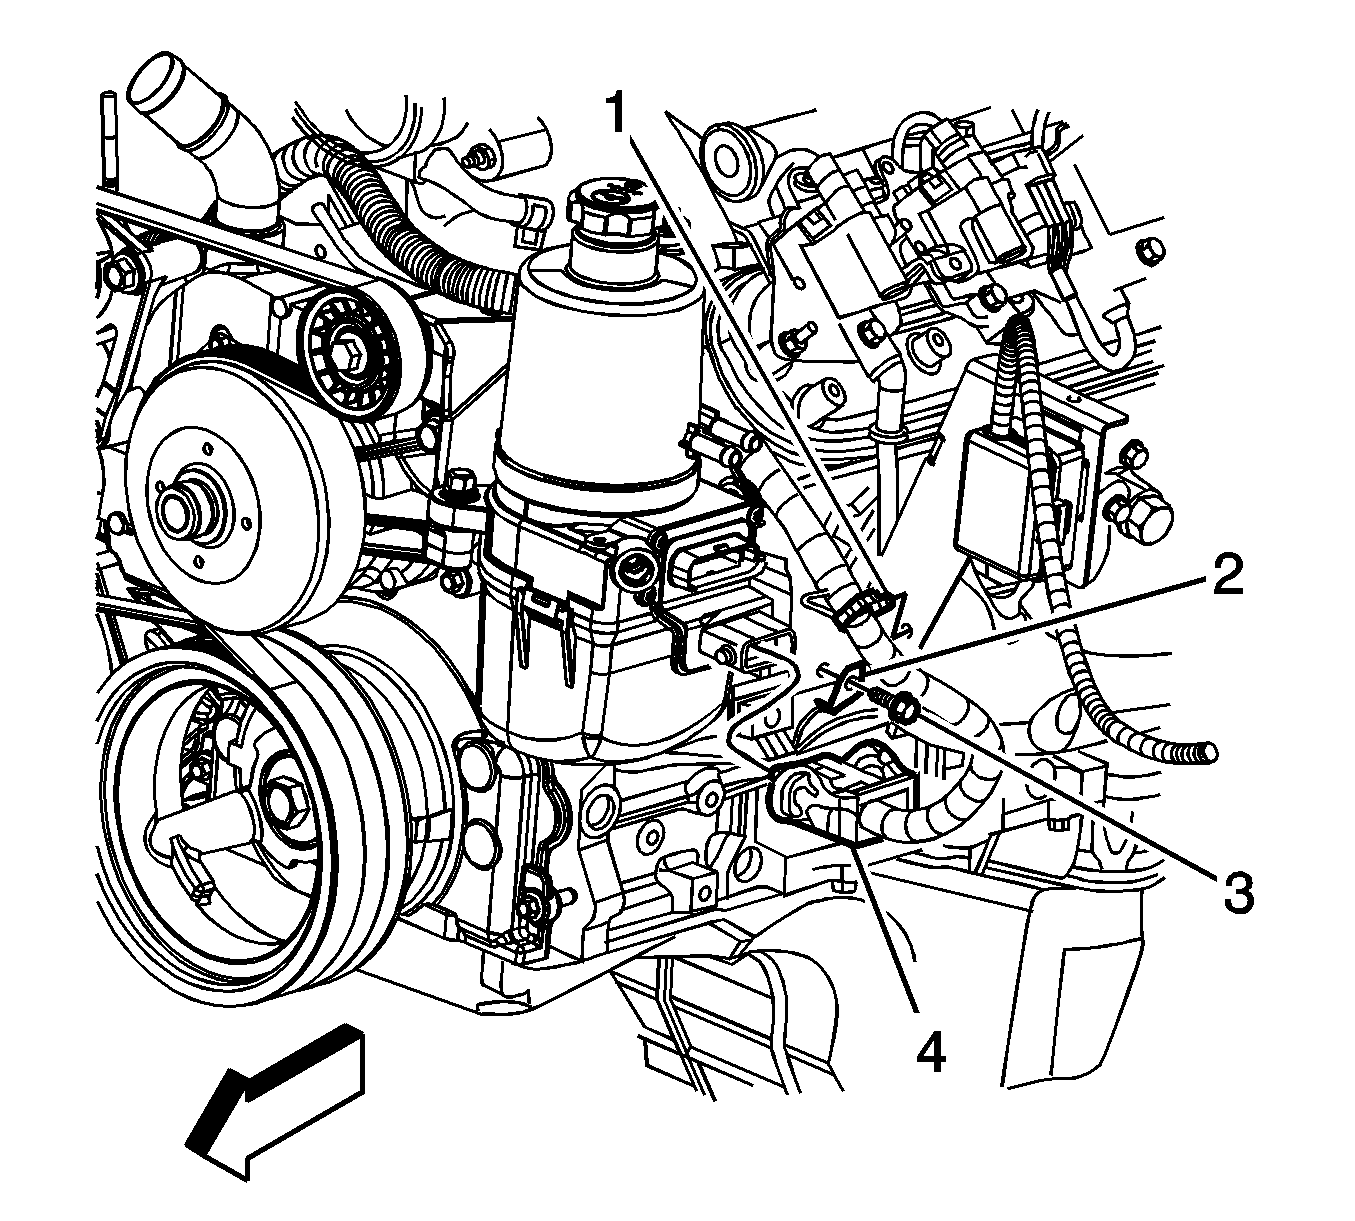
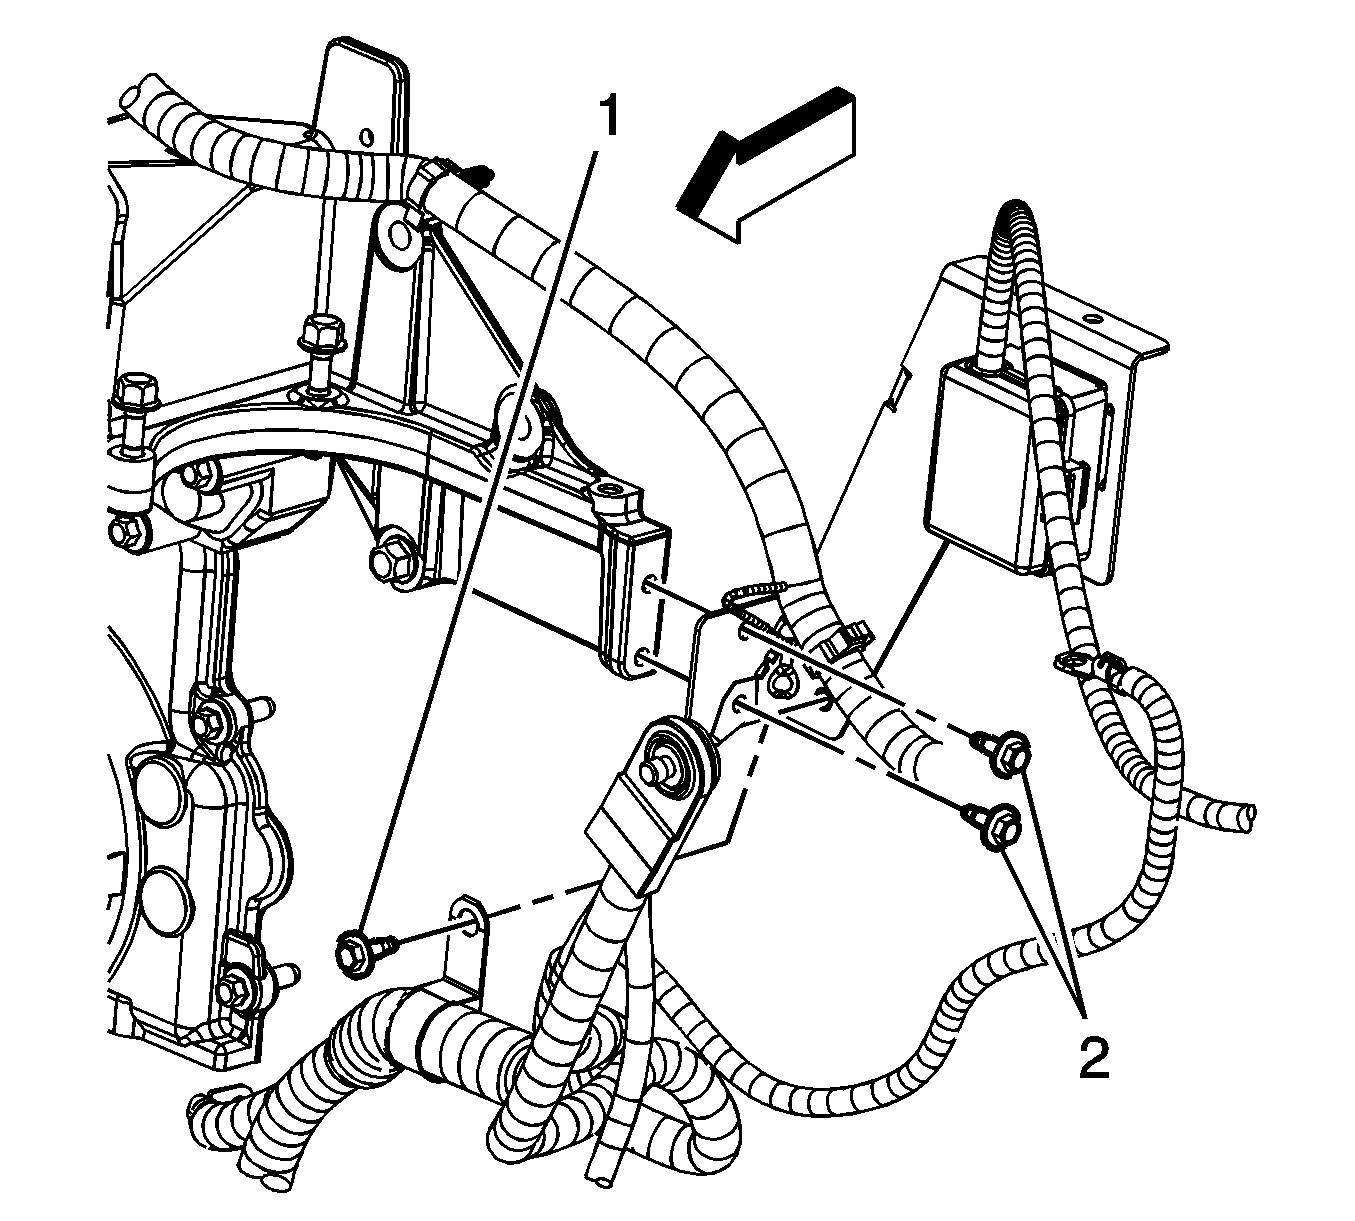
| • | The evaporative emission (EVAP) canister purge solenoid (1) |
- Remove the harness bracket nut (2) in order to remove the engine harness from the intake manifold.
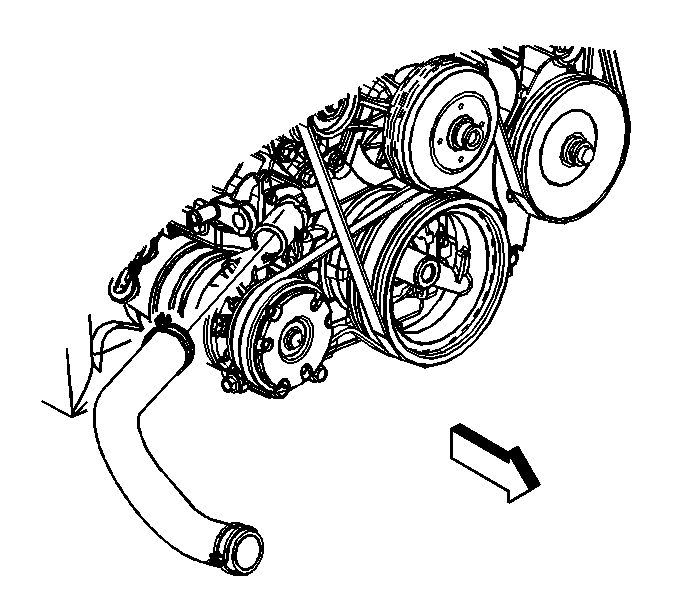
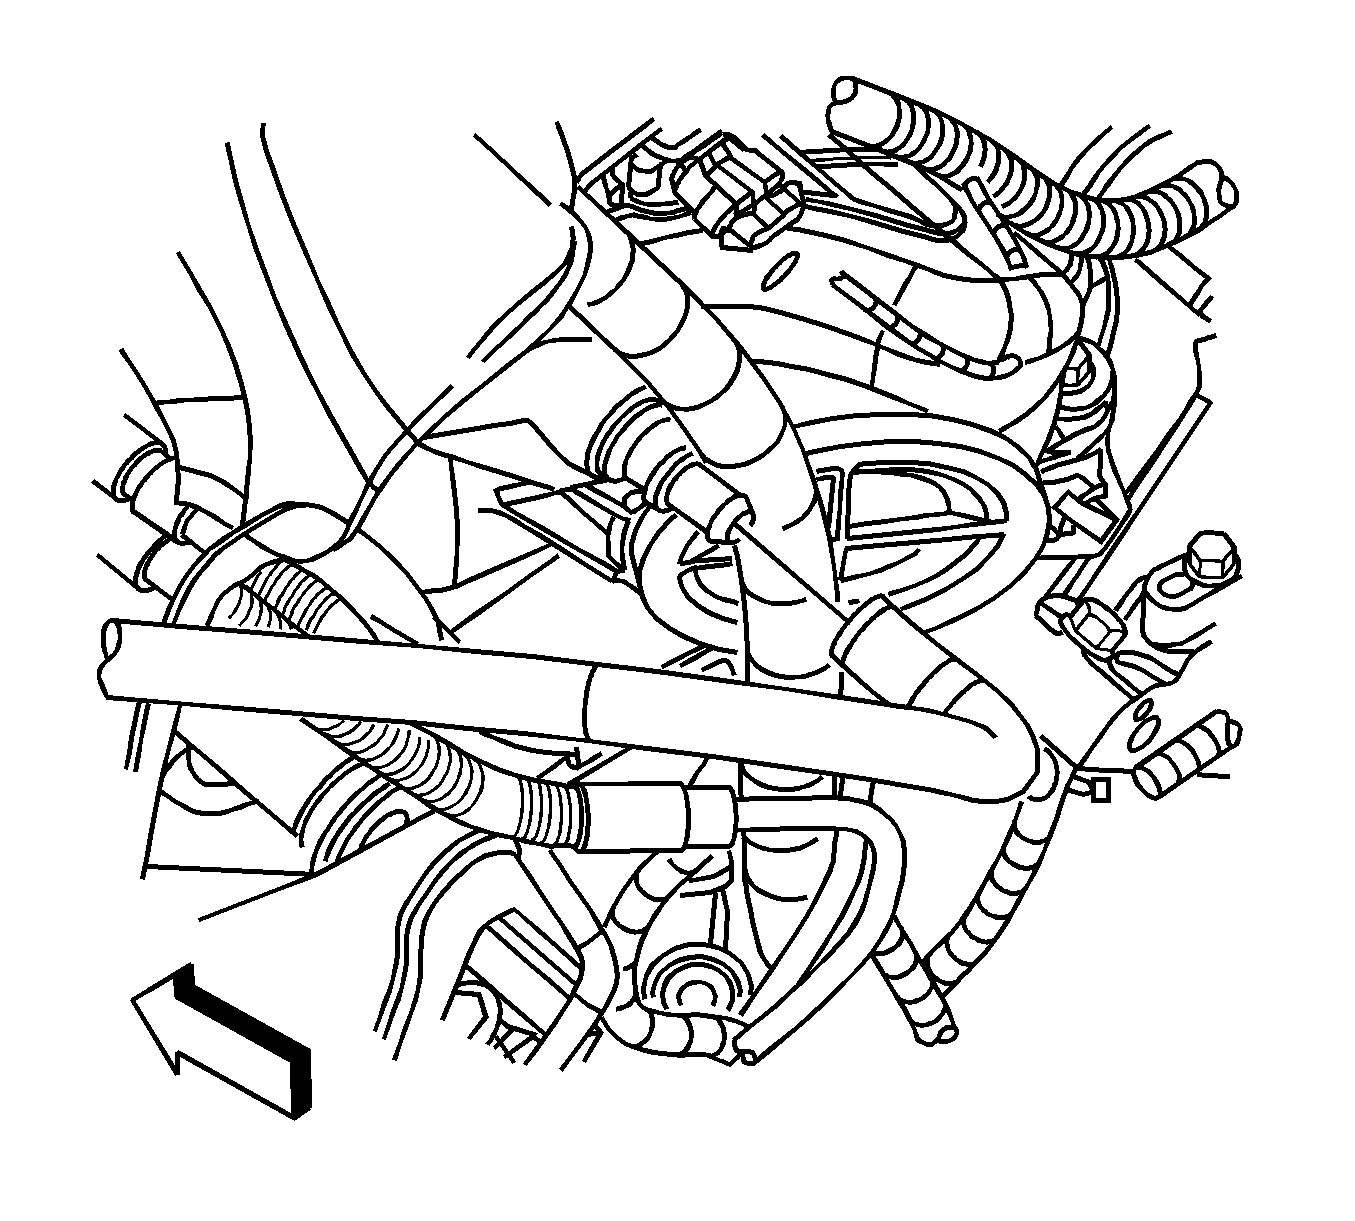
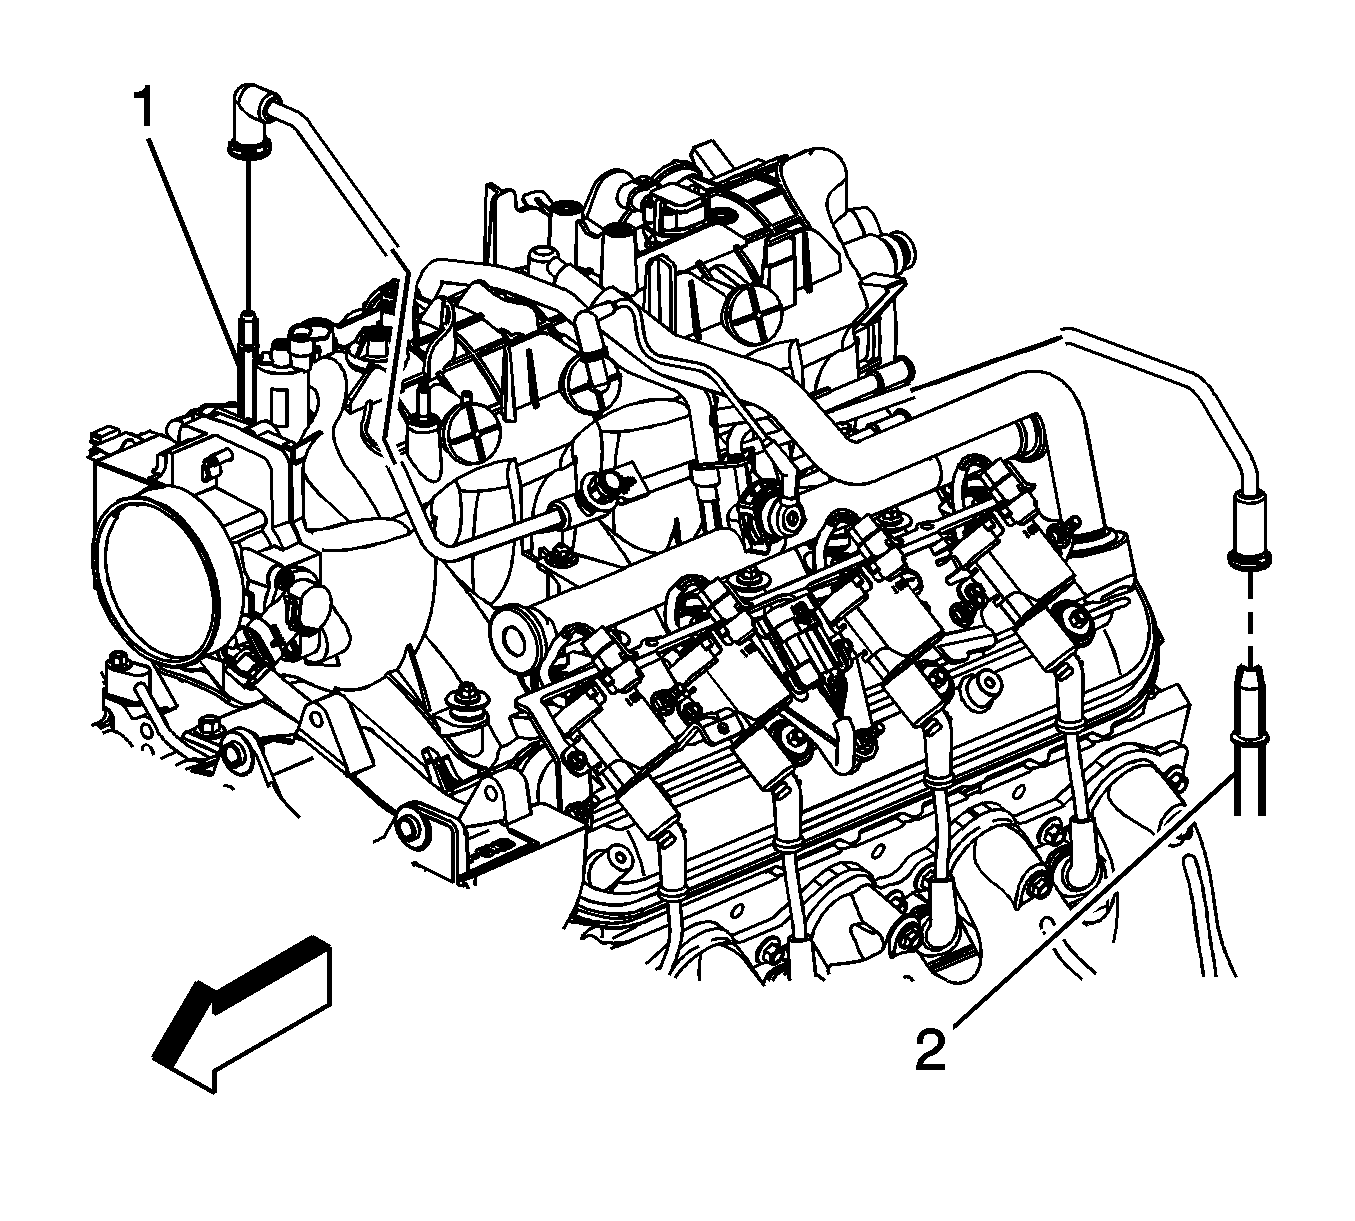
- Reposition the vent inlet hose clamp at the throttle body.
- Remove the radiator vent inlet hose from the throttle body.
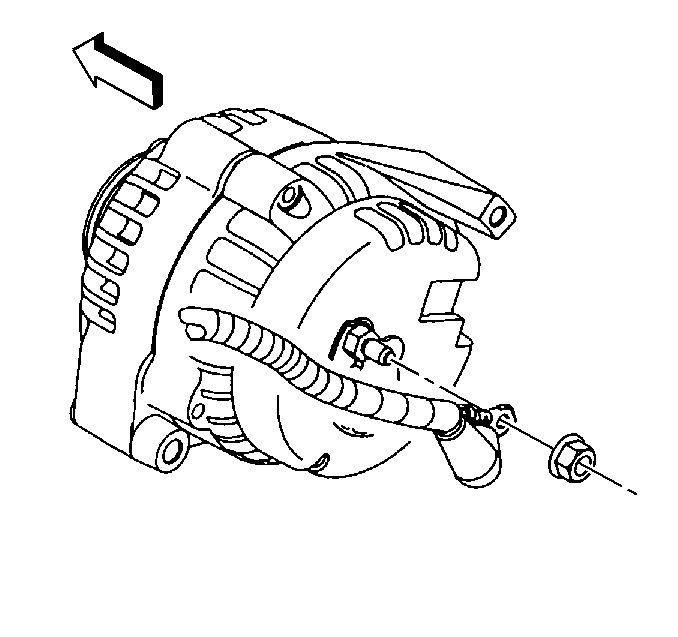
- Remove the generator cable from the generator and perform the following procedure:
| 14.1. | Slide the boot down revealing the terminal stud. |
| 14.2. | Remove the generator cable nut from the terminal stud. |
| 14.3. | Remove the generator cable. |
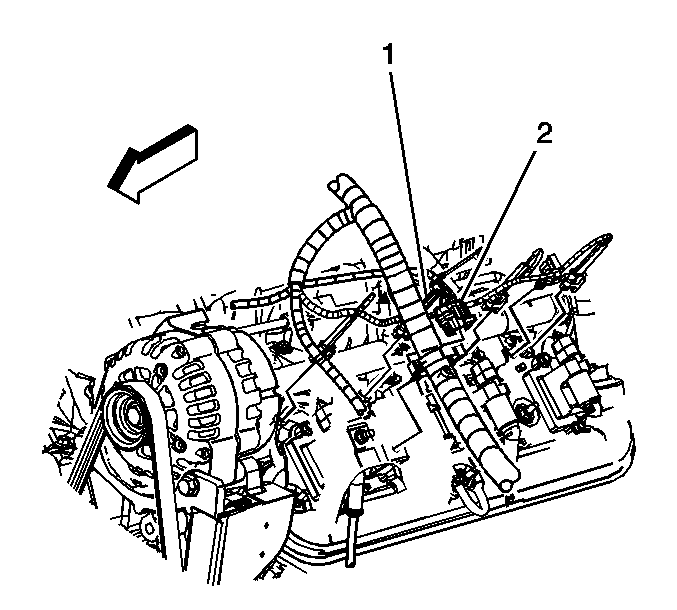
- Disconnect the main coil harness (2) and fuel injector electrical connectors on the left side.
- Disconnect the following electrical connectors:
| • | The main coil harness (4) |
| • | The electronic throttle control (ETC) (2) |
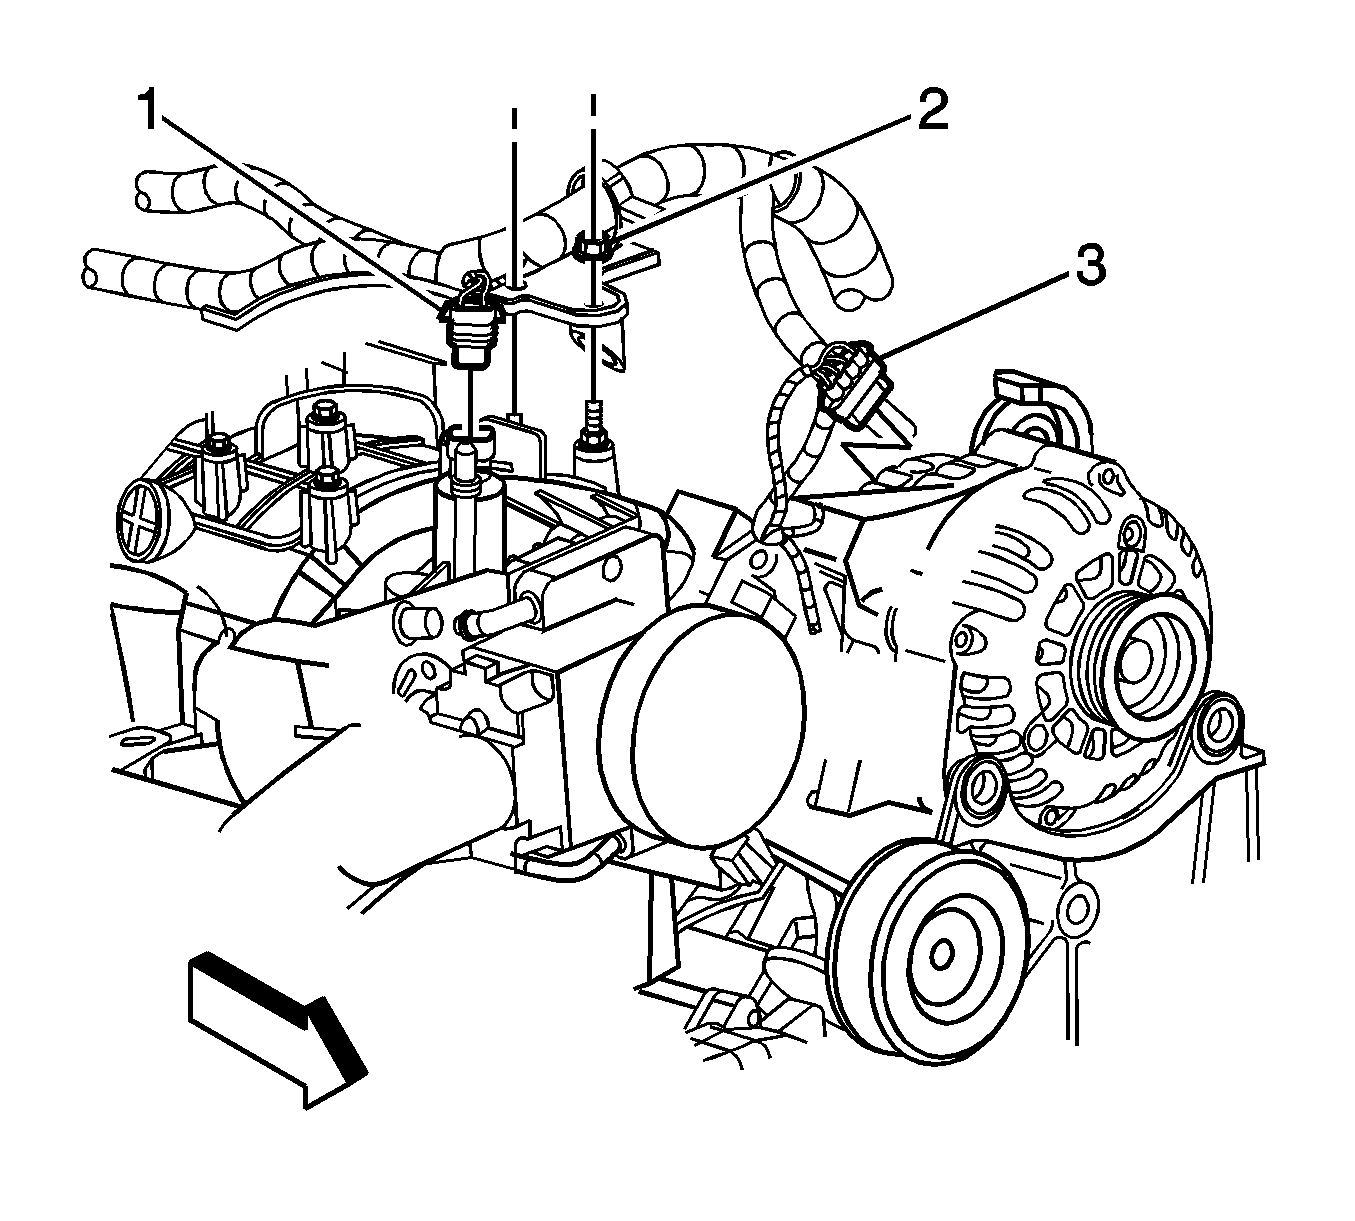
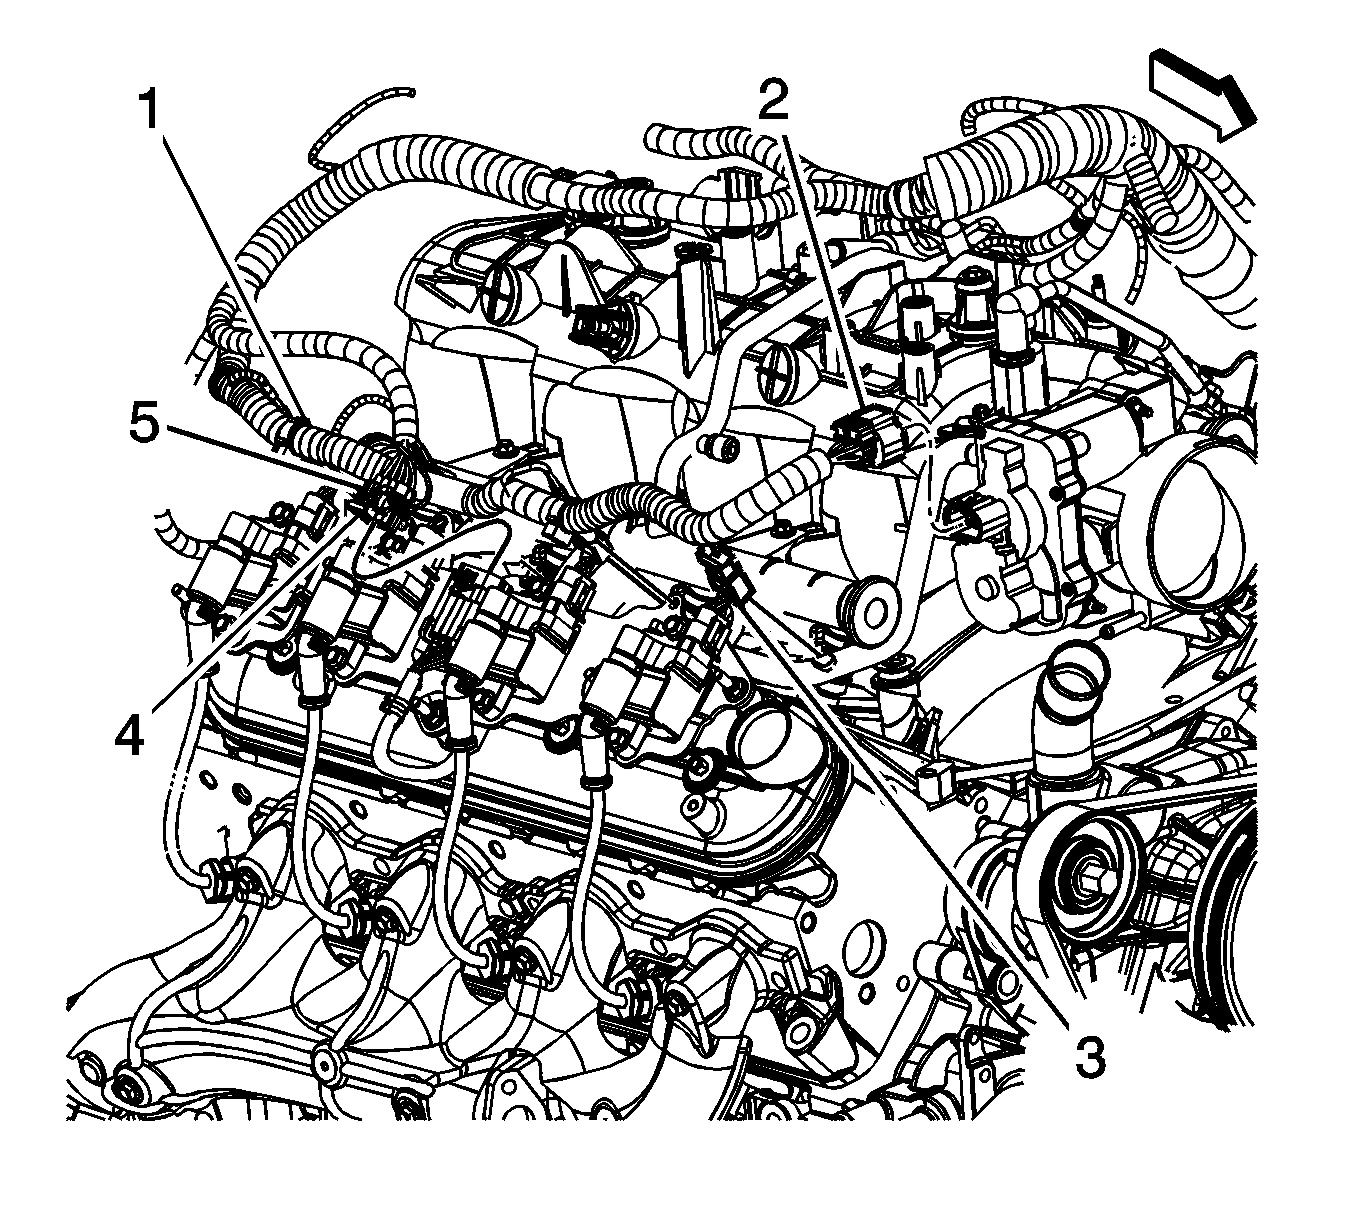
- Disconnect the manifold absolute pressure (MAP) sensor (1) and knock sensor (2) electrical
connectors.
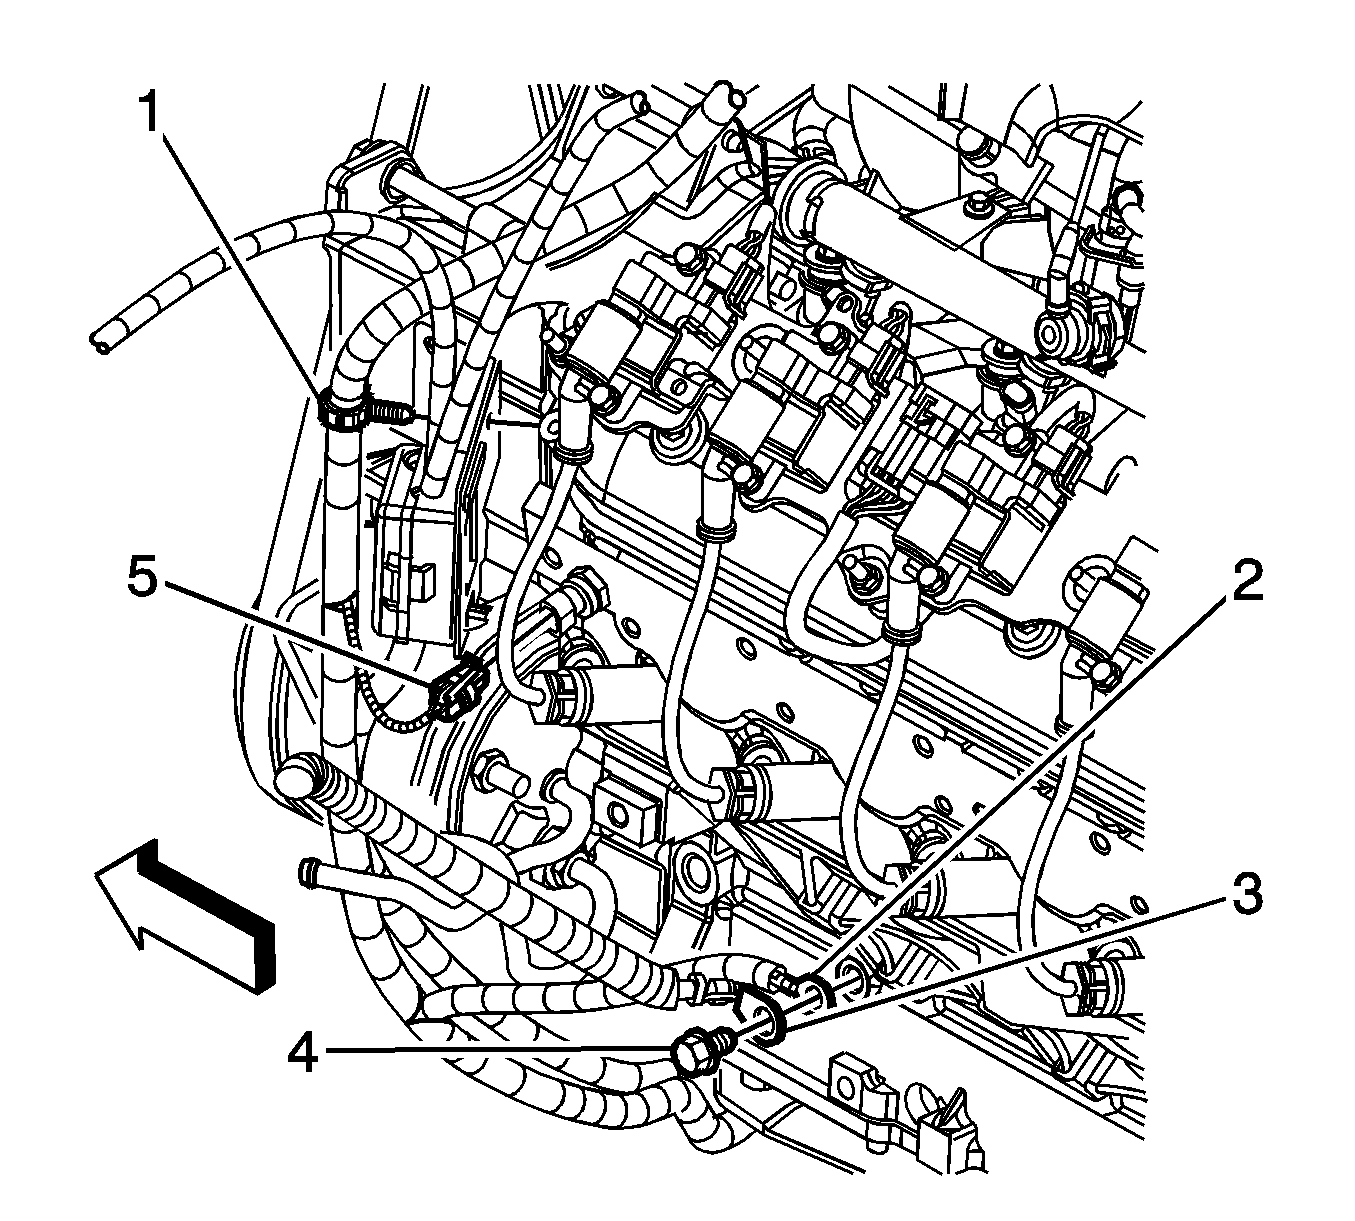
- Remove the harness ground bolt.
- Reposition the harness ground and negative battery cable from the block.
- Disconnect the following electrical connectors:
| • | The engine coolant temperature (ECT) sensor (5) |
| • | The electronic variable orifice switch |
- Remove the harness ground bolt at the right rear of the engine block.
- Reposition the harness ground and auxiliary negative battery cable, if equipped, from the block.
- Remove the harness ground bolt at the left rear of the engine block.
- Reposition the harness ground and engine ground strap from the block.
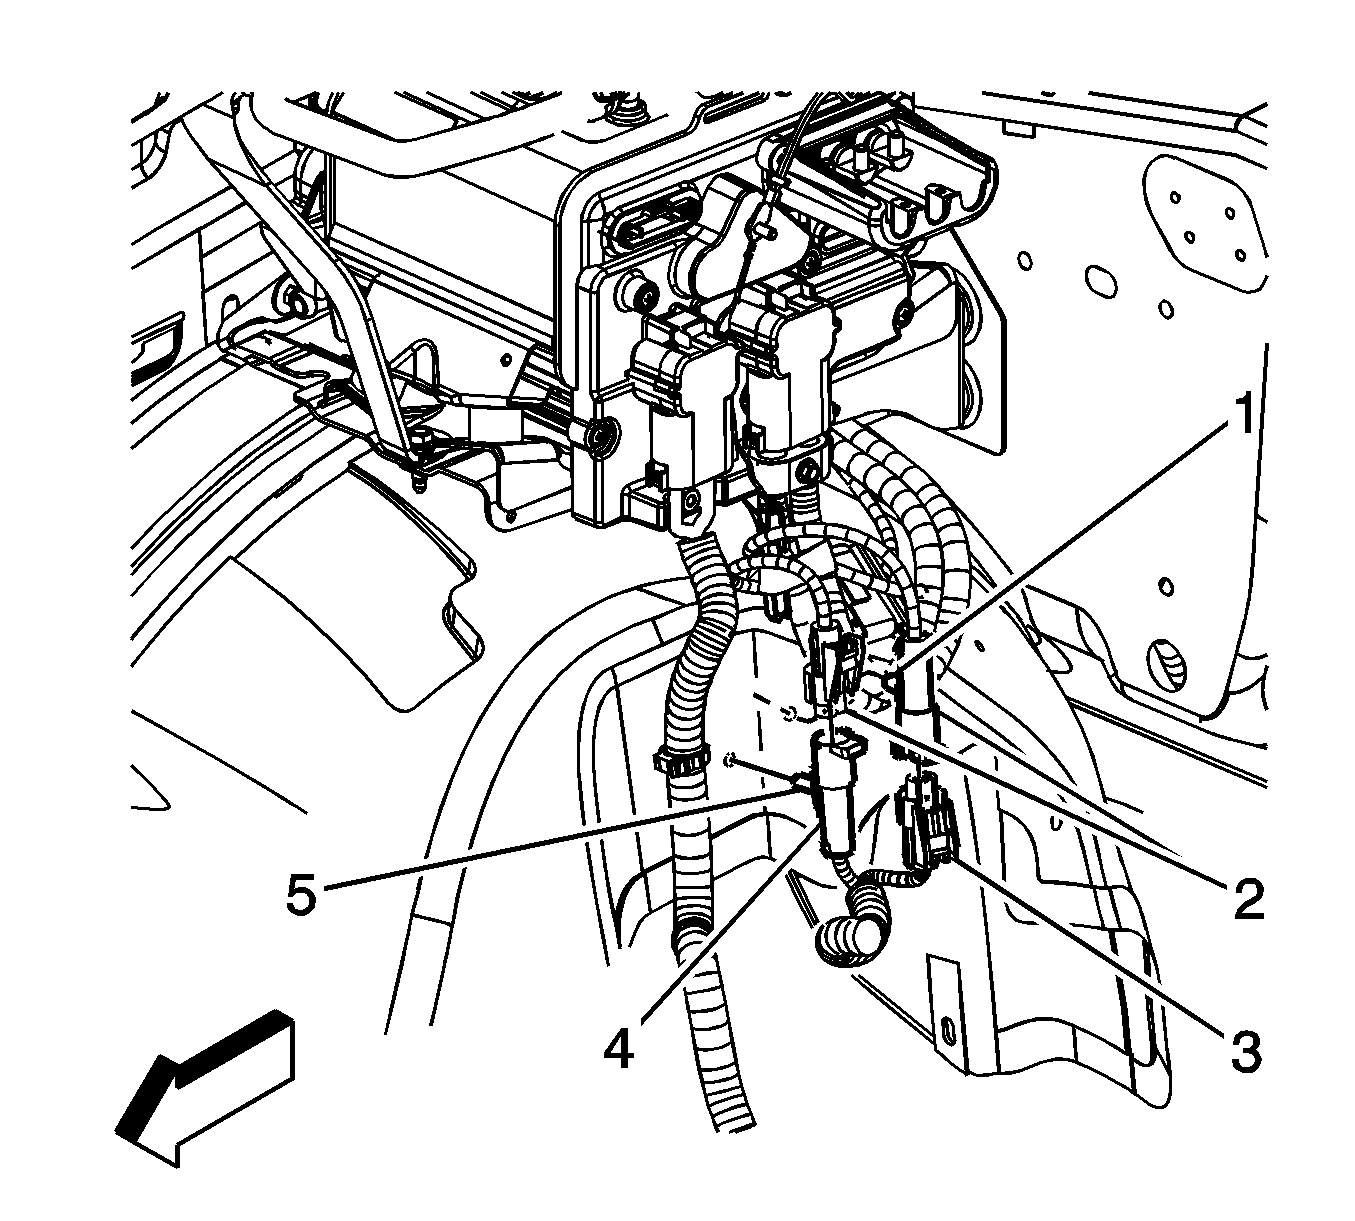
- Disconnect the following electrical connectors:
| • | The oil pressure sensor (1) |
| • | The camshaft position (CMP) sensor (3) |
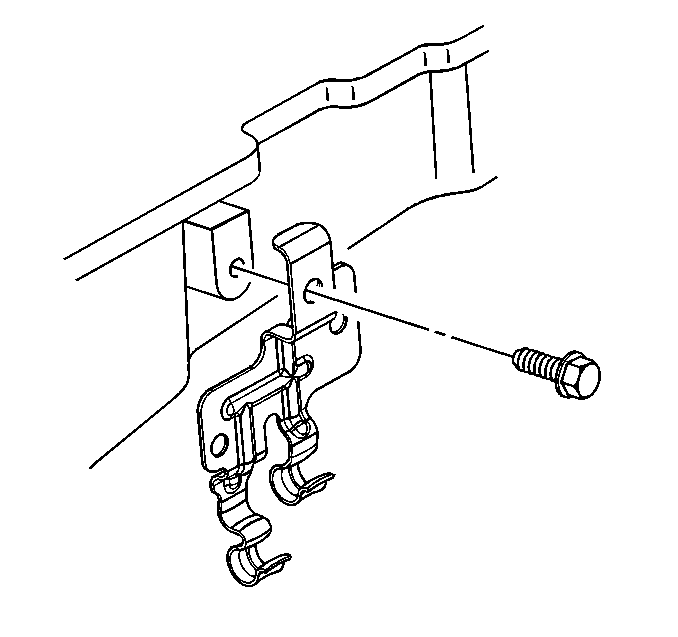
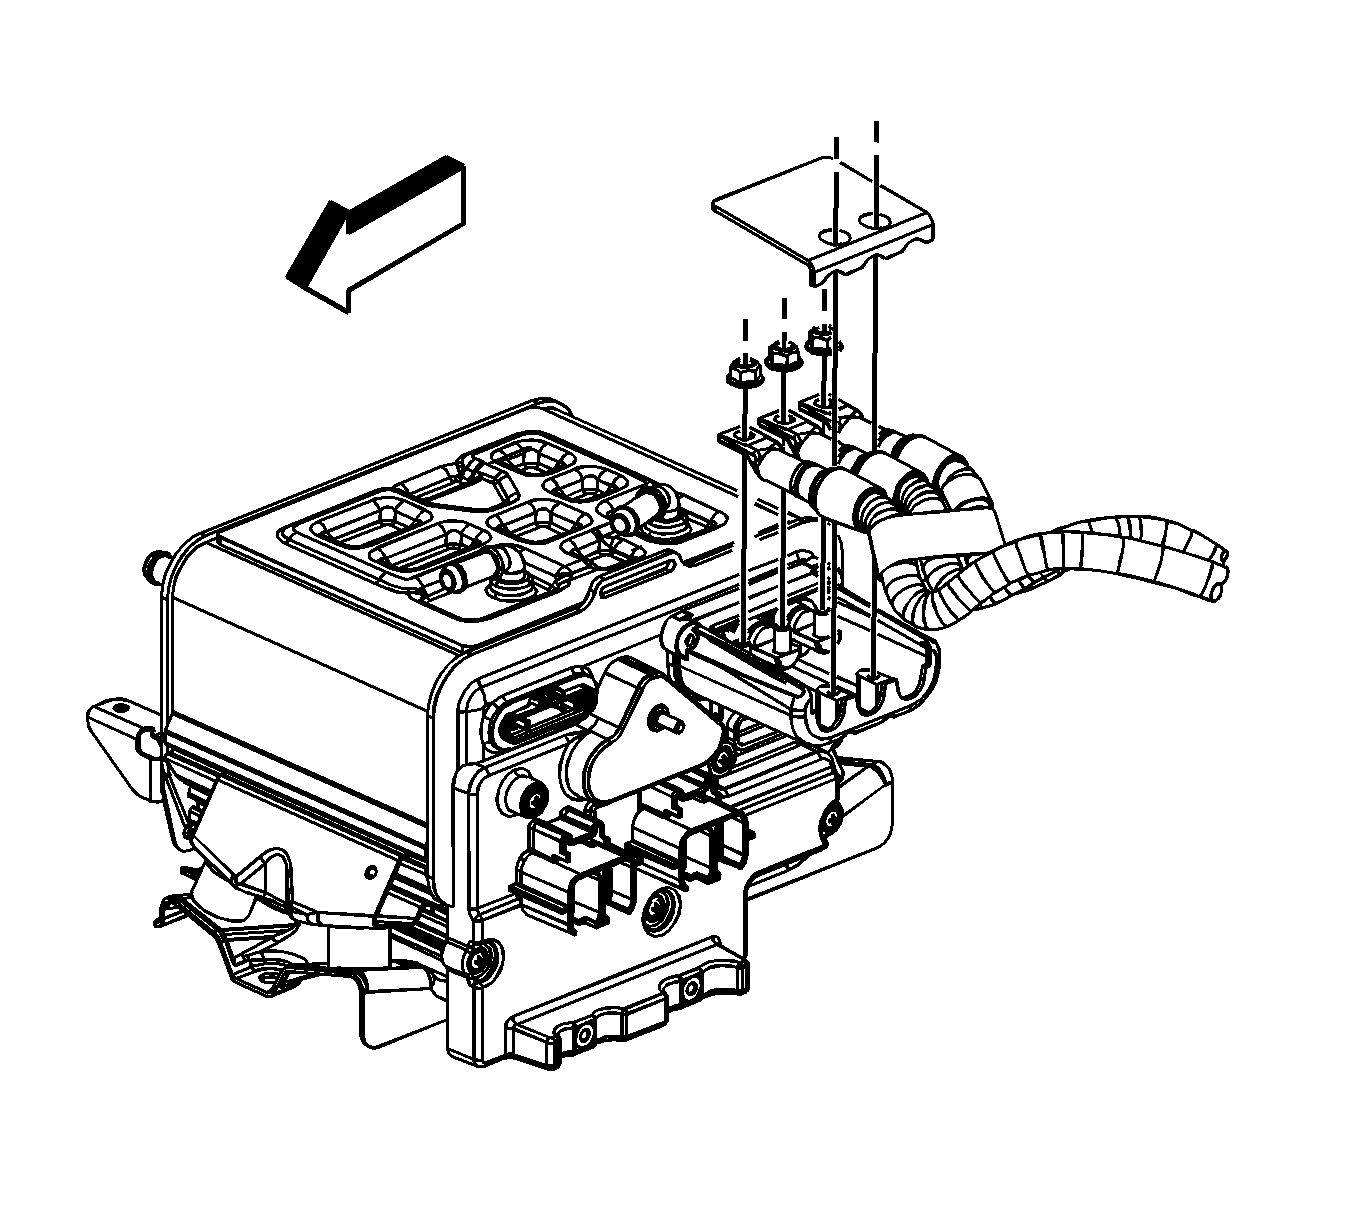
- Unclip all of the engine harness clips from the engine.
- Remove the battery cable junction block from the junction block bracket.

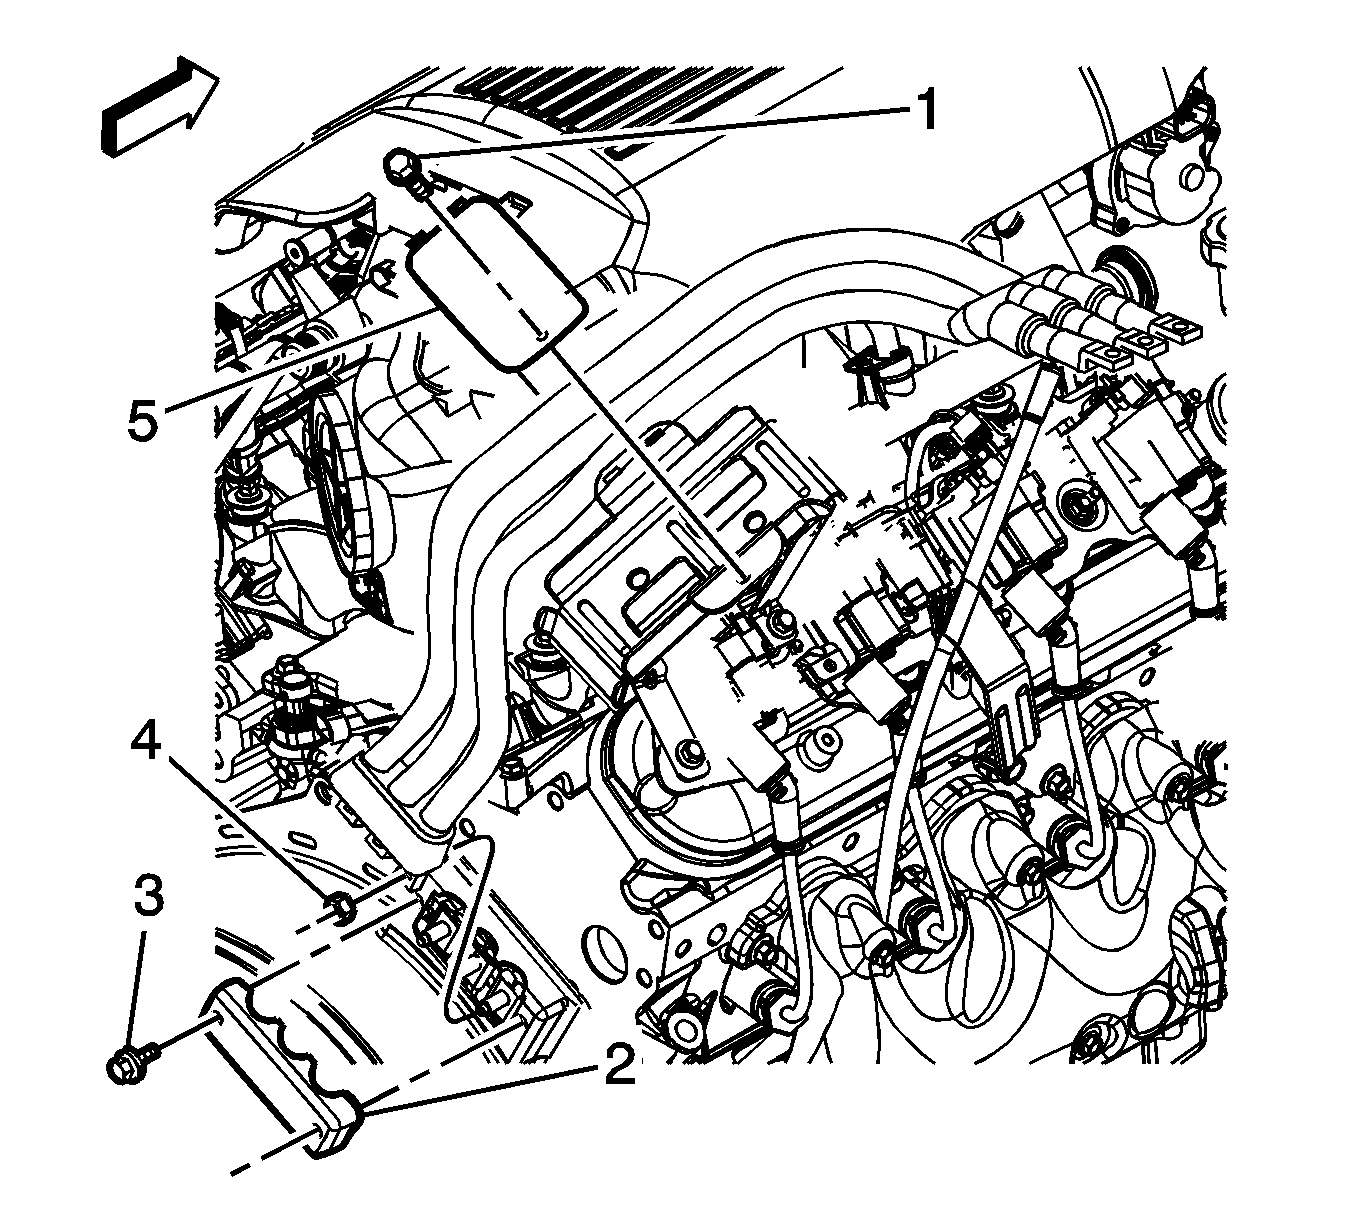
- Remove the EVAP purge solenoid vent tube. Perform the following procedure:
| 28.1. | Remove the EVAP tube end from the solenoid (1). |
| 28.2. | Remove the EVAP tube end from the vapor pipe (2). |
- Disconnect the fuel pipes. Refer to
Metal Collar Quick Connect Fitting Service
.
- Raise the vehicle.
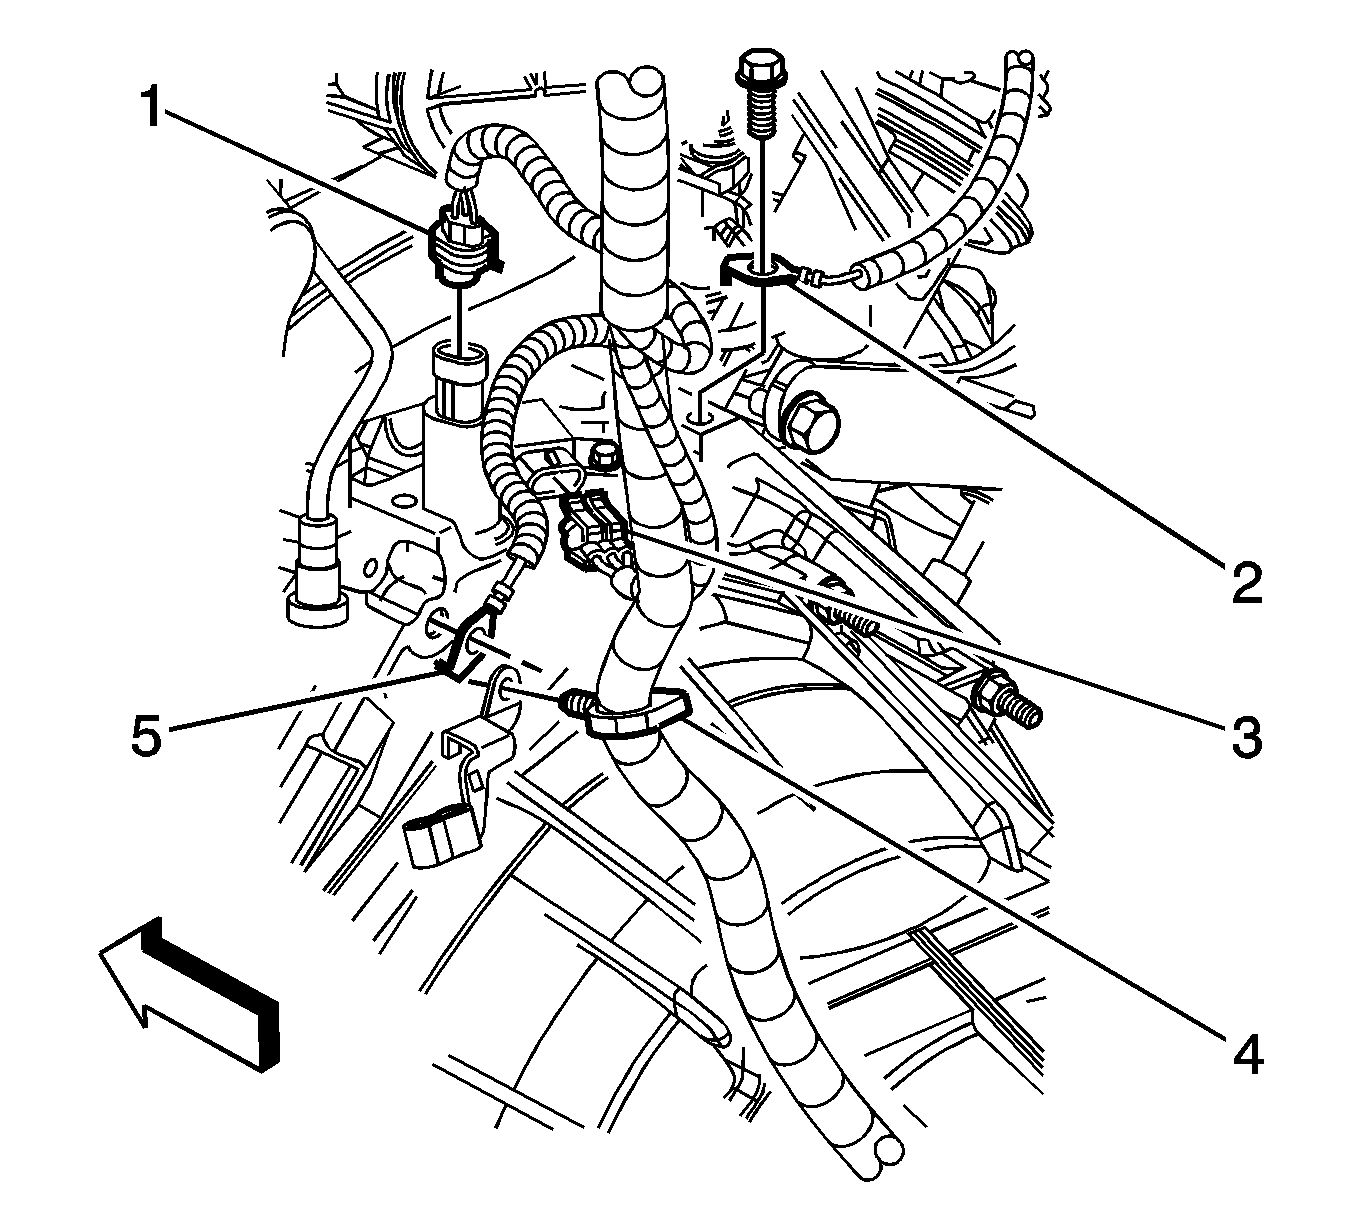
- Disconnect the following electrical connectors:
| • | The crankshaft position (CKP) sensor (1) |
| • | The engine oil sensor (3) |
| • | The coolant heater, if equipped |
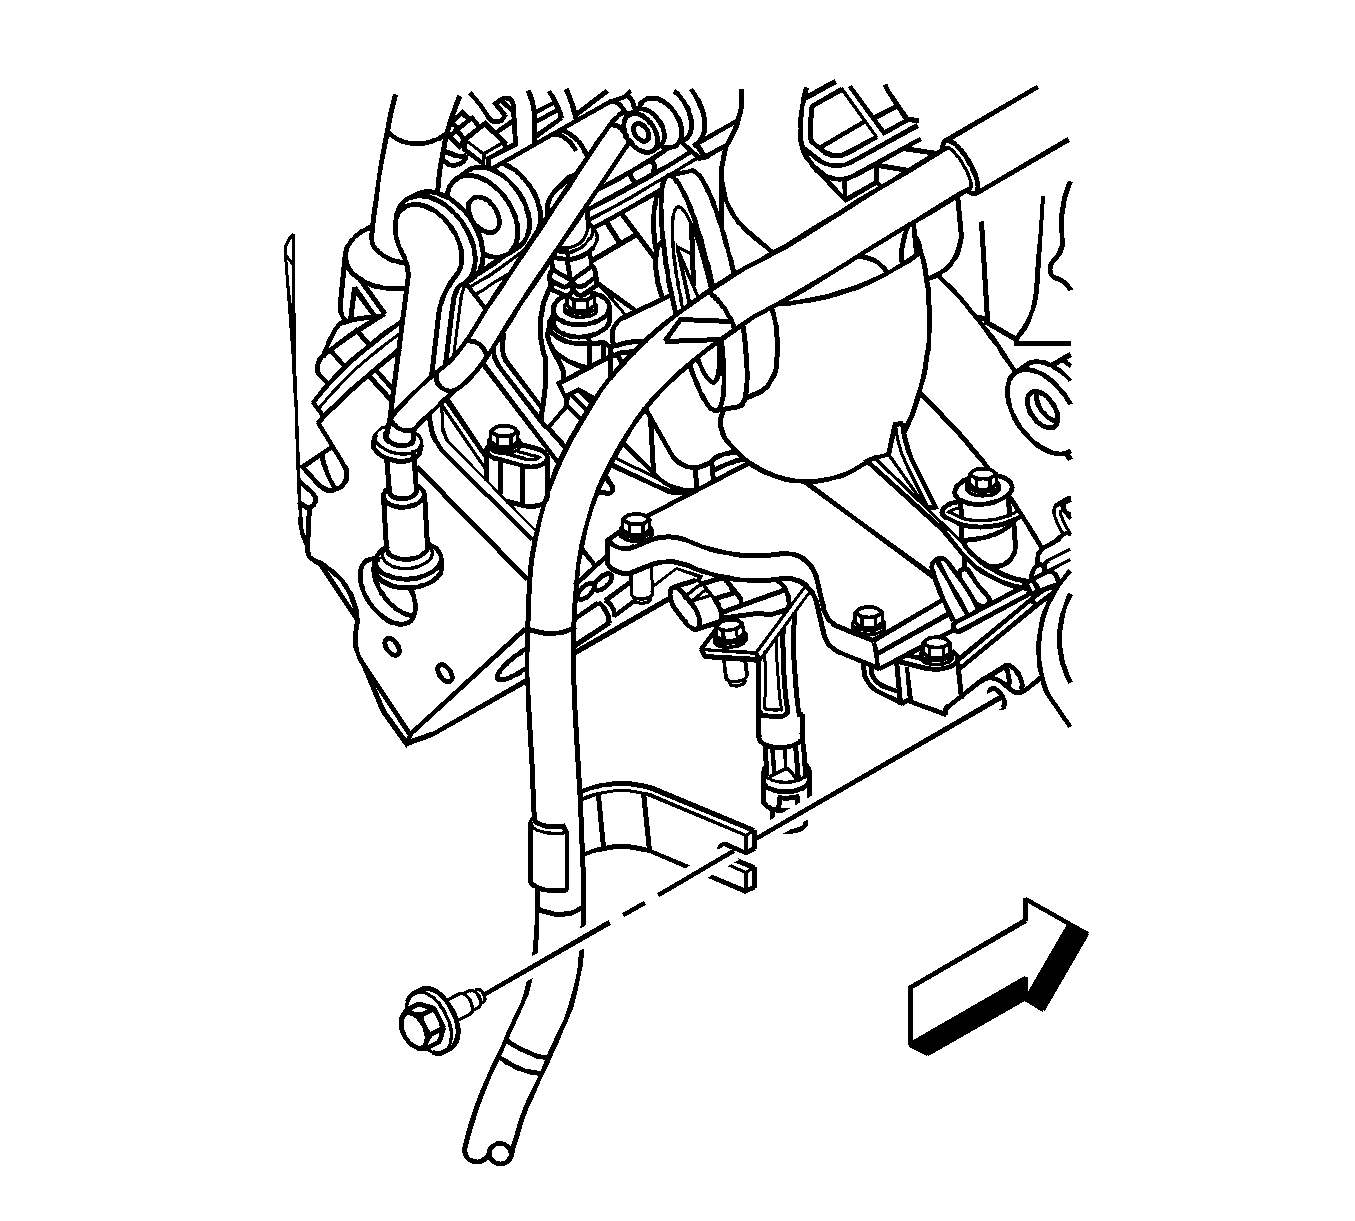
- Remove the battery cable channel bolt.
- Slide the channel pin out of the oil pan tab.
- Gather all branches of the engine wiring harness and reposition off to the side.
- Lower the vehicle.
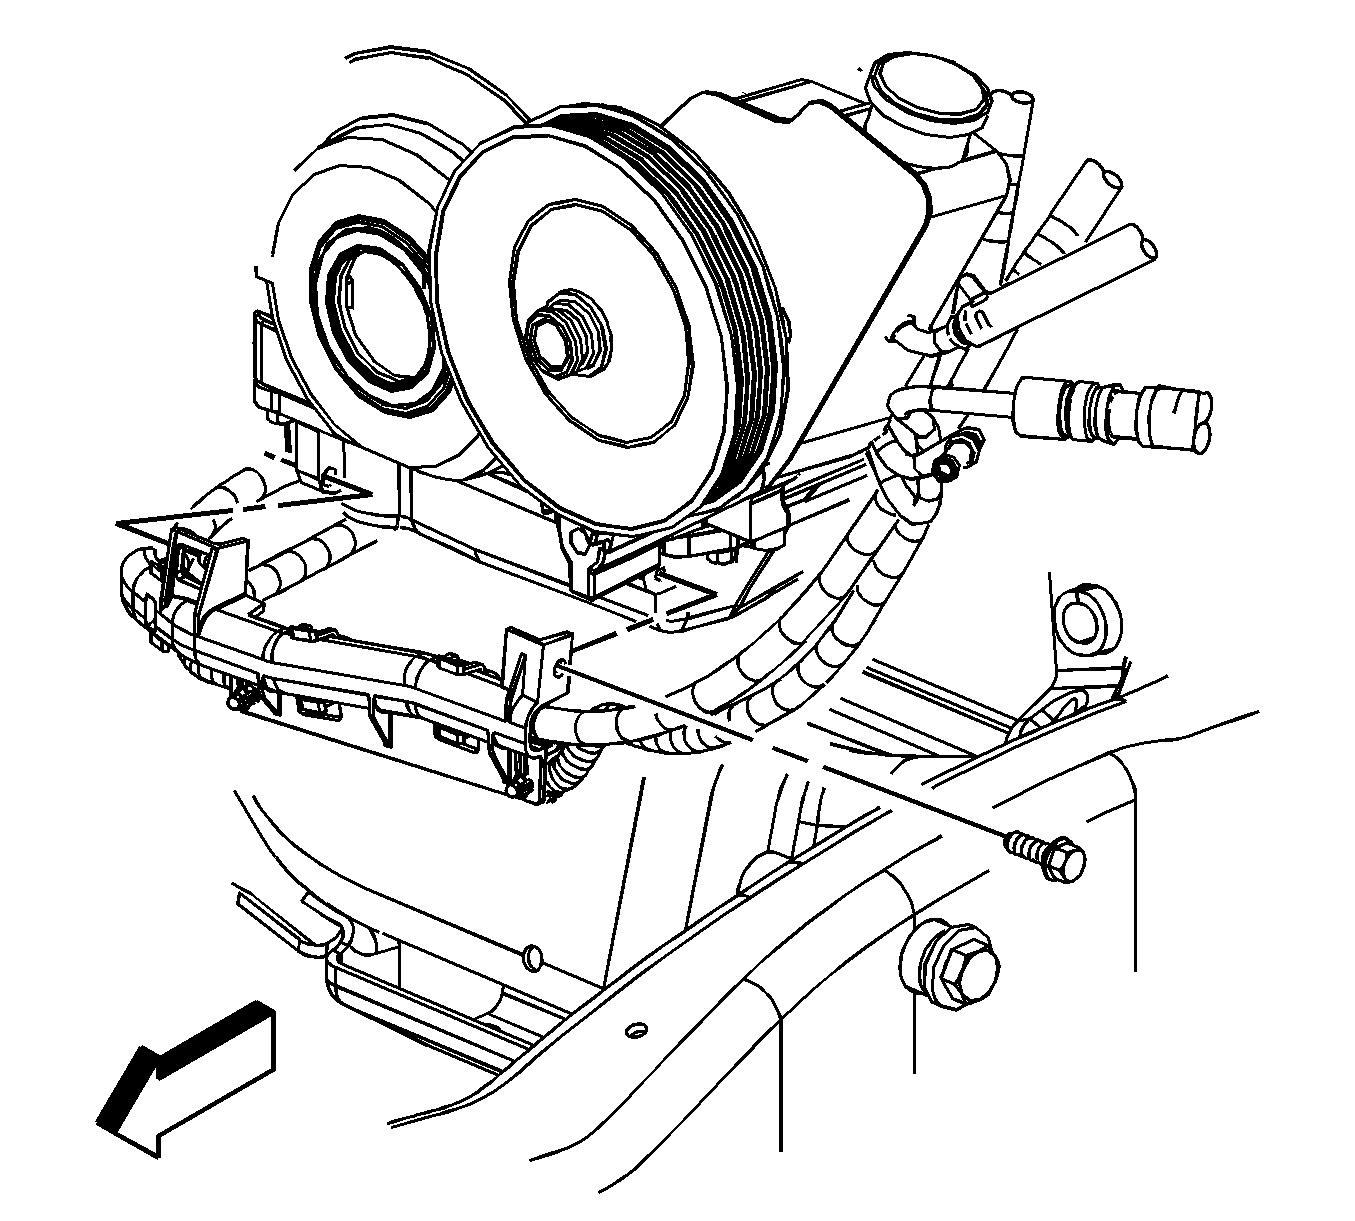
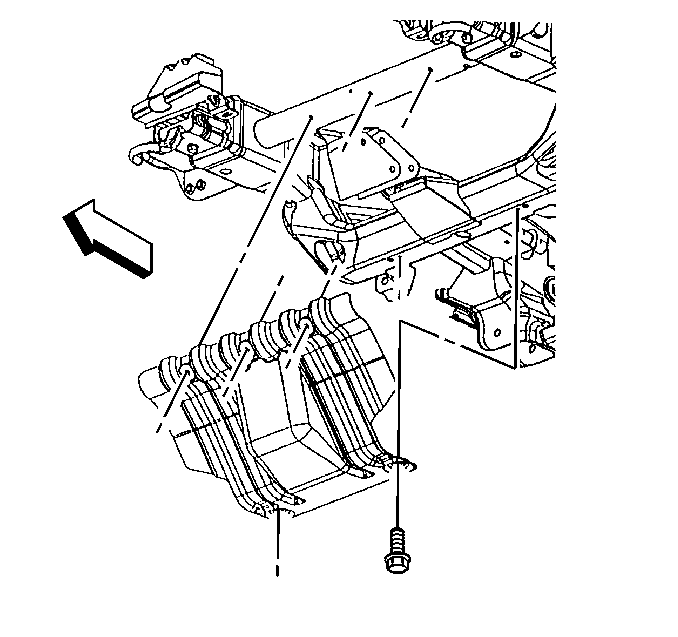
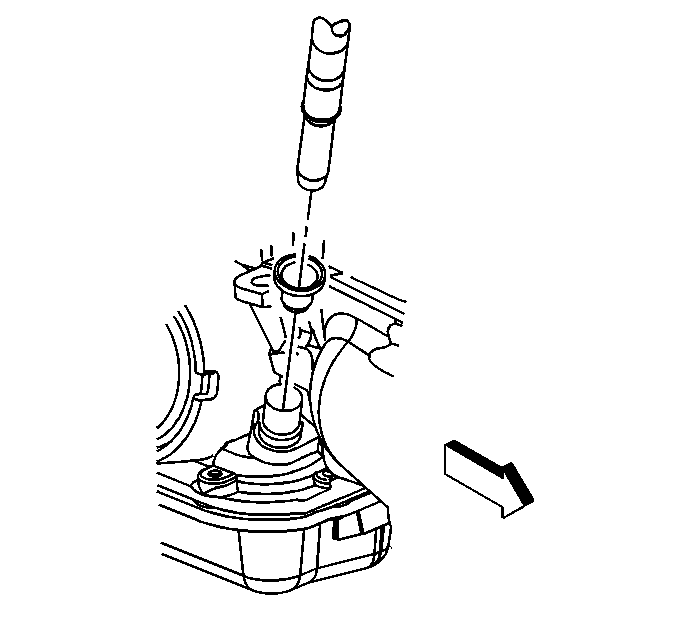
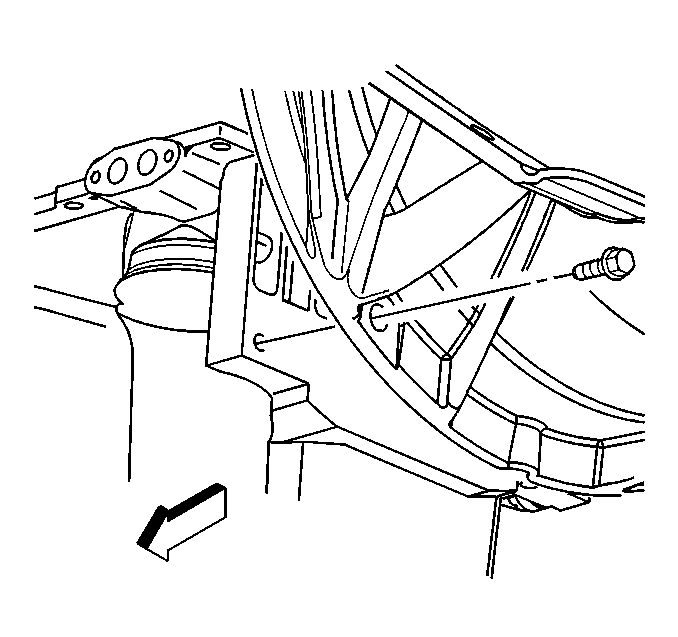
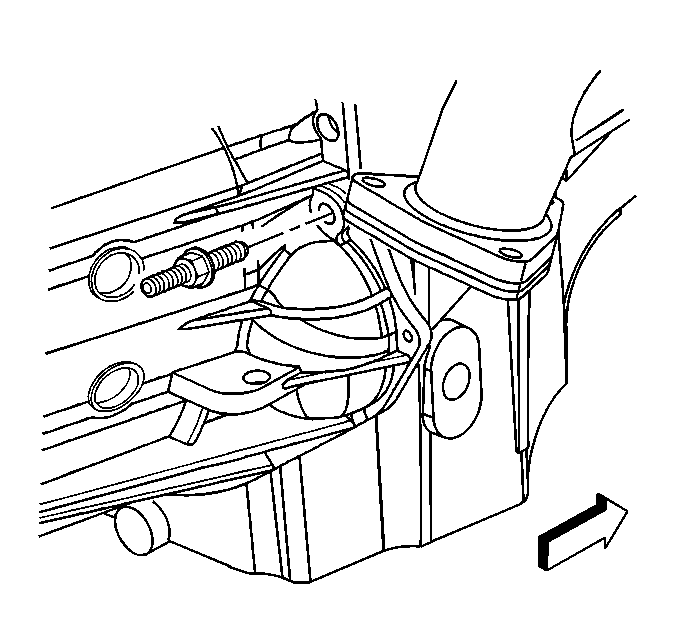
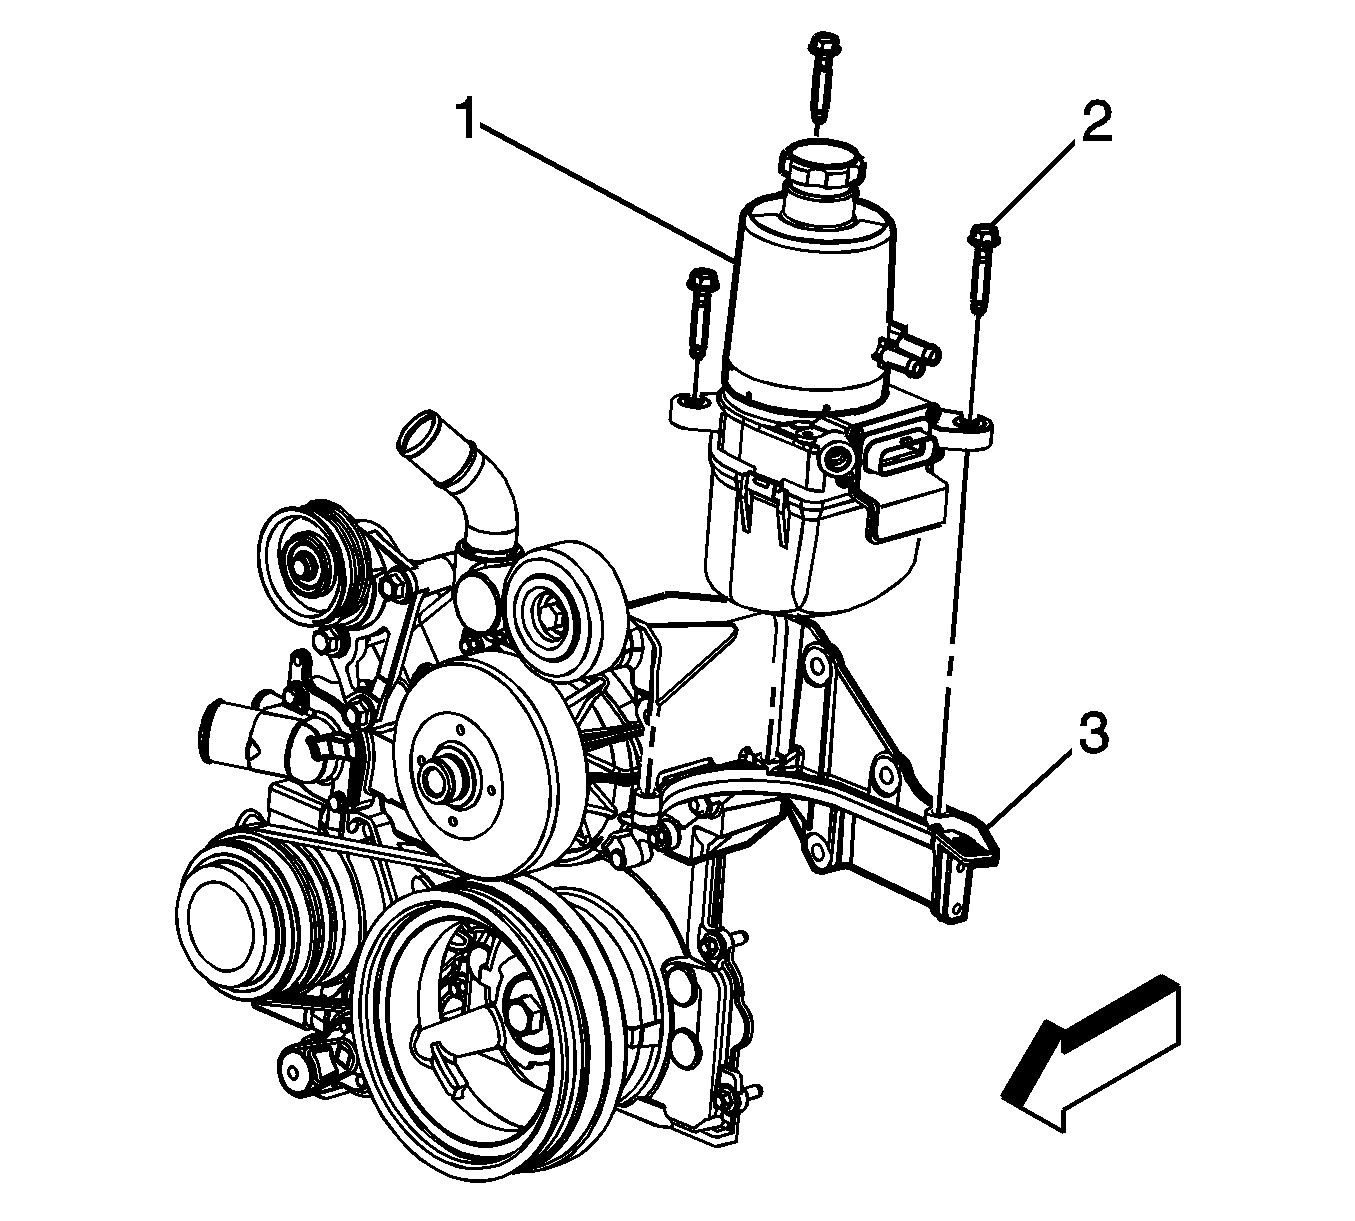
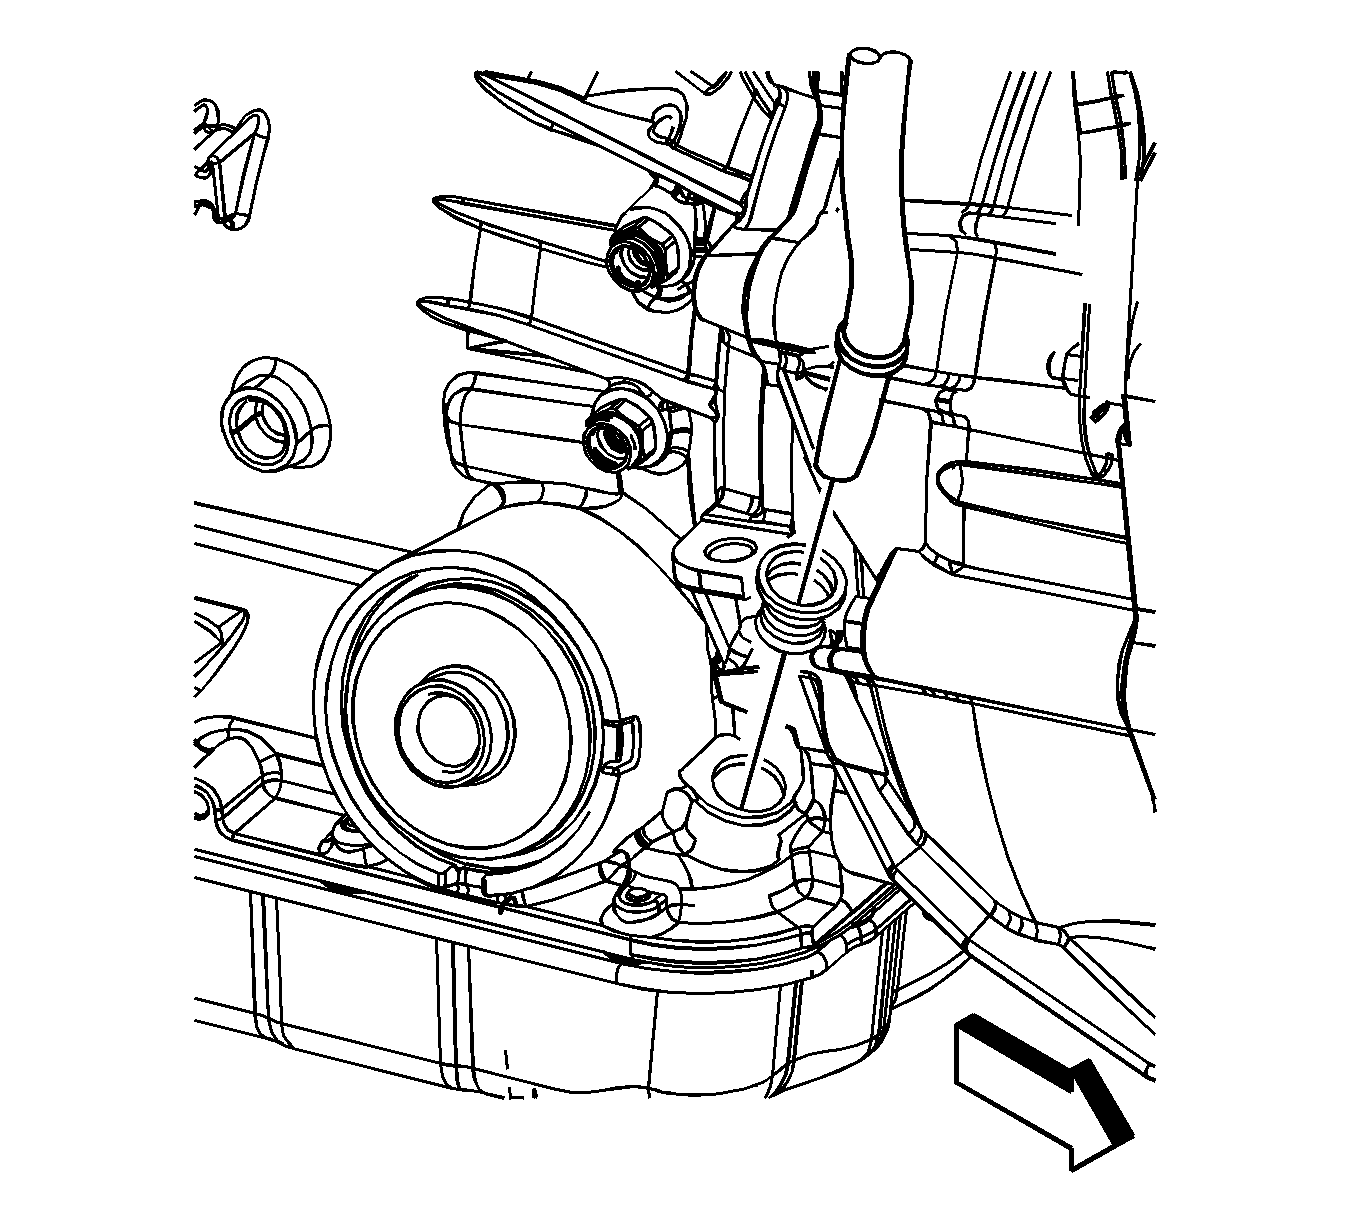
- Remove the rear power steering to engine block bolt.
- Remove the generator bracket bolts.
- Position the bracket aside.
- Remove the vacuum brake booster hose.
- Remove the ignition coils, as required, for the proper fit of the
J 41798
before lifting the engine. Refer to
Ignition Coil Replacement
.
Notice: Refer to Fastener Notice in the Preface section.
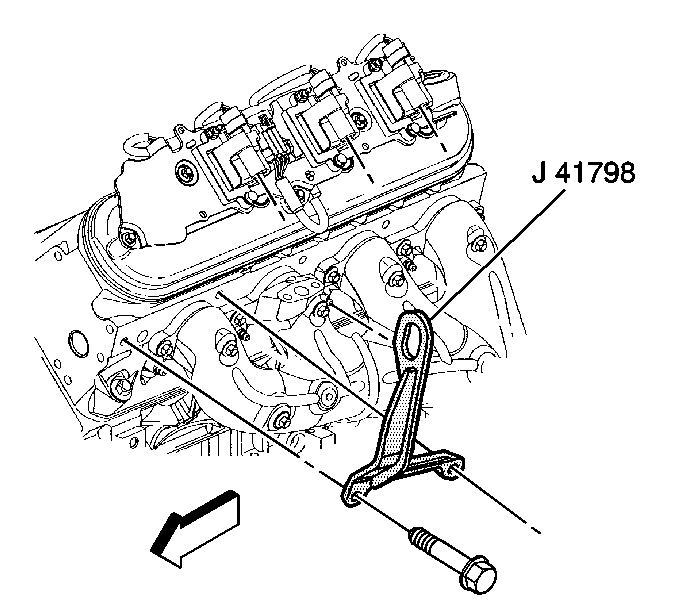
- Install the
J 41798
to the cylinder heads.
Tighten
| • | Tighten the M8 bolts to 25 N·m (18 lb ft). |
| • | Tighten the M10 bolts to 50 N·m (37 lb ft). |

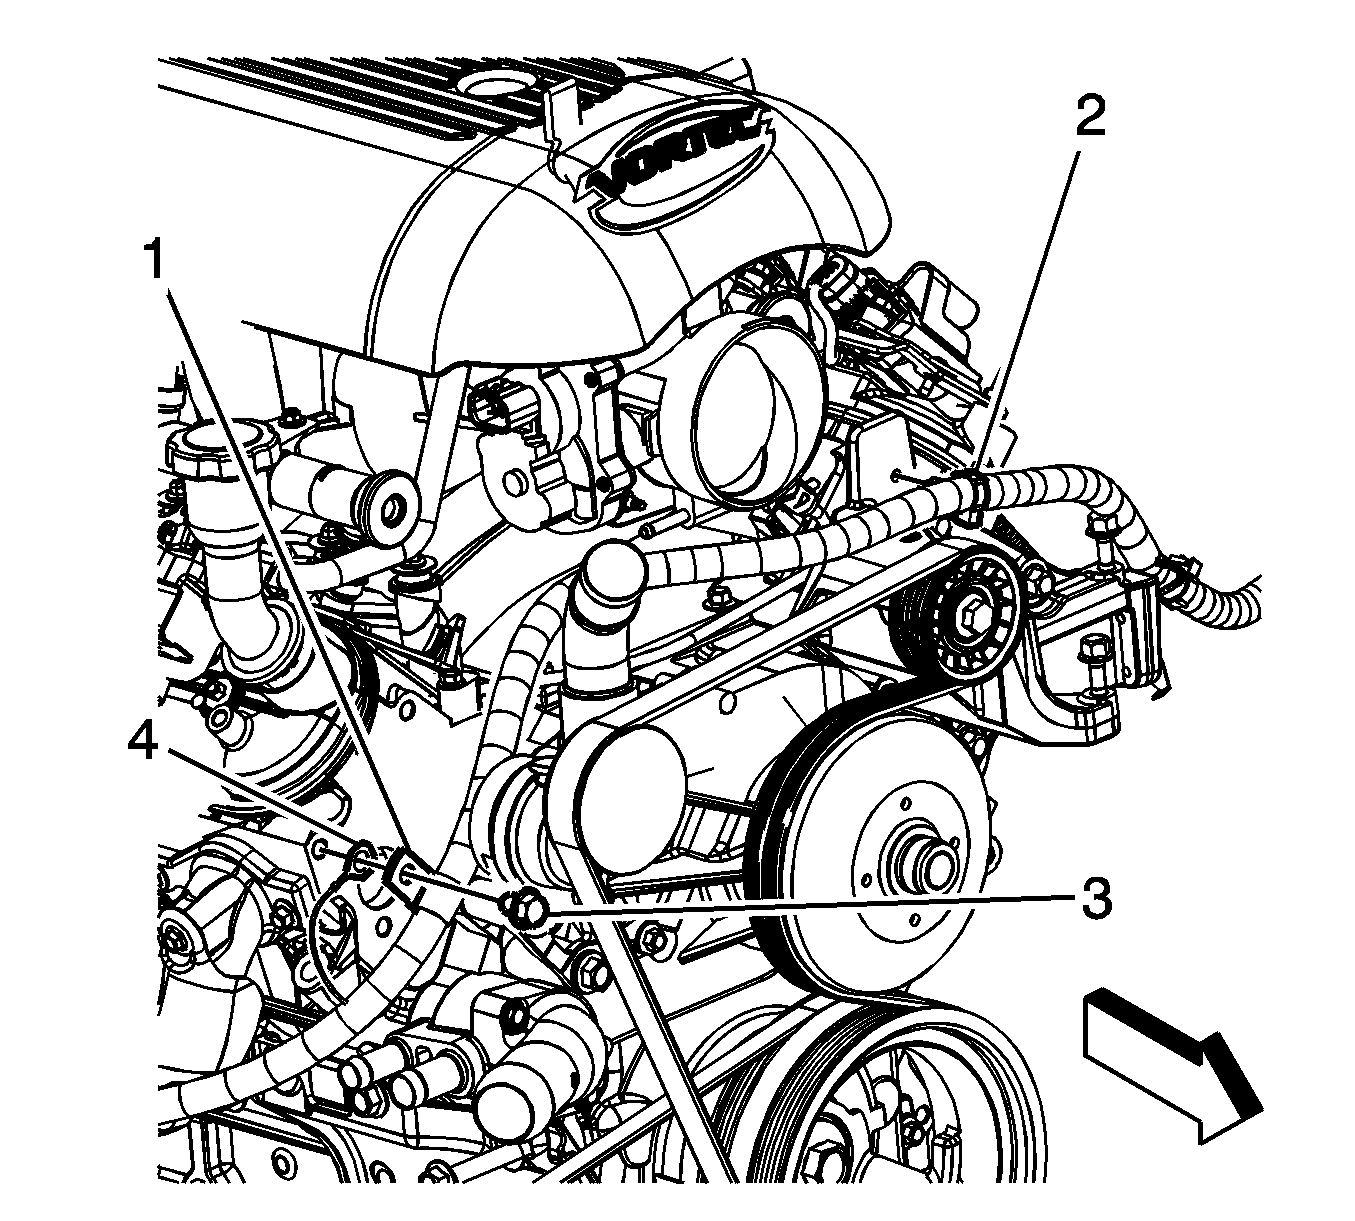
- Remove the left and right engine mount to engine mount bracket bolts.
- Raise the vehicle.
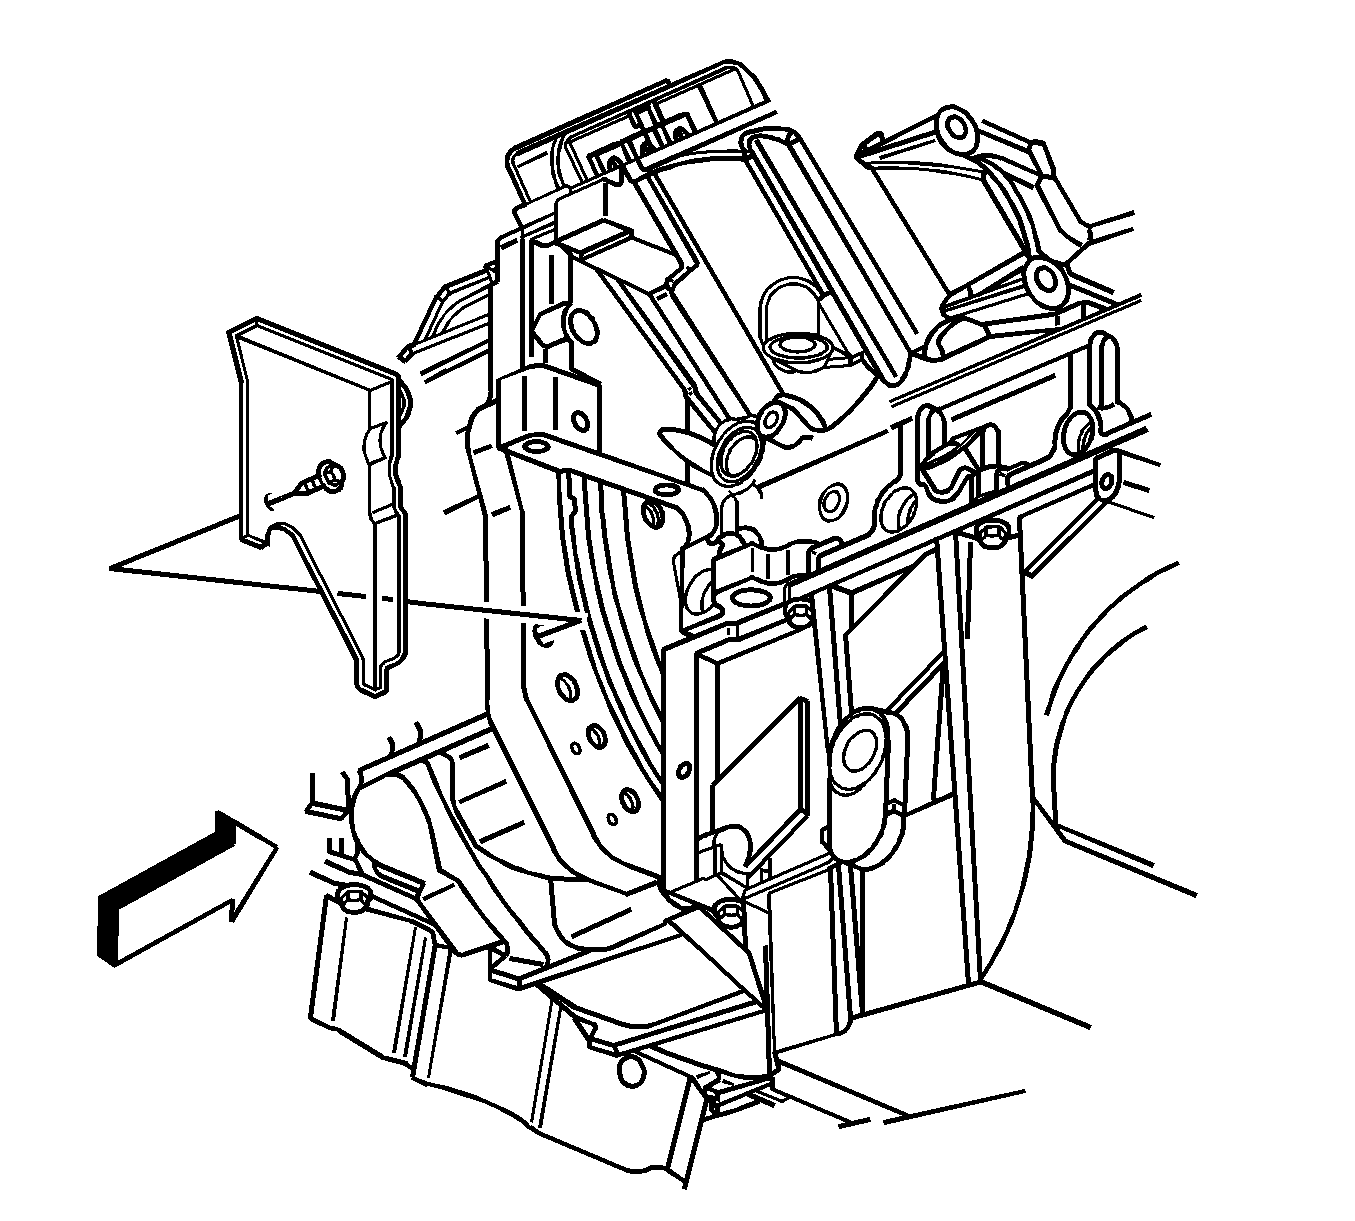
- Remove the engine sight shield bolts and shield.

- Remove the oil pan skid plate bolts and plate, if equipped.
- Drain the engine oil.
- Remove the starter motor. Refer to
Starter Motor Replacement
.
- Remove the catalytic converter. Refer to
Catalytic Converter Replacement
.
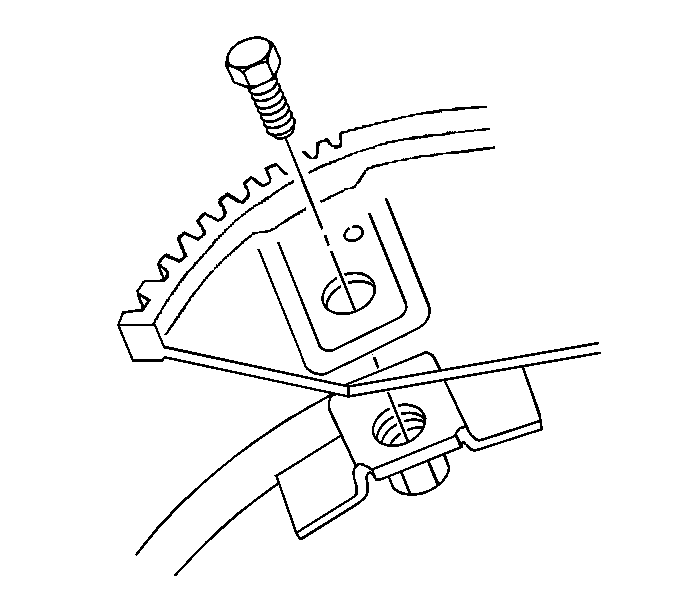
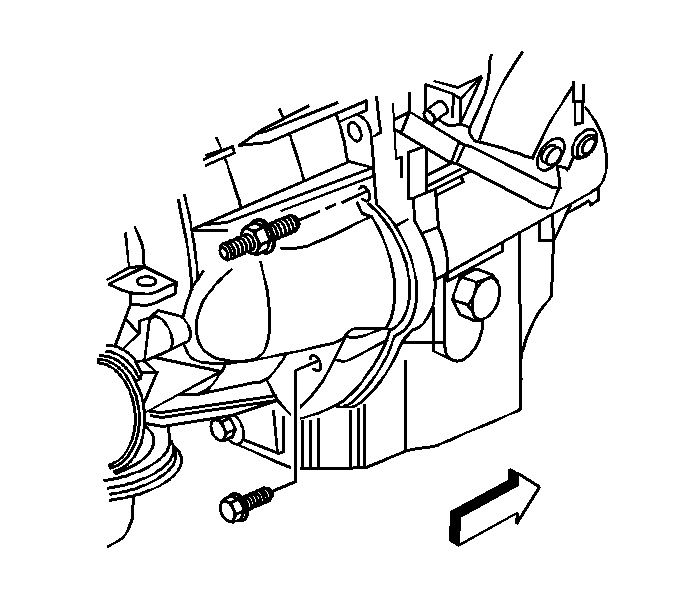
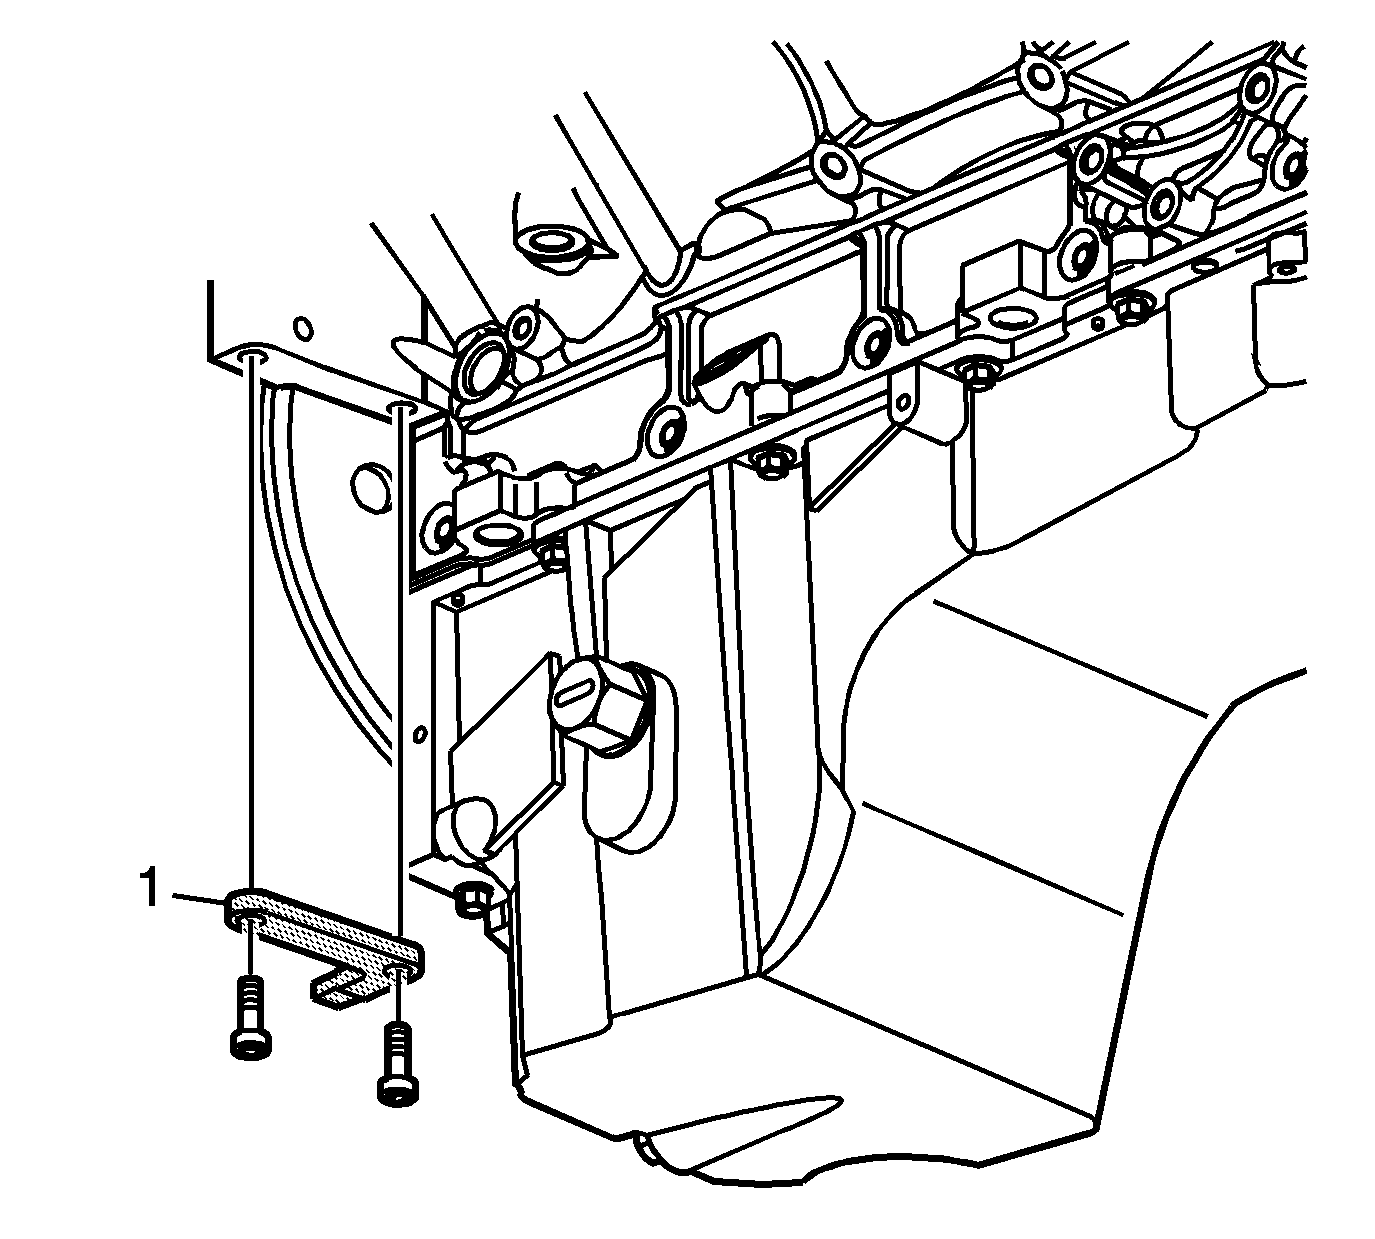
- Remove the positive battery cable clip bolt and clip.
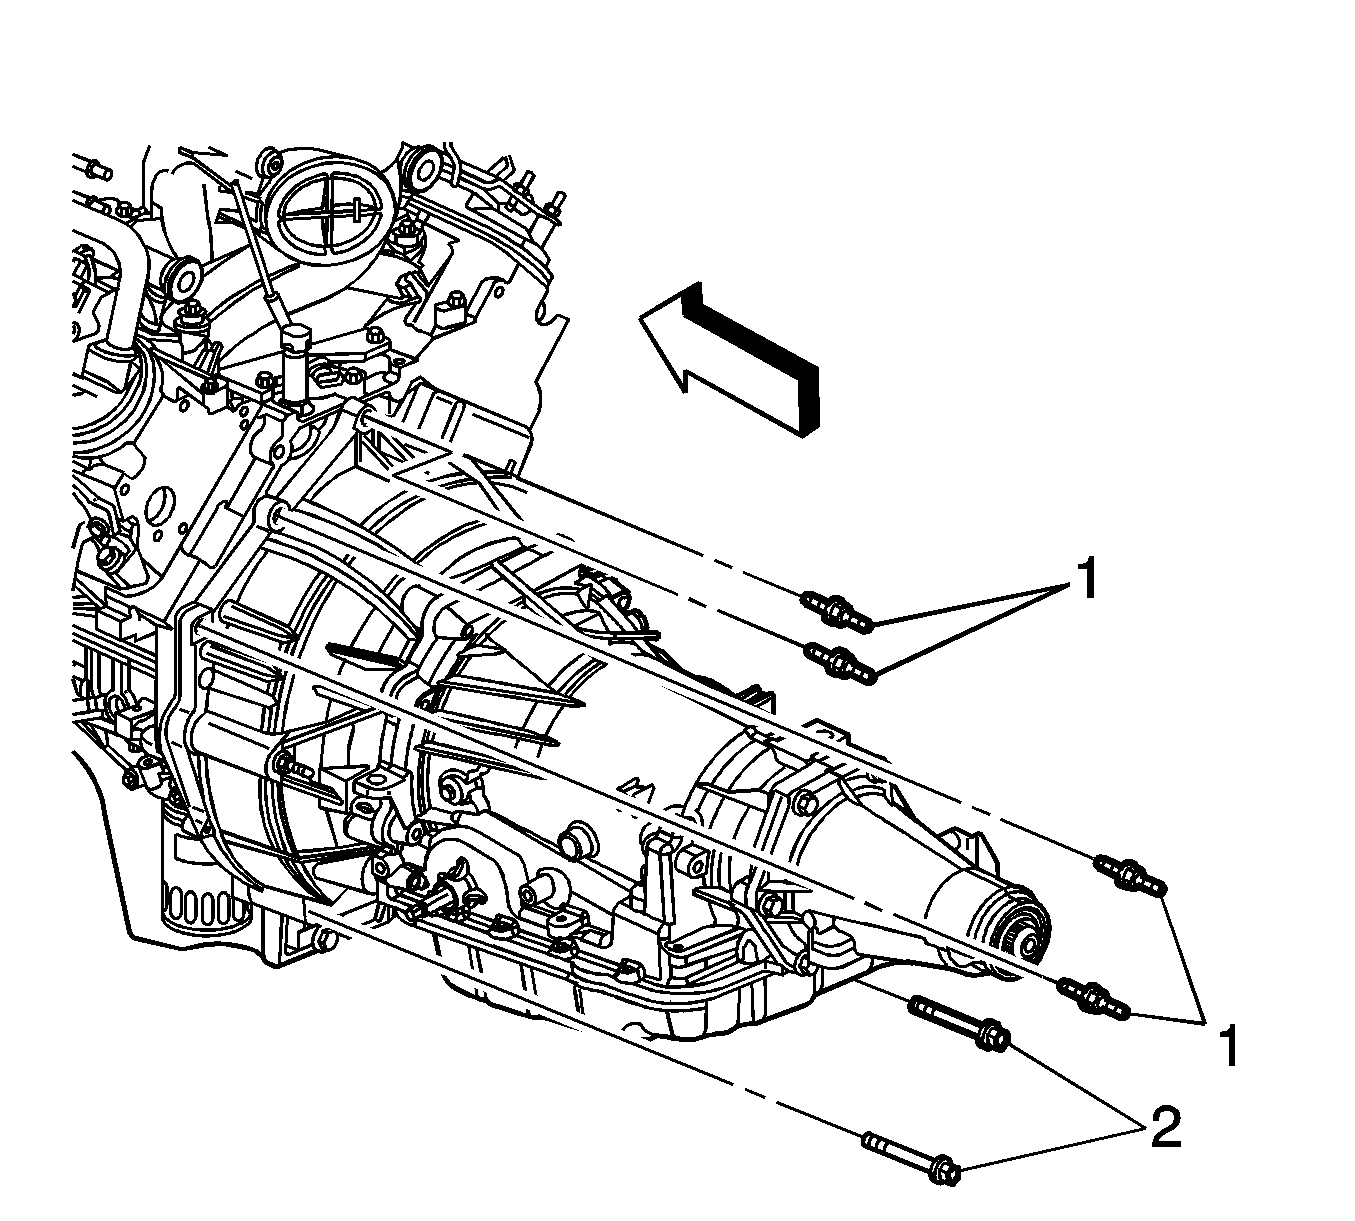
- Remove the torque converter bolts, if equipped.

- Remove the transmission oil level indicator tube nut, if equipped.
- Remove the transmission oil level indicator tube, if equipped.
- If equipped with a 4L60-E transmission, remove the transmission bolt and
stud on the right side.
- If equipped with a 4L80-E transmission, remove the transmission converter cover bolts.
- Remove the automatic transmission bolt/studs, if equipped.
- Separate the engine from the automatic transmission, if equipped. Install the
J 21366
to the transmission in order to hold the torque converter.

- Using
J 42371
, remove the clutch line form the concentric slave cylinder.
- Remove the manual transmission stud on the right side of the transmission, if equipped.
- Remove the manual transmission bolt/studs, if equipped.
- Separate the manual transmission from the engine, if equipped.
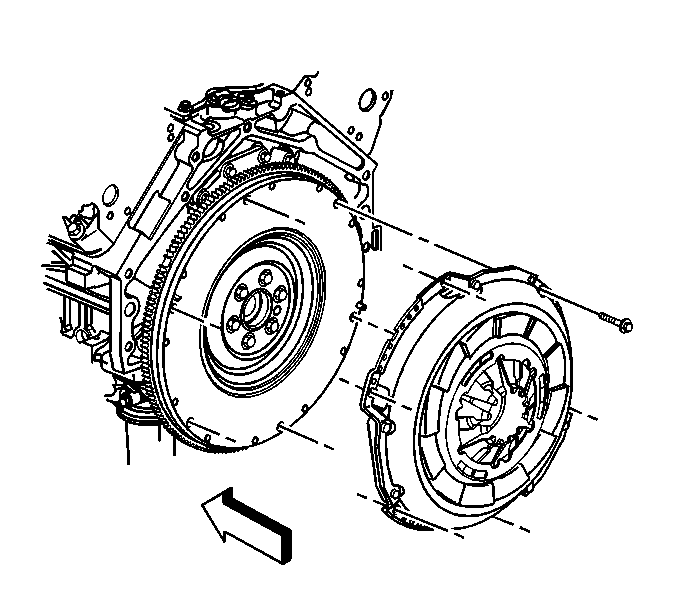
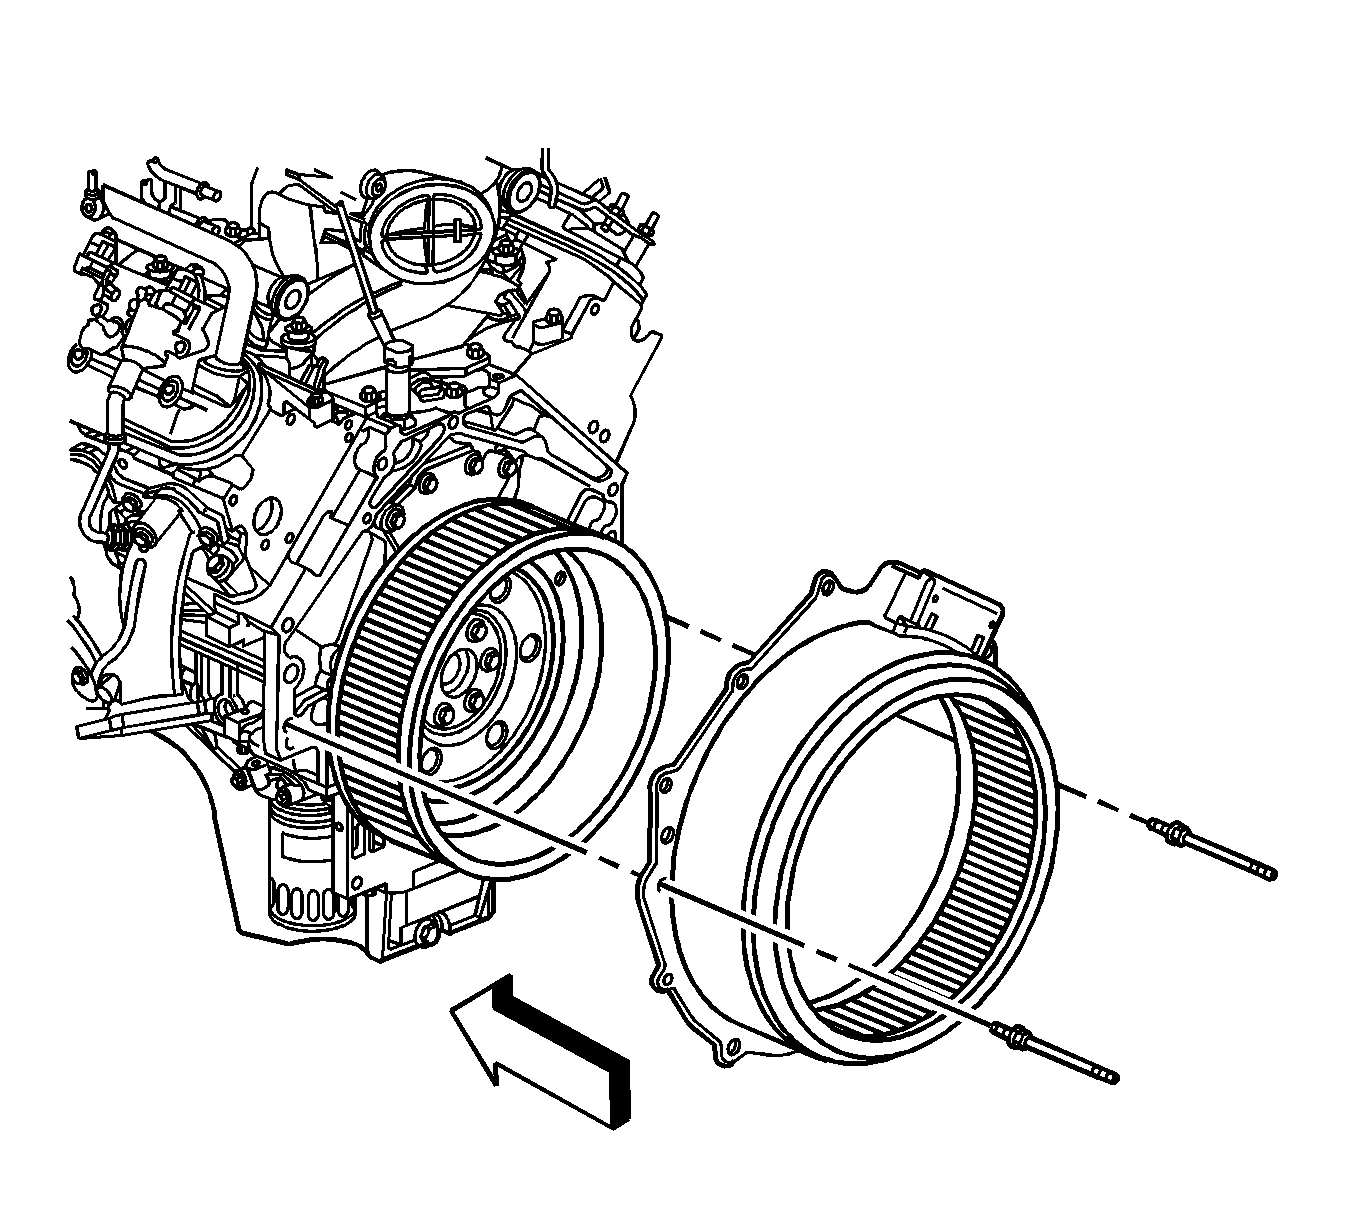
- Mark the flywheel and a clutch pressure plate lug for installation alignment.
- Remove the clutch pressure plate bolts, if equipped.
- Remove the clutch pressure plate and disc, if equipped.
- Lower the vehicle.
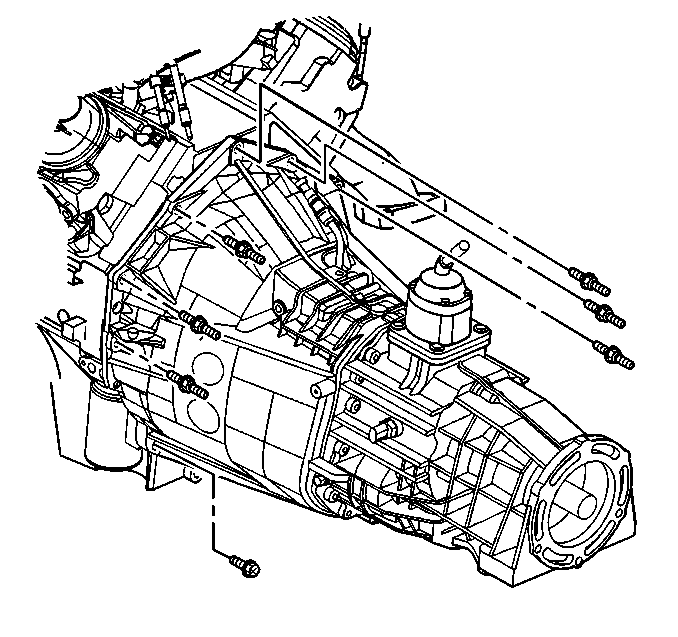
- Install an engine hoist to the
J 41798
.
- Install a floor jack under the transmission for support.
Notice: Use care while moving the engine assembly in order to avoid
breaking the MAP sensor locating tabs. Broken MAP sensor tabs may result in
decreased engine performance.
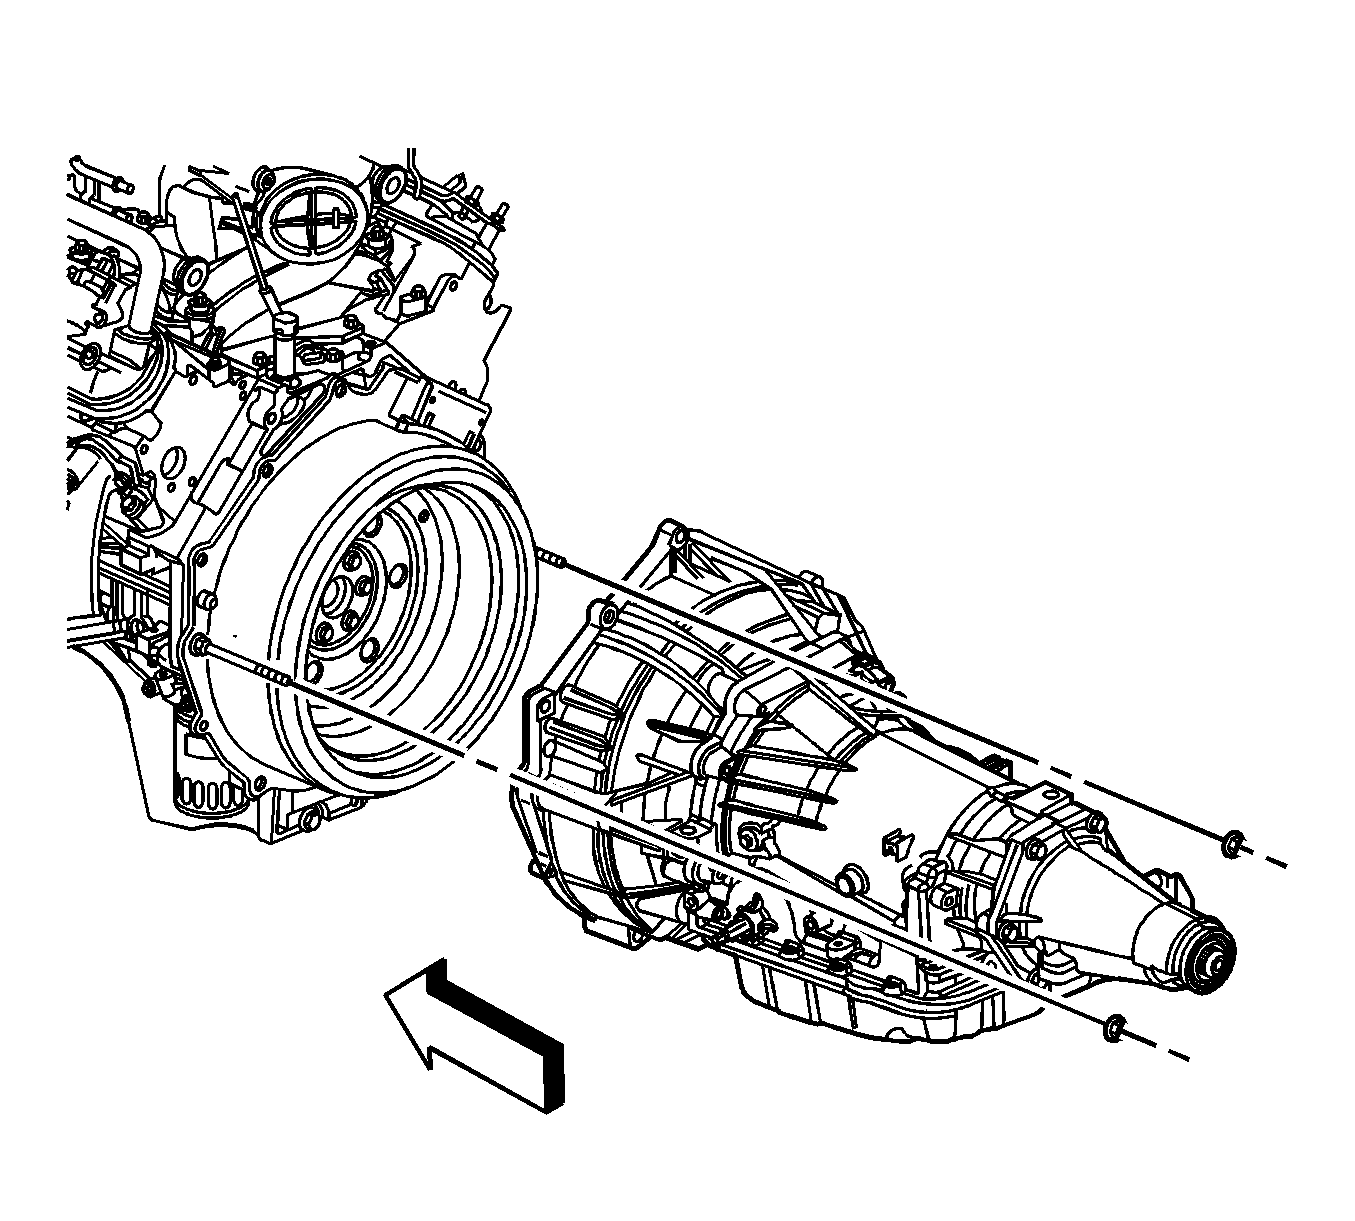
- Remove the engine.
- Install the engine to an engine stand.
- Remove the engine hoist.
- Remove the
J 41798
from the engine.
Installation Procedure
Notice: Refer to Fastener Notice in the Preface section.
- Install the
J 41798
to the engine.
Tighten
| • | Tighten the M8 bolts to 25 N·m (18 lb ft). |
| • | Tighten the M10 bolts to 50 N·m (37 lb ft). |
- Install an engine hoist to the
J 41798
.
- Remove the engine from the engine stand.
- Install the engine to the vehicle.
- Align the engine and transmission.
- Install the left and right engine mount to engine mount bracket bolts.
Tighten
Tighten the bolts to 65 N·m (48 lb ft).
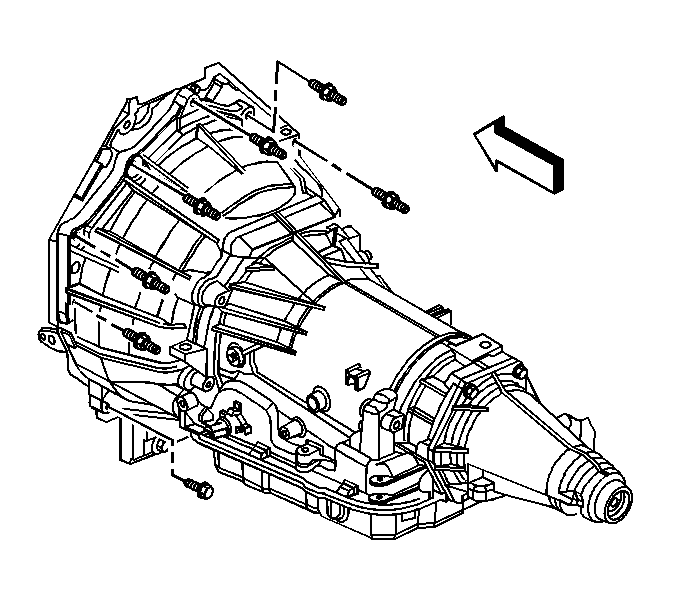
- Install the upper transmission bolts until snug.
- Remove the floor jack from under the transmission.
- Remove the engine hoist.
- Remove the
J 41798
from the engine.
- Install the ignition coils and the spark plug wires. Refer to
Ignition Coil Replacement
.
- Raise the vehicle.
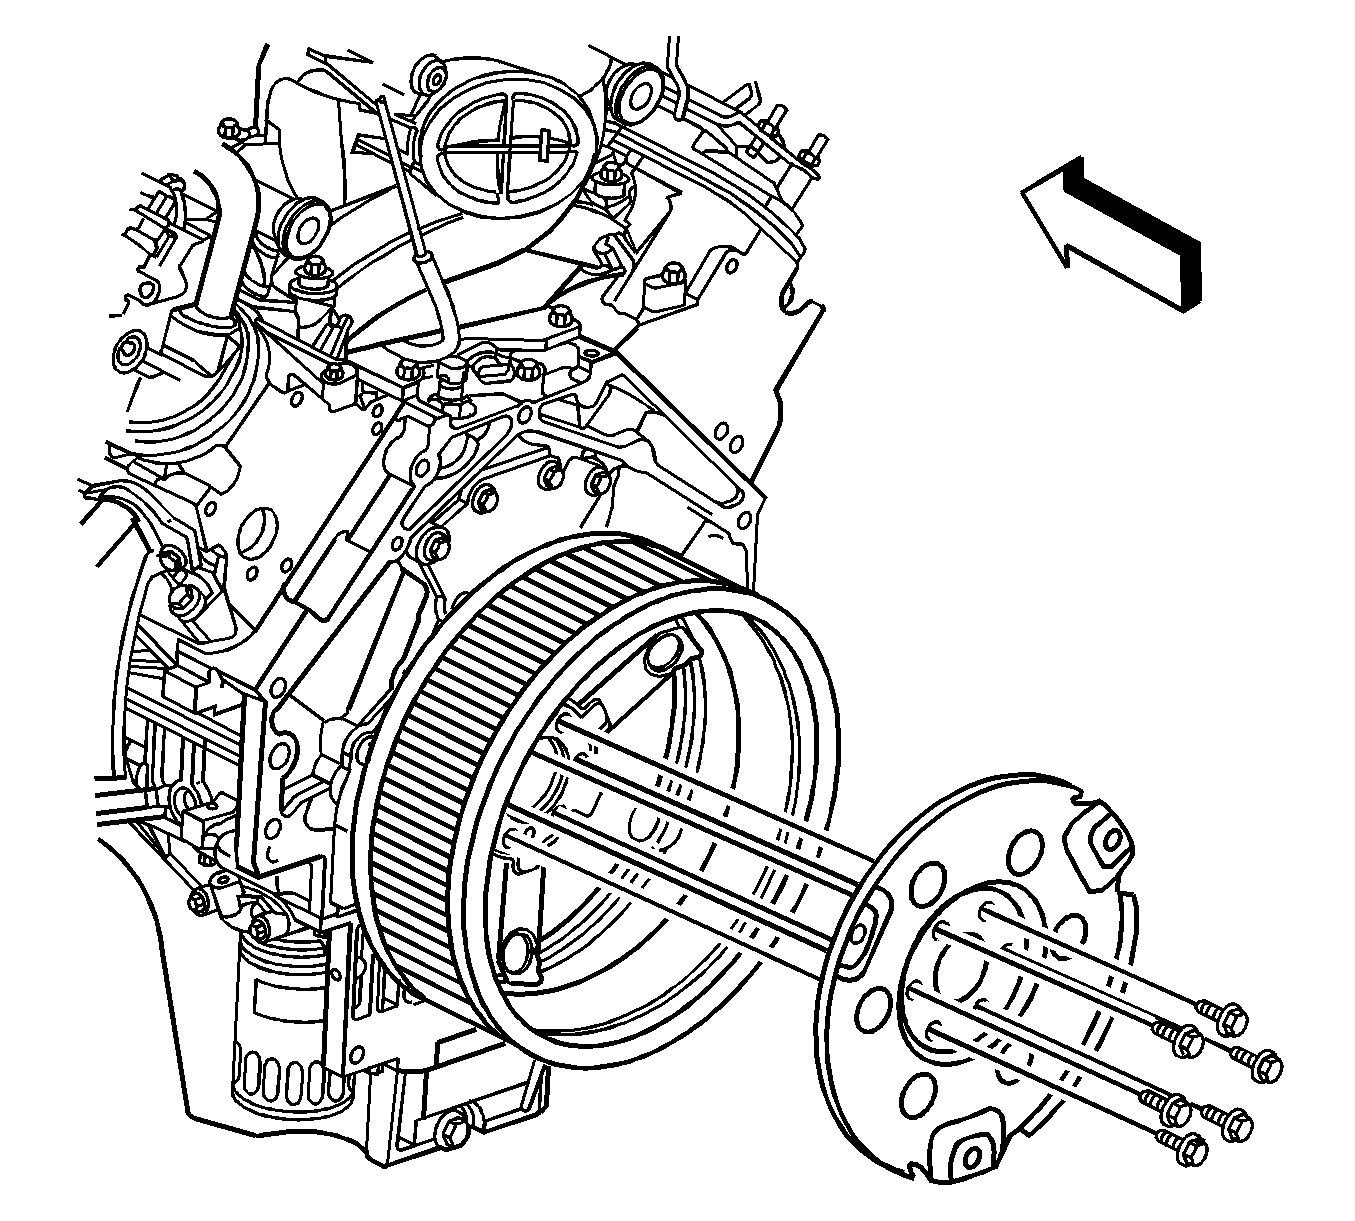
- Install the disc and clutch pressure plate and bolts until snug, if equipped.
- Using
J 5824-A
, align the clutch disc splines with the pilot bearing.
- Align the marks made during removal.
- Tighten the clutch pressure plate bolts in the sequence shown, evenly over 3 increments with the fourth
increment to the final specification.
Tighten
Tighten the bolts to 70 N·m (52 lb ft).
- Install the clutch line to the concentric slave cylinder.
- Install the manual transmission bolt/studs, if equipped.
- Install the manual transmission stud on the right side of the transmission, if equipped.
Tighten
Tighten the bolt/studs to 50 N·m (37 lb ft).
- Remove the
J 21366
from the transmission.
- Install the automatic transmission, if equipped.
- If equipped with a 4L80-E transmission, install the transmission converter cover bolts.
- If equipped with a 4L60-E transmission, install the transmission bolt and
stud on the right side.
Tighten
Tighten the bolts/studs to 50 N·m (37 lb ft).
- Install the automatic transmission oil level indicator tube, if equipped.
- Install the automatic transmission oil level indicator tube nut, if equipped.
Tighten
Tighten to nut to 18 N·m (13 lb ft).
- Install the torque converter bolts, if equipped.
Tighten
| • | If equipped with a 4L60-E transmission, tighten the bolts to 63 N·m (47 lb ft) |
| • | If equipped with a 4L80-E transmission, tighten the bolts to 60 N·m (44 lb ft). |
- Install the positive cable clip and bolt.
Tighten
Tighten the bolt to 9 N·m (80 lb in).
- Install the catalytic converter. Refer to
Catalytic Converter Replacement
.
- Install the starter motor. Refer to
Starter Motor Replacement
.
- Install the oil pan skid plate and bolts, if equipped.
Tighten
Tighten the bolts to 20 N·m (15 lb ft).
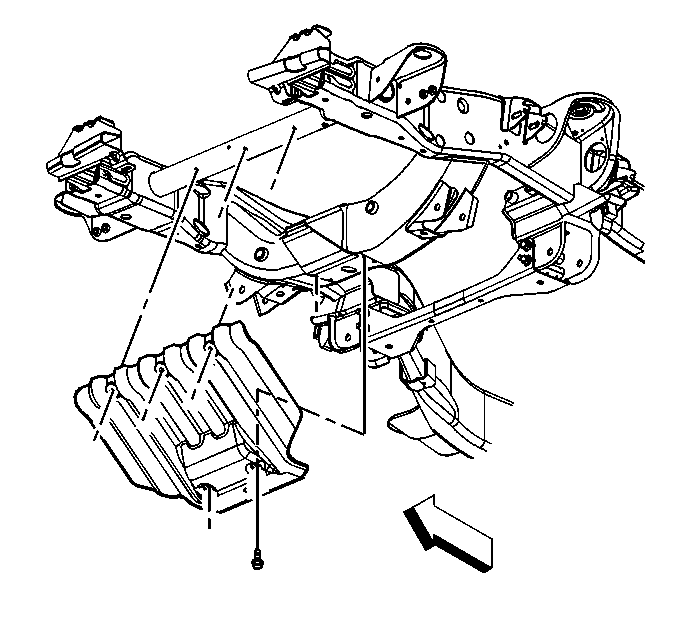
- Install the engine shield and bolts.
Tighten
Tighten the bolts to 20 N·m (15 lb ft).
- Lower the vehicle.
- Install the vacuum brake booster hose.
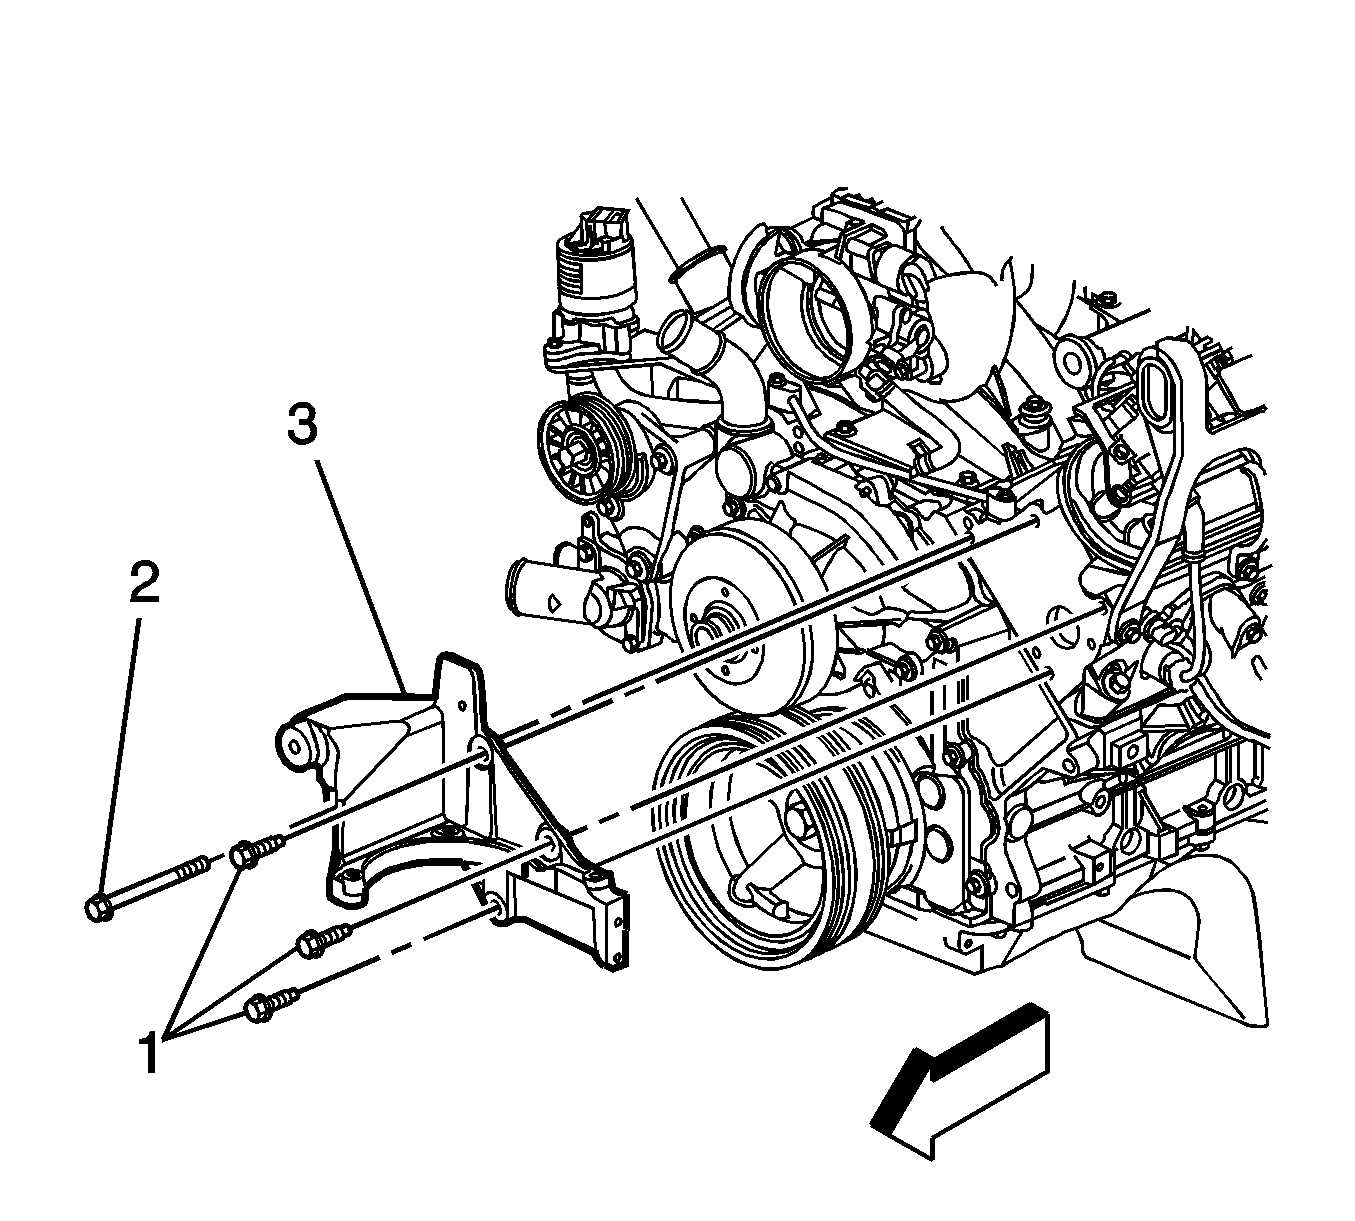
- Position the generator bracket to the front of the engine.
- Install the generator bracket bolts until snug.
- Install the rear power steering pump to engine block bolt until snug.
Tighten
Tighten the bolts to 50 N·m (37 lb ft).
- Route the engine wiring harness to the lower engine area.
- Raise the vehicle.
- Slide the channel pin into the oil pan tab.
- Install the battery cable channel bolt.
Tighten
Tighten the bolt to 12 N·m (106 lb in).
- Connect the following electrical connectors:
| • | The engine oil level sensor (3) |
| • | The coolant heater, if equipped |
- Lower the vehicle.
- Connect the fuel pipes. Refer to
Metal Collar Quick Connect Fitting Service
.
- Install the EVAP purge solenoid vent tube to the solenoid (1).
- Install the EVAP tube to the vapor pipe (2).
- Install the battery cable junction block to the junction block bracket.
- Clip all of the engine wiring harness clips to their correct location.
- Connect the following electrical connectors:
| • | The oil pressure sensor (1) |
- Position the harness ground and the engine ground strap to the block.
- Install the harness ground bolt at the left rear of the engine block.
- Position the harness ground and auxiliary negative battery cable, if equipped, to the block.
- Install the harness ground bolt at the right rear of the engine block.
Tighten
Tighten the bolts to 16 N·m (12 lb ft).
- Connect the following electrical connectors:
| • | The electronic variable orifice switch |
- Position the harness ground and negative battery cable to the block.
- Install the harness ground bolt.
Tighten
Tighten the bolt to 25 N·m (18 lb ft).
- Connect the MAP sensor (1) and knock sensor (2) electrical connectors.
- Connect the following electrical connectors:
| • | The main coil harness (4) |
- Connect the main coil harness (2) and fuel injector electrical connectors on the left side.
- Install the generator cable to the generator. Perform the following procedure:
| 59.1. | Install the generator cable. |
| 59.2. | Install the generator cable nut to the terminal stud. |
Tighten
Tighten the nut to 9 N·m (80 lb in).
| 59.3. | Slide the boot over the terminal stud. |
- Install the radiator vent inlet hose to the throttle body.
- Position the vent inlet hose clamp at the throttle body.
- Install the engine wiring harness bracket and nut (2).
Tighten
Tighten the nut to 5 N·m (44 lb in).
- Connect the following electrical connectors:
| • | The EVAP canister purge solenoid (1) |
- Install the heater hoses. Refer to
Heater Inlet Hose Replacement
and
Heater Outlet Hose Replacement
.
- Open the hose clamp and install the radiator outlet hose to the water pump.
- Open the hose clamp and install the radiator inlet hose to the water pump.
- Install the radiator support. Refer to
Radiator Support Replacement
.
- Install the A/C compressor. Refer to
Air Conditioning Compressor Replacement
.
- Remove the hood hinge bolts from the service position (2).
- Lower the hood to the normal position.
- Install the hood hinge bolts.
Tighten
Tighten the bolts to 25 N·m (18 lb ft).
- Remove the fender covers.
- Fill the crankcase with the proper quantity and grade of engine oil. Refer to
Approximate Fluid Capacities
or
Fluid and Lubricant Recommendations
.
- Bleed the hydraulic clutch, if equipped. Refer to
Hydraulic Clutch Bleeding
.
- Perform the CKP system variation learn procedure. Refer to
Crankshaft Position System Variation Learn
.
Important: After an overhaul, the engine should be tested. Use the following procedure after the engine is install in the vehicle.
- Test the vehicle using the following procedure:
| 76.1. | Disable the ignition system. |
| 76.2. | Crank the engine several times. Listen for any unusual noises or evidence that parts are binding. |
| 76.3. | Enable the ignition system. |
| 76.4. | Start the engine and listen for unusual noises. |
| 76.5. | Check the vehicle oil pressure gage or light and confirm that the engine has acceptable oil pressure. |
| 76.6. | Run the engine speed at about 1,000 RPM until the engine has reached normal operating temperature. |
| 76.7. | Listen for sticking lifters and other unusual noises. |
| 76.8. | Inspect for fuel, oil, and/or coolant leaks while the engine is running. |
| 76.9. | Perform a final inspection for the proper engine oil an coolant levels. |
- Install the engine shield. Refer to
Upper Intake Manifold Sight Shield Replacement
.
- Close the hood.
Engine Replacement 5.3L Engine w/RPO HP2
Tools Required
| • | J 46093 Rotor and
Flexplate Holding Tool |
Removal Procedure
- Open the hood.
- Place the fender covers over both fenders.
- Raise the hood to the service position. Perform the following procedure:
| 3.1. | Remove the hood hinge bolts (1). |
| 3.2. | Raise the hood until vertical. |
| 3.3. | Install the hood hinge bolts until snug in the service position (2). |
- Disconnect the energy storage box (ESB). Refer to
Hybrid Battery Service Disconnect/Connect
in Engine Electrical.
- Remove the engine sight shield. Refer to
Upper Intake Manifold Sight Shield Replacement
.
- Remove the radiator support. Refer to
Radiator Support Replacement
in Body Front End.
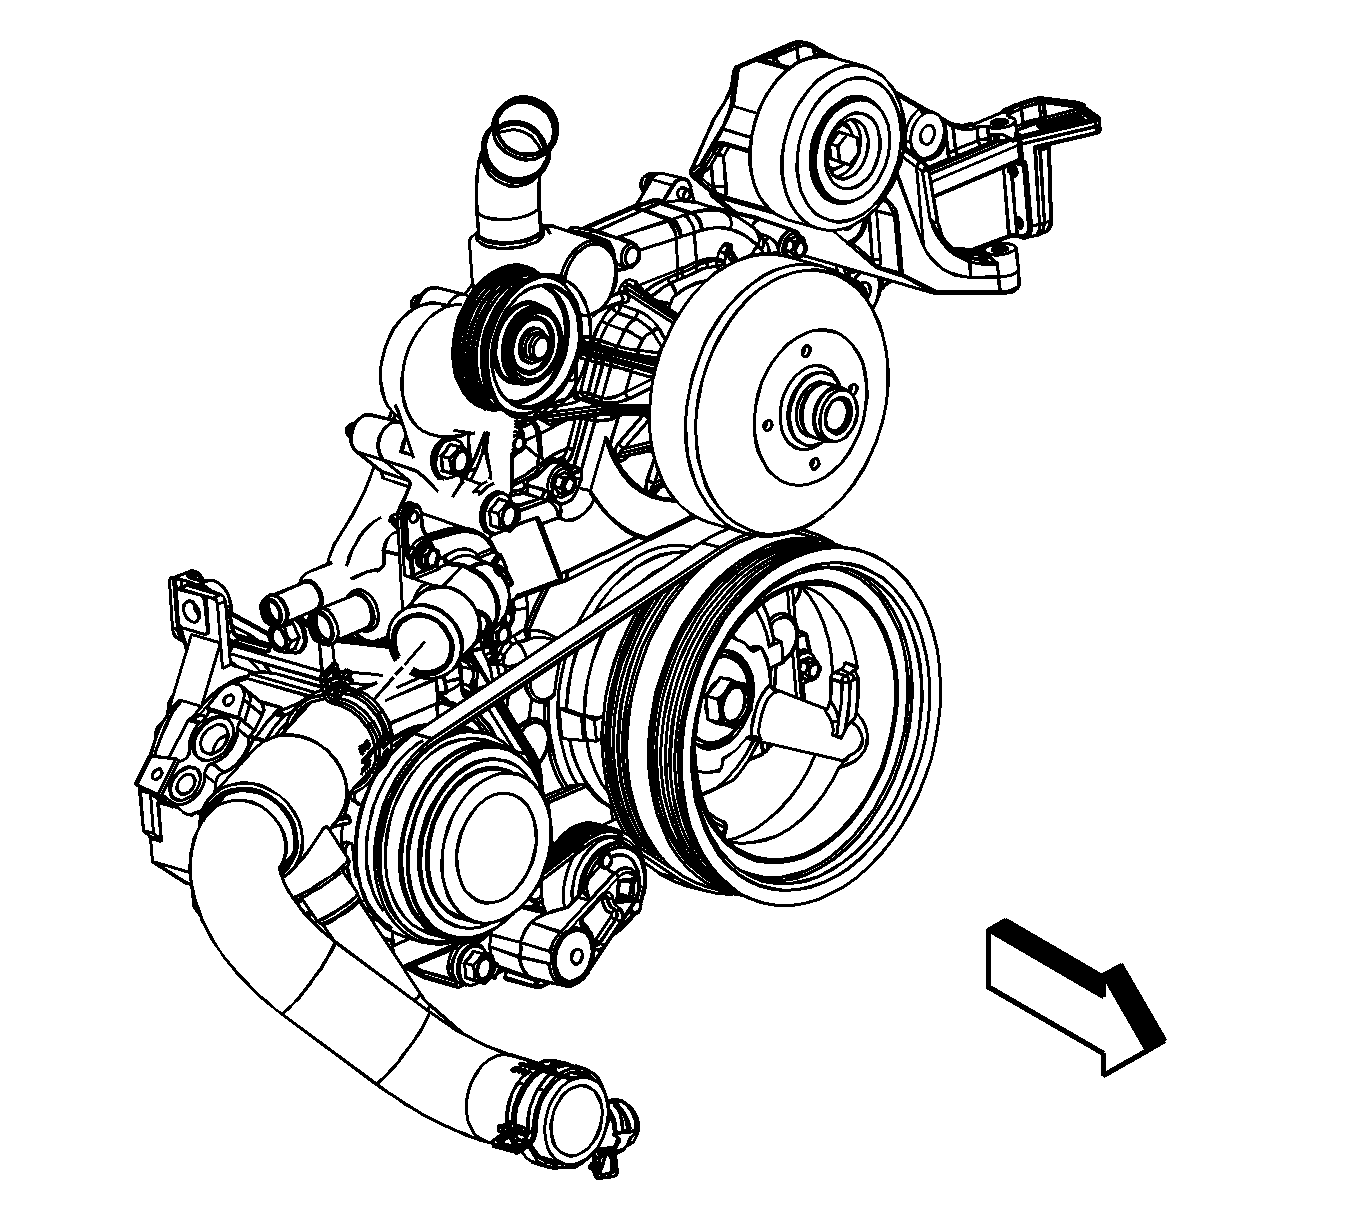
- Remove the A/C drive belt. Refer to
Air Conditioning Compressor Belt Replacement
.
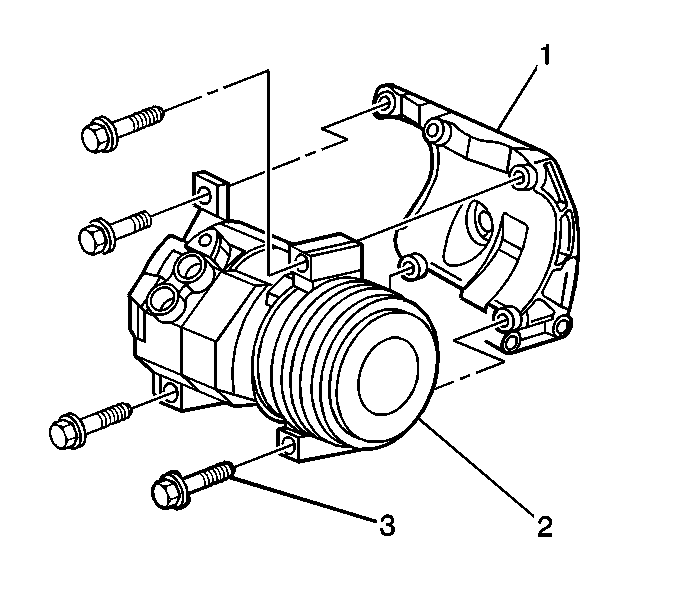
- Remove the discharge hose bolt and hose from the compressor.
- Remove the suction hose bolt and hose from the compressor.
- Discard the sealing washers. Cap the compressor and line openings.
- Disconnect the compressor electrical connections.
- Remove the A/C compressor bolts. The lower right bolt (3) will
stay with the compressor due to a lack of clearance.
- Remove the A/C compressor (2).
- Open the hose clamp and remove the radiator
inlet hose from the water pump.
- Open the hose clamp and remove the radiator
outlet hose from the water pump.
- Remove the heater hoses. Refer to
Heater Inlet Hose Replacement
and
Heater Outlet Hose Replacement
in Heating, Ventilation and Air Conditioning.
- Remove the auxiliary heater water pump. Refer to
Auxiliary Water Pump Replacement
in Engine Cooling.
- Disconnect the evaporative emission (EVAP)
canister purge solenoid (1).
- Remove the harness bracket nut (2) in order to remove the engine
harness from the intake manifold.
- Disconnect the manifold absolute pressure
(MAP) sensor (1) and knock sensor (2) electrical connectors.
- Remove the connector position assurance
(CPA) retainer (1) from the main coil harness connector.
- Disconnect the main coil harness (4) and fuel injector (2)
electrical connectors on the left side.
- Remove the harness clips (3, 5) from the fuel rail.
- Remove the CPA retainer (1) from
the main coil harness connector.
- Disengage the CPA retainer on the electronic throttle control (ETC).
- Disconnect the main coil harness (4), fuel injectors (3),
and ETC (2) electrical connectors on the right side.
- Remove the harness clips (1) from the fuel rail.
- Remove the engine wiring harness ground
bolt (4).
- Reposition the harness ground (2) and negative battery cable (3)
from the block.
- Disconnect the engine coolant temperature (ECT) sensor (5) electrical
connector.
- Remove the harness ground bolt at the right
rear of the engine block.
- Reposition the harness ground (2) and auxiliary negative battery
cable, if equipped, from the block.
- Remove the harness ground bolt at the left rear of the engine block.
- Reposition the harness ground, and engine ground strap from the block.
- Disconnect the following electrical connectors:
| • | The oil pressure sensor (1) |
| • | The camshaft position (CMP) sensor (3) |
- Unclip any missed engine harness clips from the engine.
- Disconnect the EVAP purge solenoid vent
tube from the solenoid (1) and vapor pipe (2).
- Remove the EVAP tube.
- Disconnect the fuel feed line. Refer to
Metal Collar Quick Connect Fitting Service
in Engine Controls -
4.8L, 5.3L, and 6.0L.
- Raise and suitably support the vehicle. Refer to
Lifting and Jacking the Vehicle
in General Information.
- Disconnect the following electrical connectors
from the engine:
| • | The crankshaft position (CKP) sensor (1) |
| • | The engine oil level sensor (3) |
| • | The coolant heater, if equipped |
- Remove the battery cable channel bolt.
- Slide the channel pin out of the oil pan tab.
- Reposition the lower engine wiring harness off to the side.
- Lower the vehicle.
- Reposition the upper portion of the engine wiring harness off to the side.
- Reposition the vent inlet hose clamp at
the throttle body.
- Remove the radiator vent inlet hose from the throttle body.
- Remove the 3-phase cable bracket
cover bolt (1).
- Remove the starter/generator control module
(SGCM) cover bolts and cover.
- Remove the 3-phase cable nuts.
- Remove the 3-phase cable from the SGCM studs.
- Tie the cable out of the way.
- Disconnect the engine harness electrical
connector (3) from the power steering pump.
- Remove the power steering pump harness 42-volt
connector (5) from the wheelhouse panel.
- Disconnect the power steering pump harness 42-volt electrical connectors (3,
5).
- Remove the power steering pump harness bolt (3).
- Remove the power steering pump harness clip (2) from the bracket.
- Remove the power steering pump harness clip (1) from the bracket.
- Remove the ground bolt (3).
- Disconnect the power steering pump harness electrical connector (4)
from the power steering pump.
- Remove the power steering pump harness from the vehicle.
- Remove the battery cable clip bolt (1).
- Remove the battery cable junction block bracket bolts (2) from
the power steering pump bracket.
- Remove the power steering pump bolts (2).
- Reposition the power steering pump (1) with the lines attached,
off to the side.
- Remove the power steering pump bracket bolts (1, 2) and bracket (3).
- Remove the vacuum brake booster hose.
- Remove the ignition coils, as required, for the proper fit of the J 41798
. Refer to
Ignition Coil Replacement
in Engine Controls - 4.8L, 5.3L, and
6.0L.
Notice: Refer to Fastener Notice in the Preface section.
- Install the J 41798
to
the cylinder heads.
Tighten
| • | Tighten the M8 bolts to 25 N·m (18 lb ft). |
| • | Tighten the M10 bolts to 50 N·m (37 lb ft). |
- Remove the left and right engine mount to
engine mount bracket bolts.
- Raise the vehicle.
- Remove
the engine shield bolts and shield, if equipped.
- Remove the oil pan skid plate bolts and
plate, if equipped.
- Drain the engine oil.
- Remove the catalytic converter. Refer to
Catalytic Converter Replacement
in Engine Exhaust.
- Remove the positive battery cable clip bolt
and clip.
- Remove the passenger side closeout cover
bolt and cover.
Important: It is highly recommended to use a 3/8 inch,
6-point shallow thin wall socket and a wobble extension to loosen the torque
converter bolts, and a 8 mm ball end hex key to remove the bolts, in order
to prevent possibly stripping the bolts.
- Remove the torque converter bolts.
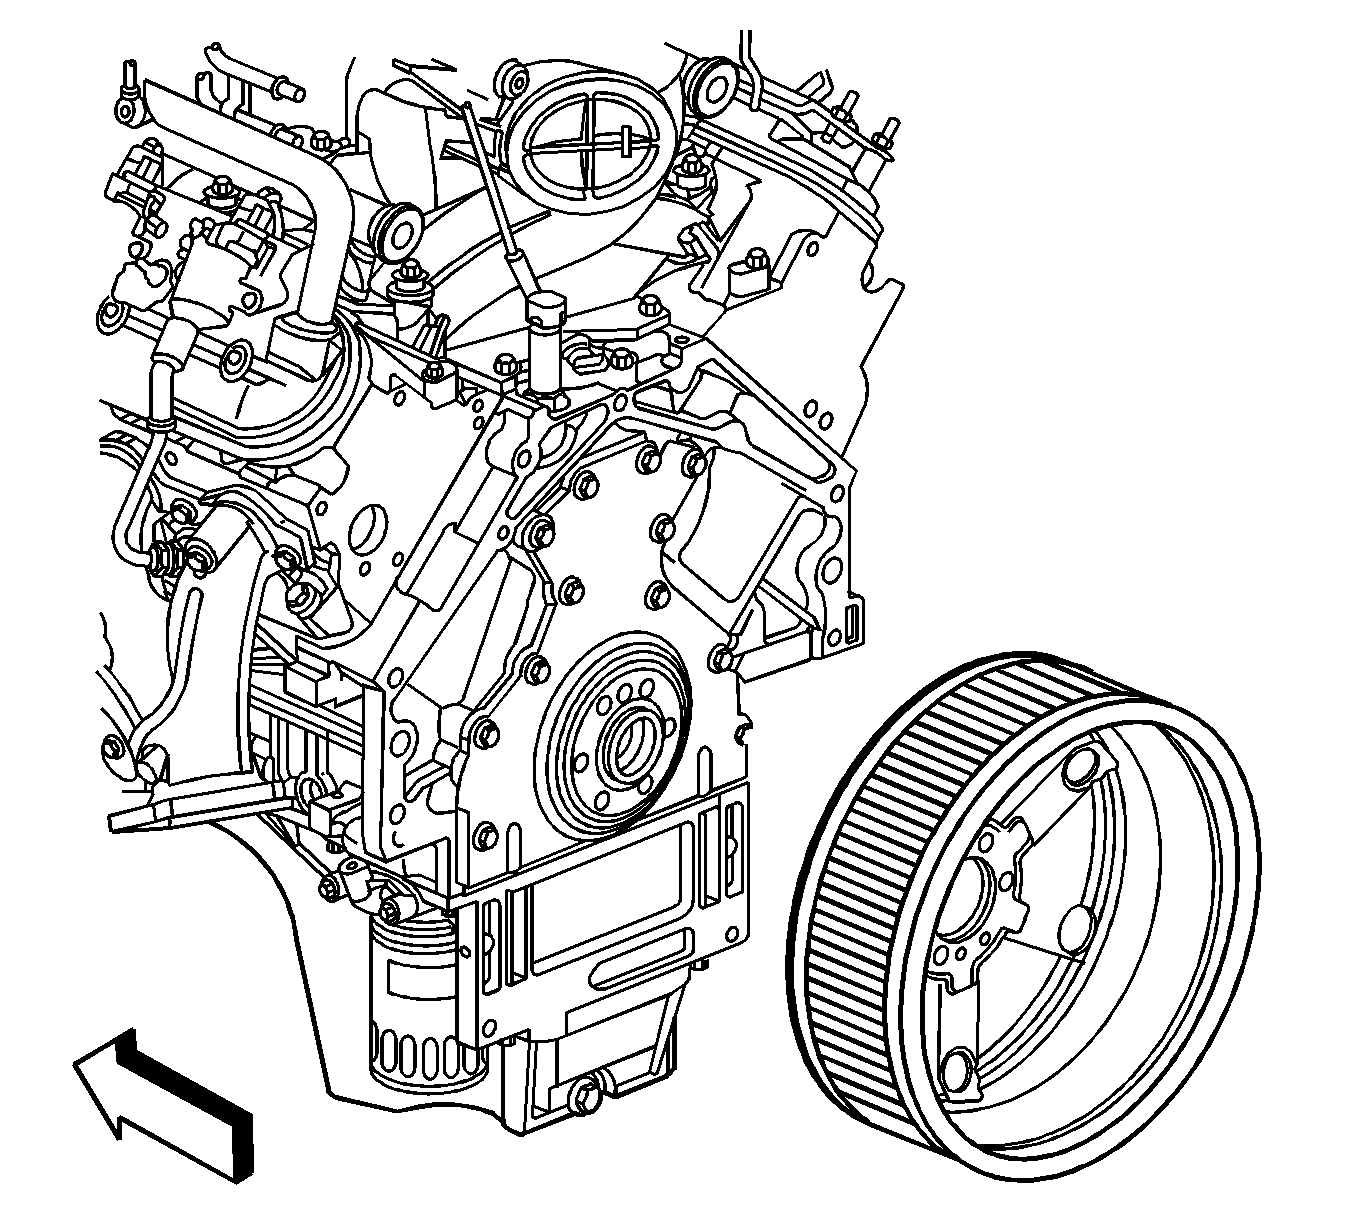
- Install J 46093
to the engine block.
The flange of J 46093
should locate into a hole in the flexplate.
Use 2 M10 1.5 x 40 mm bolts for proper tool operation.
Tighten
Tighten the bolts to 50 N·m (37 lb ft).
- Remove the transmission oil level indicator
tube bolt.
- Remove the transmission oil level indicator
tube from the transmission.
- Remove the transmission studs (1)
and bolts (2).
- Remove the transmission nuts.
- Install an engine hoist to the J 41798
.
- Install a floor jack under the transmission bellhousing for support.
Notice: Use care while moving the engine assembly in order to avoid
breaking the MAP sensor locating tabs. Broken MAP sensor tabs may result in
decreased engine performance.
- Separate the engine from the transmission. Install the J 21366
to the transmission in order to hold the torque
converter.
- Position or remove the transmission fill tube while removing the engine.
- Remove the engine from the vehicle.
- Once the engine is out of the vehicle, set the engine down.
- Remove the stator studs.
- Remove the stator.
- Remove the flexplate bolts and flexplate.
- Remove the rotor.
- Install the engine onto an engine stand.
- Remove the engine hoist.
- Remove the J 41798
from the engine.
Installation Procedure
- Install the J 41798
to the cylinder heads.
Tighten
| • | Tighten the M8 bolts to 25 N·m (18 lb ft). |
| • | Tighten the M10 bolts to 50 N·m (37 lb ft). |
- Install an engine hoist to the J 41798
.
- Remove the engine from the engine stand.
- Set the engine down.
- Install the rotor.
- Install the flexplate and bolts.
Tighten
Tighten the bolts to 100 N·m (74 lb ft).
- Install the stator.
- Install the stator studs.
Tighten
Tighten the studs to 16 N·m (12 lb ft).
- Install the engine to the vehicle.
- Remove the J 21366
from
the transmission.
- Position or install the transmission fill tube while installing the engine.
- Install the left and right engine mount
to engine mount bracket bolts.
Tighten
Tighten the bolts to 65 N·m (48 lb ft).
- Install the upper transmission stud until snug.
- Remove the floor jack from under the transmission bellhousing.
- Remove the engine hoist.
- Remove the J 41798
from the engine.
- Install the ignition coils, as required. Refer to
Ignition Coil Replacement
in Engine Controls - 4.8L, 5.3L, and
6.0L.
- Raise the vehicle.
- Install the transmission nuts.
Tighten
Tighten the nuts to 12 N·m (106 lb in).
- Install the transmission studs (1)
and bolts (2).
Tighten
Tighten the studs/bolts to 50 N·m (37 lb ft).
- Install the transmission oil level indicator
tube to the transmission.
- Install the transmission oil level indicator
tube bolt.
Tighten
Tighten the bolt to 18 N·m (13 lb ft).
- Remove the J 46093
from the engine block.
Important: It is highly recommended to use a 8 mm
ball end hex key to install and hand tighten the torque converter bolts. Then use
a 3/8 inch, 6-point shallow thin wall socket and a wobble extension
to torque the torque converter bolts in order to prevent possibly stripping the bolts.
- Install the torque converter bolts.
Tighten
Tighten the bolts to 63 N·m (46 lb ft).
- Install the passenger side closeout cover
and bolt.
Tighten
Tighten the bolt to 12 N·m (106 lb in).
- Install the positive battery cable clip
and bolt.
Tighten
Tighten the bolt to 9 N·m (80 lb in).
- Install the catalytic converter. Refer to
Catalytic Converter Replacement
in Engine Exhaust.
- Install the oil pan skid plate and bolts,
if equipped.
Tighten
Tighten the bolts to 20 N·m (15 lb ft).
- Install
the engine shield and bolts, if equipped.
Tighten
Tighten the bolts to 20 N·m (15 lb ft).
- Lower the vehicle.
- Install the vacuum brake booster hose.
- Install the power steering pump bracket (3) and bolts (1, 2).
Tighten
Tighten the bolts to 25 N·m (18 lb ft).
- Position the power steering pump (1) with the lines attached to the bracket.
- Install the power steering pump bolts (2).
Tighten
Tighten the bolts to 25 N·m (18 lb ft).
- Install the battery cable junction block
bracket bolts (2) to the power steering pump bracket.
Tighten
Tighten the bolts to 9 N·m (80 lb in).
- Install the battery cable clip bolt (1).
Tighten
Tighten the bolt to 9 N·m (80 lb in).
- Install the power steering pump harness to the vehicle.
- Connect the power steering pump harness electrical connector (4)
to the power steering pump.
- Install the ground bolt (3).
Tighten
Tighten the bolt to 25 N·m (18 lb ft).
- Install the power steering pump harness clip (1) to the bracket.
- Install the power steering pump harness
clip (2) to the bracket.
- Install the power steering pump harness bolt (3).
Tighten
Tighten the bolt to 25 N·m (18 lb ft).
- Connect the power steering pump harness
42-volt electrical connectors (3, 5).
- Install the power steering pump harness 42-volt connector (5)
to the wheelhouse panel.
- Connect the engine harness electrical connector (3)
to the power steering pump.
- Position the cable.
- Install the 3-phase cable to the SGCM studs.
- Install the 3-phase cable nuts.
Tighten
Tighten the nuts to 9 N·m (80 lb in).
- Install the SGCM cover and bolts.
Tighten
Tighten the bolts to 9 N·m (80 lb in).
- Install the 3-phase cable bracket
cover bolt (1).
Tighten
Tighten the bolt to 9 N·m (80 lb in).
- Install the radiator vent inlet hose to
the throttle body.
- Position the vent inlet hose clamp at the throttle body.
- Position the upper portion of the engine
wiring harness.
- Raise the vehicle.
- Position the lower engine wiring harness.
- Slide the channel pin into the oil pan tab.
- Install the battery cable channel bolt.
Tighten
Tighten the bolt to 12 N·m (106 lb in).
- Connect the following electrical connectors
to the engine:
| • | The engine oil level sensor (3) |
| • | The coolant heater, if equipped |
- Lower the vehicle.
- Connect the fuel feed line. Refer to
Metal Collar Quick Connect Fitting Service
in Engine
Controls - 4.8L, 5.3L, and 6.0L.
- Install the EVAP tube.
- Connect the EVAP purge solenoid vent tube to the solenoid (1) and
vapor pipe (2).
- Connect the following electrical connectors:
| • | The oil pressure sensor (1) |
- Position the harness ground and engine ground strap to the block.
- Install the harness ground bolt at the left rear of the engine block.
Tighten
Tighten the bolt to 16 N·m (12 lb ft).
- Position the harness ground (2) and auxiliary negative battery
cable, if equipped, to the block.
- Install the harness ground bolt at the right rear of the engine block.
Tighten
Tighten the bolt to 16 N·m (12 lb ft).
- Connect the ECT sensor (5) electrical
connector.
- Position the harness ground (2) and negative battery cable (3)
to the block.
- Install the engine wiring harness ground bolt (4).
Tighten
Tighten the bolt to 25 N·m (18 lb ft).
- Install the harness clips (1) to
the fuel rail.
- Connect the main coil harness (4), fuel injectors (3), and
ETC (2) electrical connectors on the right side.
- Engage the CPA retainer on the ETC.
- Install the CPA retainer (1) to the main coil harness connector.
- Install the harness clips (3, 5)
to the fuel rail.
- Connect the main coil harness (4) and fuel injector (2)
electrical connectors on the left side.
- Install the CPA retainer (1) to the main coil harness connector.
- Connect the MAP sensor (1) and knock
sensor (2) electrical connectors.
- Install the harness bracket nut (2).
Tighten
Tighten the nut to 5 N·m (44 lb in).
- Connect the EVAP canister purge solenoid (1).
- Install the auxiliary heater water pump. Refer to
Auxiliary Water Pump Replacement
in Engine Cooling.
- Install the heater hoses. Refer to
Heater Inlet Hose Replacement
and
Heater Outlet Hose Replacement
in Heating, Ventilation and Air Conditioning.
- Install the radiator outlet hose to the
water pump and close the hose clamp.
- Install the radiator inlet hose to the water
pump and close the hose clamp.
- Install the A/C compressor (2).
- Install the A/C compressor bolts.
Tighten
Tighten the bolts to 50 N·m (37 lb ft).
- Connect the compressor electrical connections.
- Remove the caps from the compressor and line openings. Install NEW sealing
washers.
- Install the suction hose and bolt to the compressor.
Tighten
Tighten the bolt to 16 N·m (12 lb ft).
- Install the discharge hose and bolt to the compressor.
Tighten
Tighten the bolt to 16 N·m (12 lb ft).
- Install the A/C drive belt. Refer to
Air Conditioning Compressor Belt Replacement
.
- Install the radiator support. Refer to
Radiator Support Replacement
in Body Front End.
- Connect the ESB. Refer to
Hybrid Battery Service Disconnect/Connect
in Engine Electrical.
- Remove the hood hinge bolts from the service position.
- Lower the hood to the normal position.
- Install the hood hinge bolts.
Tighten
Tighten the bolt to 25 N·m (18 lb ft).
- Remove the fender covers.
- Fill the crankcase with the proper quantity and grade of engine oil. Refer
to
Approximate Fluid Capacities
or
Fluid and Lubricant Recommendations
in Maintenance and
Lubrication.
- Perform the CKP system variation learn procedure. Refer to
Crankshaft Position System Variation Learn
in Engine Controls -
4.8L, 5.3L, and 6.0L.
- Test the vehicle using the following procedure:
| 100.1. | Disable the ignition system. |
| 100.2. | Crank the engine several times. Listen for any unusual noises or evidence
that parts are binding. |
| 100.3. | Enable the ignition system. |
| 100.4. | Start the engine and listen for unusual noises. |
| 100.5. | Check the vehicle oil pressure gage or light and confirm that the engine
has acceptable oil pressure. |
| 100.6. | Run the engine speed at about 1,000 RPM until the engine has reached
normal operating temperature. |
| 100.7. | Listen for sticking lifters and other unusual noises. |
| 100.8. | Inspect for fuel, oil, and/or coolant leaks while the engine
is running. |
| 100.9. | Perform a final inspection for the proper engine oil and coolant levels. |
- Install the engine sight shield. Refer to
Upper Intake Manifold Sight Shield Replacement
.
- Close the hood.
