Underbody Pop or Clunk Type Noise While Turning or Driving on Uneven Road Surfaces (Install Body Mount Insulator)

| Subject: | Underbody Pop or Clunk Type Noise While Turning or Driving on Uneven Road Surfaces (Install Body Mount Insulator) |
| Models: | 2004-2006 Cadillac Escalade, Escalade ESV, Escalade EXT |
| 2004-2006 Chevrolet Avalanche, Suburban, Tahoe |
| 2004-2007 Chevrolet Silverado (Classic) |
| 2004-2006 GMC Yukon, Yukon XL, Yukon Denali, Yukon Denali XL |
| 2004-2007 GMC Sierra, Sierra Denali (Classic) |
| 2003-2008 HUMMER H2 |
This bulletin is being revised to add the 2008 HUMMER H2. Please discard Corporate Bulletin Number 06-08-61-003A (Section 08 - Body and Accessories).
Condition
Some customers may comment on a pop or clunk type noise while turning or driving on uneven road surfaces. This noise can be heard and/or felt at either the driver's or front passenger floor pan area.
Cause
Under certain conditions, normal movement between the frame and body mount may cause this noise to occur.
Correction
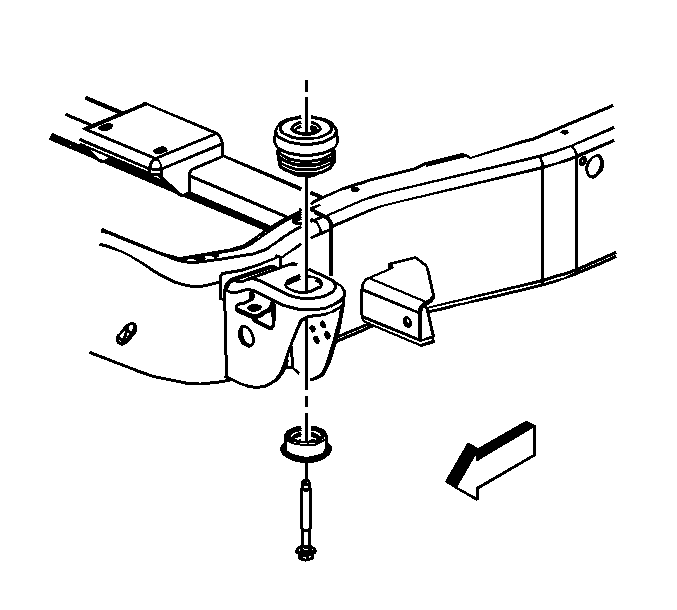
Install an insulator at the right and left side #1 body mounts. The insulator should be installed between the upper portion of the body mount and the frame bracket. The #1 mount is the mount located just under the A-pillar. Use the procedure listed below.
- Raise the vehicle on the hoist. It is recommended to use a four-post lift or strap the vehicle frame to the hoist arms.
- For the left side mount only, remove the intermediate park brake cable. Perform the following steps:
- Remove all of the body mount bolts on the side being repaired.
- Properly support the body at the #1 body mount area.
- Lower the chassis accordingly in order to remove the upper portion of the #1 body mount.
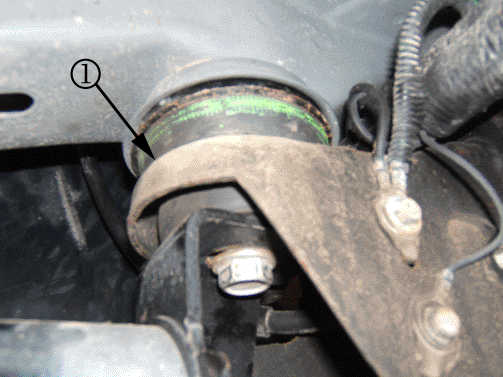
- Install the new insulator to the bottom of the top portion of the #1 body mount. The picture shows the insulators (1) location after the body mount is reassembled.
- Install the #1 body mount to the frame bracket.
- Perform the following procedure before installing the bolts.
- Install the body mount bolts.
- Reinstall the intermediate park brake cable.
- Repeat steps 3-9 for the other side.
- Test drive the vehicle to verify the repair.
| 2.1. | Remove the nut from the park brake equalizer. |
| 2.2. | Remove the intermediate cable from the equalizer. |
| 2.3. | Depress the retaining tabs that secure the park brake cable to the frame. |
| 2.4. | Pull slightly on the cable from the mounting area in order to provide slack for body movement without binding the cable. |

Caution: When you remove the body mount, do NOT separate the frame from the body more than is necessary. Possible personal injury and damage to multiple parts may result.
Important: While the body mount is removed, check the underbody area that interfaces with the top of the body mount for excess build-up of E-Coat Primer or other foreign material. If the surface is not smooth use a 90 degree die grinder, or equivalent to remove the excessive build-up. Apply an anti-corrosion protection, P/N 12378398 (in Canada, 10952414), to the bare surface as necessary to prevent rusting.

| 8.1. | Clean the bolt threads of all the original thread locking compound. |
| 8.2. | Clean the threads of the bolt with denatured alcohol or equivalent and allow to dry. |
| 8.3. | Apply Threadlocker, GM P/N 89021297 (In Canada use P/N 10953488). |
Tighten
For 2003, 2004 and 2005 model year, tighten the bolts to 85 N·m (63 lb ft).
Tighten
For 2006-2008 model year, tighten the bolts to 100 N·m (74 lb ft).
Parts Information
Part Number | Description | Qty |
|---|---|---|
15899719 | Insulator, Body | 2 |
Warranty Information
For vehicles repaired under warranty, use:
Labor Operation | Description | Labor Time |
|---|---|---|
E9438* | Install Insulator to #1 Body Mount | 1.7 hrs |
* This labor operation number is for bulletin use only. This number will not be published in the Labor Time Guide. | ||
