Exhaust Pipe Replacement - Left Side 6.6L Engine
Removal Procedure
- Remove the turbocharger exhaust pipe. Refer to Turbocharger Exhaust Pipe Replacement .
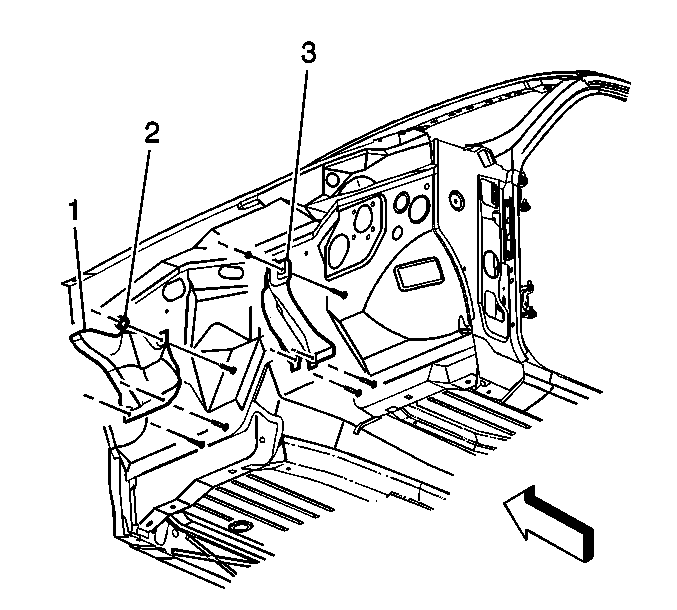
- Remove the exhaust heat shield nuts (2) heat shield (3) from the dash panel.
- Remove left exhaust pipe heat shield bolts.
- Position the heat shield to the side in order to access the exhaust manifold to exhaust pipe bolts.
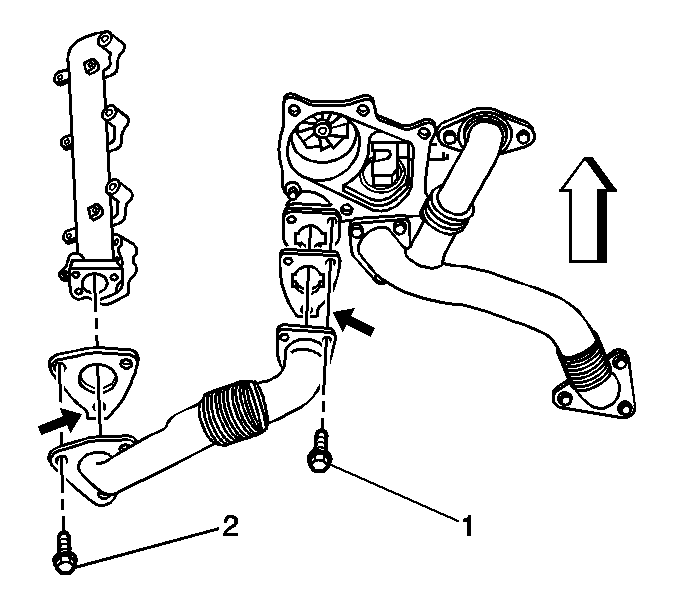
- Remove the exhaust manifold to exhaust pipe bolts (2).
- Remove and discard the gasket.
- Lower the vehicle.
- Remove the exhaust pipe heat shield. The shield will remove from the top of the engine.
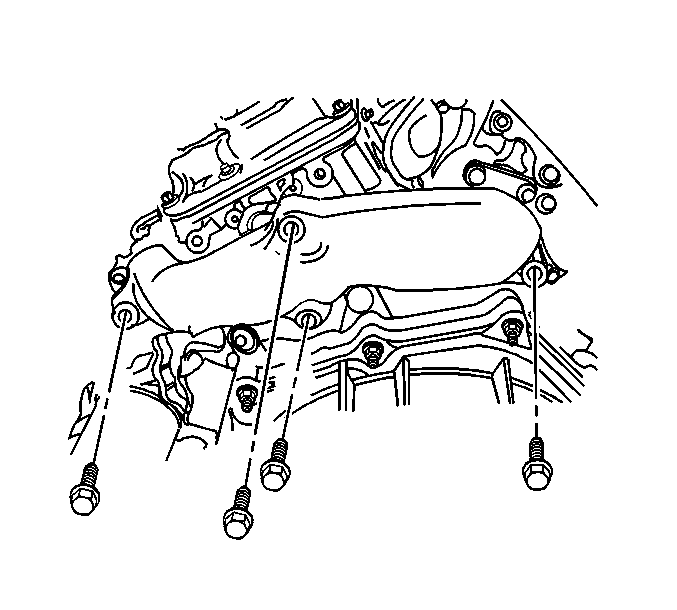
- Remove the exhaust pipe bolts (1) from the turbocharger.
- Remove the exhaust pipe with the gasket.
- Clean the exhaust pipe.
- Clean the exhaust pipe mating surfaces.
- Inspect the exhaust pipe for dents and cracks.
- Replace the exhaust pipe if any damage is found.
The turbocharger exhaust pipe does not need to be removed from the vehicle in order to remove the left exhaust pipe. Position the turbocharger exhaust pipe out of the way.
Do not remove the heat shield at this time.
Installation Procedure
- Install the exhaust pipe with a NEW gasket to the turbocharger. Align the tab on the gasket at the turbocharger to face inward.
- Install the exhaust pipe to turbocharger bolts (1).
- Install the exhaust pipe heat shield but do not install the bolts.
- Raise the vehicle.
- Install the exhaust pipe with a NEW gasket to the exhaust manifold. Align the tabs on the gasket to face outward.
- Install the exhaust pipe to exhaust manifold bolts (2).
- Install the exhaust pipe heat shield bolts.
- Install the left side exhaust heat shield (3) at the dash panel.
- Install the heat shield nuts (2).
- Install the turbocharger exhaust pipe. Refer to Turbocharger Exhaust Pipe Replacement .
To aid in installation temporarily install an exhaust pipe to exhaust manifold bolt.
Notice: Use the correct fastener in the correct location. Replacement fasteners must be the correct part number for that application. Fasteners requiring replacement or fasteners requiring the use of thread locking compound or sealant are identified in the service procedure. Do not use paints, lubricants, or corrosion inhibitors on fasteners or fastener joint surfaces unless specified. These coatings affect fastener torque and joint clamping force and may damage the fastener. Use the correct tightening sequence and specifications when installing fasteners in order to avoid damage to parts and systems.
Tighten
Tighten the bolts to 53 N·m (39 lb ft).
Tighten
Tighten the bolts to 53 N·m (39 lb ft).
Tighten
Tighten the bolts to 8 N·m (71 lb in).
Tighten
Tighten the nuts to 9 N·m (80 lb in).
