CAMPAIGN: FUEL INJECTION PUMP HOUSING EROSION

Subject: FUEL INJECTION PUMP HOUSING EROSION
Models: 1992 W5RO42 and W7RO42 GMC Forwards
TO: ALL GENERAL MOTORS DEALERS:
General Motors of Canada Limited has learned that the fuel injection pump housing may erode on certain 1992 W5-7 GMC Forward equipped with 6.5L (6BGlTC) Diesel Engines. The erosion condition could eventually allow diesel fuel to leak into the engine crankcase causing oil dilution which could lead to engine failure. Analysis has shown that the pump housing erosion condition is the result of cavitation in the injection pump caused by positive to negative pressure fluctuations.
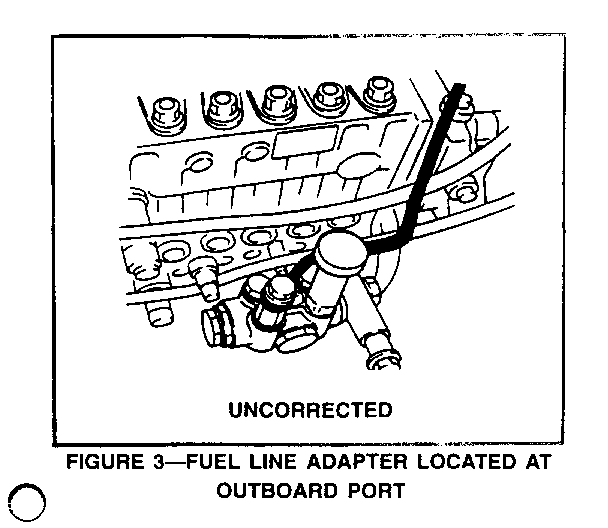
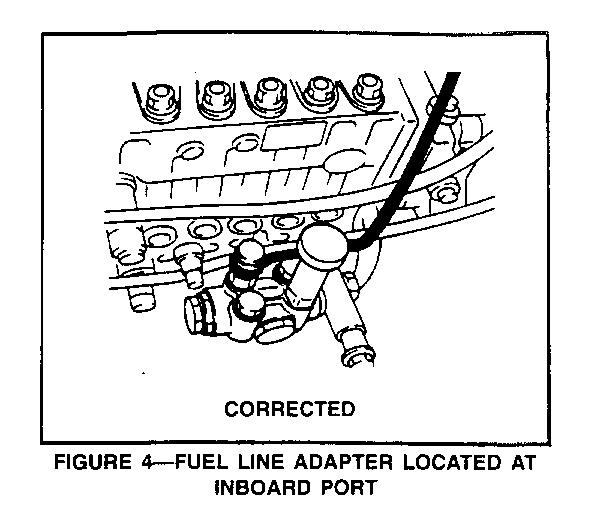
To correct this condition, the location of the fuel supply line on the transfer pump will need to be switched from the outboard Port "A" (Figure 3) to the inboard Port "B" (Figure 4).
VEHICLES INVOLVED:
Involved are CERTAIN 1992 model W5RO42 and W7RO42 GMC Forward trucks. These vehicles were built within the following VIN breakpoints:
Year Model Plant Plant Code From Through 1992 GMC W5 Detroit 3 N3000003 N3002278 1992 GMC W7 Detroit 3 N3200004 N3202272
All affected vehicles have been identified by the VIN listing provided to involved dealers with this bulletin. Any dealer not receiving a listing was not shipped any of the affected vehicles.
DEALER CAMPAIGN RESPONSIBILITY:
Dealers are to perform this campaign on all involved vehicles at no charge to owners, regardless of kilometres traveled, age of vehicle, or ownership, from this time forward.
Whenever a vehicle subject to this campaign is taken into your new or used vehicle inventory, or it is in your dealership for service, you are to ensure the campaign correction has been made before selling or releasing the vehicle.
Owners of vehicles recently sold from your new vehicle inventory are to be contacted by the dealer, and arrangements made to make the required modification according to instructions contained in this bulletin.
CAMPAIGN PROCEDURE:
Refer to Section 4 of the Service Policies and Procedures Manual for the detailed procedure on handling Product Campaigns. Dealers are requested to complete the campaign on all transfers as soon as possible.
OWNER NOTIFICATION:
All owners of record at the time of campaign release are shown on the attached computer listing and have been notified by first class mail from General Motors. The listings provided are for campaign activity only and should not be used for any other purpose.
PARTS INFORMATION:
Parts required to complete this campaign should be ordered through regular channels, as follows:
Part Number Description Quantity/Vehicle
97383286 Fuel Injection Pump Modification Kit 1 which consists of: 2 pcs. Gasket; Feed Pump 6 pcs. Gasket; Fuel Pipe 1 pc. Pipe; Fuel Feed
PARTS AND LABOUR CLAIM INFORMATION:
Credit for the campaign work performed will be paid upon receipt of a properly completed campaign claim card or DCS transmission in accordance with the following:
Repair Code Description Time Allowance 2A Replace Fuel Injection Pump Modification Kit 0.7
Time allowance includes 0.1 hour for dealer administrative detail associated with this campaign. Parts credit will be based on dealer net plus 30% to cover parts handling.
SERVICE PROCEDURE:
1. Set parking brake and block wheels.
2. Tilt Cab: Make sure Tilt-lock is properly positioned.
3. Remove the tie-strap securing harnesses to fuel pipe. Save strap to be reused later.
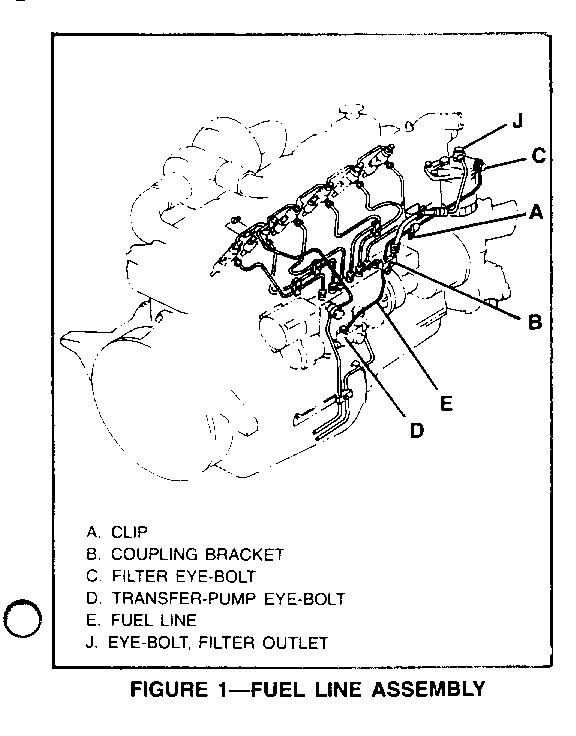
4. Remove one (1) 10mm bolt "A" (Figure 1), securing clip to fuel line mounting bracket.
5. Loosen (1) 10mm bolt "B" (Figure 1) and remove coupling bracket from fuel lines. (Save parts removed in Steps 4 and 5 to be reused later.)
6. Loosen eye-bolt at fuel filter "C" (Figure 1) using a 17mm socket and ratchet, do not completely remove bolt at this time.
IMPORTANT: When working with lines be careful not to bend or damage them.
7. Loosen eye-bolt at transfer pump "D" (Figure 1) using a 17mm socket, swivel, 18" long extension and ratchet. Use a 19mm open end wrench to prevent the adapter from turning at the transfer pump. (NRR/W5 loosen and remove the filter outlet eye-bolt "J" to gain additional clearance.)
8. Remove the eye-bolts from the fuel line at the filter and transfer pump, and save them to be reused later.
9. Remove the fuel line between fuel filter and transfer pump "E" (Figure 1).
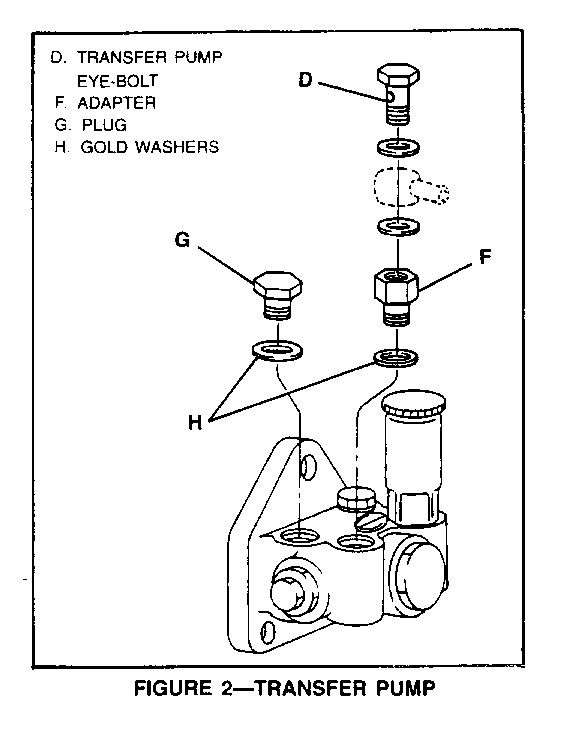
10. Remove the adapter "F" (Figure 2) from the transfer pump using a 19mm socket, swivel, 18" long extension and ratchet.
IMPORTANT: Be careful not to let the valve and spring in the transfer pump come out when the adapter is removed. Make sure the valve and spring stay in position.
11. Remove the plug "G" (Figure 2) next to adapter previously removed using a 19mm socket, swivel, extension and ratchet.
IMPORTANT: Be careful not to let the valve and spring in the transfer pump come out when the plug is removed. Make sure the valve and spring stay in position.
12. Using a new washer, install the plug "G" (Figure 2) into the outboard properly positioned in the groove and that the spring is properly positioned in the plug.
13. Tighten the plug using a 19mm socket and torque wrench to 40 N.m (30 lbs. ft.).
14. Reinstall adapter "F" (Figure 2) in transfer pump assembly port, where plug was removed, using new washer. Make sure washer is properly positioned in the groove and that the spring is properly positioned in the adapter.
15. Tighten the adapter using a 19mm socket and torque wrench to 40 N.m (30 lbs. ft.).
16. Put the new fuel pipe between the transfer pump and fuel filter.
17. Install eye-bolt, the one previously removed from the transfer pump, using new washers into the transfer pump and finger tighten "D" (Figure 1).
18. Install eye-bolt, the one previously removed from the fuel filter, using new washers into the fuel filter and finger tighten "C" (Figure 1). (NRR/W5 install eye-bolt at filter outlet "J" (Figure 1) using new washers.)
19. Install fuel line clip to fuel pipe with one 10nun bolt and finger tighten "A" (Figure 1).
20. Install fuel line coupling bracket to fuel lines with one 10mm bolt and tighten "B" (Figure 1).
21. Tighten the one 10mm bolt and clip securing fuel line to fuel line bracket to 8 N.m (6 lbs. ft.) "A" (Figure 1).
22. Tighten eye-bolt to fuel filter using a 17mm socket and torque wrench to 40 N.m (30 lbs. ft.) "C" (Figure 1).
23. Tighten eye-bolt to transfer pump using a 17mm socket and torque wrench to 40 N.m (30 lbs. ft.) "D" (Figure 1). It may be necessary to hold the adapter or the line lug to prevent them from turning. (NRR/W5 tighten eye-bolt at filter outlet "J" (Figure 1) to 40 N.m (30 lbs. ft.).
24. Resecure the wire harnesses to the fuel pipe using previously removed strap. 25. Start the engine and idle for 2 to 5 minutes. Inspect for leaks and correct as required.
26. Install Campaign Identification Label.
INSTALLATION OF CAMPAIGN IDENTIFICATION LABEL
Clean surface of radiator upper mounting panel and apply a Campaign Identification Label. Make sure the correct campaign number is inserted on the label. This will indicate that the campaign has been completed.
Dear General Motors Customer:
General Motors of Canada Limited has learned that the fuel injection pump housing may erode on certain 1992 W5-7 GMC Forward equipped with 6.5L Diesel Engines. The erosion condition could eventually allow diesel fuel to leak into the engine crankcase causing oil dilution which could lead to engine failure. Analysis has shown that the pump housing erosion condition is the result of cavitation in the injection pump caused by positive to negative pressure fluctuations.
To correct this condition, the fuel supply line will need to be relocated on the transfer pump. This change will insure that the pump pressure will remain positive, increasing pump durability and reliability without affecting engine performance.
This service will be provided for you at no charge.
Please contact your GM dealer as soon as possible to arrange a service date.
If parts are required, ask your dealer for details regarding their availability. If parts are not in stock, they can be ordered before scheduling your service date.
This letter identifies your vehicle. Presentation of this letter to your dealer will assist their Service personnel in completing the necessary correction to your vehicle in the shortest possible time.
We are sorry to cause you this inconvenience; however, we have taken this action in the interest of your continued satisfaction with our products.
Customer Support Department General Motors of Canada Limited
2N20
General Motors bulletins are intended for use by professional technicians, not a "do-it-yourselfer". They are written to inform those technicians of conditions that may occur on some vehicles, or to provide information that could assist in the proper service of a vehicle. Properly trained technicians have the equipment, tools, safety instructions and know-how to do a job properly and safely. If a condition is described, do not assume that the bulletin applies to your vehicle, or that your vehicle will have that condition. See a General Motors dealer servicing your brand of General Motors vehicle for information on whether your vehicle may benefit from the information.
