SENTRY DIESEL FUEL FILTER WATER IN FUEL

VEHICLES AFFECTED: All 1984 Models With The 6.2L Diesel Engine
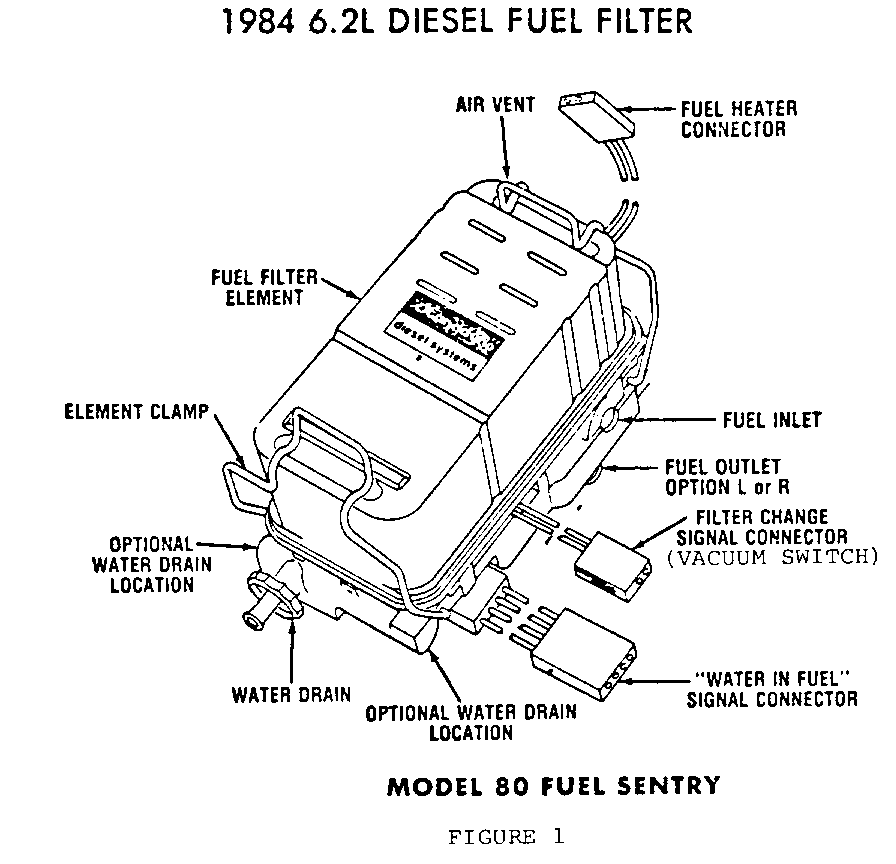
This bulletin covers service information for the Stanadyne Model 80 Fuel Sentry Fuel Filter and the 'water in fuel' light. The 1984 model trucks with a 6.2L diesel engine use a single fuel filter combining primary and secondary filtering capability and a water separation system. The filter also has an integral fuel heater (Figure 1).
WATER IN FUEL LIGHT
During refueling, it is possible for water to be pumped into the fuel tank along with the fuel. The 1984 vehicles have a water separation system in the filter (Figure 1). The vehicle also has a 'Water In Fuel' light in the instrument cluster which is designed to come on if water has accumulated in the fuel filter or if the filter becomes plugged. The 'Water In Fuel' light is also designed to come on during engine starting as a check that the bulb is working. If the light does not come on, check the bulb and fuse.
If the 'Water In Fuel' light comes on, the following chart may help determine the cause.
'WATER IN FUEL' LIGHT CHART CONDITION RECOMMENDATION ACTION ---------------------------- --------------------- Light comes on intermittently. Drain water from fuel filter.
Light stays on-engine running
1. Temperatures above freezing Drain fuel filter immediately. If no water is drained and light stays on - replace fuel filter.
2. Temperatures below freezing Drain fuel filter immediately. If no water can be drained - water may be frozen. Open air bleed to check for fuel pressure. If no fuel pressure replace filter. Light comes on at high speed or Fuel filter- plugged - replace. heavy accelerations.
Light stays on continuously - engine stalls will not restart.
1. After initial start-up. Fuel filter or fuel lines may be plugged. Replace or clear lines. 2. Immediately after refueling- Fuel tank purging required. See Large amounts of water pro- 'Fuel Tank Purge' procedure. bably pumped into the tank.
FUEL TANK PURGE PROCEDURE
CAUTION:
Use caution when working on or near the fuel tank or other parts of the fuel system. Use the same safety precautions you would normally use with gasoline when handling and disposing of the purged fuel. To dispose of purged fuel, contact a waste oil collection facility, a dealer, or a service station.
NOTICE: If the truck has an optional fuel tank (RPO NL2), use the following procedure on each side.
To purge the fuel tank:
1. Park vehicle in a level position. The fuel pick up is in the approximate centre of the tank.
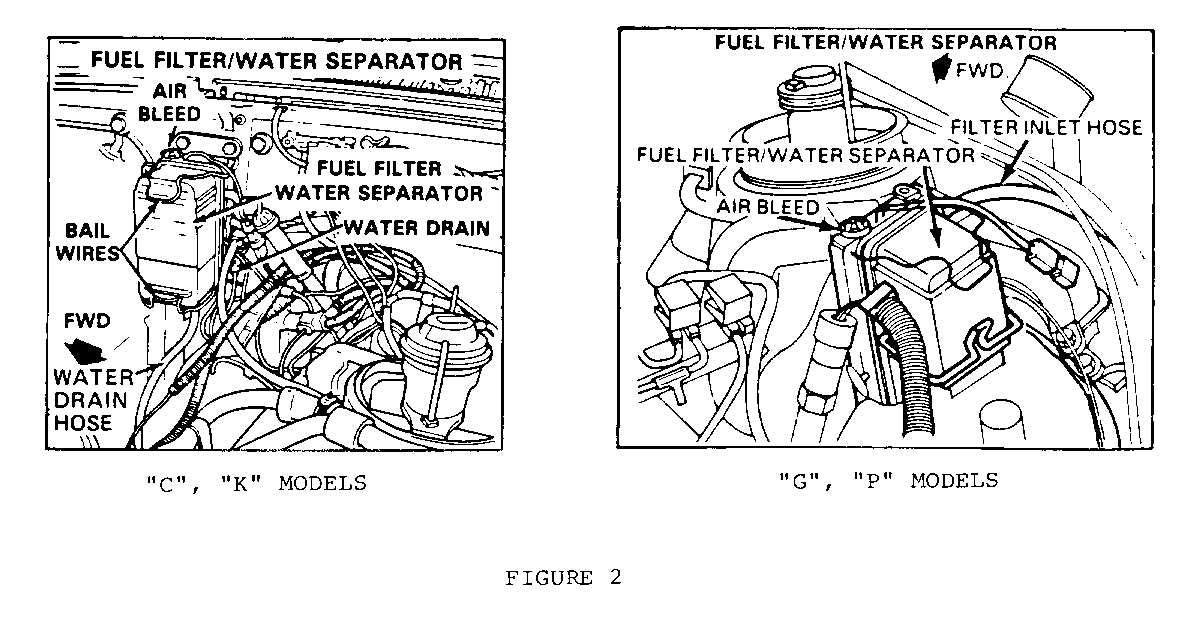
2. Place a large container under the filter water drain hose. Open the drain 3-4 turns. (Figure 2)
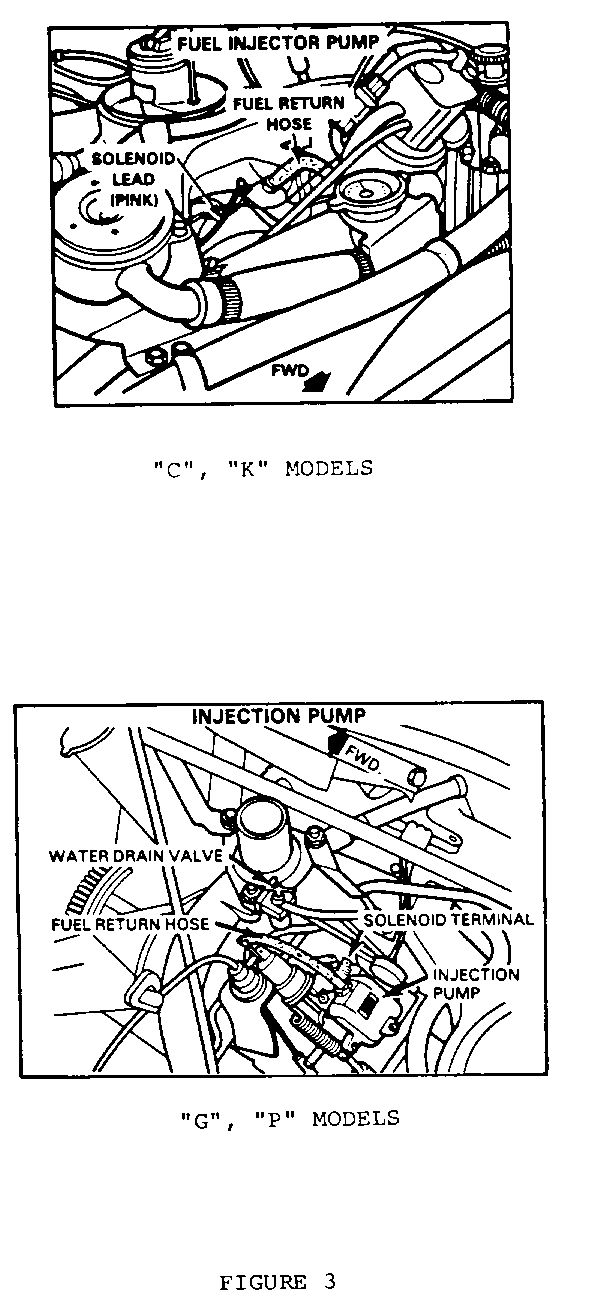
3. Disconnect the fuel return hose at the injection pump (Figure 3).
4. With the fuel tank cap properly installed, apply a low pressure 20.6 - 34.4 kPa (3-5 psi) maximum air through the fuel return hose. The fuel tank cap is designed to retain 20.6 - 34.4 kPa (3-5 psi) pressure, allowing water to be forced out of the tank via the filter drain hose.
5. Continue to drain until only clear fuel is observed - the complete contents of the tank may have to be drained.
6. Close drain valve tightly. Reinstall the fuel return hose.
FUEL FILTER REPLACEMENT
The fuel filter is easily removed and installed with the use of a screwdriver. To prevent fuel spillage drain fuel from the filter by opening both the air bleed and water drain valve allowing fuel to drain out into an appropriate container.
To remove the filter:
1. Remove fuel tank cap. This releases any pressure or vacuum in the tank.
2. Disengage both bail wires with a screwdriver.
3. Remove the filter.
4. Clean any dirt off the fuel port sealing surface of the filter adapter and the new filter.
5. Install the new filter; snap into position with bail wires.
6. Close the water drain valve and open the air bleed. Connect a 1/8 inch I.D. hose to the air bleed port and place the other end into a suitable container.
7. Disconnect fuel injection pump shut off solenoid wire. (Figure 3)
8. Crank engine for 10-15 seconds and then wait one minute for the starter motor to cool. Repeat until clear fuel is observed from the air bleed.
9. Close the air bleed, reconnect the injection pump solenoid wire and replace fuel tank cap.
10. Start engine and allow it to idle for 5 minutes.
11. Check fuel filter for leaks.
FUEL EXHAUSTION, ENGINE STOPS
Care should be taken not to run out of fuel however, if the engine stalls and you suspect fuel exhaustion the following procedure will facilitate restarting.
First, determine if engine stall is due to fuel exhaustion. open the filter air bleed valve (Figure 2). If air is present then the vehicle is probably out of fuel.
To restart the engine:
1. Add at least 7.5 liters (2 gallons) of fuel if the vehicle is parked on a level surface; as much as 18 liters (5 gallons) may be required if the vehicle is parked on a slope.
2. Disconnect the fuel injection pump shut off solenoid wire (pink wire) (Figure 3).
3. With the air bleed open crank the engine 10 to 15 seconds. Wait one minute for the starter to cool. Repeat until clear fuel is observed at the air bleed.
4. Close air bleed and reconnect injection pump solenoid wire.
5. Repeat cranking 10-15 seconds until engine starts.
FUEL FILTER-WATER DRAIN
To drain water:
1. Remove the vehicle fuel tank cap.
2. Place a container below the filter drain hose located below the filter (Figure 2).
3. With the engine off open water drain valve 2-3 turns.
4. Start engine. Allow it to idle for about 1-2 minutes or until clear fuel is observed.
5. Stop engine and close water drain valve.
6. Install fuel tank cap.
If the 'Water In Fuel' light comes on again after driving a short distance or the engine runs rough or stalls, a large amount of water has probably been pumped into the fuel tank. The fuel tank should be purged. See 'Fuel Tank Purge' procedure previously.
BIOCIDES
In warm or humid weather, fungi and/or bacteria may form in diesel fuel if there is water in the fuel. Fungi or bacteria can cause fuel system damage by plugging the fuel lines, fuel filter, or injection nozzles. They can also cause fuel system corrosion.
If fungi or bacteria have caused your fuel system problems, the fuel system components will have to be cleaned. Then, use a diesel fuel biocide to sterilize the fuel system (follow the biocide manufacturer's instructions).
Do not use any fuel additive other than a biocide as recommended here. No other fuel additive is recommended.
COLD WEATHER OPERATION
A fuel heater is an integral part of the fuel filter (Figure 1). The fuel heater is designed to come on when the fuel temperature is less than 4 deg.C (400F). It warms the fuel and helps stop wax flakes from building up in the fuel filter.
If the vehicle is driven in temperatures of less than -180C (0 deg.F) and Number 1-D or 'winterized' Number 2-D fuel is not available, kerosene can be added to reduce waxing. Kerosene should be added at a ratio of one gallon of kerosene to two gallons of diesel fuel. Because of the lower energy value of kerosene (and reduced fuel economy) it should be added only when anticipated temperatures are less than -18 deg.C (0 deg.F). Once kerosene has been added the engine should be run for several minutes to mix the fuel.
NOTICE: DO NOT try to use home heating oil or gasoline in the diesel engine. Either heating oll or gasoline may cause engine damage.
The addition of kerosene will not unplug a filter plugged with wax. Warming a 'waxed' filter 0 deg.C to 10 deg.C (32 deg.F to 50 deg.F) will return the wax to solution. Filter replacement is not normally required.
Also refer to the vehicle's Owner's and Driver's Manual for additional information on diesel fuel and cold weather operation.
General Motors bulletins are intended for use by professional technicians, not a "do-it-yourselfer". They are written to inform those technicians of conditions that may occur on some vehicles, or to provide information that could assist in the proper service of a vehicle. Properly trained technicians have the equipment, tools, safety instructions and know-how to do a job properly and safely. If a condition is described, do not assume that the bulletin applies to your vehicle, or that your vehicle will have that condition. See a General Motors dealer servicing your brand of General Motors vehicle for information on whether your vehicle may benefit from the information.
