DTC P0723 Output Speed Sensor Circuit Intermittent L57/L65 EFI
Circuit Description
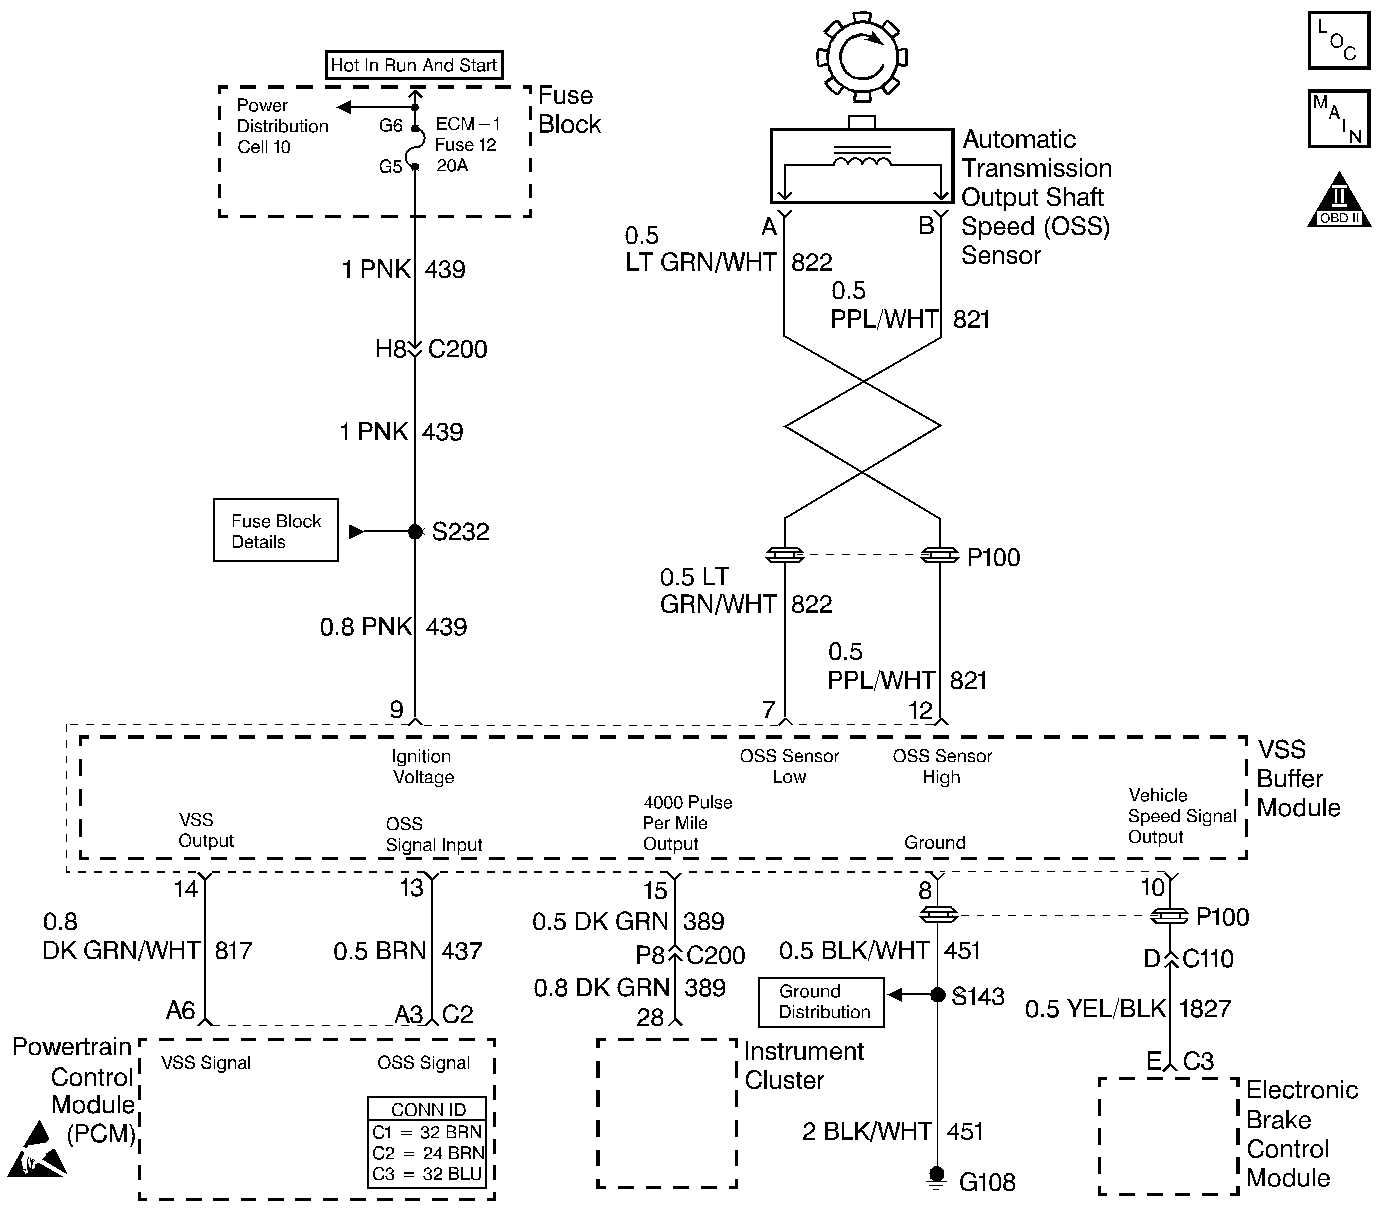
The speed sensor circuit consists of a magnetic induction type sensor, which is the output shaft speed (OSS) sensor, a vehicle speed sensor (VSS) buffer module, and wiring. Gear teeth pressed onto the output shaft carrier assembly induce an alternating voltage into the sensor. This signal transmits to the VSS buffer module. The VSS buffer module compensates for various final drive ratios. The VSS buffer module also converts the alternating current (AC) OSS signal into a 40 pulse per revolution (PPR) 5-volt DC square wave form signal on circuit 437 to indicate transmission output speed.
If the PCM detects an unrealistically large change in the output shaft speed (OSS) sensor reading, then DTC P0723 sets. DTC P0723 is a type B DTC.
Conditions for Running the DTC
| • | No TFP manual valve position switch DTC P1810. |
| • | No TFP manual valve position switch change for greater than 6 seconds. |
| • | The engine must be running more than 475 RPM for at least 7 seconds. |
| • | System voltage is 8.0-18.0 volts. |
Conditions for Setting the DTC
The OSS RPM decrease is greater than 1000 RPM while in a DRIVE gear for at least 3.5 seconds.
Action Taken When the DTC Sets
| • | The PCM illuminates the malfunction indicator lamp (MIL). |
| • | The PCM commands to maximum line pressure. |
| • | The PCM freezes shift adapts. |
| • | The PCM defaults to the calculated output speed value using the ISS sensor values. |
| • | The PCM stores DTC P0723 in PCM history. |
Conditions for Clearing the MIL/DTC
| • | For Federal and California emissions, the PCM turns OFF the MIL during the third consecutive trip in which the diagnostic test runs and passes. |
| • | A scan tool clears the DTC from PCM history. |
| • | For Federal and California emissions, the PCM clears the DTC from PCM history if the vehicle completes 40 consecutive warm-up cycles without an emission related diagnostic fault occurring. |
| • | For vehicles equal to or greater than 15,000 lbs GVW, the PCM clears the DTC from PCM history if the vehicle completes 40 consecutive warm-up cycles without a non-emission related diagnostic fault occurring. |
| • | The PCM cancels the DTC default actions when the fault no longer exists and the ignition switch is OFF long enough in order to power down the PCM. |
Diagnostic Aids
| • | Inspect the wiring at the PCM, the A/T OSS, the VSS buffer module connectors and all other circuit connecting points for the following conditions: |
| - | A backed out terminal |
| - | A damaged terminal |
| - | Reduced terminal tension |
| - | A chafed wire |
| - | A broken wire inside the insulation |
| - | Moisture intrusion |
| - | Corrosion |
| • | It may be necessary to drive the vehicle. |
| • | When diagnosing for an intermittent short or open, massage the wiring harness while watching the test equipment for a change. |
Test Description
The numbers below refer to the step numbers on the diagnostic table.
-
This step verifies the fault condition.
-
This step verifies the OSS sensor and circuit output to the VSS buffer module.
-
This step tests the voltage supply to the VSS buffer module.
-
This step tests the integrity of the ground circuit.
Step | Action | Value(s) | Yes | No | ||||
|---|---|---|---|---|---|---|---|---|
1 | Was the Powertrain On-Board Diagnostic (OBD) System Check performed? | -- | ||||||
Important: Before clearing the DTCs, use the scan tool in order to record the Freeze Frame and Failure Records. Using the Clear Info function erases the Freeze Frame and Failure Records from the PCM. Does the transmission OSS fluctuate more than the specified value? | 1,000 RPM | Go to Diagnostic Aids | ||||||
3 |
Does the voltage fluctuate at 2000 RPM? | -- | ||||||
Does the voltage fluctuate at 2,000 RPM? | Greater than 2.0 volts AC | |||||||
5 | Inspect circuit 821 (PPL/WHT) and circuit 822 (LT GRN/WHT) for an intermittent open. Refer to General Electrical Diagnosis in Wiring Systems. Was the condition found? | -- | ||||||
6 | Inspect circuit 821 (PPL/WHT) and circuit 822 (LT GRN/WHT) for an intermittent short together or a short to ground. Refer to General Electrical Diagnosis in Wiring Systems. Was the condition found? | -- | -- | |||||
Is the voltage greater than the specified value? | 10.5 volts DC | |||||||
8 | Repair the intermittent open or high resistance in circuit 439 (PNK). Refer to Wiring Repairs in Wiring Systems. Is the repair complete? | -- | -- | |||||
Is the voltage greater than the specified value? | 10.5 volts DC | |||||||
10 | Repair the open or high resistance in circuit 451 (BLK/WHT) (ground). Refer to Wiring Repairs in Wiring Systems. Is the repair complete? | -- | -- | |||||
11 |
Is the voltage steady and within the specified value? | 4.8-5.2 volts DC | ||||||
12 | Repair the short in circuit 821 (PPL/WHT) and circuit 822 (LT GRN/WHT). Refer to Wiring Repairs in Wiring Systems. Is the repair complete? | -- | -- | |||||
13 |
Is the voltage reading steady within the specified value? | 1.5-3.5 volts DC | ||||||
14 | Is the voltage from step 11 greater than the specified value? | 5.2 Volts DC | ||||||
15 | Inspect for a short to power in circuit 437 (BRN). Refer to General Electrical Diagnosis in Wiring Systems. Was the condition found? | -- | ||||||
16 | Inspect circuit 437 (BRN) for continuity or short to ground. Refer to General Electrical Diagnosis in Wiring Systems. Was the condition found? | -- | ||||||
17 | Replace the OSS sensor. Refer to Vehicle Speed Sensor Replacement . Is the replacement complete? | -- | -- | |||||
18 | Replace the VSS buffer module. Is the replacement complete? | -- | -- | |||||
19 | Inspect the PCM terminals and connector for reduced terminal tension or corrosion. Was the condition found? | -- | ||||||
20 | Replace the PCM. Refer to Powertrain Control Module Replacement/Programming in Engine Controls. Is the replacement complete? | -- | -- | |||||
21 | Repair the circuit as necessary. Refer to Wiring Repairs in Wiring Systems. Is the repair complete? | -- | -- | |||||
22 | Perform the following procedure in order to verify the repair:
Has the test run and passed? | -- | System OK |
