For 1990-2009 cars only
Removal Procedure
- Disconnect the negative battery cable(s).
- Raise the vehicle.
- Remove the left front tire.
- Remove the splash shield from the left front wheel well.
- Remove the lead wires from the glow plugs in cylinders 1 and 3. Use J 39083 glow plug connector remover and installer in order to disconnect the glow plug lead wires.
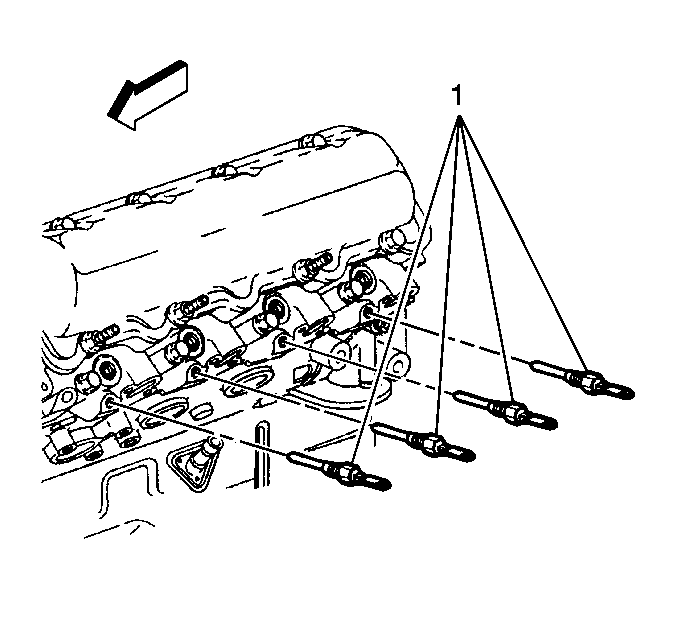
- Remove the glow plugs (1) from cylinders 1 and 3. If the glow plug was damaged during removal, refer to Damaged Glow Plug Removal
- Remove the Engine Cover. Refer to Engine Cover removal in Interior Trim.
- From the inside of the vehicle, remove the lead wires from the glow plugs in cylinders 5 and 7. Use J 39083 glow plug connector remover and installer in order to disconnect the glow plug lead wires.
- Remove the glow plugs from cylinders 5 and 7. If the glow plug was damaged during the removal procedure, refer to Damaged Glow Plug Removal
Caution: Unless directed otherwise, the ignition and start switch must be in the OFF or LOCK position, and all electrical loads must be OFF before servicing any electrical component. Disconnect the negative battery cable to prevent an electrical spark should a tool or equipment come in contact with an exposed electrical terminal. Failure to follow these precautions may result in personal injury and/or damage to the vehicle or its components.
Installation Procedure
- Install the glow plugs into cylinders 1 and 3 by reaching through the left front wheel well.
- Install the lead wires for cylinder 1 and 3.
- Install the splash shield in the left front wheel well.
- Inspect the wire routing, ensuring that the lead wires are not rubbing against the exhaust manifold or any part that may harm the wire insulation.
- Install the left front tire.
- Install the glow plugs into cylinders 5 and 7 from inside of the vehicle.
- Connect the lead wires to the glow plugs.
- Connect the negative battery cables.
- Install the Engine Cover. Refer to Engine Cover Installation in Interior Trim.
Tighten
Tighten the glow plugs to 17 N·m (13 lb ft).
Tighten
Tighten the glow plugs to 17 N·m (13 lb ft).
Important: Ensure that the PCM electrical harness is properly routed to avoid contact with the Engine Cover during installation.
