Fuel Injection System Diagnosis EFI
Always begin the diagnosis of the electronic fuel injection system with the On-Board Diagnostic (OBD) System Check before proceeding to any other diagnostics. This will reduce the diagnosis time and prevent an unnecessary replacement of parts. The On-Board Diagnostic (OBD) System Check will give direction to further diagnostics, such as Engine Cranks But Will Not Run or a DTC Table. The diagnosis of an electronic fuel injection pump, including the fuel injection solenoid, the fuel solenoid driver, the injection timing stepper motor and the engine shutoff solenoid also starts with the On-Board Diagnostic (OBD) System Check.
If a driveability symptom exists, refer to the particular symptom in the Driveability Symptoms.
Damage to the injection lines including chinking that causes restrictions or leakage could effect driveability or cause a DTC to set.
Fuel Pipes/Hoses
A fuel odor may be the result of a leaking fuel feed, return pipe or hose. Fuel pipes that are pinched, plugged, or misrouted may cause a restricted fuel delivery.
Fuel Injection System Diagnosis MFI
Housing Pressure Cold Advance Solenoid

The housing pressure cold advance feature advances the injection timing about 4 degrees during cold operation. This provides better cold starts, reduced white smoke, improved cold idle, and emission control.
With the heavy-duty emission engine, an engine coolant temperature switch (ECT) controls the circuit. The ECT is located at the rear of the right cylinder head. The switch is calibrated to open the circuit at 35°C (95°F). Below the switching point, decreasing the housing pressure from 68.95 kPa (10 psi) to 0 advances the timing. Above the switching point, the housing pressure is returned to 68.95 kPa (10 psi). The same switch energizes the fast idle solenoid.
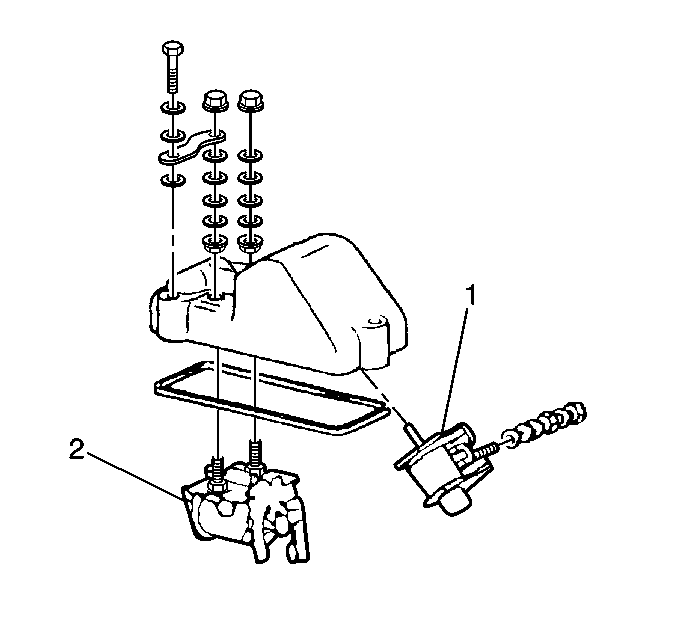
An inoperative housing pressure cold advance solenoid (1) may cause white smoke and excessive noise on a cold start.
With the engine temperature below 27°C (80°F), start and idle the engine. Disconnect the housing pressure cold advance solenoid connector. If the system is operating, you will notice a decrease in engine noise and a drop in engine speed.
If this does not occur, diagnose the system using the following steps:
- Perform the Cold Advance System Electrical Check. Refer to Engine Electrical.
- Remove the injection pump cover (if the cold advance system electrical circuit is operating). Refer to Injection Pump Cover Removal.
- Ground the pump cover. Use a fused jumper wire to momentarily touch the housing pressure cold advance solenoid terminal and listen for a click sound.
- Observe the movement of the plunger against the valve. If you do not observe any contact. The problem could be a bad cover. Repair the restriction in the fuel return line (if the solenoid operates).
- Remove the fuel return line connector from the injection pump cover (if the solenoid does not operate).
- Determine if the spring loaded valve in the return line connector is stuck. Replace the fuel return line connector (if the valve is stuck).
- Use an ohmmeter to check for continuity between the solenoid housing and injection pump cover (if the valve moves). Repair the poor ground connection (if the ohmmeter displays more than 0.5 ohms).
- Replace the housing pressure cold advance solenoid. (if the ground connection is OK). Refer to Cold Advance Solenoid Removal.
- Check the advance piston function (if the solenoid check is OK and the white smoke problem continues). Refer to Diagnosis of The Advance Piston.
Diagnosis of The Shutdown Solenoid
An inoperative shutdown solenoid (2) can cause a no-start condition. Disconnect the shutdown solenoid harness connector. Turn the ignition switch ON and momentarily touch the solenoid harness connector to the solenoid connector. The system is operating properly (if you hear a click). Diagnose the system using the following steps (if you do not hear a click):
- Connect a test lamp to ground.
- Turn the ignition switch ON. Back probe the shutdown harness connector. Check for an open circuit from the ignition switch to the solenoid (if the test lamp did not light).
- Check the ground circuit between the solenoid stud and the injection pump cover to see if the connectors are clean and tight (if the test lamp was lit).
- Repair and retest the connections (if the connections are not clean and tight).
- Remove the injection pump cover (if the ground circuit is OK). Refer to Injection Pump Cover Removal.
- Connect a jumper wire between the solenoid ground connector and ground.
- Turn the ignition switch ON and momentarily touch the shutdown solenoid harness connector to shutdown the solenoid terminal. Check for an internal injection pump problem (if the solenoid operates).
- Replace the shutdown solenoid (if the solenoid will not operate). Refer to Injection Pump Cover Installation.
Diagnosis of the Advance Piston
- Depress the rocker lever with a screwdriver or hammer handle (with the engine at about 2000 RPM).
- Timing should retard approximately 5 degrees. The engine RPM should decrease and the engine runs rough.
- If no change occurs in the engine RPM, go to step 4.
- Disconnect the green wire from the cold advance solenoid.
- Remove and repair the injection pump (if no change occurs in the engine RPM). Refer to Injection Pump Cover Removal.
| 4.1. | Run the engine at 2000 RPM. |
| 4.2. | Touch a fused jumper wire from the positive battery terminal to the cold advance solenoid terminal. |
| 4.3. | Engine timing should advance approximately 3 degrees and the engine RPM should increase. |
Fuel Pipes/Hoses
A fuel odor may be the result of a leaking fuel feed, return pipe or hose. Fuel pipes that are pinched, plugged, or misrouted may cause a restricted fuel delivery.
