| Table 1: | Injector Balance Test Example |
| Table 2: | Fuel Injector Balance Test Procedure |
Cylinder | 1 | 2 | 3 | 4 | 5 | 6 |
|---|---|---|---|---|---|---|
1st Reading | 434 kPa (63 psi) | 434 kPa (63 psi) | 434 kPa (63 psi) | 434 kPa (63 psi) | 434 kPa (63 psi) | 434 kPa (63 psi) |
2nd Reading | 351 kPa (51 psi) | 331 kPa (48 psi) | 351 kPa (51 psi) | 365 kPa (53 psi) | 344 kPa (50 psi) | 344 kPa (50 psi) |
Amount of Drop | 83 kPa (12 psi) | 103 kPa (15 psi) | 83 kPa (12 psi) | 69 kPa (10 psi) | 90 kPa (13 psi) | 90 kPa (13 psi) |
Acceptable Range Average ±10 kPa: 86 ±10 kPa 76-96 kPa (12 psi ± 1.5 psi 11-14 psi) | Injector OK | Faulty injector - too much fuel drop | Injector OK | Faulty injector - too little fuel drop | Injector OK | Injector OK |
Circuit Description
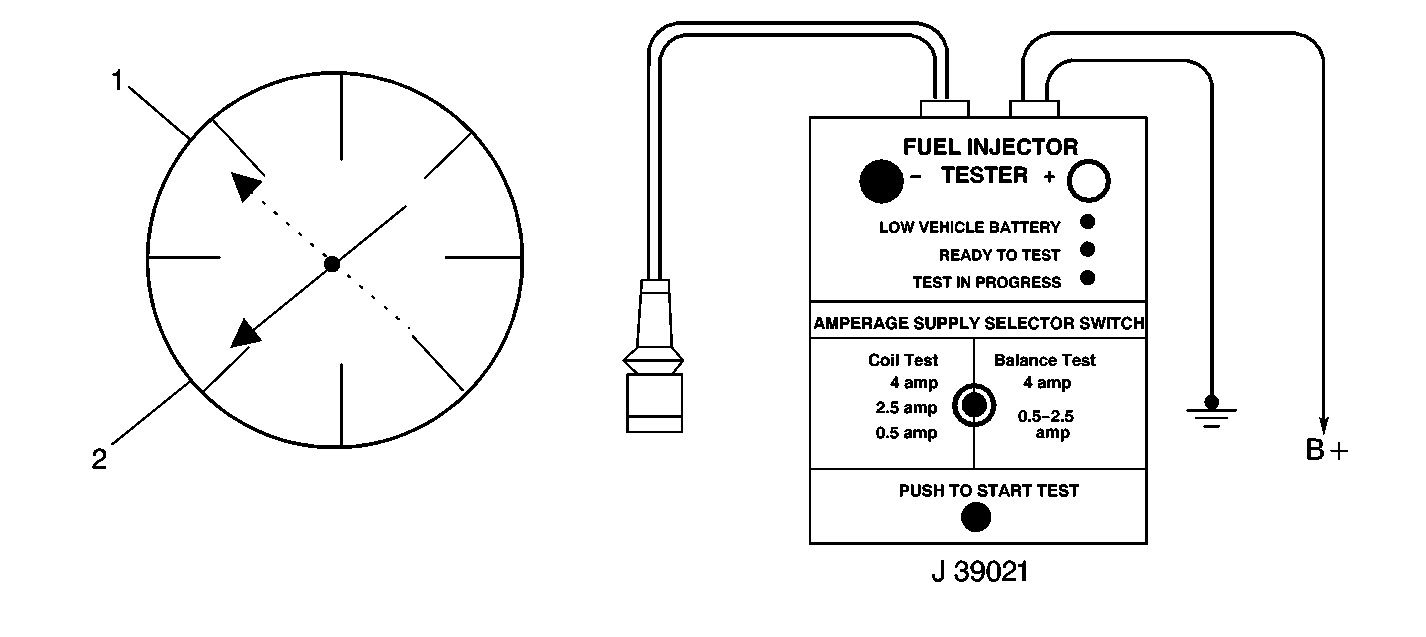
The Fuel Injector Tester J 39021 , the Injector Switch Box J 39021-210 and the Injector Harness Connector J 39021-301 energize the injector for a precise amount of time allowing a measured amount of fuel into the manifold. This causes a drop in system fuel pressure that can be recorded and used to compare each injector. All injectors should be within the same pressure drop range, the average pressure drop value for all injectors is ±10 kPa (1.5 psi).
Test Description
Caution: Wrap a shop towel around the fuel pressure connection in order to reduce the risk of fire and personal injury. The towel will absorb any fuel leakage that occurs during the connection of the fuel pressure gage. Place the towel in an approved container when the connection of the fuel pressure gage is complete.
-
The engine coolant temperature must be below the operating temperature in order to avoid irregular fuel pressure readings due to Hot Soak fuel boiling.
-
The fuel pressure should be within the specified range with the fuel pump running. If the fuel pressure is not within the specified range, refer to Fuel System Diagnosis .
-
Allow the fuel pressure to stabilize about 3 minutes. On a hot vehicle fuel pressure may increase due to fuel expansion after the pump stops running. This is a normal condition but the fuel pressure should stabilize and hold. The fuel pressure should reach a steady value. If the fuel pressure does not reach a steady value, refer to Fuel System Diagnosis .
-
If the pressure drop value for each fuel injector is within 10 kPa (1.5 psi) of the average pressure drop value, the fuel injectors are flowing properly. Calculate the pressure drop value for each fuel injector by subtracting the second pressure reading from the first pressure reading. Refer to the illustration above.
Step | Action | Value(s) | Yes | No |
|---|---|---|---|---|
1 | Was the Powertrain On-Board Diagnostic (OBD) System Check performed? | -- | ||
2 | Was the Fuel Injector Coil Test performed? | -- | ||
3 | Is the engine coolant temperature above the specified value? | 94°C (201°F) | ||
Allow the engine to cool below the specified value. Is the action complete? | 94°C (201°F) | -- | ||
|
Caution: The fuel pump will operate for 2 seconds after you have turned off the ignition. Make sure that all the fuel pipes and fittings are securely fastened in order to prevent personal injury.
Important: The fuel pump will run for approximately 2 seconds. Repeat Step 5 as necessary in order to achieve the highest possible fuel pressure. Is the fuel pressure within the specified limits? | Central SFI - 415-455 kPa (60-66 psi) | Go to Fuel System Diagnosis | ||
After the fuel pump stops, the fuel pressure should decrease slightly. Does the fuel pressure remain constant within the specified value? | Central SFI -379-413 kPa (55-60 psi) | Go to Fuel System Diagnosis | ||
|
Caution: The fuel pump will operate for 2 seconds after you have turned off the ignition. Make sure that all the fuel pipes and fittings are securely fastened in order to prevent personal injury.
Does any fuel injector have a pressure drop value that is either higher than the average pressure drop or lower than the average pressure drop by the specified value? | 10 kPa (1.5 psi) | Go to Symptoms | ||
8 |
Notice: Do not repeat any portion of this test before running the engine in order to prevent the engine from flooding. Re-test any fuel injector that does not meet the specification. Refer to the procedure in Step 7. Does any fuel injector still have a pressure drop value that is either higher than the average pressure drop or lower than the average pressure drop by the specified value? | 10 kPa (1.5 psi) | Go to Symptoms | |
9 | Replace the malfunctioning fuel injectors. Refer to Central Sequential Multiport Fuel Injector Replacement . Is the action complete? | -- | -- | |
10 |
Caution: The fuel pump will operate for 2 seconds after you have turned off the ignition. Make sure that all the fuel pipes and fittings are securely fastened in order to prevent personal injury.
Are any DTCs displayed that have not been diagnosed? | -- | Go to the applicable DTC table | System OK |
