Information on 4L60-E M30 Rear Wheel Drive Automatic Transmission Valve Body Reconditioning, DTC P0741, P0756, P0894, Harsh 1-2 Shift

| Subject: | Information on 4L60-E M30 Rear Wheel Drive Automatic Transmission Valve Body Reconditioning, DTC P0741, P0756, P0894, Harsh 1-2 Shift |
| Models: | 2004-2007 Buick Rainier |
| 2002-2005 Cadillac Escalade |
| 1997-2002 Chevrolet Camaro |
| 1997-2003 Chevrolet Corvette, S-10 |
| 1997-2005 Chevrolet Astro |
| 1997-2005 Chevrolet Blazer |
| 1997-2007 Chevrolet Express, Silverado Classic, Silverado, Suburban, Tahoe |
| 2002-2007 Chevrolet Avalanche, TrailBlazer, TrailBlazer EXT |
| 2004-2007 Chevrolet Colorado |
| 2004 Chevrolet SSR |
| 1997-2003 GMC Jimmy, Sonoma |
| 1997-2005 GMC Safari |
| 1997-2007 GMC Savana, Sierra Classic, Sierra, Yukon |
| 2001-2007 GMC Envoy, Envoy XL, Envoy XUV, Envoy Denali, Envoy XL Denali, Yukon XL, Yukon Denali, Yukon XL Denali |
| 2004-2007 GMC Canyon |
| 1997-2004 Oldsmobile Bravada |
| 1997-2002 Pontiac Firebird |
| 2004 Pontiac GTO |
| 2006-2007 HUMMER H3 |
| 2005-2007 Saab 9-7X |
| with Hydra-Matic® 4L60-E Automatic Transmission (RPO M30) |
The following new service information outlined in this bulletin will aid technicians in providing easy to follow valve body reconditioning instructions and new illustrations to simplify reassembly of the valve body. This service bulletin will also provide additional service information documents that are related to the 4L60-E transmission.
Related Service Documents
| • | DTC P0741 - Torque Converter Clutch (TCC) System - Stuck Off. Refer to Service Bulletin 04-07-30-041. |
| • | DTC P0756 - 2-3 Shift Solenoid Valve Performance - No First or Second Gear. Refer to Service Bulletin 01-07-30-036F. |
| • | DTC P0894 - Transmission Component Slipping. Refer to Service Bulletin 06-07-30-007. |
| • | Harsh 1-2 Shift. Refer to Bulletin PIP3170E. |
Important: If valve body cleaning is not required, Do Not disassemble the bores unless it is necessary to verify movement of valves.
Inspection Procedure
- Using the exploded views in this bulletin, inspect each bore for freedom of valve(s) movement and evidence of debris. Pay particular attention to those valves related to the customer’s concern.
- Verify movement of the valves in their normal installed position. Valves may become restricted during removal or installation. This is normal due to small tolerances between the valves and bores.
- If a valve is restricted and cannot be corrected by cleaning the valve and bore, then replace the valve body. Describe the restricted valve on the repair order.
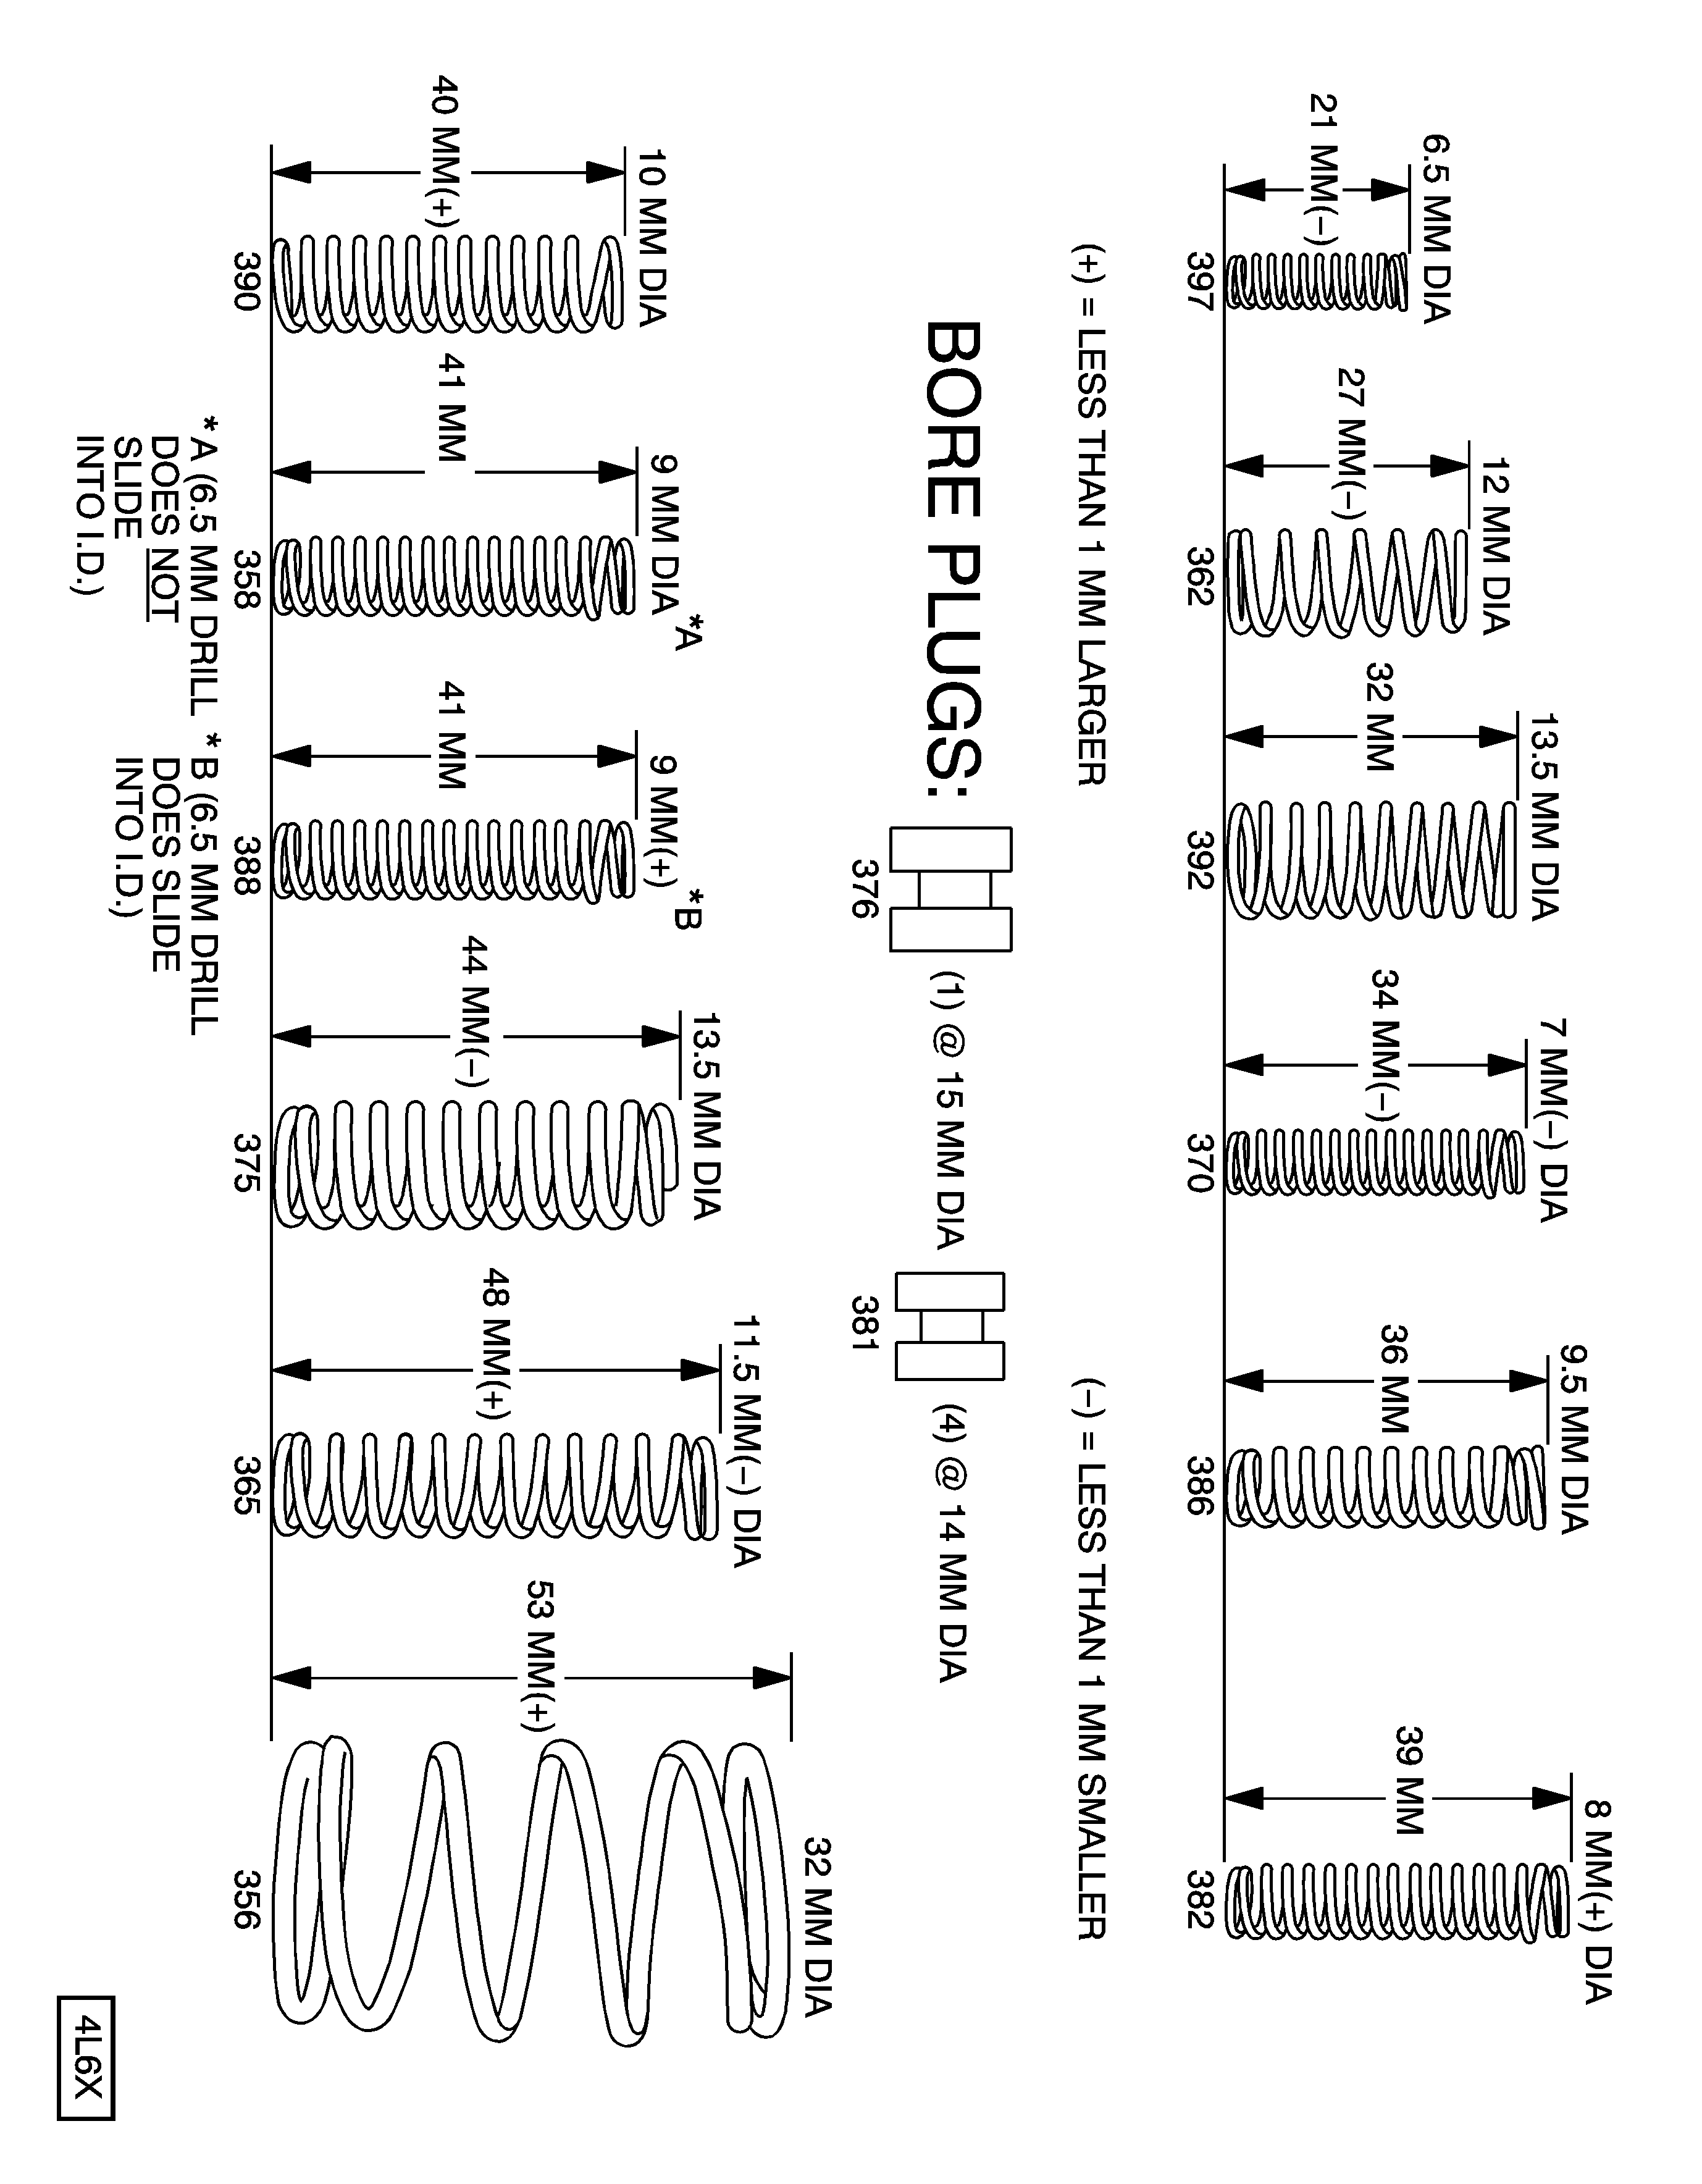
Valve Body Spring and Bore Plug Chart (Metric)
Valve Body Spring and Bore Plug Chart (Inch)
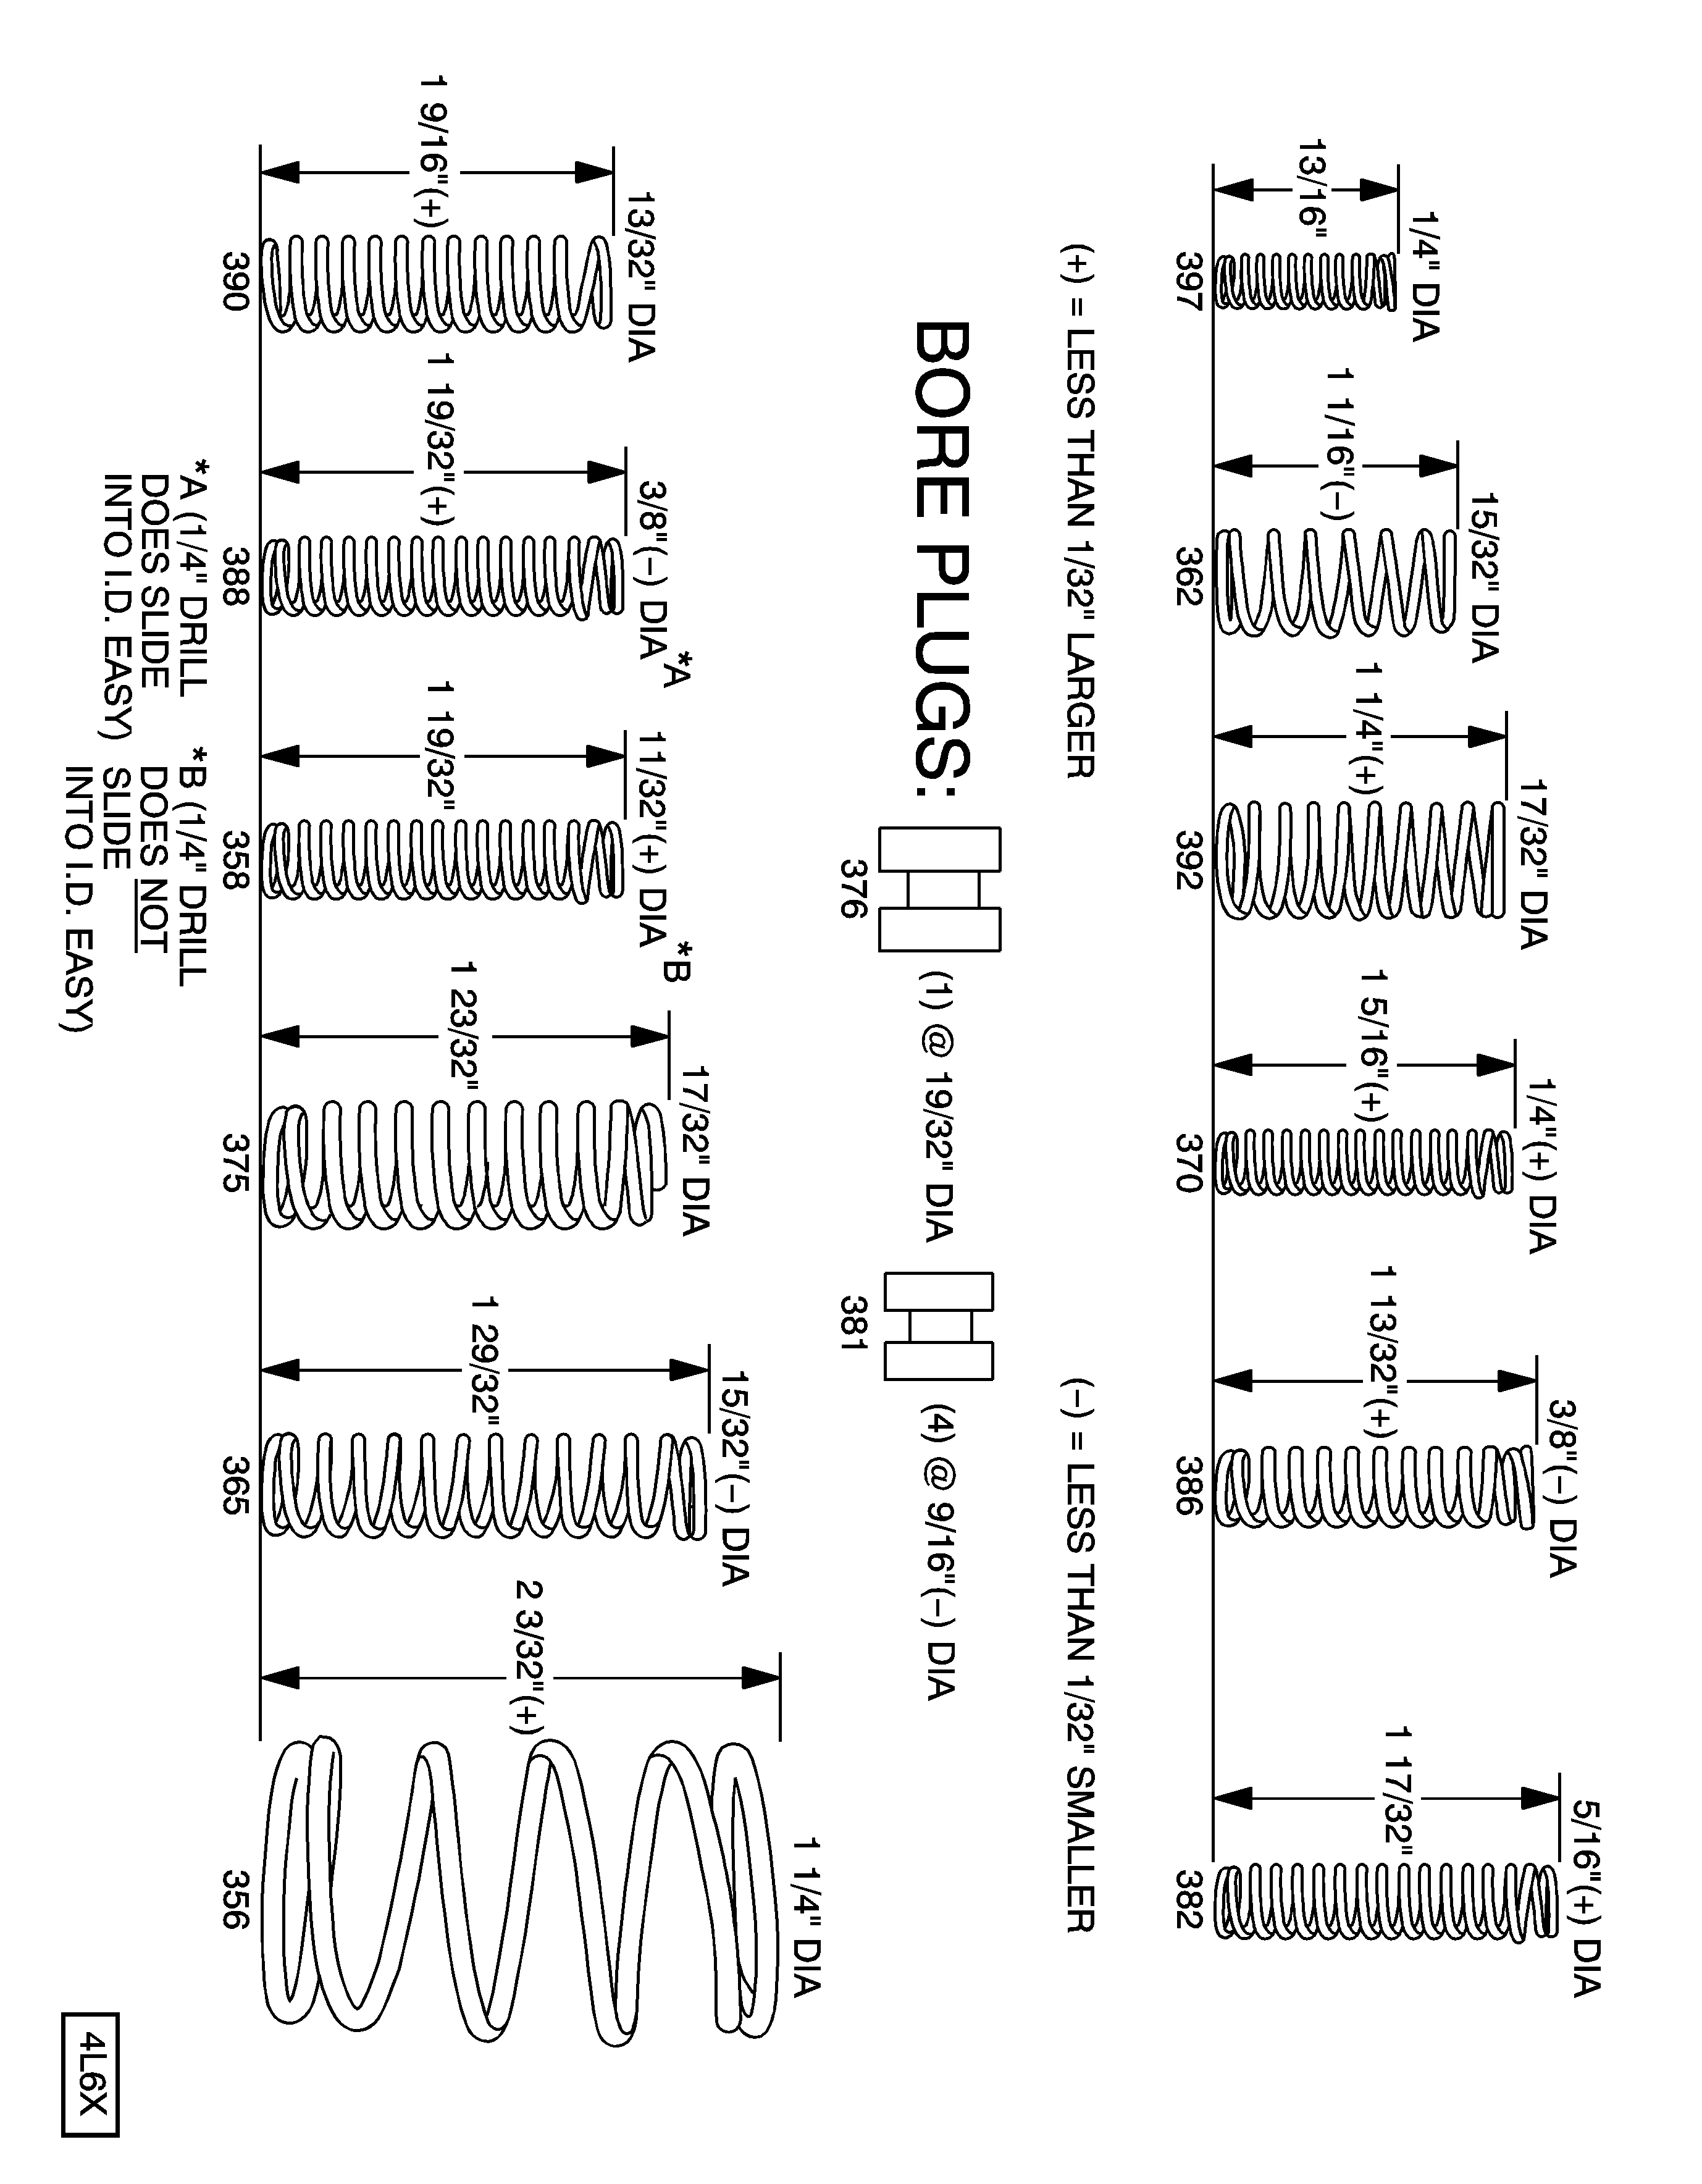
Call Out Number | Description |
|---|---|
350 | Valve Assembly, Control Body |
354 | Piston, Forward Accumulator |
355 | Pin, Forward Accumulator |
356 | Spring, Forward Accumulator |
357 | Valve, Forward Abuse |
358 | Spring, Forward Abuse Valve |
359 | Plug, Bore |
360 | Pin, Coiled Spring |
361 | Valve, Low Over Run |
362 | Spring, Low Over Run Valve |
363 | Cover, Forward Accumulator |
364 | Bolt, Forward Accumulator Cover |
365 | Spring, 1-2 Shift Valve |
366 | Valve, 1-2 Shift |
367 A | Shift Solenoid A (1-2 / 3-4) |
367 B | Shift Solenoid B (2-3) |
368 | Valve, 2-3 Shift |
369 | Valve, 2-3 Shuttle |
370 | Spring, Accumulator Valve |
371 | Valve, Accumulator |
372 | Sleeve, Accumulator Valve |
374 | Valve, Accumulator Feed Limit |
375 | Spring, Accumulator Feed Limit Valve |
376 | Plug, Bore |
377 | Pressure Control Solenoid |
378 | Retainer, Pressure Control Solenoid |
387 | Valve, Reverse Abuse |
395 | Retainer, Bore Plug |
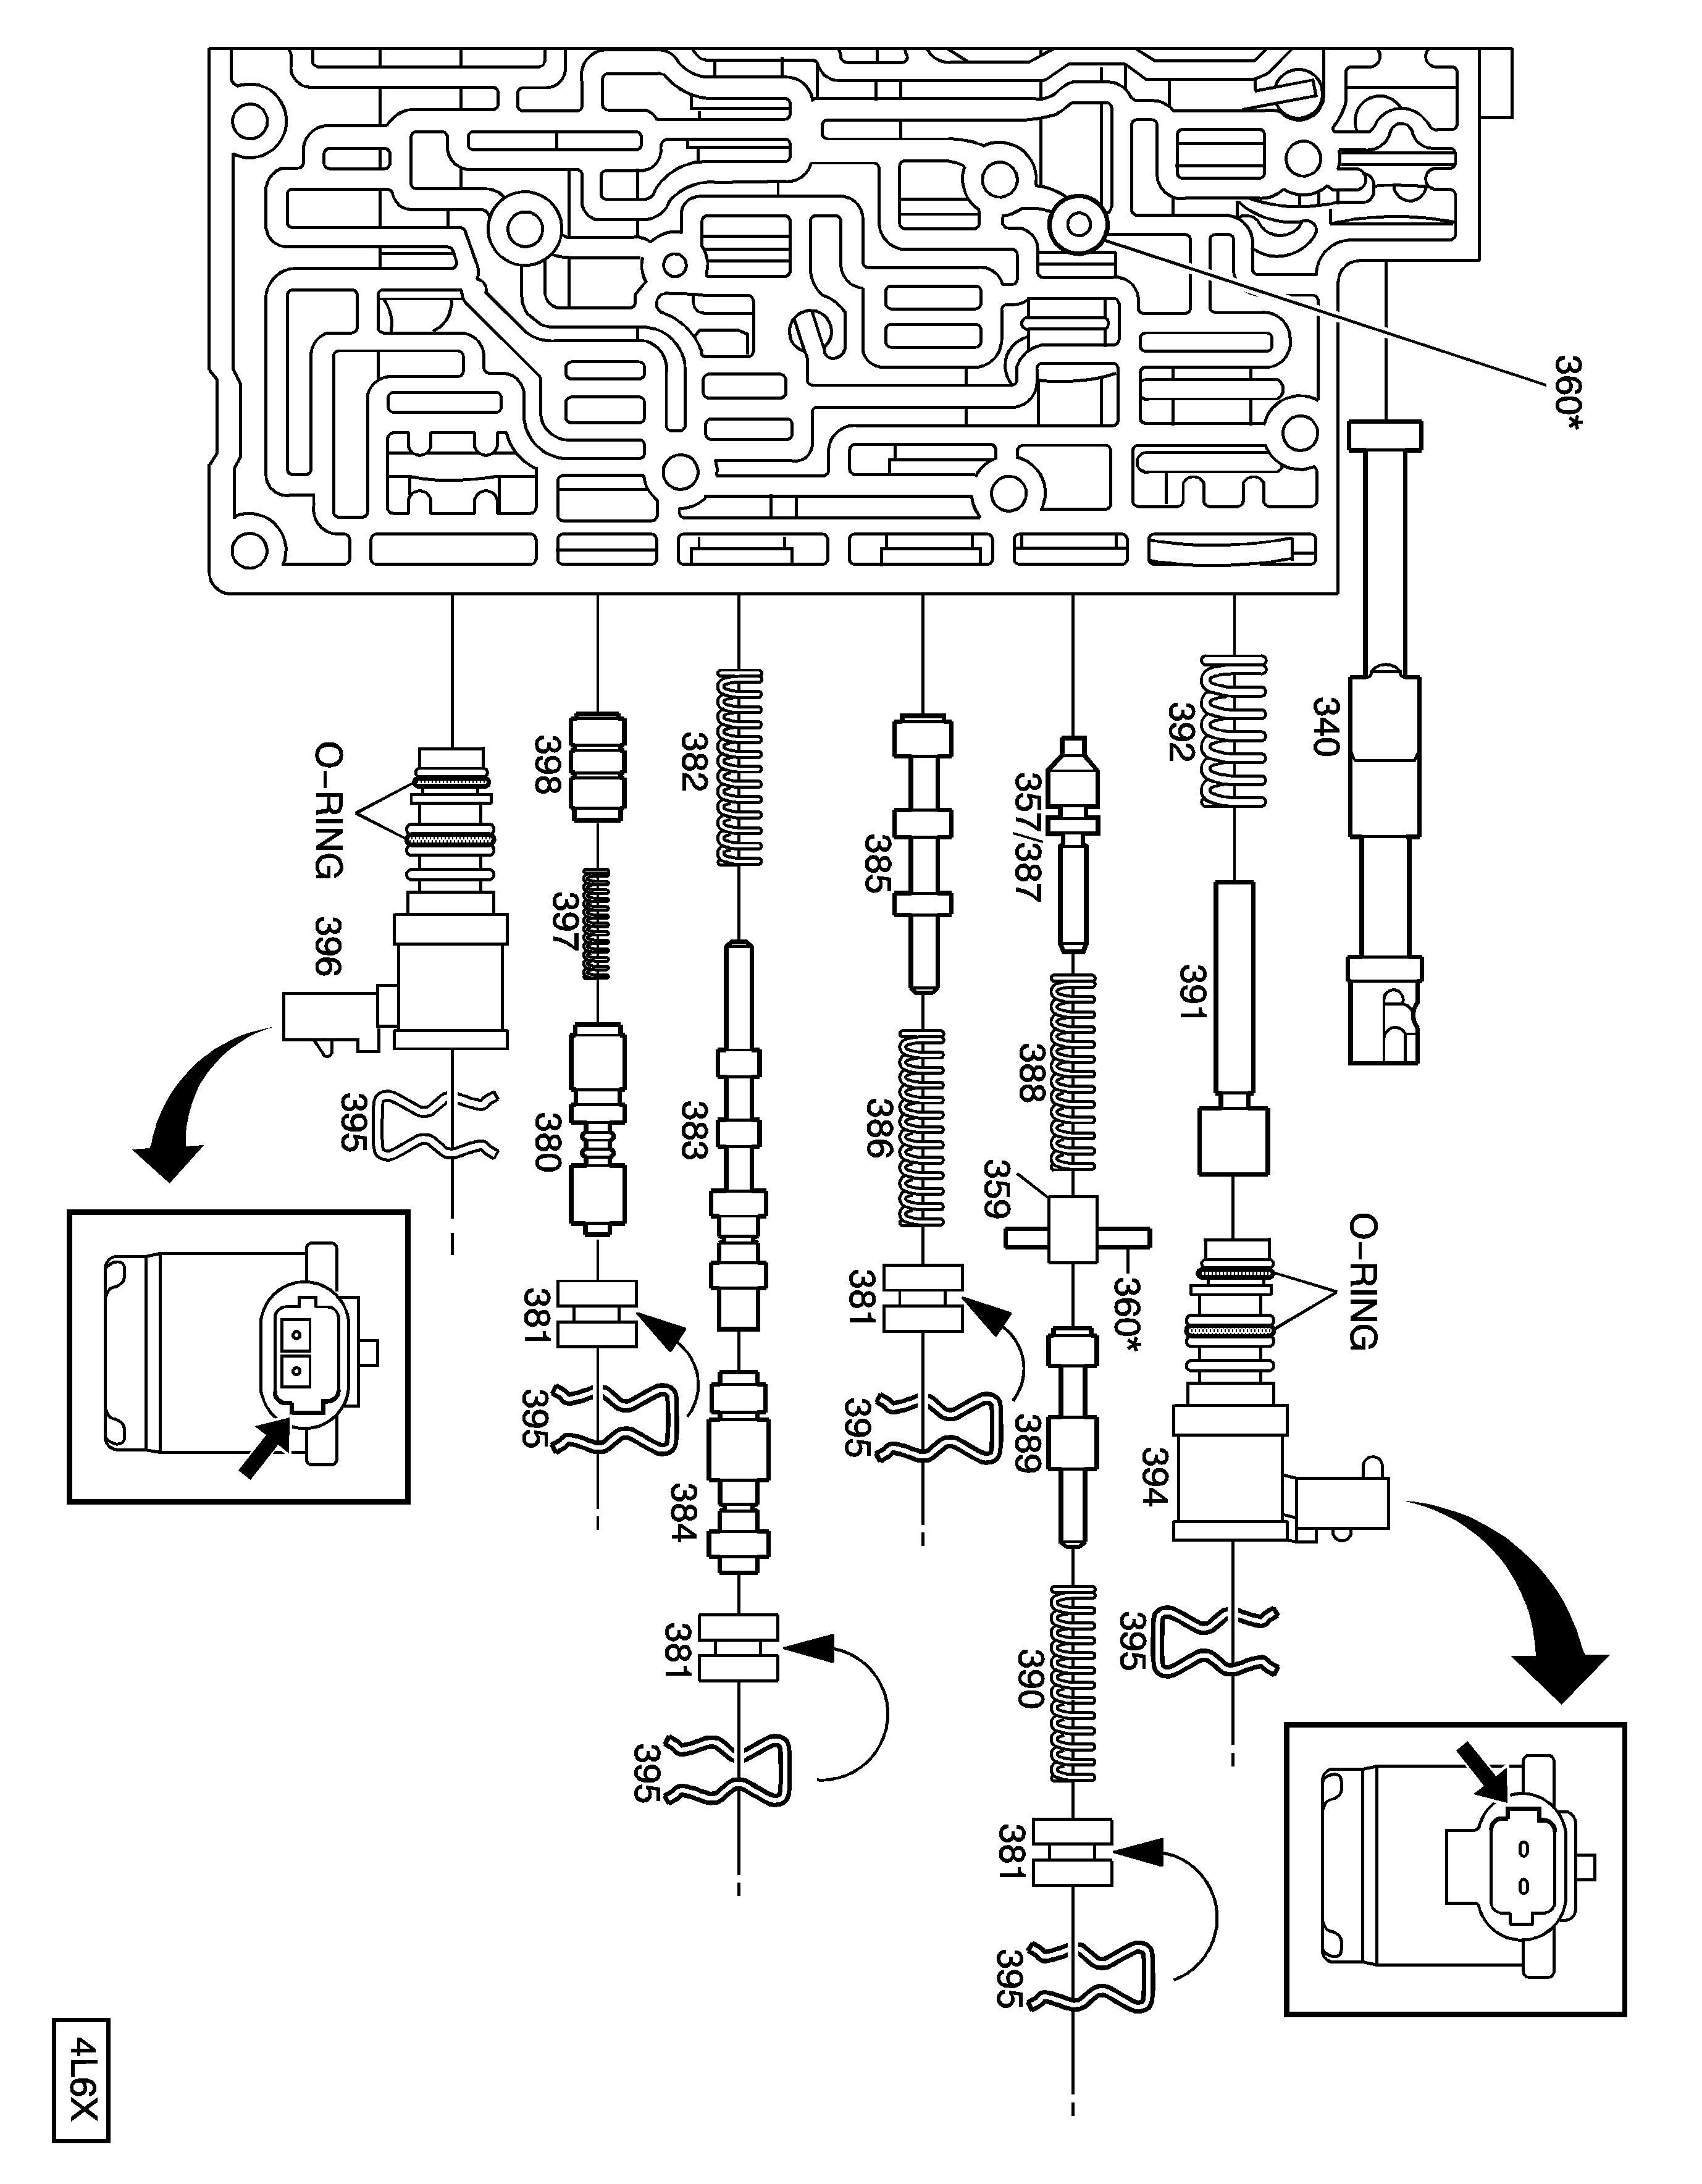
Call Out Number | Description |
|---|---|
340 | Valve, Manual |
357 | Valve, Forward Abuse |
359 | Plug, Bore |
360 | Pin, Coiled Spring |
380 | Valve, Regulator Apply (Model Dependent) |
381 | Plug, Bore |
382 | Spring, 4-3 Sequence Valve |
383 | Valve, 4-3 Sequence |
384 | Valve, 3-4 Relay |
385 | Valve, 3-4 Shift |
386 | Spring, 3-4 Shift Valve |
387 | Valve, Reverse Abuse |
388 | Spring, Reverse Abuse Valve |
389 | Valve, 3-2 Downshift |
390 | Spring, 3-2 Downshift Valve |
391 | Valve, 3-2 Control |
392 | Spring, 3-2 Control Valve |
394 | 3-2 Control Solenoid |
395 | Retainer, Bore Plug |
396 | TCC PWM Solenoid |
397 | Spring, Regulator Apply (Model Dependent) |
398 | Valve, Isolator (Model Dependent |
Notice: Be sure all solenoids are installed with the electrical connectors facing the non-machined (cast) side of the valve body; otherwise the solenoids will bind against the transmission case as the valve body bolts are tightened and damage may occur.
Disassembly/Reassembly
- If a valve is restricted by a metal burr from machining that bore, remove the valve and burr, then inspect movement in the valve’s normal position. If no other debris or restrictions are found, then reassemble the valve body and install in the transmission.
- If the valve body has been contaminated with debris from another transmission component failure, then disassemble all bores for complete cleaning of all valve body components. If possible, keep individual bore parts separated for ease of reassembly. Use the illustrations in this bulletin for a positive identification and location of individual parts:
- Using GM Brake Clean, or equivalent, in a safe and clean environment (clean aluminum pan), clean the valve body and dry it with compressed air. Use appropriate eye protection.
- Clean individual valve body components with GM Brake Clean, or equivalent. Coat each valve with clean ATF and reassemble in each bore. Check each valve for free movement during assembly of each bore.
| • | Left Side Control Valve Body Assembly |
| • | Right Side Control Valve Body Assembly |
| • | Control Valve Body Assembly Chart, Valve Springs and Bore Plugs |
