Growl or Moan Noise coming from Front Axle (Replace Front Axle Differential Case)

| Subject: | Growl or Moan Noise Coming From Front Axle (Replace Front Axle Differential Case) |
| Models: | 2003-2006 Chevrolet Avalanche, Silverado, Suburban, Tahoe |
| 2003-2006 GMC Sierra, Yukon, Yukon XL |
| with 4WD and Active Transfer Case (RPO NP8) and 8.25 Inch Front Axle |
This bulletin is being revised to update the model years. Please discard Corporate Bulletin Number 03-04-19-004A (Section 04 -- Driveline/Axle).
Condition
Some customers may comment on a growl or moan-type noise coming from the front axle above 50 km/h (30 mph). This condition may be described as a noise that phases or cycles in and out. This noise is present in the 2WD mode only, and may be present whether the vehicle is accelerating, decelerating, or at a steady speed. The noise goes away in 4WD or Auto 4WD modes.
Cause
This noise may be caused by a low clearance condition within the differential in the front axle assembly. In the 2WD mode, the front differential has a large amount of relative motion between the differential pinion and side gears. In the 4WD or Auto 4WD modes, the transfer case motors the front propeller shaft, and the relative motion between the differential gears is reduced or eliminated, so the noise is eliminated.
Correction
Replace the front differential case, P/N 26018131. This is the component bolted to the ring gear. It is NOT necessary to replace the differential gears unless unusual wear is observed. Use the procedure listed below.
- Raise the vehicle.
- Remove the front engine protection shield. Refer to Engine Protection Shield Replacement in the Frame and Underbody sub-section of the Service Manual.
- Drain the differential carrier assembly.
- Disconnect the electrical connector from the actuator and wire harness from the right inner axle shaft housing and differential carrier.
- Remove the right wheel driveshaft inboard flange bolts from the inner axle shaft.
- Disconnect the right wheel driveshaft from the inner axle shaft.
- Remove the inner axle shaft housing nuts from the bracket.
- Remove the inner axle shaft housing bolts from the differential carrier assembly.
- Carefully remove the inner axle shaft housing assembly from the differential carrier.
- Remove the left wheel driveshaft inboard flange bolts from the inner axle shaft.
- Remove the left inner axle shaft from the differential carrier assembly.
- Remove the front drive axle clutch shaft from the differential carrier assembly.
- Remove the differential carrier assembly bolts.
- Separate the right carrier case half from the left carrier case half.
- Remove the differential case assembly from the carrier.
- Place the differential case in a vise.
- Remove the differential side bearings using the J 22888-20A.
- Remove the differential case from the vise.
- Remove the ring gear bolts.
- Remove the ring gear from the differential case. Drive the ring gear off with a brass drift if necessary.
- Remove the pinion shaft pin. Use a hammer and a drift pin in order to drive out the pin.
- Remove the pinion shaft.
- Roll the differential pinion gears out of the case with the pinion gear thrust washers.
- Remove the differential side gears and the side gear thrust washers. Mark the pinion gears and thrust washers top and bottom and the differential side gears and thrust washers left and right.
- Lubricate the pinion and side gears using axle lubricant. Use the proper fluid. Refer to the Maintenance and Lubrication subsection.
- Install the differential side gear thrust washers to the differential side gears.
- Install the differential side gears and thrust washers into the new differential case.
- Install the differential pinion gears and thrust washers by performing the following steps:
- Install the pinion gear shaft.
- Install the pinion gear shaft lock pin using a hammer and a brass drift.
- Install the ring gear onto the differential case.
- Install the ring gear bolts. Hand start each bolt to ensure that the ring gear is properly seated to the differential case.
- Tighten the ring gear bolts. Tighten the ring gear bolts alternately and in stages, gradually pulling the ring gear onto the differential case.
- Install the differential side bearings by performing the following steps:
- Install the new differential case assembly into the carrier.
- Clean the sealing surface of each half of the differential carrier case and the inner axle housing to differential carrier assembly. The surfaces must be clean of all grease and oil.
- Apply a bead of sealer, P/N 1052942 (Canadian P/N 10953466), or equivalent, to one differential carrier case half sealing surface.
- Install the right differential carrier case half.
- Install the differential carrier case bolts
- Install the front drive axle clutch shaft to the differential carrier.
- Install the left side inner axle shaft by doing the following steps:
- Apply sealant, P/N 1052942 (Canadian P/N 10953466), or equivalent, to the inner axle housing to differential carrier sealing surface.
- Install the right inner axle shaft housing assembly to the differential carrier assembly.
- Install the inner axle shaft housing bolts.
- Install the inner axle shaft housing washers and nuts to the bracket.
- Connect the wheel drive shaft inboard flange to the inner axle shaft.
- Install the wheel drive shaft inboard flange to the inner axle shaft bolts.
- Connect the wire harness to the inner axle shaft housing and differential carrier.
- Connect the electrical connector to the front axle actuator.
- Fill the differential carrier assembly with axle lubricant. Use the proper fluid. Refer to Lubricant Replacement -- Front Drive Axle in the Front Axle sub-section of the Service Manual.
- Install the front engine protection shield. Refer to Engine Protection Shield Replacement in the Frame and Underbody sub-section of the service manual.
- Lower the vehicle.
Important: The ring gear bolts have left-hand threads.
| 28.1. | Position one pinion gear between the differential side gears. |
| 28.2. | Position the second pinion gear between the differential side gear directly opposite of the first gear. |
| 28.3. | Rotate the differential side gears until the pinion gears are directly opposite the opening in the differential case. |
| 28.4. | Install the thrust washers. Rotate the pinion gears toward the differential case opening in order to permit the sliding in of the thrust washers. |
Important: The mating surface of the ring gear and the differential case must be clean and free of burrs before installing the ring gear.
Tighten
Tighten the ring gear bolts in sequence to 120 N·m (88 lb ft).
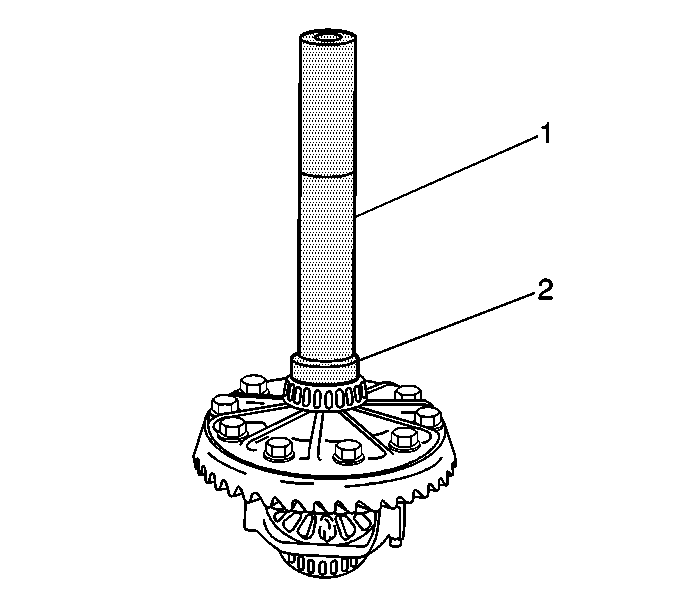
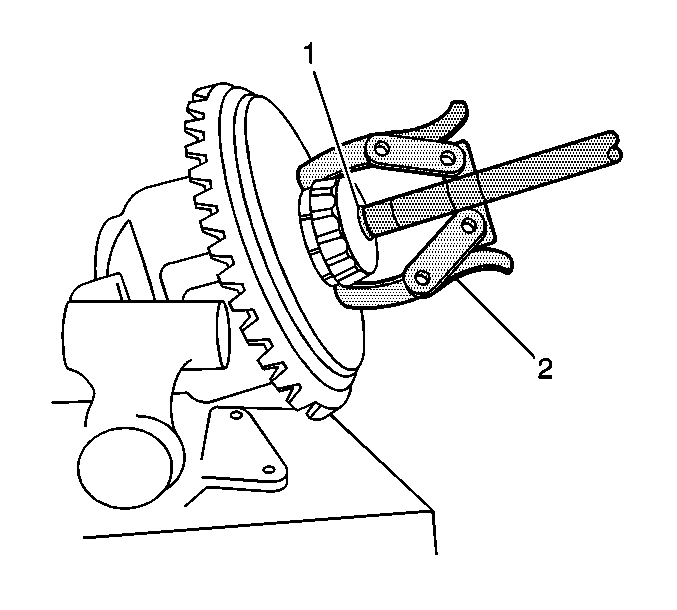
| 34.1. | In order to protect the differential case, install the J 8107-2 in the case on the side opposite the bearing installation. |
| 34.2. | Install the J 22761 (2) and the J 8092 (1) onto the differential case bearing as shown. |
| 34.3. | Drive the differential case bearing onto the case using the J 22761 and the J 8092. |
Tighten
Tighten the differential carrier case bolts to 47 N·m (35 lb ft).
| 41.1. | Install the left side inner shaft into the differential carrier assembly until the inner shaft is seated against the differential side gear. |
| 41.2. | While holding the inner shaft against the differential side gear, turn the inner shaft in order to align the splines of the inner shaft with the splines on the differential side gear. |
| 41.3. | Drive the inner into the differential case side gear using a soft-faced mallet until the retaining ring on the inner shaft is fully seated within the groove in the differential case side gear. Pull back on the inner shaft to ensure that the inner shaft is properly retained in the differential case side gear. |
Tighten
Tighten the inner axle shaft housing bolts to 40 N·m (30 lb ft).
Tighten
Tighten the inner axle shaft housing nuts to 100 N·m (75 lb ft).
Tighten
Tighten the wheel drive shaft inboard flange to the inner axle shaft bolts to 79 N·m (58 lb ft).
Parts Information
Part Number | Description |
|---|---|
26018131 | Case, Front Differential |
Warranty Information
For vehicles repaired under warranty, use:
Labor Operation | Description | Labor Time |
|---|---|---|
F9970* | Case, Front Differential - Replace | 1.7 hrs |
Add | If Equipped With Front Differential Shield | 0.3 hr |
*This is a unique labor operation number for use only with this bulletin. This number will not be published in the Labor Time Guide. | ||
