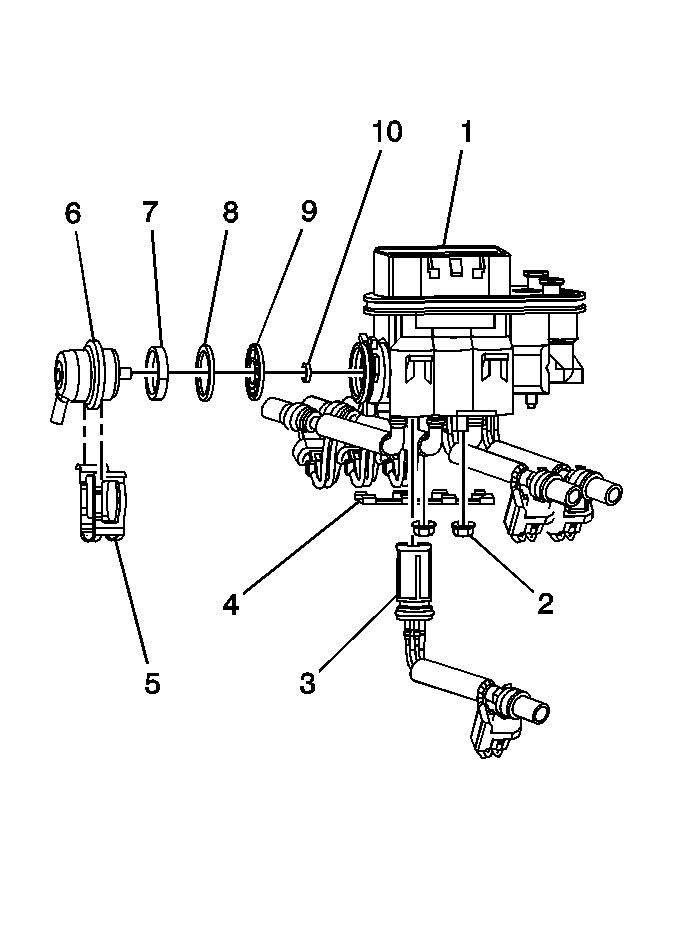
Removal Procedure

- Remove the upper intake manifold. Refer
to
Upper Intake Manifold Replacement
in
Engine Mechanical-4.3L.
- Remove the fuel pressure regulator retaining clip (5).
- Twist and pull the fuel pressure regulator (6) in order to remove the
regulator from the housing using a shop towel to catch any spilled fuel.
- Remove and discard the regulator seal O-ring (10).
- Remove and discard the regulator filter (9).
- Remove and discard the regulator seal O-ring (8).
- Remove and discard the regulator seal backup ring (7).
- Cover the fuel pressure regulator housing to prevent contamination from
entering the fuel system.
Installation Procedure
Important: If the fuel pressure regulator is to be reinstalled, inspect the filter screen
for contamination. If the filter screen is contaminated, replace the regulator.

- Lubricate the NEW O-rings with clean engine
oil.
- Assemble the following NEW parts to the fuel pressure regulator:
| • | Regulator seal O-ring (8) |
| • | Regulator seal O-ring (10) |
- Install the fuel pressure regulator with the vacuum tube pointing down.
- Install the fuel pressure regulator retainer clip (5).
- Install the upper manifold. Refer to
Upper Intake Manifold Replacement
in Engine Mechanical-4.3L.
- Tighten the fuel fill cap.
- Connect the negative battery cable. Refer to
Battery Negative Cable Disconnection and Connection
in Engine Electrical.
- Inspect for leaks.
| 8.1. | Turn the ignition ON, for 2 seconds. |
| 8.2. | Turn the ignition OFF, for 10 seconds. |
| 8.3. | Turn the ignition ON. |
| 8.4. | Inspect for fuel leaks. |


