Air Conditioning Compressor Replacement L18 w/ Harrison
Tools Required
J 39400-A Halogen Leak Detector
Removal Procedure
- Recover the refrigerant. Refer to Refrigerant Recovery and Recharging .
- Remove the air conditioning (A/C) drive belt. Refer to Air Conditioning Compressor Belt Replacement in Engine Mechanical - 8.1 L.
- Raise and support the vehicle. Refer to Lifting and Jacking the Vehicle .
- Remove the right front tire and wheel assembly. Refer to Tire and Wheel Removal and Installation in Tires and Wheels.
- Remove the right wheel house panel. Refer to Wheelhouse Panel Replacement in Body Front End.
- Remove the compressor hose assembly bolt from the A/C compressor.
- Remove the compressor hose assembly from the A/C compressor.
- Discard the sealing washers. Cap all of the openings.
- Disconnect the electrical connections.
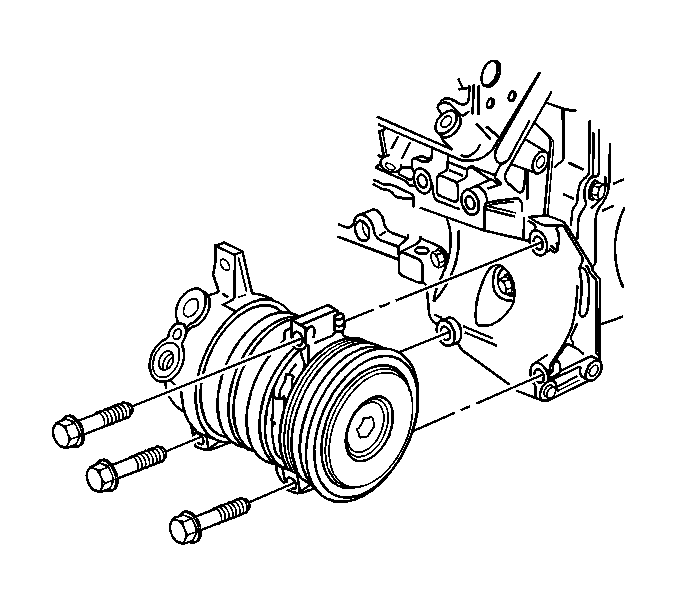
- Remove the 3 A/C compressor mounting bolts. The lower right bolt will stay with the compressor due to a lack of clearance.
- Remove the A/C compressor from the bracket through the fender well.
- If replacing the A/C compressor, drain and measure as much of the oil as possible from the removed compressor.
| 12.1. | Drain the oil from both the suction and discharge ports of the removed A/C compressor into a clean container. |
| 12.2. | Remove the A/C compressor crankcase oil drain plug and drain the crankcase oil into the same container. |
| 12.3. | Measure and record the amount of oil drained from the removed A/C compressor. |
This measurement will be used during installation of the replacement A/C compressor.
| 12.4. | Properly discard the used PAG oil. |
Installation Procedure
- Add the proper amount of PAG oil to the compressor crankcase. Refer to Refrigerant System Capacities
- Install the A/C compressor drain plug.
- Install the A/C compressor to the mounting bracket .
- Install the 3 A/C compressor mounting bolts.
- Connect the electrical connection.
- Install the A/C compressor hose assembly to the compressor using new sealing washers.
- Install the A/C comressor hose assembly bolt to the A/C compressor.
- Install the right wheel house panel. Refer to Wheelhouse Panel Replacement in Body Front End.
- Install the right front tire and wheel assembly. Refer to Tire and Wheel Removal and Installation in Tires and Wheels.
- Lower the vehicle.
- Install the A/C drive belt. Refer to Air Conditioning Compressor Belt Replacement in Engine Mechanical - 8.1 L.
- Evacuate and recharge the A/C system. Refer to Refrigerant Recovery and Recharging .
- Leak test the fittings of the component using the J 39400-A .
Notice: Use the correct fastener in the correct location. Replacement fasteners must be the correct part number for that application. Fasteners requiring replacement or fasteners requiring the use of thread locking compound or sealant are identified in the service procedure. Do not use paints, lubricants, or corrosion inhibitors on fasteners or fastener joint surfaces unless specified. These coatings affect fastener torque and joint clamping force and may damage the fastener. Use the correct tightening sequence and specifications when installing fasteners in order to avoid damage to parts and systems.
Tighten
Tighten the drain plug to 20 N·m (15 lb ft).

Important: Insert the mounting bolt into the lower right mounting bracket before installing the A/C compressor.
Tighten
Tighten the bolts to 50 N·m (37 lb ft).
Tighten
Tighten the bolt to 34 N·m (25 lb ft).
Air Conditioning Compressor Replacement LR4, LM7, LQ4,w/ Denso
Tools Required
J 39400-A Halogen Leak Detector
Removal Procedure
- Recover the refrigerant. Refer to Refrigerant Recovery and Recharging .
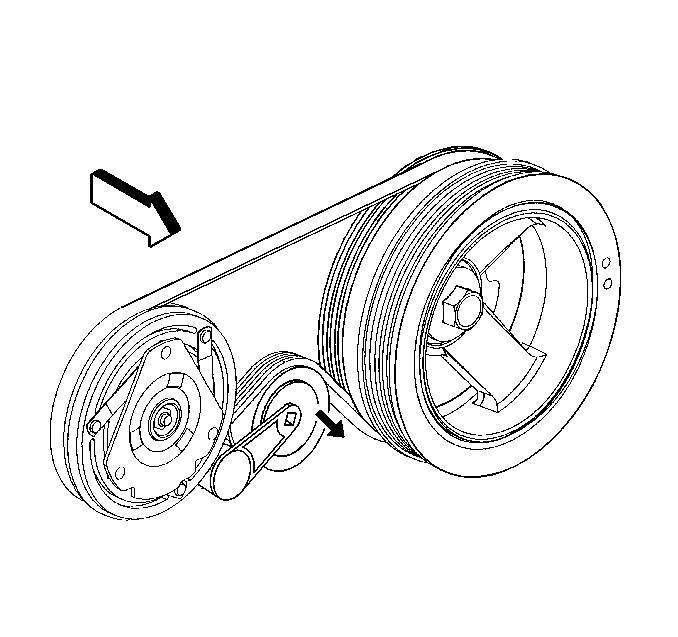
- Install a ratchet into the air conditioning (A/C) belt tensioner adapter opening.
- Rotate the A/C belt tensioner clockwise in order to relieve the tension on the belt.
- Remove the A/C belt from the A/C compressor.
- Slowly release the tension on the A/C belt tensioner.
- Remove the right front tire and wheel assembly. Refer to Tire and Wheel Removal and Installation in Tires and Wheels.
- Remove the wheel house panel from the vehicle. Refer to Wheelhouse Panel Replacement in Body Front End.
- Remove the discharge hose bolt from the A/C compressor.
- Remove the discharge hose from the A/C compressor.
- Remove the suction hose bolt from the A/C compressor.
- Remove the suction hose from the A/C compressor.
- Discard the sealing washers. Cap all of the openings.
- Disconnect the electrical connections.
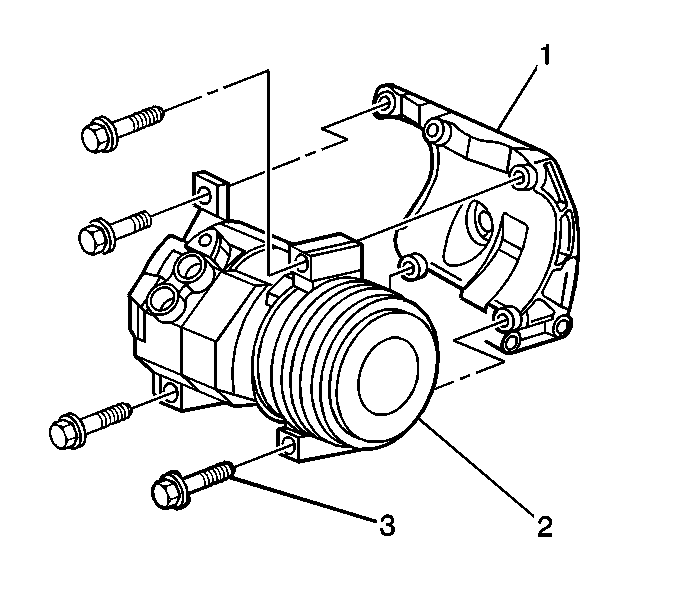
- Remove the A/C compressor mounting bolts. The lower right bolt (3) will stay with the compressor due to a lack of clearance.
- Remove the A/C compressor (2) from the bracket (1).
- If replacing the A/C compressor, drain and measure as much of the oil as possible from the removed compressor .
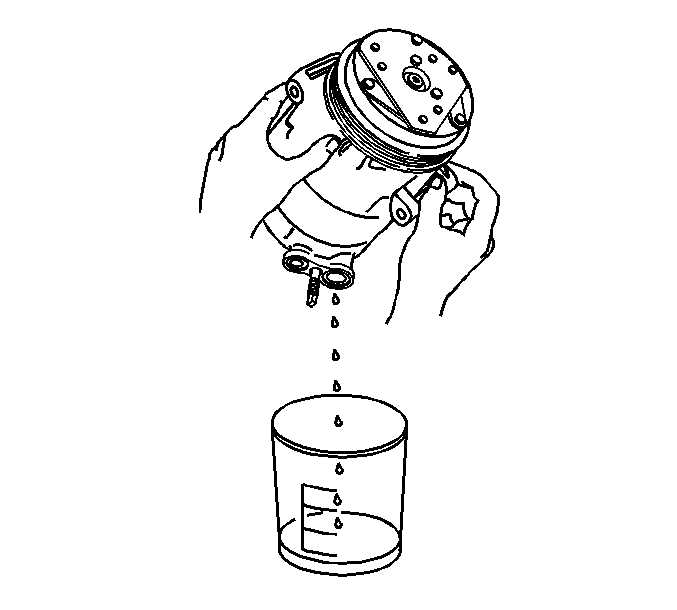
| 16.1. | Drain the oil from both the suction and discharge ports of the removed A/C compressor into a clean container. |
Rotate the compressor shaft to assist in draining the compressor.
| 16.2. | Measure and record the amount of oil drained from the removed A/C compressor. |
This measurement will be used during installation of the replacement A/C compressor.
| 16.3. | Properly discard the used PAG oil. |
Installation Procedure
- The replacement compressor is shipped with the 240ml (8.0 oz) of refrigerant oil .
- Before installing the compressor, the refrigerant oil will have to be partially drained:
- Drain the calculated amount of refrigerant oil from the replacement compressor.
- Install the A/C compressor (2) to the bracket (1) through the fender well. Insert the mounting bolt (3) into the lower right mounting boss before installing the A/C compressor.
- Install the A/C compressor to the bracket. Insert the mounting bolt into the lower right mount before installing the A/C compressor.
- Install the A/C compressor mounting bolts.
- Connect the electrical connector to the A/C compressor.
- Install the A/C discharge hose to the compressor using new sealing washers.
- Install the A/C discharge hose bolt to the A/C compressor.
- Install the A/C suction hose to the compressor using new sealing washers.
- Install the A/C suction hose bolt to the A/C compressor.
- Install the wheel house panel to the vehicle. Refer to Wheelhouse Panel Replacement in Body Front End.
- Install the right front tire and wheel assembly. Refer to Tire and Wheel Removal and Installation in Tires and Wheels.
- Install the A/C drive belt. Refer to Air Conditioning Compressor Belt Replacement in Engine Mechanical --4.8 L, 5.3 L, and 6.0 L.
- Evacuate and recharge the A/C system. Refer to Refrigerant Recovery and Recharging .
- Leak test the fittings of the component using the J 39400-A .
Important: The refrigerant oil in the A/C system must be balanced during compressor replacement.
| 2.1. | Refer to the amount of refrigerant oil recorded during the compressor removal. |
| 2.2. | Subtract the amount recorded from the replacement compressor PAG oil capacity. Refer to Refrigerant System Capacities . |
The difference between the replacement compressor PAG oil capacity and the recorded amount is the calculated amount to be drained from the replacement compressor.

Notice: Use the correct fastener in the correct location. Replacement fasteners must be the correct part number for that application. Fasteners requiring replacement or fasteners requiring the use of thread locking compound or sealant are identified in the service procedure. Do not use paints, lubricants, or corrosion inhibitors on fasteners or fastener joint surfaces unless specified. These coatings affect fastener torque and joint clamping force and may damage the fastener. Use the correct tightening sequence and specifications when installing fasteners in order to avoid damage to parts and systems.
Tighten
Tighten the bolts to 50 N·m (37 lb ft).
Tighten
Tighten the bolt to 16 N·m (12 lb ft).
Tighten
Tighten the bolt to 16 N·m (12 lb ft).
Air Conditioning Compressor Replacement LB7 w/ Denso
Tools Required
J 39400-A Halogen Leak Detector
Removal Procedure
- Recover the refrigerant. Refer to Refrigerant Recovery and Recharging .
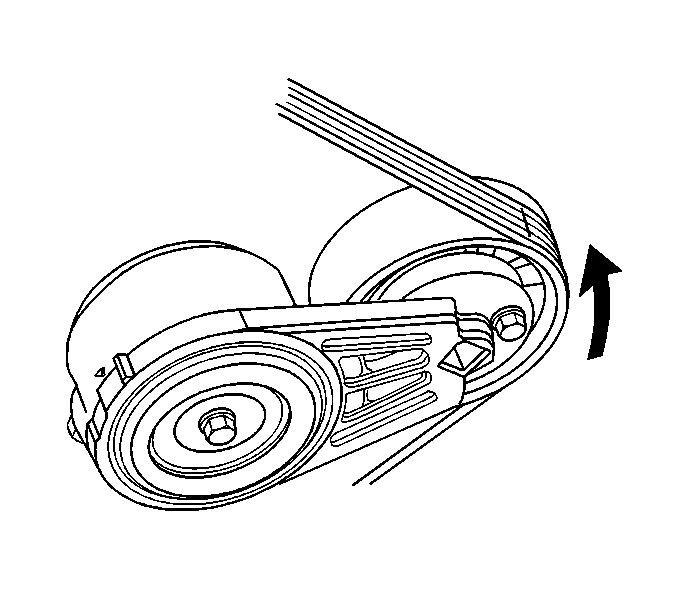
- Install a ratchet into the belt tensioner adapter opening.
- Rotate the belt tensioner counterclockwise in order to relieve the tension on the belt.
- Remove the belt from the A/C compressor.
- Slowly release the tension on the belt tensioner.
- Remove the discharge hose bolt from the A/C compressor.
- Remove the discharge hose from the A/C compressor.
- Remove the suction hose bolt from the A/C compressor.
- Remove the suction hose from the A/C compressor.
- Discard the sealing washers. Cap all of the openings.
- Disconnect the electrical connections.
- Remove the A/C compressor mounting bolts.
- If replacing the A/C compressor, drain and measure as much of the oil as possible from the removed compressor .
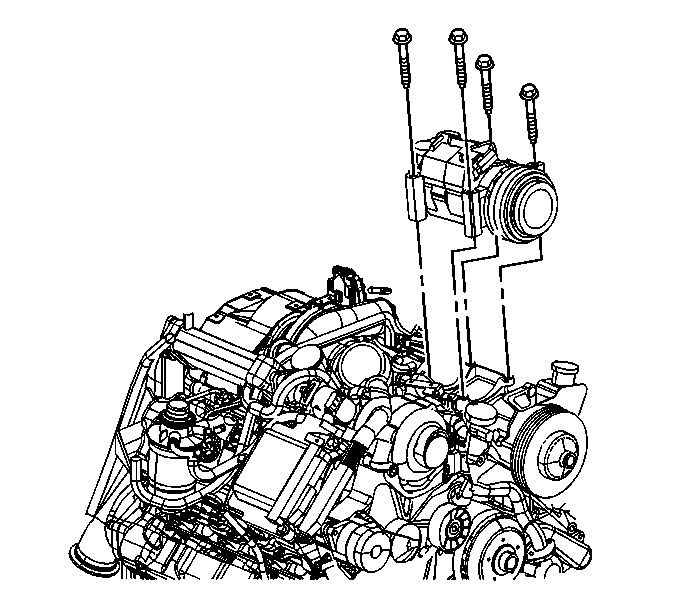
| 13.1. | Drain the oil from both the suction and discharge ports of the removed A/C compressor into a clean container. |
Rotate the compressor shaft to assist in draining the compressor.
| 13.2. | Measure and record the amount of oil drained from the removed A/C compressor. |
This measurement will be used during installation of the replacement A/C compressor.
| 13.3. | Properly discard the used PAG oil. |
Installation Procedure
- The replacement compressor is shipped with 240 ml (8.0 oz) of refrigerant oil .
- Before installing the compressor, the refrigerant oil will have to be partially drained:
- Drain the calculated amount of refrigerant oil from the replacement compressor.
- Install the A/C compressor.
- Install the A/C compressor mounting bolts.
- Connect the electrical connection.
- Install the A/C discharge hose to the compressor using new sealing washers.
- Install the A/C discharge hose bolt to the A/C compressor.
- Install the A/C suction hose to the compressor using new sealing washers.
- Install the A/C suction hose bolt to the A/C compressor.
- Install the drive belt. Refer to Drive Belt Replacement in Engine Mechanical - 6.6L.
- Evacuate and recharge the A/C system. Refer to Refrigerant Recovery and Recharging .
- Leak test the fittings of the component using the J 39400-A .
Important: The refrigerant oil in the A/C system must be balanced during compressor replacement.

| 2.1. | Refer to the amount of refrigerant oil recorded during the compressor removal. |
| 2.2. | Subtract the amount recorded from the replacement compressor PAG oil capacity. Refer to Refrigerant System Capacities . |
The difference between the replacement compressor PAG oil capacity and the recorded amount is the calculated amount to be drained from the replacement compressor.

Tighten
Tighten the bolts to 50 N·m (37 lb ft).
Tighten
Tighten the bolt to 16 N·m (12 lb ft).
Tighten
Tighten the bolt to 16 N·m (12 lb ft).
Air Conditioning Compressor Replacement L35 w/Harrison
Tools Required
J 39400-A Halogen Leak Detector
Removal Procedure
- Recover the refrigerant. Refer to Refrigerant Recovery and Recharging .
- Remove the drive belt. Refer to Drive Belt Replacement in Engine Mechanical - 4.3L.
- Remove the A/C compressor hose assembly bolt from the A/C comressor.
- Remove the A/C compressor hose assembly from the A/C compressor.
- Disconnect the electrical connectors.
- Remove the A/C compressor mounting bolts.
- Remove the A/C compressor from the bracket.
- If replacing the A/C compressor, drain and measure as much of the oil as possible from the removed compressor .
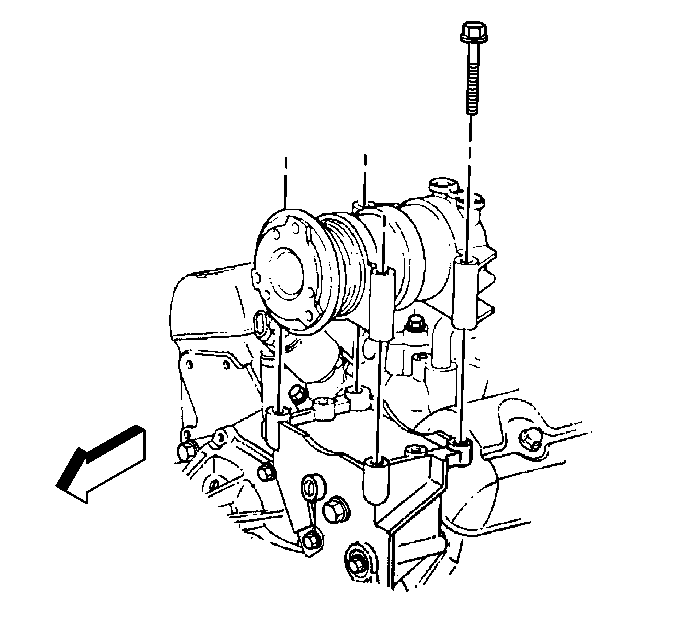
| 8.1. | Drain the oil from both the suction and discharge ports of the removed A/C compressor into a clean container. |
| 8.2. | Remove the A/C compressor crankcase oil drain plug and drain the crankcase oil into the same container. |
| 8.3. | Measure and record the amount of oil drained from the removed A/C compressor. |
This measurement will be used during installation of the replacement A/C compressor.
| 8.4. | Properly discard the used PAG oil. |
Installation Procedure
- Add the proper amount of PAG oil to the compressor crankcase. Refer to Refrigerant System Capacities .
- Install the A/C compressor drain plug.
- Install the compressor into the bracket.
- Install the compressor bolts.
- Install the A/C compressor hose to the compressor using new sealing washers.
- Install the A/C comressor hose bolt to the A/C compressor.
- Connect the electrical connections.
- Install the drive belt. Refer to Drive Belt Replacement in Engine Mechanical - 4.3L.
- Evacuate and recharge the A/C system. Refer to Refrigerant Recovery and Recharging .
- Leak test the fittings of the component using the J 39400-A .
Notice: Use the correct fastener in the correct location. Replacement fasteners must be the correct part number for that application. Fasteners requiring replacement or fasteners requiring the use of thread locking compound or sealant are identified in the service procedure. Do not use paints, lubricants, or corrosion inhibitors on fasteners or fastener joint surfaces unless specified. These coatings affect fastener torque and joint clamping force and may damage the fastener. Use the correct tightening sequence and specifications when installing fasteners in order to avoid damage to parts and systems.
Tighten
Tighten the drain plug to 20 N·m (15 lb ft).

Tighten
Tighten the bolts to 50 N·m (37 lb ft).
Tighten
Tighten the bolt to 34 N·m (25 lb ft).
Air Conditioning Compressor Replacement LB7 w/Harrison
Tools Required
J 39400-A Halogen Leak Detector
Removal Procedure
- Recover the refrigerant. Refer to Refrigerant Recovery and Recharging .
- Remove the drive belt. Refer to Drive Belt Replacement in Engine Mechanical - 6.6L.
- Remove the compressor hose assembly bolt from the A/C compressor.
- Remove the compressor hose assembly from the A/C compressor.
- Discard the sealing washers. Cap all of the openings.
- Disconnect the electrical connections.
- Remove the A/C compressor mounting bolts.
- If replacing the A/C compressor, drain and measure as much of the oil as possible from the removed compressor .
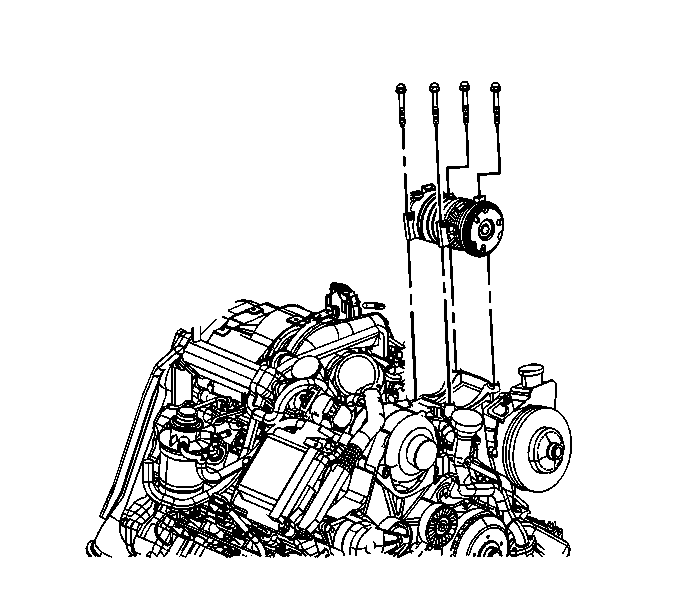
| 8.1. | Drain the oil from both the suction and discharge ports of the removed A/C compressor into a clean container. |
| 8.2. | Remove the A/C compressor crankcase oil drain plug and drain the crankcase oil into the same container. |
| 8.3. | Measure and record the amount of oil drained from the removed A/C compressor. |
This measurement will be used during installation of the replacement A/C compressor.
| 8.4. | Properly discard the used PAG oil. |
Installation Procedure
- Add the proper amount of PAG oil to the compressor crankcase. Refer to Refrigerant System Capacities .
- Install the A/C compressor.
- Install the A/C compressor mounting bolts.
- Connect the electrical connection.
- Install the refrigerant hose to the compressor using new sealing washers. Refer to Compressor Hose Assembly Replacement .
- Install the drive belt. Refer to Drive Belt Replacement in Engine Mechanical - 6.6L.
- Evacuate and recharge the A/C system. Refer to Refrigerant Recovery and Recharging .
- Leak test the fittings of the component using the J 39400-A .

Notice: Use the correct fastener in the correct location. Replacement fasteners must be the correct part number for that application. Fasteners requiring replacement or fasteners requiring the use of thread locking compound or sealant are identified in the service procedure. Do not use paints, lubricants, or corrosion inhibitors on fasteners or fastener joint surfaces unless specified. These coatings affect fastener torque and joint clamping force and may damage the fastener. Use the correct tightening sequence and specifications when installing fasteners in order to avoid damage to parts and systems.
Tighten
Tighten the bolts to 50 N·m (37 lb ft).
