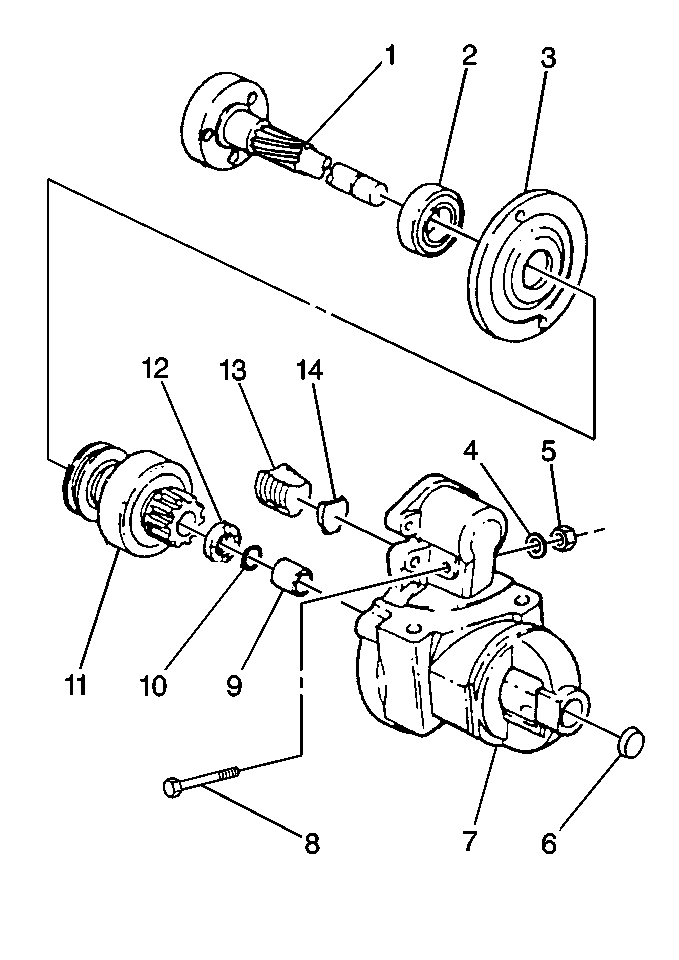
Starter Overhaul 28-MT
If the 28-MT motor does not perform to specifications,
disassembly may be necessary in order to perform further testing of the components.
Disassemble the starter motor only as necessary in order to
perform repair or replacement of the components.
Do not attempt to disassemble the following components that are serviced
as assemblies:
| • | The clutch drive assembly |
| • | The brush holder assembly |
| • | The frame and field assembly |
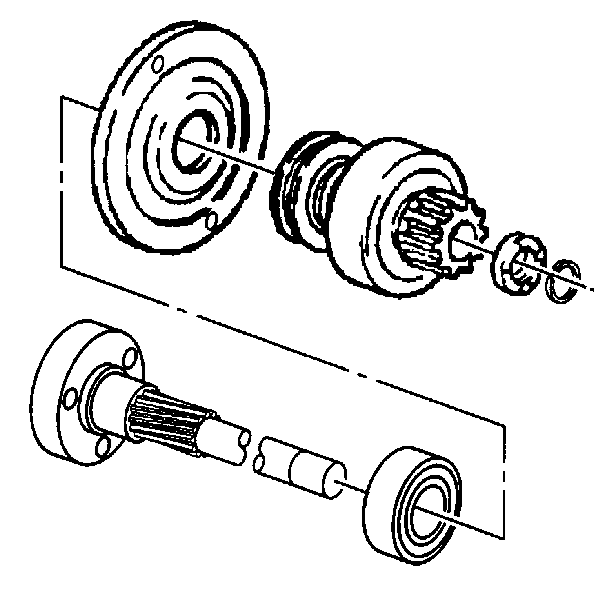
Preliminary Starter Motor Disassembly
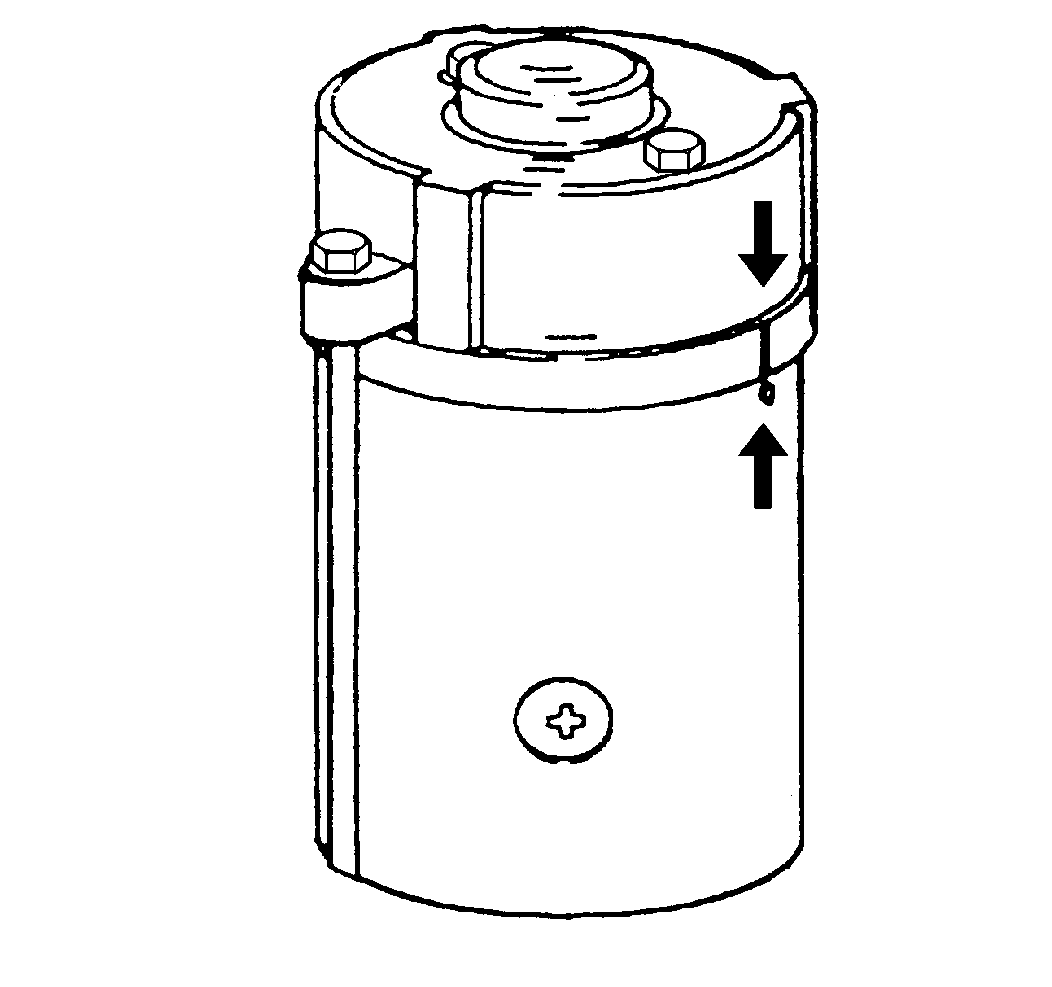
- Scribe marks completely
down 1 side of the starter motor in order to ensure proper alignment
of all of the components during assembly. Use a colored pencil
or a marker that will show on all of the components.
- Use the following procedure
in order to remove the motor lead on the frame assembly from the solenoid
assembly:
| 2.1. | Remove the nut from the motor terminal. |
| 2.2. | Slip off the motor lead. |
- Remove 2 through-bolts.
- Remove 2 brush plate screws.
- Remove the commutator end frame and the O-ring seal.
Important: Do not lose the small dowel pin that is installed between the frame
assembly and the gear reduction and drive group. The dowel pin is necessary
for assembly. If the dowel pin is lost, replace the dowel
pin with a 2 mm X 10 mm (0.79 in X 0.394 in)
long pin. Obtain the new pin or manufacture the pin locally.
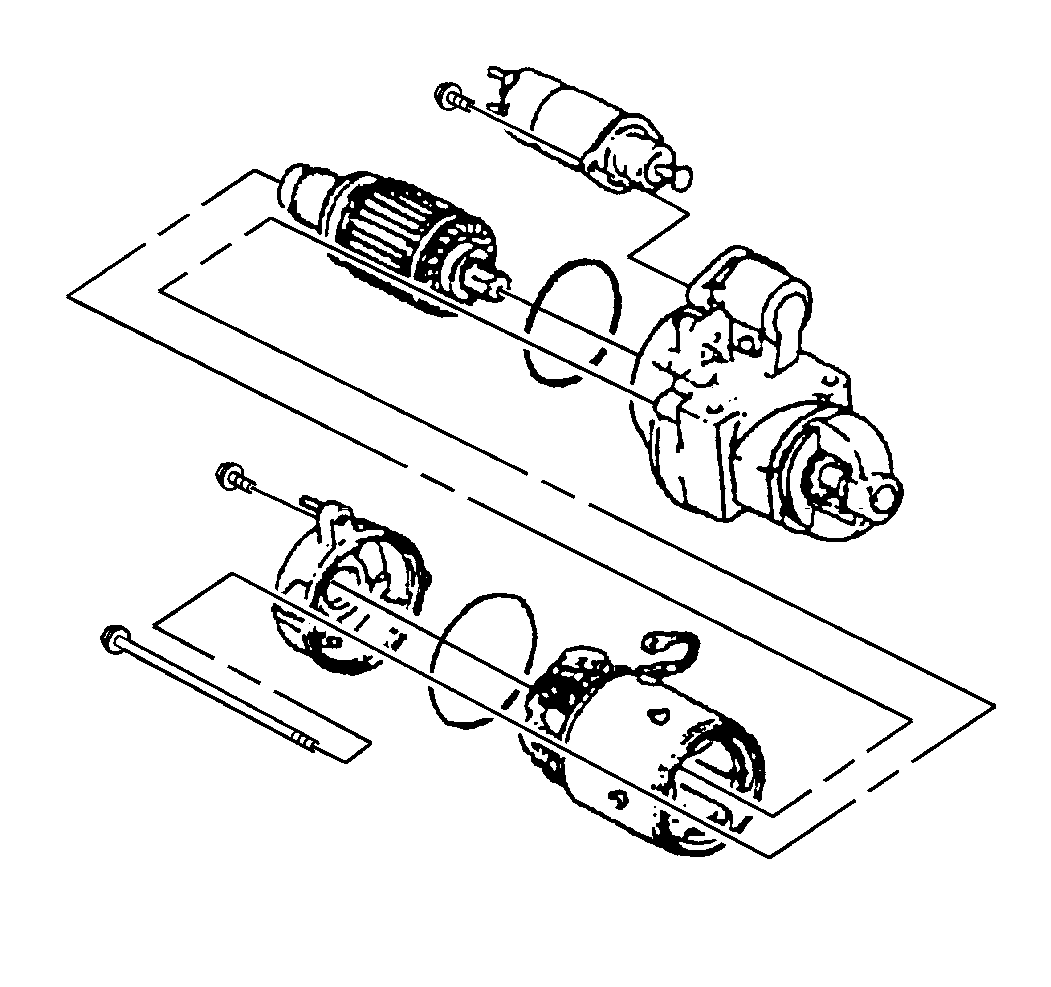
- Remove the following components:
| • | The armature may come off with the frame, the field and the brush holder
group or the gear reduction and drive group. |
- Remove the armature assembly that has the bearings.
Do not remove the bearings from the armature assembly unless replacement
of the bearings is necessary. Refer to Armature Bearing Replacement.
- Remove the solenoid screws.
- Remove the solenoid assembly.
Pivot the inside end of the solenoid assembly out of the engagement
shift lever drive group in order to withdraw the solenoid assembly.
Frame and Field Disassembly
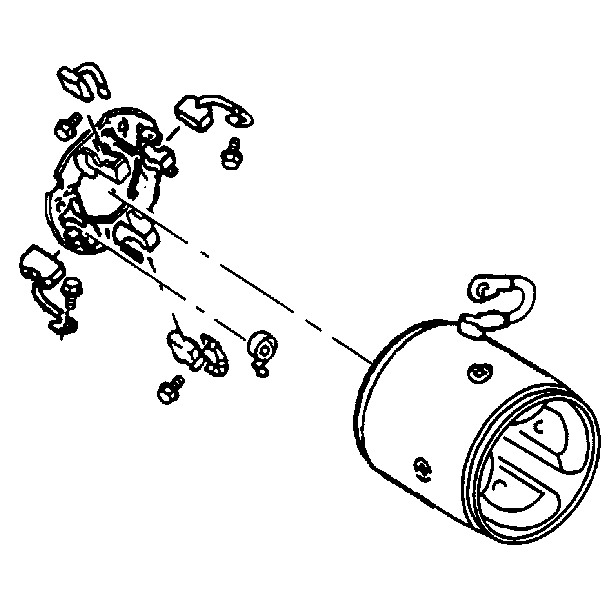
- Disassemble the insulated
brush screws. Move the brush holder assembly with the brushes slightly away
from the frame and the field assembly in order to reach across
with a screwdriver and remove the screws.
- Disassemble the frame and the field assembly.
- Disassemble the grounded brush screws.
- Disassemble the brushes if the brushes need replacement.
- Use the following procedure in order to disassemble the brush
springs if the brush springs need replacement:
| 5.1. | Grasp the brush end of each brush spring with needle nose pliers. |
| 5.2. | Twist the spring end away from the brush. Remove the brush. |
Reduction and Drive Group Disassembly
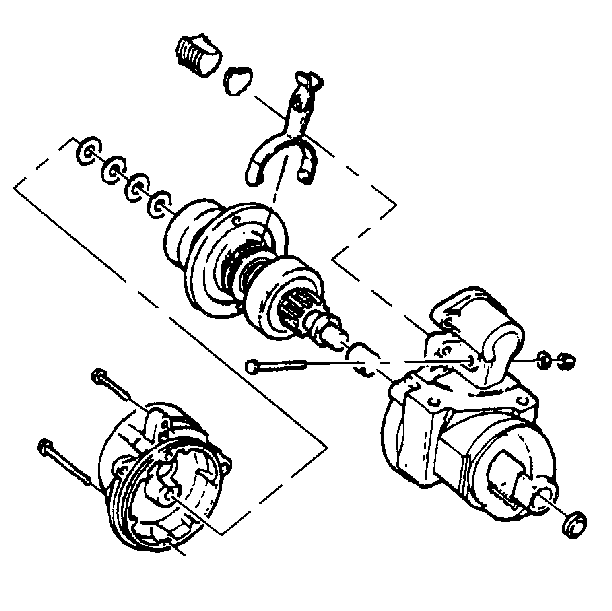
- Disassemble the housing
bolts.
- Disassemble the armature support bracket.
Important: Washers may stick to the bracket or to the driveshaft and the clutch
group as the bracket is removed. In either case, note the position and the
number of each of these washers.
- Disassemble the washers.
- Disassemble the drive housing plug and plate. Pry out the housing
plug with a large flat-bladed tool.
- Disassemble the following components:
- Disassemble the shift lever and the driveshaft and clutch group
from the drive housing together. Then separate these components. Do not remove
the bushing plug or the bushing from the drive housing unless
replacement is necessary.
Driveshaft and Clutch Disassembly
Disassembly of the driveshaft and clutch group is not required unless
it is necessary to clean, inspect, or replace one or more parts of the group
separately.
- Disassemble the stop rings
and the pinion stop.
- Position the driveshaft and clutch group on a work bench with
the internal gear end down.
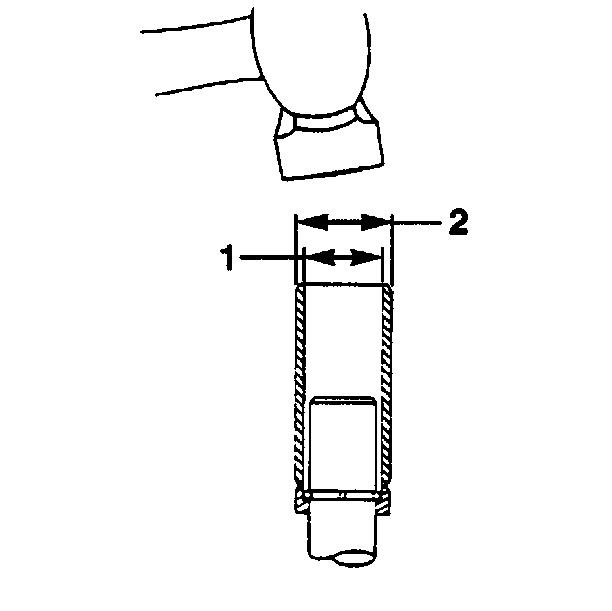
- Fabricate a tube approximately
22 mm wide (2). Drive the pinion stop toward the clutch drive
assembly until the pinion stop clears the stop rings.
- Pry the stop rings out of the driveshaft groove. Slide the stop
rings off the end of the shaft. Do not scratch the driveshaft.
- Inspect the edges of the shaft groove for burrs that may form
through repeated cranking cycles. These burrs may make removal of the
pinion stop and the clutch drive assembly difficult.
- Slide the pinion stop off the driveshaft. Discard the old pinion
stop and the stop rings. Use new components for assembly.
- Disassemble the driveshaft support from the driveshaft. Do not
remove the bearing from the driveshaft unless replacement is required.
Armature Bearing Removal
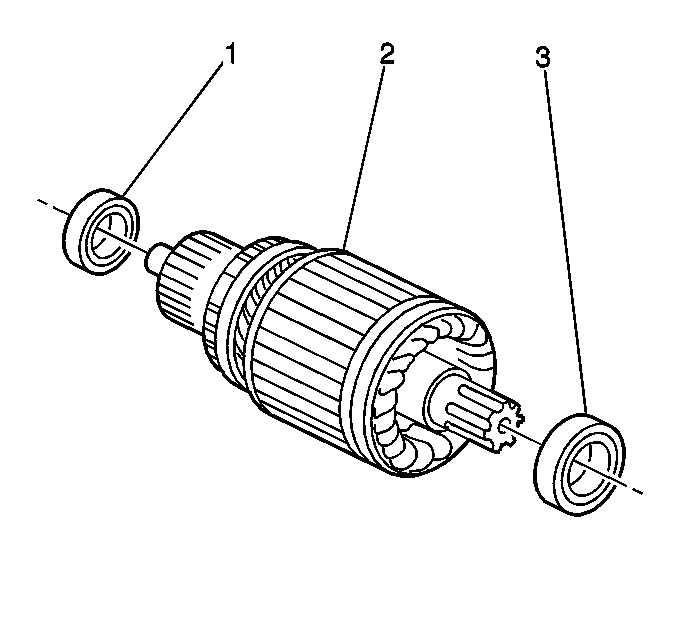
Notice: Ball bearings that are removed from the armature must be replaced with
new bearings. The removal procedure causes internal damage to the bearings.
- Remove the armature bearings (1,3) and the armature (2)
if replacing the armature and the bearings is necessary.
- Use a suitable bearing puller in order to remove the commutator
end or the drive end bearings from the armature assembly.
Armature Bearing Installation
- Use a tube that bears only on the bearing inner race in order
to install the new commutator end and/or the drive end bearings to the armature
assembly.
- Press on the bearing until the inner race bottoms out against
the shoulder of the armature shaft.
- Install the armature and armature bearings.
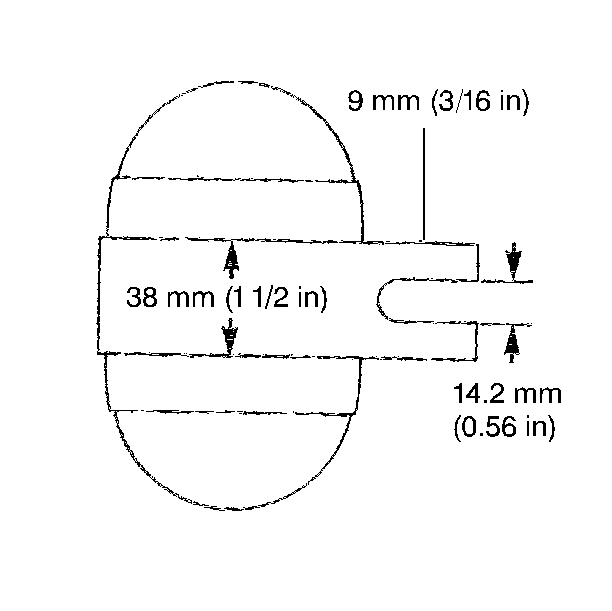
Center Support Bearing Removal
Tools Required
Locally Fabricated Tool
Use the following procedure in order to remove the center support bearing
from the driveshaft if the center support bearing needs replacement:
Notice: Ball bearings that are removed from the armature must be replaced with
new bearings. The removal procedure causes internal damage to the bearings.
- Inspect the center support bearing in order to determine if the
center support bearing needs replacement.
- Proceed with the following steps if the center support bearing
needs replacement.
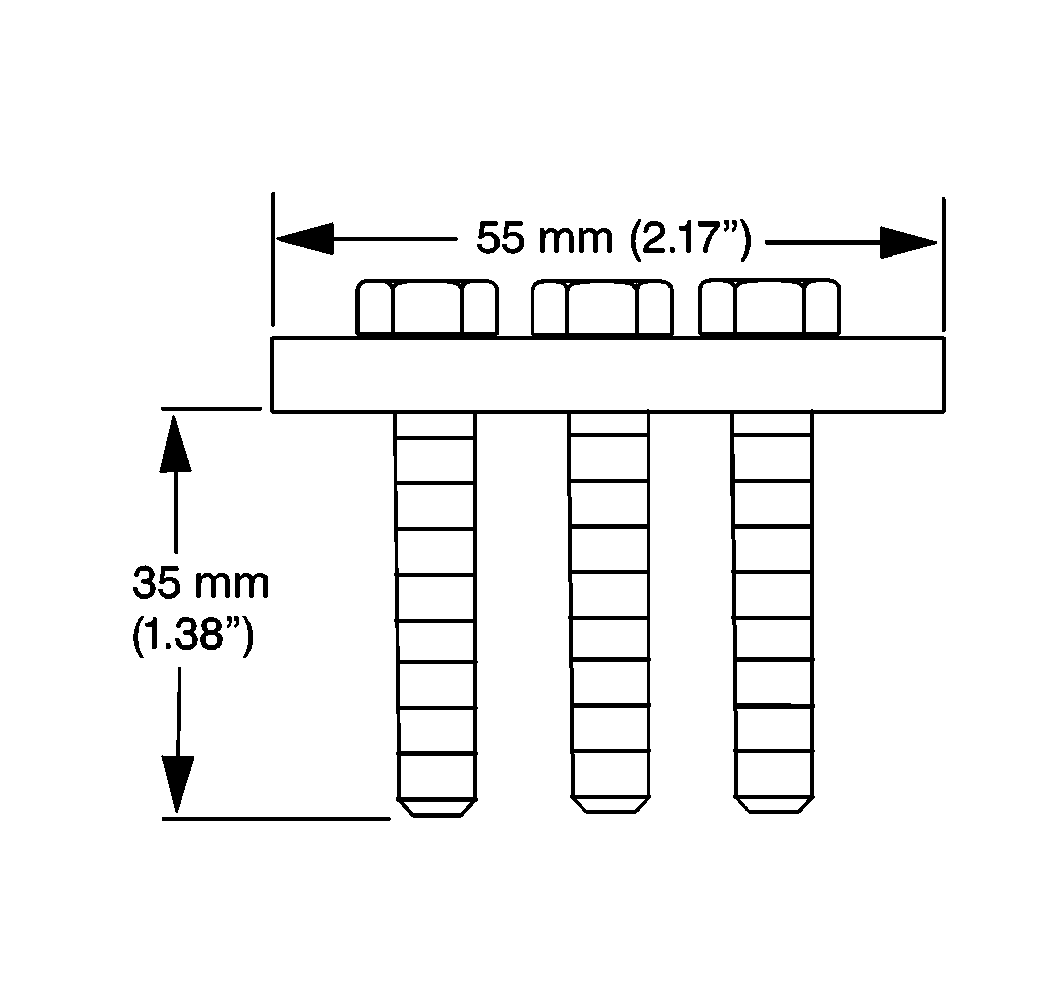
- Fabricate a tool for removing
the center support bearing using the dimensions shown.
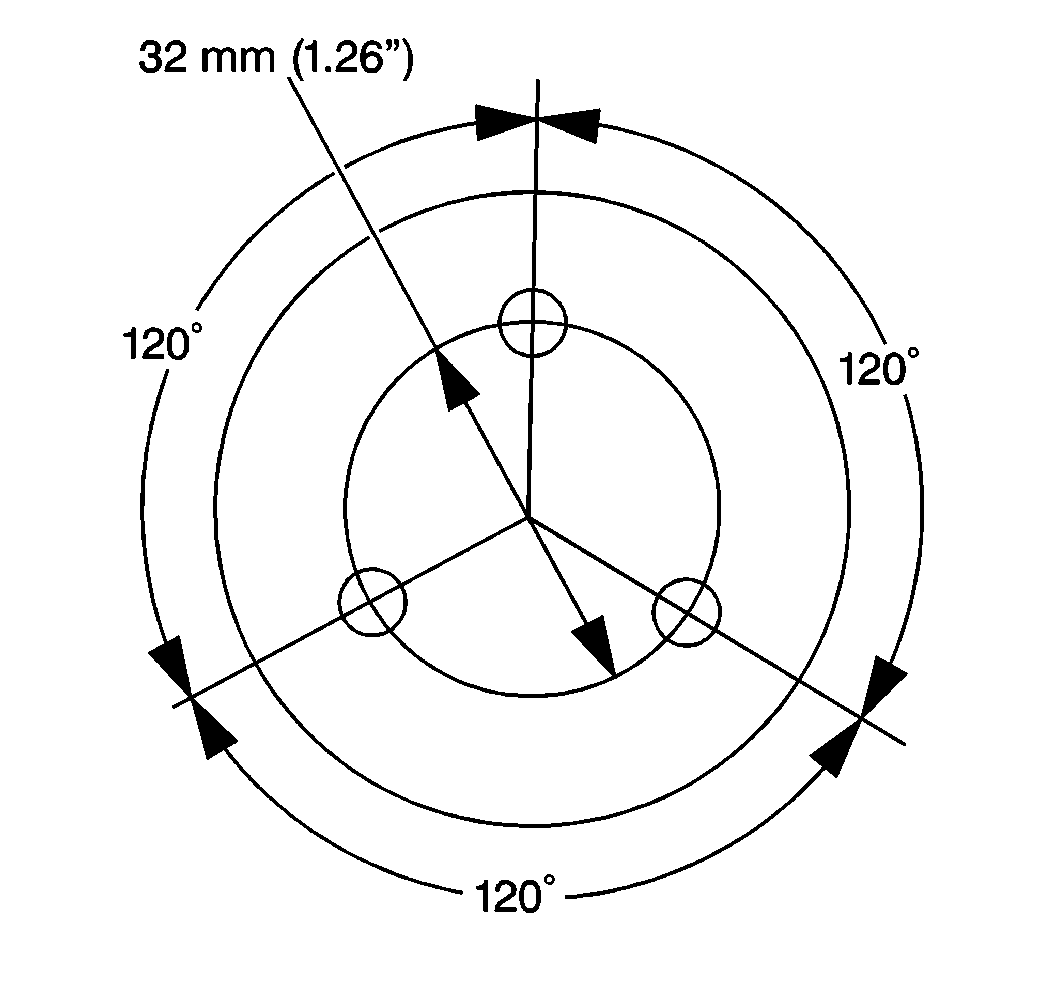
- Place the bolts in the
fabricated tool.
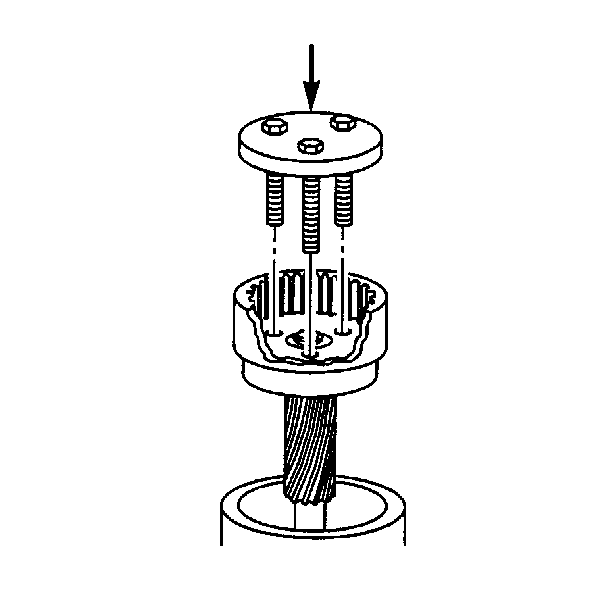
- Place the driveshaft in
a suitable support fixture.
- Place the bolt ends of
the locally fabricated tool through the access holes in the wide end of the
driveshaft.
- Squarely press the bearing (1) off the surface on the center
shaft.
Center Support Bearing Installation
- Install the new bearing
into the driveshaft using the locally fabricated tool that bears only on the
bearing inner race.
- Press on the bearing (1) until the inner race bottoms out
against the shoulder on the driveshaft.
Drive End Housing Bushing Removal
- Inspect the drive end
housing bushing (9) in order to verify if the drive end housing bushing
needs replacement.
- Use the following procedure in order to remove the drive end housing
bushing (9) from the drive end housing (7) if the drive end
housing bushing needs replacement.
| 2.1. | Drive out the plug, if present, from inside the drive housing. |
| 2.2. | Use a file in order to clean away any remnants of the old stake
and any metal shavings in order to prepare for installation of a new plug. |
| 2.3. | Use a suitable tool in order to press out the bushing. |
Drive End Housing Bushing Installation
- Use a suitable tool in order to press the new bushing into the
drive housing until the bushing is flush with the inside of the housing.
- Install a new plug, if used, in the drive housing.
- Stake the housing material over the plug at 3 places, equally
spaced.
Lubrication Procedure
Armature bearings and the driveshaft support bearing are permanently
lubricated. Do not add lubricant to these bearings. Use GM P/N 1960954
grease lubricant or the equivalent in order to lubricate the
following areas during assembly. Avoid using excessive lubrication.
| • | The drive end housing bushing in the drive housing |
| • | The pivot hole and the working surface on the ends of the shift
lever |
| • | The following components on the driveshaft: |
Driveshaft and Clutch Assembly
If disassembled, position the driveshaft on a work surface with the
internal gear end down. Assemble the driveshaft and clutch group in the following
way:
Important: If the center support bearing is being replaced, install the center
support bearing on the driveshaft.
- Install the driveshaft support to the driveshaft, seating the bearing
in the support.
- Install the clutch drive assembly to the driveshaft.
- Install the new pinion
stop onto the driveshaft.
| • | Slide the pinion stop onto the driveshaft until the recess for
the stop rings faces up. |
| • | Install the stop rings into the groove in the driveshaft. |
| • | Pick the assembly up. Support the assembly under the pinion stop.
A metal block, with a U-shaped cutout that will slide over the shaft
between the pinion gear and stop, can be clamped in a vise order
to provide support. |
| • | Ensure that the stop rings are seat fully in the pinion stop recess. |
| • | Stake the upper edge of the pinion stop over the stop ring at
4 equally spaced places. |
| • | Do not allow the staked metal to contact the driveshaft. |
Reduction and Drive Group Assembly
Important:
| • | If the drive end bushing and the plug are being replaced, install
these components into the drive housing. |
| • | Lubricate the following components: |
| • | The drive end housing bushing |
- Install the arms on the shift lever with the shift collar onto the driveshaft
and clutch group.
- Install the assembled shift lever and the driveshaft and clutch
group into the drive housing.
| • | Align the holes in the driveshaft support with the holes in the
drive housing. |
| • | Ensure that the driveshaft support fully seats in the drive housing
and that the driveshaft bearing remains fully seated in the driveshaft support. |
Notice: Use the correct fastener in the correct location. Replacement fasteners
must be the correct part number for that application. Fasteners requiring
replacement or fasteners requiring the use of thread locking compound or sealant
are identified in the service procedure. Do not use paints, lubricants, or
corrosion inhibitors on fasteners or fastener joint surfaces unless specified.
These coatings affect fastener torque and joint clamping force and may damage
the fastener. Use the correct tightening sequence and specifications when
installing fasteners in order to avoid damage to parts and systems.
- Install the following
components:
Tighten
Tighten the nut to 4.5 N·m (40 lb in).
- Install the plate, if used, and the drive housing.
- Install the washers in the same number and position as noted at
disassembly.
- Install the armature support bracket to the drive housing. Align
the mark made prior to the disassembly with the mark on the drive housing.
- Install the drive housing.
Tighten
Tighten the drive housing bolts to 8.5 N·m (75 lb in).
Frame and Field Assembly

- Install the brush springs
if removed.
| 1.1. | Start each brush spring onto the post on the brush holder assembly
just enough in order to hold the inside end of spring from turning. |
| 1.2. | Grasp the free end of the spring with needle nose pliers. Twist
the spring to the right over the top of the brush socket. |
| 1.3. | Push the spring fully onto the post. Then release the free end
in order to engage the notch in the brush socket. |
Notice: Brush leads may be damaged by excessive handling. Do not overflex the
leads near the clip welds or the clips may break
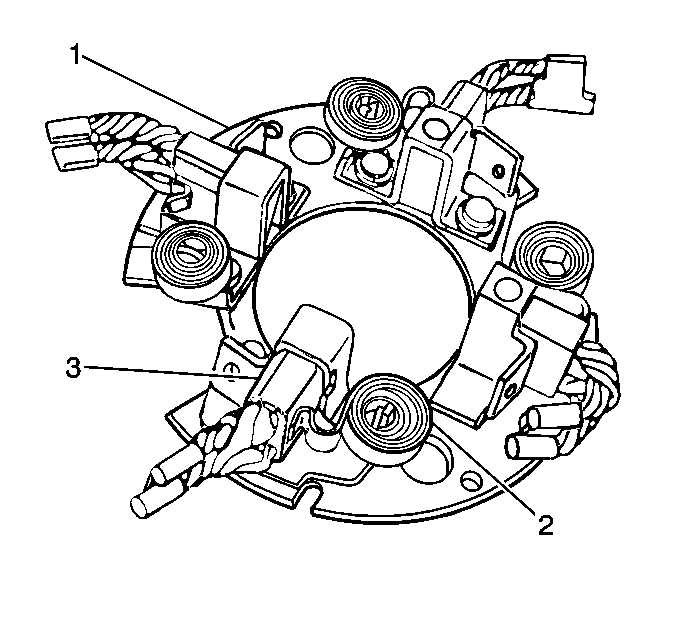
- Install the brushes (3),
to the brush holder assembly (1) with the springs (2).
| 2.1. | Ensure that the insulated brushes go into the brush sockets of
the brush holder assembly that mounts on the insulation. |
| 2.2. | To install each brush, grasp the free end of the brush spring
with needle nose pliers Twist the spring to the right in order to clear the
brush socket. Insert the brush partly into the brush socket. |
| 2.3. | Gradually release the springs so that the spring end contacts
the side, not end, of the brush. This will hold the brushes retracted until
the brush holder is installed over the armature commutator. |
- Position the terminals of the grounded brush leads behind the
terminal tabs on the brush holder.
- Install the grounded brush screws.
Notice: Use the correct fastener in the correct location. Replacement fasteners
must be the correct part number for that application. Fasteners requiring
replacement or fasteners requiring the use of thread locking compound or sealant
are identified in the service procedure. Do not use paints, lubricants, or
corrosion inhibitors on fasteners or fastener joint surfaces unless specified.
These coatings affect fastener torque and joint clamping force and may damage
the fastener. Use the correct tightening sequence and specifications when
installing fasteners in order to avoid damage to parts and systems.
- Insert the brush screws through the terminal tabs on the brush holder.
Thread the brush screws into the brush lead terminals.
Tighten
Tighten the grounded brush screws to 1.5 N·m (13 lb in).
- Install the frame and
field assembly to the brush holder assembly.
| 5.1. | Position the brush holder assembly (with installed brushes) over
the terminal end of the frame and field assembly. |
| 5.2. | Attach the terminals of the insulated brush leads to the conductors
in the frame and field assembly with the insulated brush screws. |
Tighten
Tighten the insulated brush screws to 1.5 N·m (13 lb in).
Starter Motor Unit Assembly
- Support the gear reduction
and drive group.
- Place the pinion gear end down.
Notice: Use the correct fastener in the correct location. Replacement fasteners
must be the correct part number for that application. Fasteners requiring
replacement or fasteners requiring the use of thread locking compound or sealant
are identified in the service procedure. Do not use paints, lubricants, or
corrosion inhibitors on fasteners or fastener joint surfaces unless specified.
These coatings affect fastener torque and joint clamping force and may damage
the fastener. Use the correct tightening sequence and specifications when
installing fasteners in order to avoid damage to parts and systems.
- Use the following
procedure in order to install the solenoid assembly:
| 3.1. | Pivot the plunger of the solenoid assembly in order to engage
the plunger to the shift lever in the gear reduction and drive group. |
| 3.2. | Position the solenoid mounting flange. |
| 3.3. | Install the solenoid mounting screws. |
Tighten
Tighten the solenoid screws to 2.8 N·m (25 lb in).
- Install the frame seal.
Important: If you are replacing the armature bearings, install the bearings onto
the armature. Refer to Armature Bearing Replacement.
- Use the following procedure in order to install the armature assembly
and the bearings into the gear reduction and drive group.
| 5.1. | Ensure that the teeth align. |
| 5.2. | Seat the bearing on the armature shaft fully into the housing
recess. |
- Use the following procedure in order to install the frame the
field and the brush holder group.
| 6.1. | Place the dowel pin into the hole in the armature support bracket
of the gear reduction and drive group. |
| 6.2. | Position the frame the field and the brush holder group over the
armature assembly. |
| 6.3. | Align the hole for the dowel pin. |
| 6.4. | Align the marks made during disassembly. |
| 6.5. | Seat the frame the field and the brush holder group into the gear
reduction and drive group. |
| 6.6. | Twist the brush springs away from the brushes. |
| 6.7. | Slide the brushes in order to contact the commutator on the armature. |
| 6.8. | Release the brush springs in order to contact the ends of the
brushes. |
| 6.9. | Verify that the brush spring tension is 44.5-49 N·m
(10-11 lb). |
| 6.10. | If the brush spring tension is not correct, replace the brush
springs. |
Important: The O-ring seal will damage easily during installation of the commutator
end frame. In order to prevent damage to the O-ring seal, use the following
procedure.
- Use the following procedure in order to install the O-ring seal.
| 7.1. | Install the O-ring seal onto the frame, field and brush holder
group in the normal position. The O-ring seal is in the normal position when
the seal is against the shoulder on the field frame that
will abut the installed commutator end frame. |
| 7.2. | Carefully roll the O-ring seal out of the normal position and
up onto the major outer diameter of the field frame. |
| 7.3. | Allow the seal to remain on the outer diameter of the field frame
until the commutator end frame is partially installed. |
- Use the following procedure
in order to install the commutator end frame.
| 8.1. | Align the marks on the commutator end frame and the frame and
field assembly made at disassembly. |
| 8.2. | Position the commutator end frame onto the frame and field assembly. |
| 8.3. | Leave a gap slightly larger than the thickness of the O-ring seal. |
- Use the following procedure
in order to install the brush plate screws.
| 9.1. | Use a scribe or a similar tool in order to align the tapped holes
in the brush holder assembly to the screw holes in the commutator end frame. |
| 9.2. | Install the brush plate screws. |
Tighten
Tighten the brush plate screws to 2.8 N·m (25 lb in).
- Use the following procedure
in order to install the through-bolts.
| 10.1. | Position the through-bolts. |
| 10.2. | Tighten the through-bolts by hand, but do not close the gap between
the commutator end frame and the frame and field assembly where the O-ring
seal will be located. |
| 10.3. | Roll the O-ring seal down into the normal position. The normal
position is between the commutator end frame and the frame and field assembly. |
| 10.4. | Align the timing ribs on the edge of the commutator end frame
to the timing spots on the frame and field assembly in order to ensure proper
alignment of the brushes. |
| 10.5. | Although the marks are located in 2 places on the motor,
the marks will only match in 1 way. |
Tighten
Tighten the through-bolts to 8.5 N·m (75 lb in).
- Use the following procedure
in order to install the motor lead onto the frame and field assembly.
| 11.1. | Remove the nut from the terminal on the solenoid. |
| 11.2. | Install the motor lead terminal. |
| 11.3. | Reinstall the solenoid motor terminal nut. |
Tighten
Tighten the solenoid motor terminal nut to 11 N·m (100 lb in).
