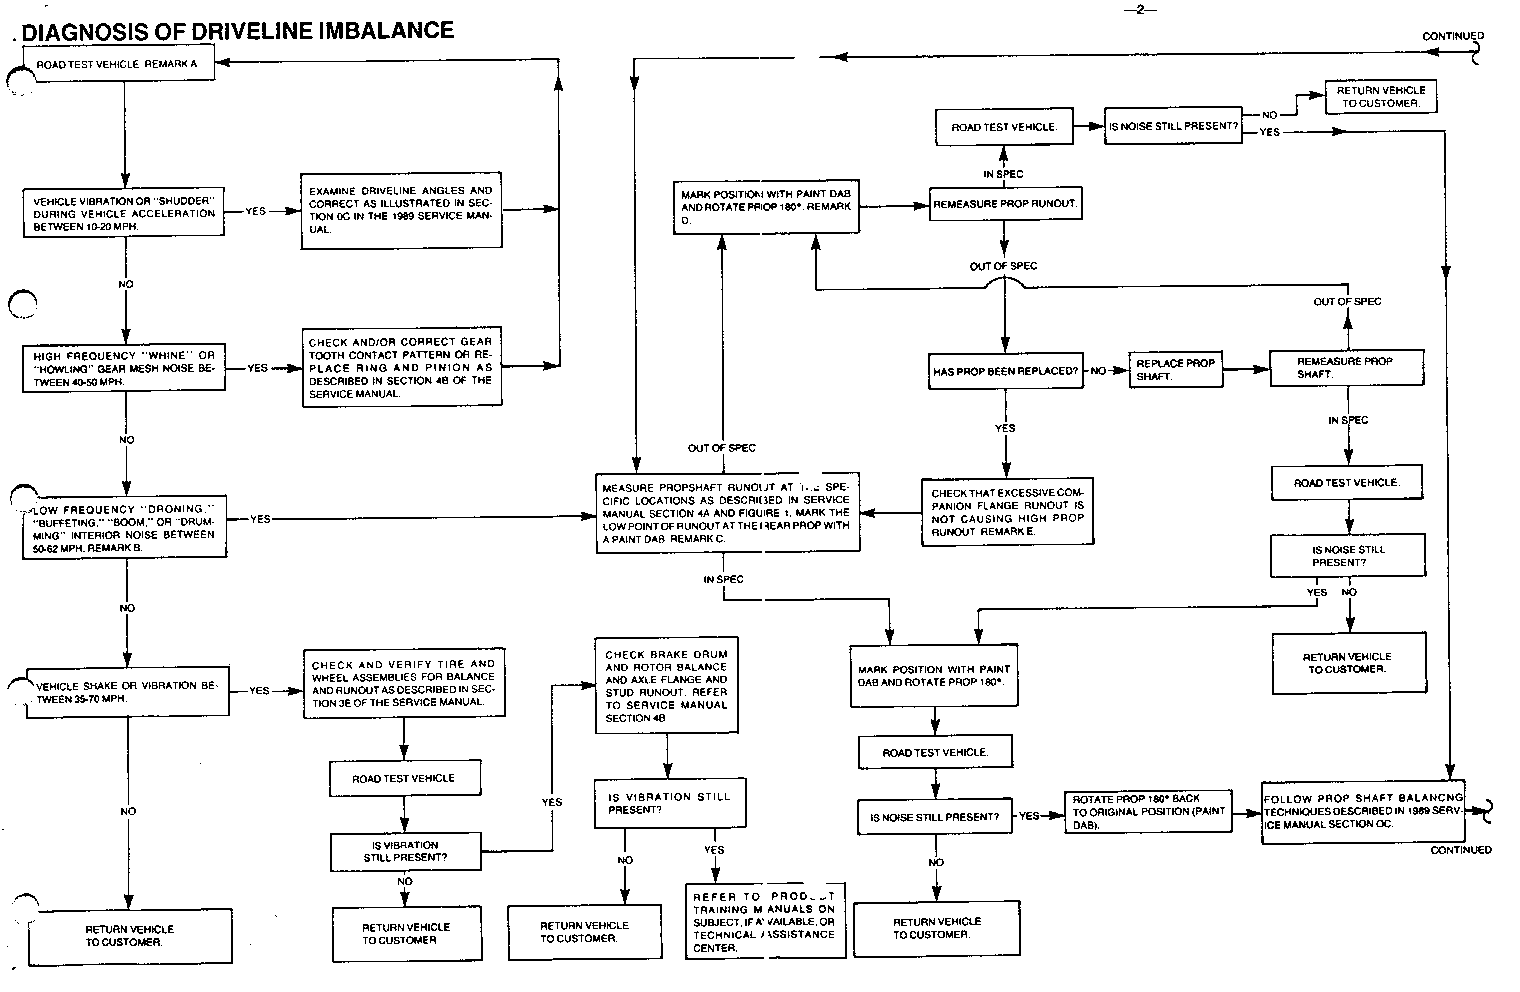
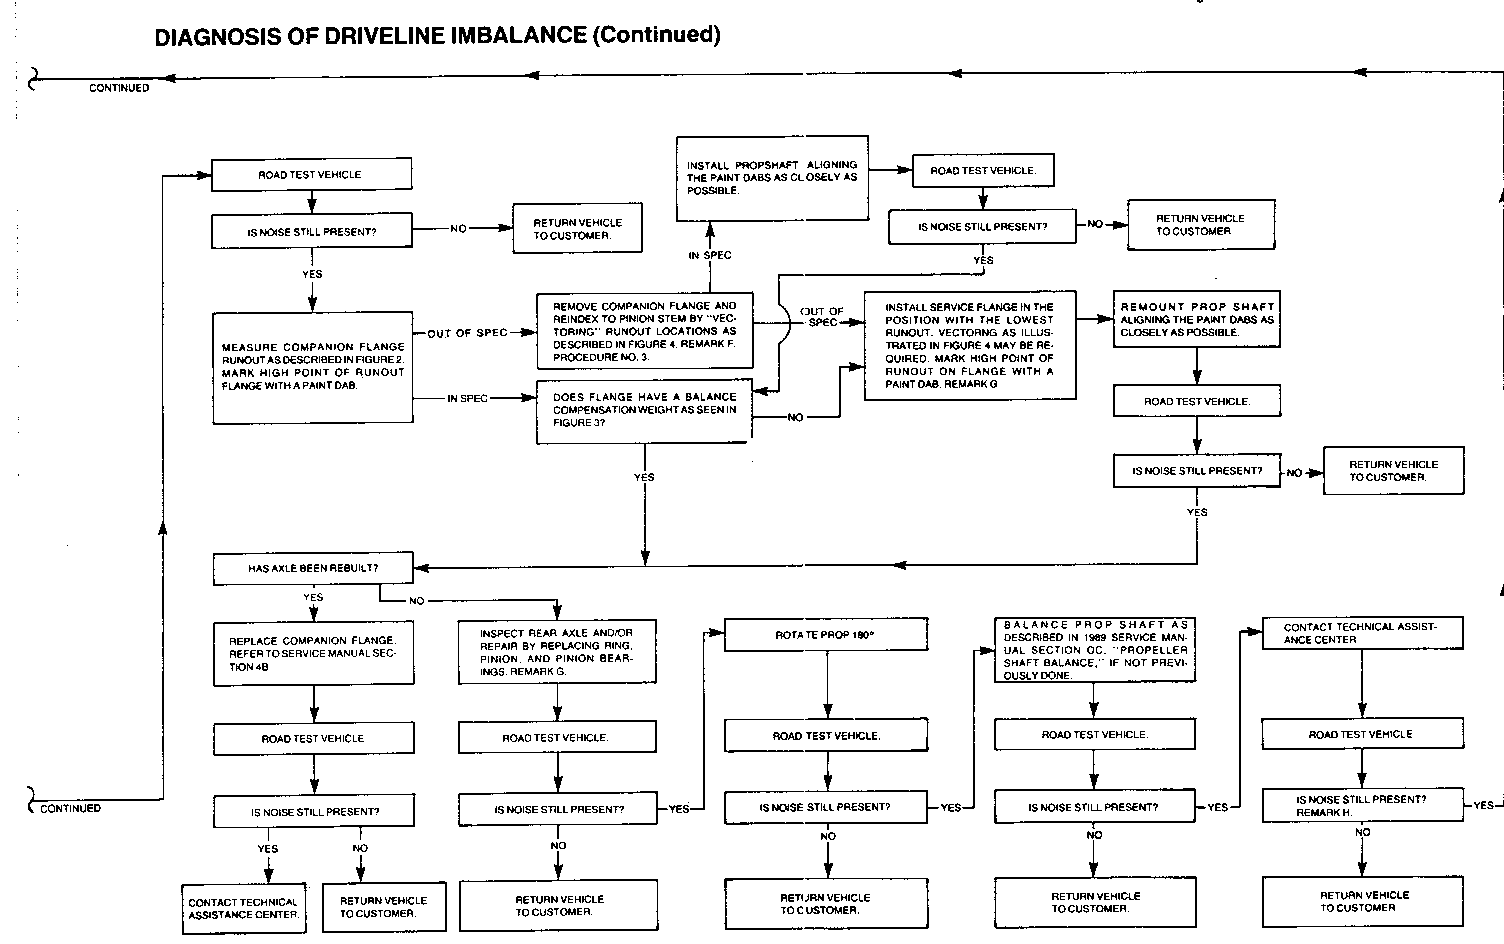
EVALUATING DRIVELINE VIBRATION (DIAGNOSIS FAULT TREE)

VEHICLES AFFECTED: 1983 - 1989 LIGHT DUTY TRUCKS
The purpose of this bulietin is to provide a logical approach to evaluating vehicles for driveline generated vibrations and imbalance occurring between 80-100 Km/h. The following diagnosis tree is designed to be used as a guide, and when utilized properly can help isolate and identify driveline disturbances.
Procedure:
Prior to road test, determine if disturbance is engine related by following the procedure below:
1. With engine at operating temperature and vehicle parked, set parking brake and place transmission shift lever in neutral.
2. Slowly accelerate engine from idle to 4000 RPM (diesels 3200 RPM), noting RPM at which vibration is felt (if any).
3. If vibration is felt, disregard use of this bulletin and isolate and repair responsible engine component (transmission, clutch/flywheel, torque convertor, engine accessory, etc.).
Road test vehicle on a smooth level road to verify customer comment. It is usually beneficial to road test the vehicle with the customer present. Note the speeds and conditions at which the disturbance is most noticeable. Refer to Remark A in this bulletin for diagnosis information.
To Use Diganosis Tree:
Locate symptom on the diagnosis tree which best describes the disturbance. Follow arrows and perform the required check or service action. Never bypass or skip an inspection or assume that a component is OK. All steps must be performed as called out.
Definition of Terms
"Boom" - Continuous base drum roll sound caused by body cavity resonance excited by drivetrain. Sometimes felt as pressure in ears.
"Buffeting" - High pressure pulsation.
"Droaning" - A low heavy reverberating often muffled sound. Sounds like a bowling ball rolling down alley.
"Drumming" - A drum roll similar to "Boom".
"Howling" - A mid-range continuous sound usually associated with driveline gear noise.
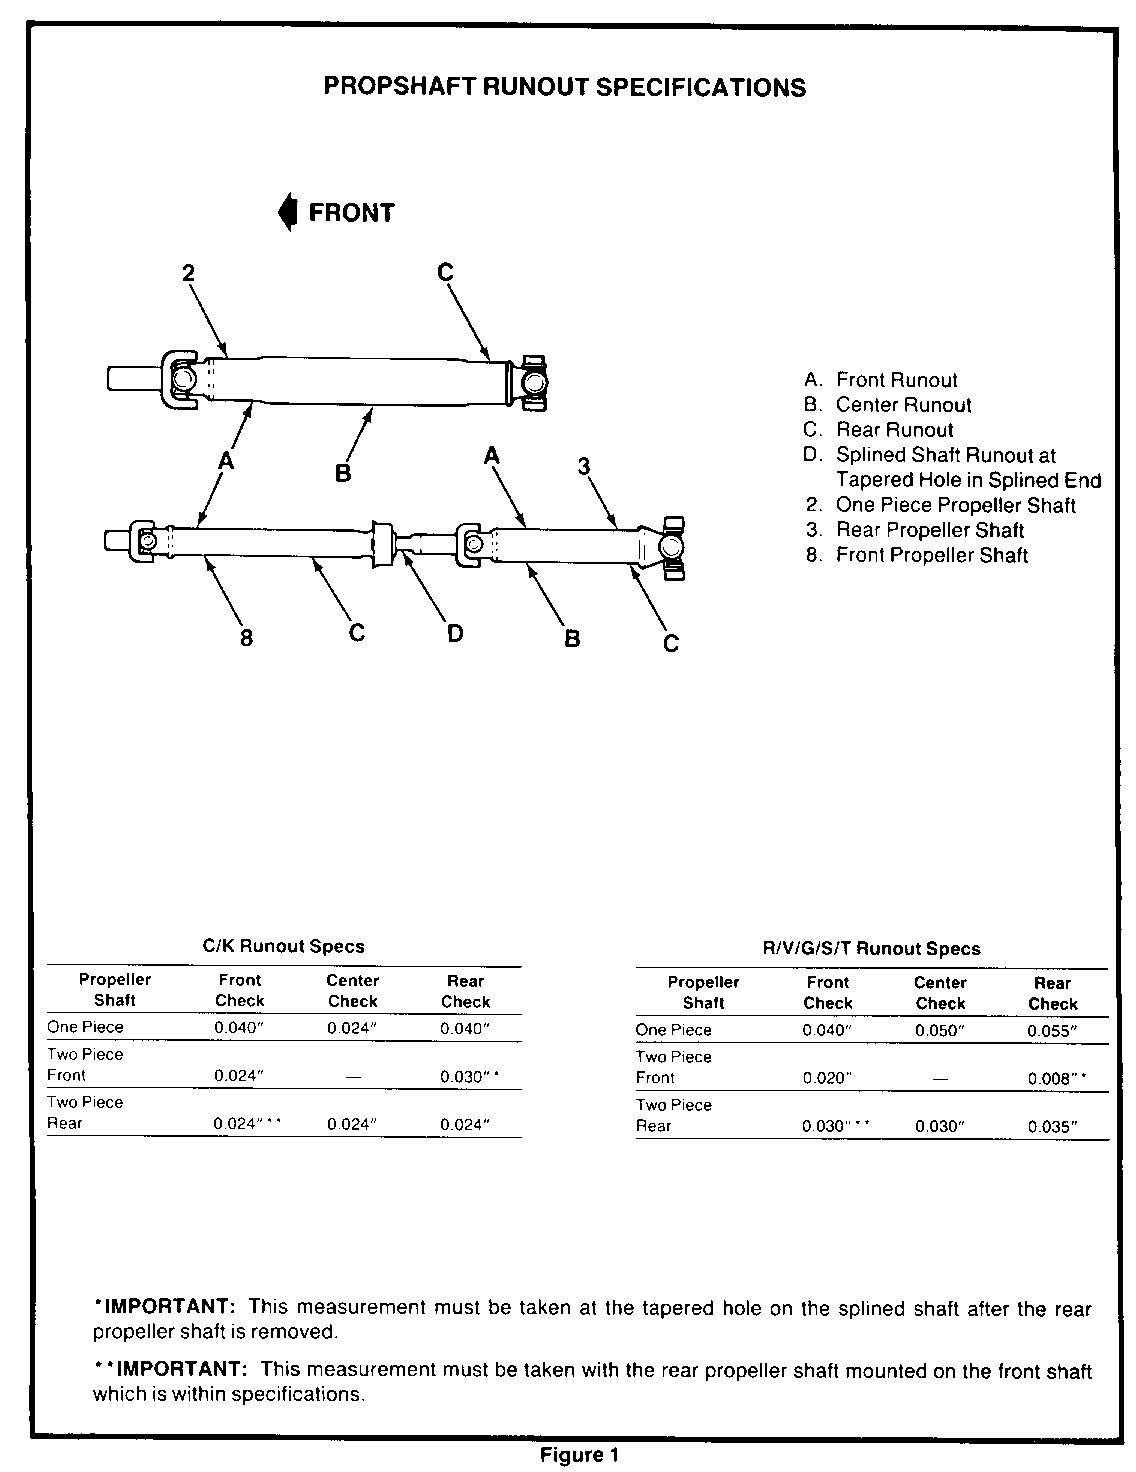
Propshaft Runout Specifications - Figure 1
C/K Runout Specs ----------------
Propeller Front Centre Rear Shaft Check Check Check ----- ----- ----- ----- One Piece 1 mm(0.040") 0.6 mm(0.024") 1 mm (0.040")
Two Piece Front 0.6 mm(O.024") 0.7 ( 0.030")
Two Piece Rear 0.6 mm(O.024"**) 0.6 mm(O.024") 0.6 mm(O.024")
R/V/G/S/T Runout Specs ----------------------- Propeller Front Centre Rear Shaft Check Check Check ----- ----- ----- ----- One Piece 1 mm (0.040") 1.3 mm (0.050") 1.4 mm ( 0 . 0 5 5" )
Two Piece Front 5 mm (0.020") 0.2 mm (0.008")*
Two Piece Rear 0.8 mm (0.030"**) 0.8 mm (0.030") 0.9 mm (0.035")
*IMPORTANT: This measurement must be taken at the tapered hole on the splined shaft after the rear propeller shaft is removed
**IMPORTANT: This measurement must be taken with the rear propeller shaft mounted on the front shaft which is within specification.
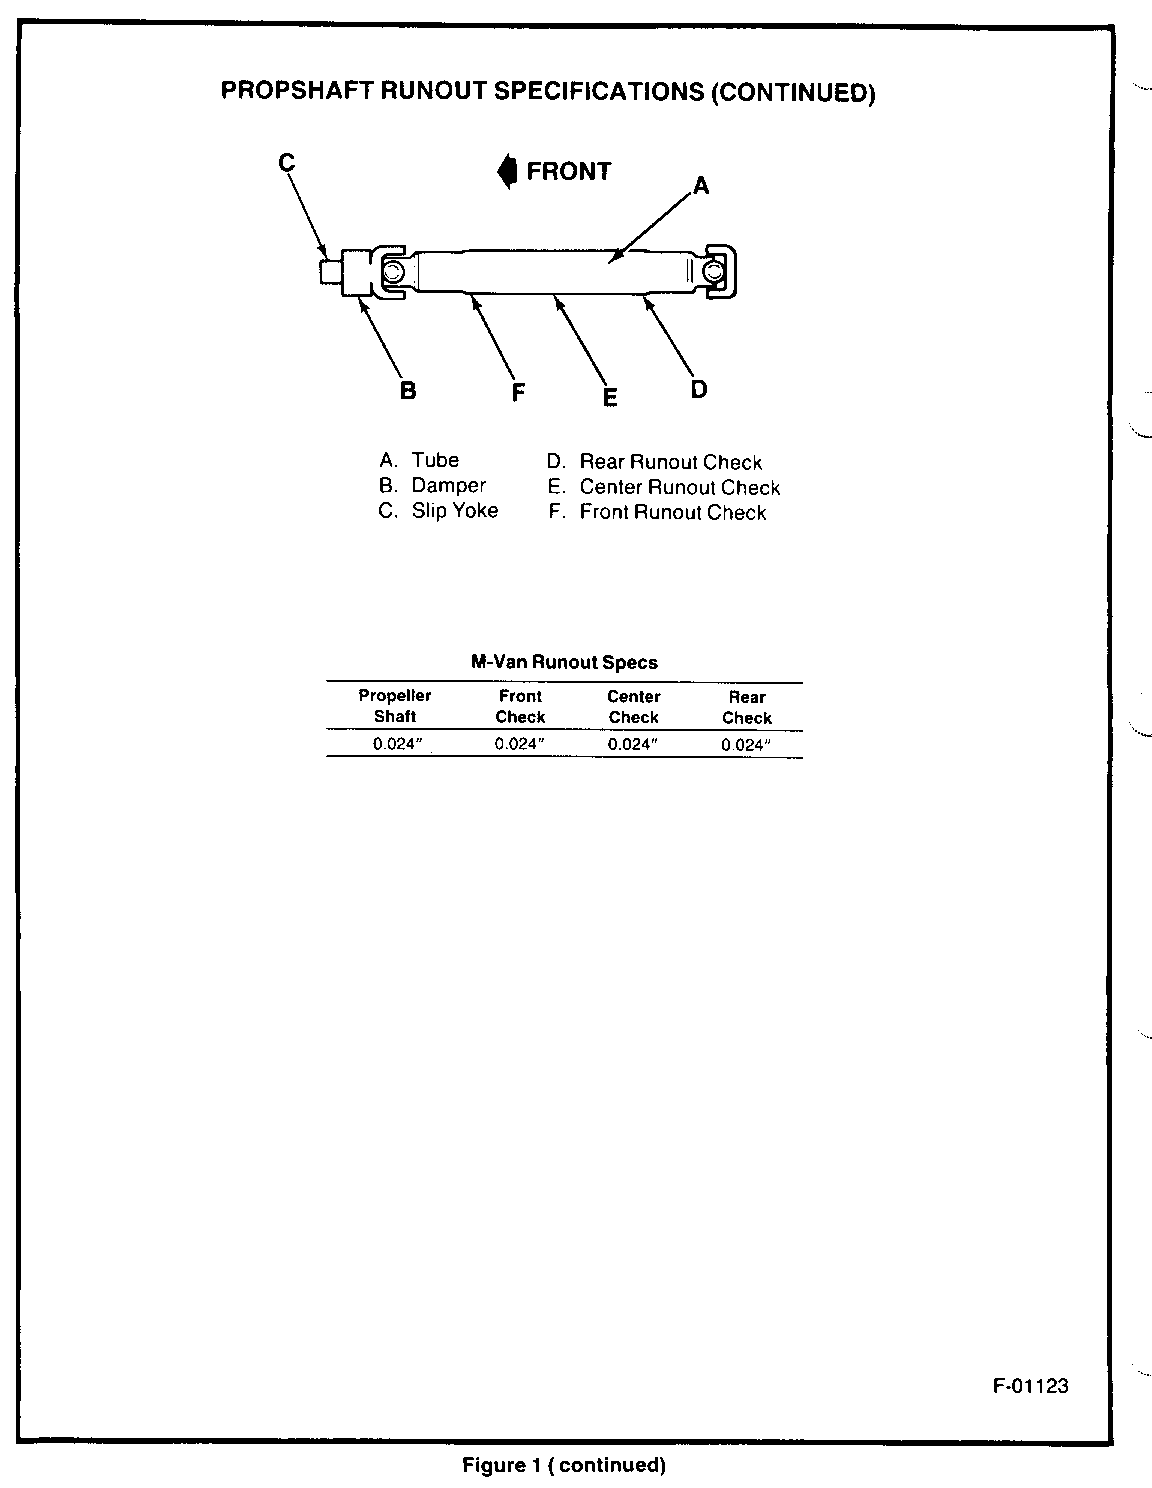
PROPSHAFT RUNOUT SPECIFICATION (CONTINUED)
M VAN RUNOUT SPECS
Propeller Front Centre RearShaft Shaft Check Check Check ----- ----- ----- ----- 0.6mm (0.024") 0.6mm (0.024") 0.6mm (0.024") 0.6mm (0.024")
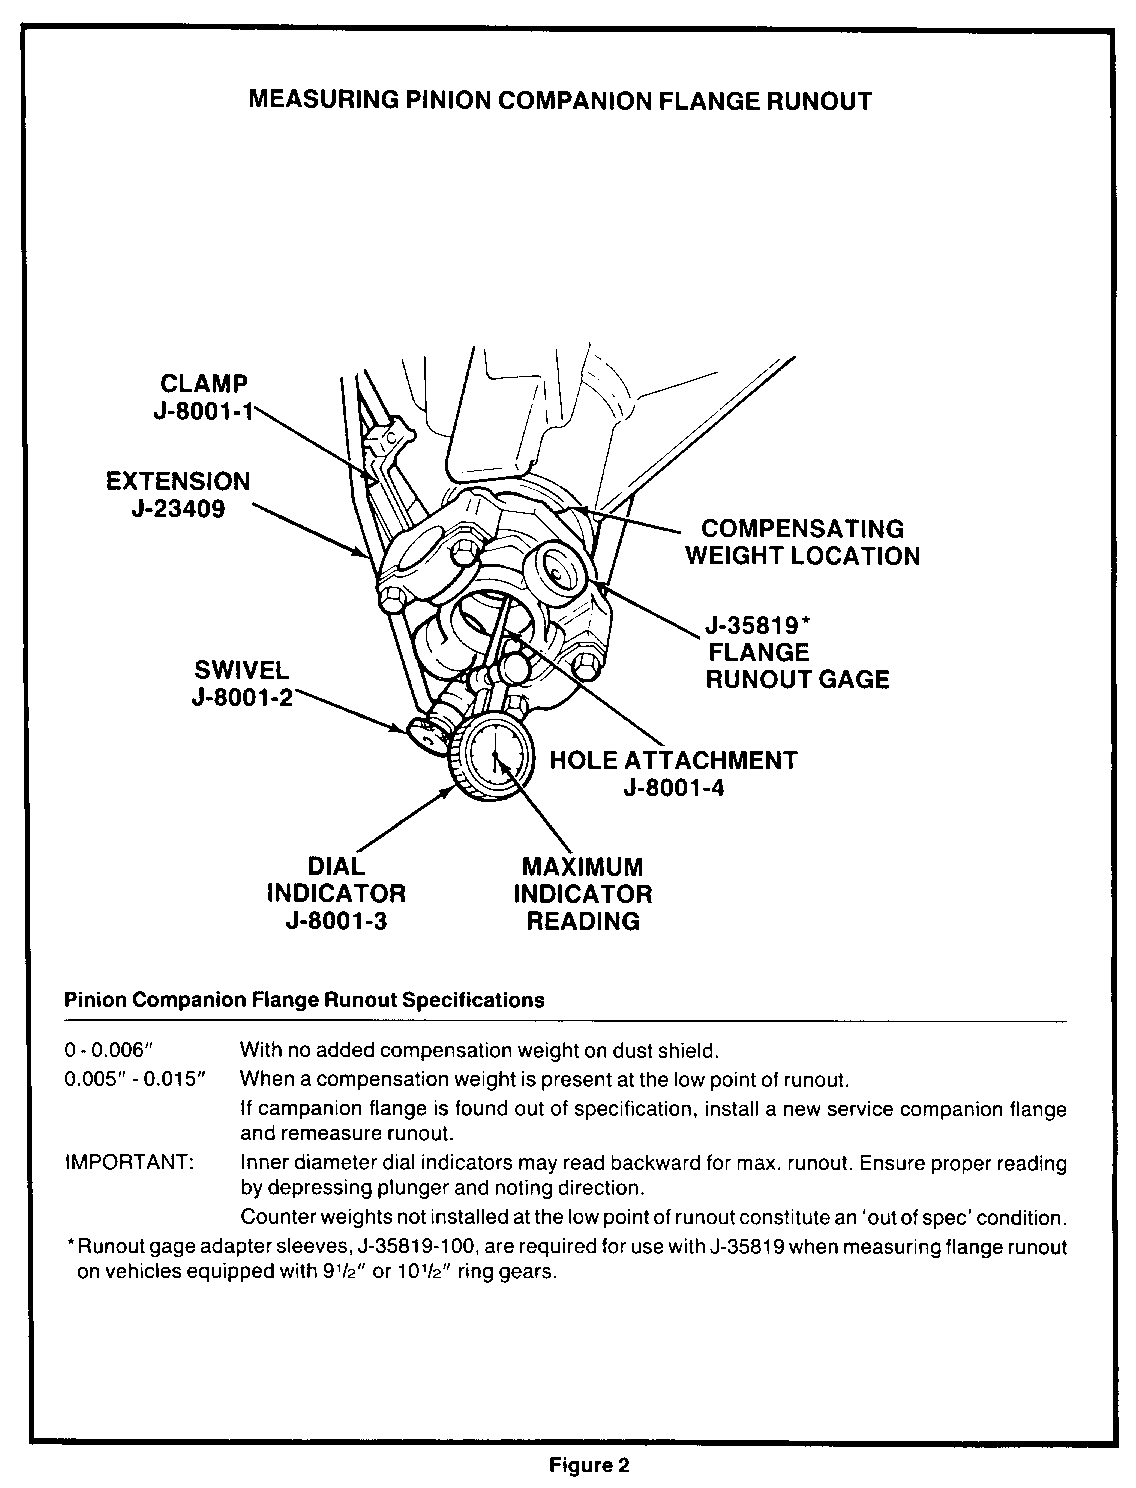
Measuring Pinion Companion Flange Runout - Figure 2
Pinion Companion Flange Runout Specifications
0 - 0.2 mm With no added compensation weight on dust (O - 0.006") shield.
0.1 - 0.4 mm When a compensation weight is present at the (0.005" - 0.015") low point of runout.
If campanion flange is found out of specification, install a new service companion flange and remeasure runout.
IMPORTANT: Inner diameter dial indicators may read backward for max. runout. Ensure proper reading by depressing plunger and noting direction.
Counter weights not installed at the low point of runout, constitute an 'out of spec' condition.
*Runout gauge adapter sleeves, J-35819-100, are required for use with J-35819 when measuring flange runout on vehicles equipped with 241 mm (9-1/2") or 267 mm (10-1/2") ring gears.
Companion Flange Compensation Weights - Figure 3
This "compensation" weight was originally installed to compensate for the effect of offsetting 1/2 the mass of the propshaft because of companion flange runout. missing or improperly located weights may worsen the driveline disturbance.
Refer to Figure #2 for companion flange and compensation weight specifications.
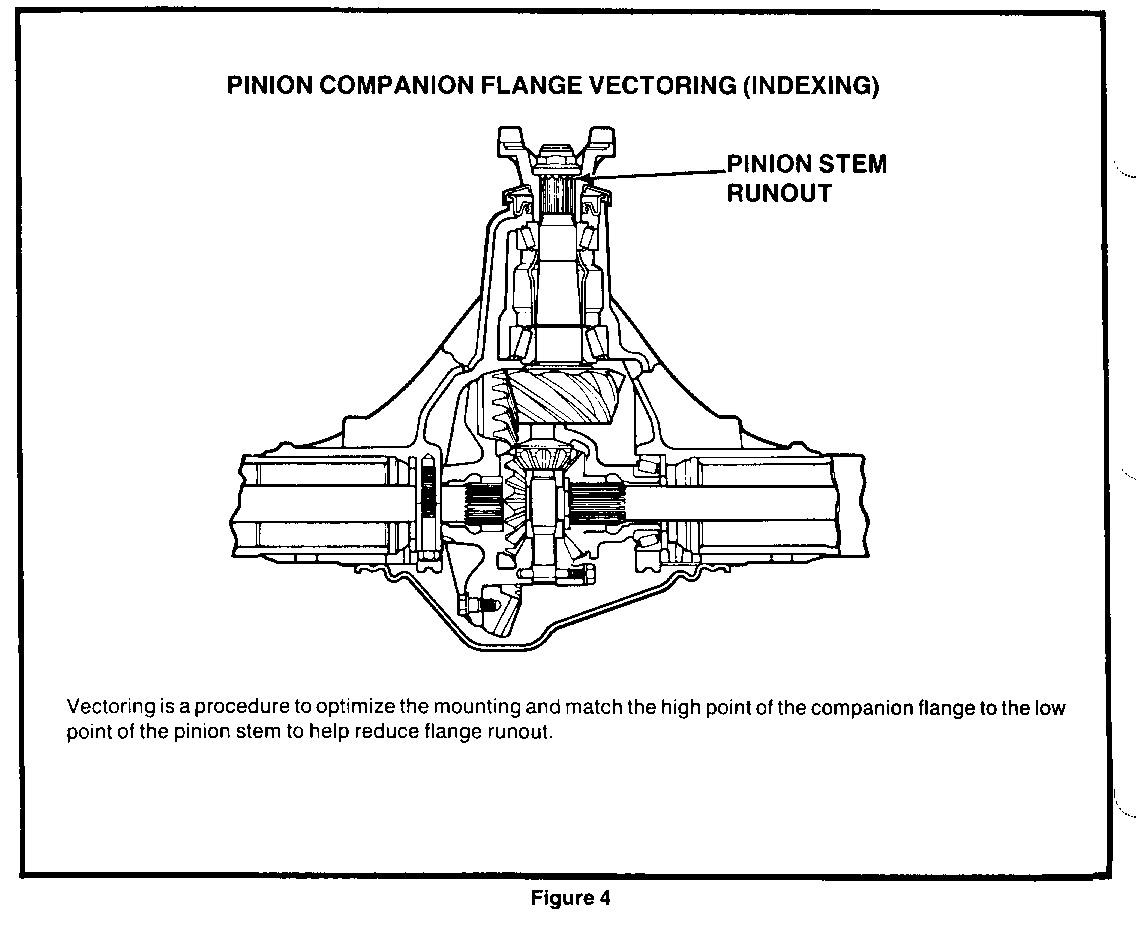
Pinion Companion Flange Vectoring (Indexing) - Figure 4
Vectoring is a procedure to optimize the mounting and match the high point of the companion flange to the low point of the pinion stem to help reduce flange runout.
Procedure:
1. Measure runout of companion flange, as described in Figure #2. Indicate high point with a mark.
2. Remove companion flange as described in Section 4B of the Service Manual.
3. Measure runout of pinion stem at radius between nut thread and spline. Mark low point.
4. Reinstall pinion companion flange with marks aligned. Tighten pinion nut to specification torque. Refer to Section 4B of the Service Manual.
5. Remeasure companion flange runout. If excessive runout still exists, do Step 6.
6. Additional reindexing of the companion flange to the pinion stem.
Remarks
A. Verify concern. Drive on smooth road up to 105 Km/h (65 mph) as speed limits permit. Note speeds and severity of disturbance. Assure that disturbance is not engine or transmission related. Refer to Section OC "Vibration Diagnosis Chart" in the 1989 Service Manual. If disturbance is determined to be engine/transmission related, disregard use of this bulletin.
B. Disturbance may peak within this speed range.
C. Visually check components for damage, looseness, missing balance weights, etc.
D. This may compensate for companion flange runout.
E. Excessive companion flange runout may occur as high prop runout. Replace companion flange as required, see Figure #2.
F. IMPORTANT: If runout is reduced to below 0.1 mm (0.005") and the flange possesses a compensation weight, this part is out of spec. See Figure #2.
G. Ensure the companion flange runout is still well within specifications.
H. If this point has been crossed several times, it is recommended that the Technical Assistance Centre be contacted.

General Motors bulletins are intended for use by professional technicians, not a "do-it-yourselfer". They are written to inform those technicians of conditions that may occur on some vehicles, or to provide information that could assist in the proper service of a vehicle. Properly trained technicians have the equipment, tools, safety instructions and know-how to do a job properly and safely. If a condition is described, do not assume that the bulletin applies to your vehicle, or that your vehicle will have that condition. See a General Motors dealer servicing your brand of General Motors vehicle for information on whether your vehicle may benefit from the information.
