Fuel System Diagnosis Pickup
Fuel System Description
If the fuel supply system is not delivering enough fuel driveability could be
greatly affected. If air is being drawn into the fuel injection system a Cranks But
Will Not Run, or a Hard Start symptom could exist. If another diagnosis indicates,
or if the fuel supply system is suspected of not delivering enough fuel or drawing
air, the following systems should be checked:
| • | Any air leaks or restrictions between the fuel injection pump and the
fuel tank will seriously affect pump output. |
| • | Insufficient fuel in the fuel tank |
| • | Any loose fuel component connections |
| • | Any hoses and lines that are flattening when the engine is running, or
have kinks that would restrict the flow of fuel |
Supply System
The fuel flows through a pre-filter screen in the tank and to the engine through
the fuel supply lines. There is no lift pump in the fuel tanks or on the frame. The
fuel passes through the base plate of the fuel injector control module (FICM) to cool
the module. From the FICM the fuel flows to the fuel filter assembly, which combines
a water separator, a prime pump and a filter element. Within the assembly, there is
also a fuel heater. An integrated hand pump is used to prime the fuel system after
changing the fuel filter or servicing the fuel system. The fuel injection pump at
the front of the engine valley includes a fuel supply pump and a high-pressure pump.
Fuel is drawn to the supply pump from the primary fuel tank by the supply pump and
delivered to the high-pressure pump.
High Pressure System
The much larger section of the pump assembly is the high-pressure fuel injection
pump. The pump is engine-driven by the camshaft gear. From the high-pressure pump,
the pressurized fuel flows to the left common fuel rail, then to the right common
fuel rail. Each common fuel rail supplies one bank of four fuel injectors.
Return System
The Fuel Return System routes fuel from the fuel injectors and the fuel injection
pump. The return fuel travels to the fuel cooler and then to the fuel tank. This fuel
is used to cool and lubricate the injection pump and the injectors.
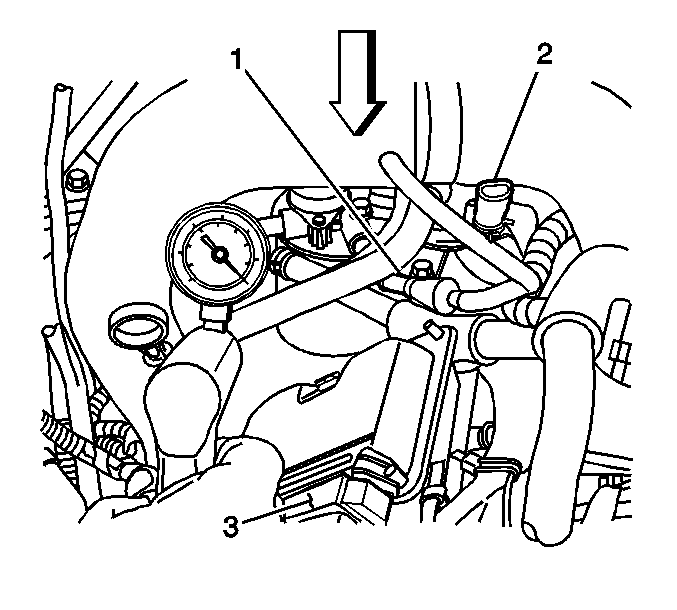
Fuel System Air Leak Check
- Install the J 44638
Vacuum
Gage to the fuel system service port on the right front side of the engine.
- Remove the air duct from the air cleaner assembly to the turbo inlet.
- Remove the generator for visibility of the fuel supply lines. Refer to
Generator Replacement
in Engine Electrical.
- Prime the fuel system until 10 psi is indicated on the J 44638
.
- Check for external fuel leaks between the fuel filter assembly and the
fuel injection pump.
| • | If fuel is leaking externally, replace or repair the leaking component. |
| • | If no external fuel leaks are found, go to step 6. |
- Reprime the fuel system until 10 psi is indicated on the J 44638
.
| • | If the fuel pressure drops from 10 psi to 2 psi in less
than 1 minute, go to step 24. |
| • | If the fuel pressure drops from 10 psi to 2 psi in more
than 1 minute, go to step 7. |
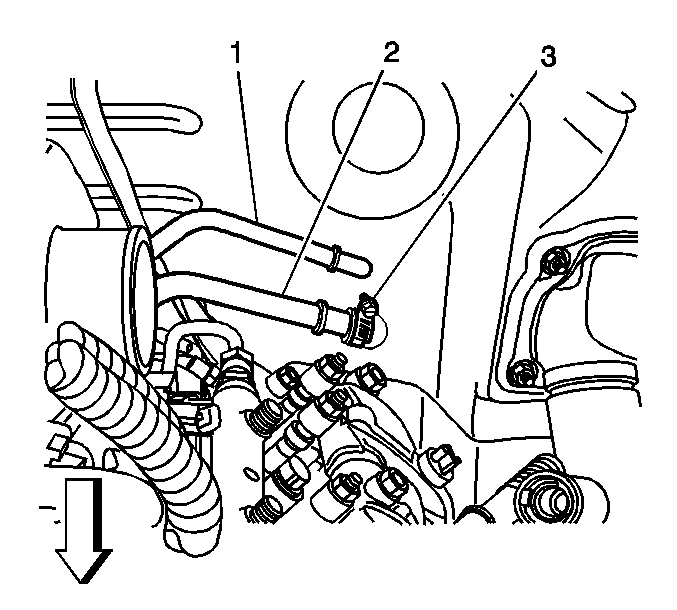
- Disconnect the fuel supply line (2)
at the engine. Refer to
Metal Collar Quick Connect Fitting Service
.
- Cap off the fuel supply pipe (2) on the engine with a ½ inch
rubber plug (3) and clamp.
- Disconnect the fuel return line (1) at the engine. Refer to
Metal Collar Quick Connect Fitting Service
.
- Install a J 23738-A
Mityvac
on the fuel return pipe on the engine.
- Check the fuel system components on top of the engine for vacuum leaks.
Important: There is an orifice in the fuel injection
pump between the fuel supply and fuel return systems. This will delay the vacuum being
pulled from the fuel supply lines.
| 11.1. | Apply at least 25 inches Hg of vacuum to the fuel return
pipe with the J 23738-A
and wait
more than 1 minute for the system to stabilize. |
| 11.2. | Repeat the previous substep 6 times. |
| • | If the vacuum does not drop below 8 inches within 10 minutes,
go to step 12. |
| • | If the vacuum drops below 8 inches within 10 minutes, go to step 22. |
- Reconnect the fuel supply line at the engine.
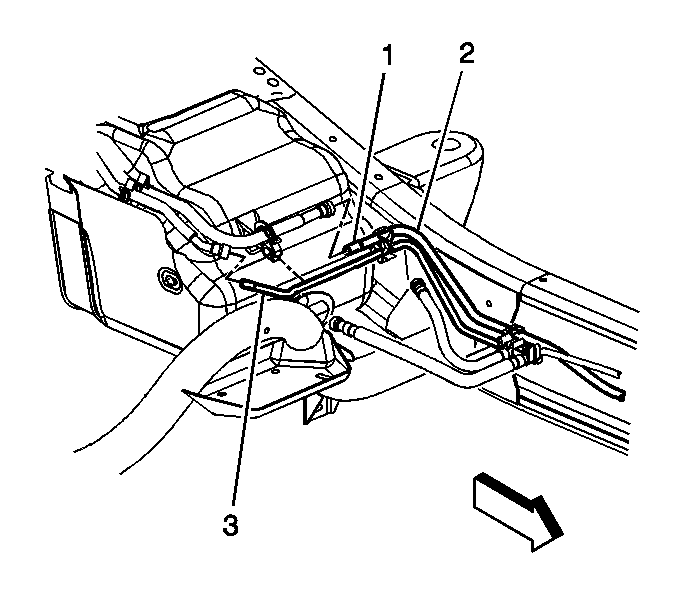
- Disconnect the chassis fuel line from the short fuel line between the fuel sender
and the chassis fuel line in front of the fuel tank (1). Refer to
Metal Collar Quick Connect Fitting Service
.
- Plug the chassis fuel line (1) using a ½ inch rubber
plug, and clamp the plug.
- Check the fuel system components on top of the engine for vacuum leaks.
Important: There is an orifice in the fuel injection
pump between the fuel supply and fuel return systems. This will delay the vacuum being
pulled from the fuel supply lines.
| 15.1. | Apply at least 25 inches Hg of vacuum to the fuel return
pipe with the J 23738-A
and wait
more than 1 minute for the system to stabilize. |
| 15.2. | Repeat the previous substep 10 times. |
| • | If the vacuum does not drop below 8 inches within 10 minutes,
go to step 16. |
| • | If the vacuum does drop below 8 inches within 10 minutes, inspect
the O-ring sealing surfaces of the engine fuel supply line for damage and correct
as necessary. If the sealing surfaces are not damaged, replace the chassis fuel lines
and go to step 29. |
- Reconnect the fuel line at the fuel tank and the fuel return line at the
engine.
- Install a transparent hose between the fuel injection control module (FICM)
outlet and the fuel filter inlet, with a vertical loop to observe the incoming fuel
for air bubbles.
- Install the generator. Refer to
Generator Replacement
in Engine Electrical.
- Prime the fuel system 30 times to remove the air in the fuel system.
Important: The engine must be run for at least 10 minutes
to allow the fuel system to stabilize and remove all air from the fuel system.
- Start and idle the engine.
- Observe the fuel in the transparent hose for air bubbles.
| • | If there are no air bubbles of any kind entering the transparent hose
with the incoming fuel, the fuel suction system is OK. Go to step 29. |
| • | If any air bubbles are entering the transparent hose with the incoming
fuel, stop the engine and go to step 23. |
- Check the fuel injection pump and the on-engine fuel suction system for
air leakage.
| 22.1. | Disconnect the fuel outlet hose (2)
from the outlet pipe (1) of the fuel filter assembly. |
| 22.2. | Open the drain on the fuel filter assembly and drain the fuel into a suitable
container. |
| 22.4. | Install a J 23738-A
on
the outlet port (1) of the fuel filter assembly. |
| 22.5. | Apply 15 inches Hg of vacuum to the fuel pipe and observe
the J 23738-A
. |
| • | If the vacuum does not drop, connect the fuel supply line at the engine
and go to the next substep. |
| • | If the vacuum drops, repair the air leak between the fuel supply line
fitting and the fuel filter assembly. |
| 22.6. | Install a J 23738-A
to the fuel outlet hose (2) from the fuel filter assembly. |
| 22.8. | Remove the supply hose (3) from the fuel
injection pump (4) and plug the hose. |
| 22.9. | Apply 15 inches Hg of vacuum and observe the reading. |
| • | If the vacuum drops, repair the leak between the fuel filter assembly
outlet and the fuel injection pump inlet. |
| • | If the vacuum does not drop, go to the next substep. |
| 22.10. | Disconnect the fuel injection pump return
hose (1). |
| 22.11. | Cap off the fuel return pipe on the fuel injection pump with a ½ inch
rubber plug, and clamp the plug. |
| 22.12. | Install a J 23738-A
to the fuel inlet pipe of the fuel injection pump. |
| 22.13. | Apply 20 inches of vacuum and observe the J 23738-A
. |
| • | If the vacuum does not drop, replace the fuel injection pump inlet supply
hose (3). Then go to step 29. |
- Check the fuel sender for air leakage.
| 23.2. | Remove the fuel sender from the fuel tank. |
| 23.3. | Remove the strainer from the fuel sender and plug the bottom end of the
pickup tube. |
| 23.4. | Apply 15 inches Hg of vacuum to the upper end of the pickup
tube and observe the J 23738-A
. |
| • | If the vacuum holds, inspect the O-ring sealing surfaces of the fuel sending
unit and the chassis fuel line for damage and correct as necessary. If the sealing
surfaces are not damaged, replace the fuel line between the chassis line and the fuel
sending unit. Then go to Step 29. |
| • | If the vacuum does not hold replace the fuel sender, reinstall the fuel
tank, and go to step 29. |
- Prime the fuel system 30 times or until fuel pressure is 10 psi
to remove the air from the fuel system. Air will be forced out of the system within
2 minutes.
- Remove the hose from the fuel filter assembly outlet fitting and plug
the hose.
- Verify that the J 44638
is installed.
- Remove the ignition 1 relay.
- Crank the engine 2-3 times in 15 second intervals and observe
the J 44638
.
| • | If the indicates 5 inches Hg of vacuum or more, go to step 6. |
- Remove the transparent hose if necessary and attach any disconnected components
or fuel lines.
- Prime the fuel system 30 times to remove the air in the fuel hoses
- Clean any fuel spillage.
- Start the engine. If the engine starts and stalls, repeat step 30.
- Run the engine to check for fuel leakage.
- Verify that the customer concern is corrected. If the customer concern
is not corrected, go to
Symptoms - Engine Controls
.
Fuel System Diagnosis Cab Chassis
Fuel System Description
If the fuel supply system is not delivering enough fuel driveability could be
greatly affected. If air is being drawn into the fuel injection system a Cranks But
Will Not Run, or a Hard Start symptom could exist. If another diagnosis indicates,
or if the fuel supply system is suspected of not delivering enough fuel or drawing
air, the following systems should be checked:
| • | Any air leaks or restrictions between the fuel injection pump and the
fuel tank will seriously affect pump output. |
| • | Insufficient fuel in the fuel tank. |
| • | Any loose fuel component connections. |
| • | Any hoses and lines that are flattening when the engine is running, or
have kinks that would restrict the flow of fuel. |
Supply System
The fuel flows through a pre-filter screen in the tank and to the engine through
the fuel supply lines. There is no lift pump in the fuel tanks or on the frame. The
fuel passes through the base plate of the fuel injector control module (FICM) to cool
the module. From the FICM the fuel flows to the fuel filter assembly, which combines
a water separator, a prime pump and a filter element. Within the assembly, there is
also a fuel heater. An integrated hand pump is used to prime the fuel system after
changing the fuel filter or servicing the fuel system. The fuel injection pump at
the front of the engine valley includes a fuel supply pump and a high-pressure pump.
Fuel is drawn to the supply pump from the primary fuel tank by the supply pump and
delivered to the high-pressure pump.
High Pressure System
The much larger section of the pump assembly is the high-pressure fuel injection
pump. The pump is engine-driven by the camshaft gear. From the high-pressure pump,
the fuel flows through the junction block. The junction block routes pressurized fuel
to both common fuel rails. Each common fuel rail supplies one bank of four fuel injectors.
Return System
The Fuel Return System routes fuel from the fuel injectors, the junction block,
and the fuel injection pump. The return fuel travels to the fuel cooler and then to
the fuel tank. This fuel is used to cool and lubricate the injection pump and the
injectors.
Fuel System Air Leak Check
- Install the J 44638
Vacuum Gage to the fuel system service port on the right front side of the engine.
- Remove the air duct from the air cleaner assembly to the turbo inlet.
- Remove the generator for visibility of the fuel supply lines. Refer to
Generator Replacement
in Engine Electrical.
- Prime the fuel manager until 10 psi is indicated on the J 44638
.
- Check for external fuel leaks between the fuel filter/heater assembly
and the fuel injection pump.
| • | If fuel is leaking externally, replace or repair the leaking component. |
| • | If no external fuel leaks are found, go to step 6. |
- Reprime the fuel system until 10 psi is indicated on the J 44638
.
| • | If the fuel pressure drops from 10 psi to 2 psi in less
than 1 minute, go to step 23. |
| • | If the fuel pressure drops from 10 psi to 2 psi in more
than 1 minute, go to step 7. |
- Disconnect the fuel supply line (2)
at the engine. Refer to
Metal Collar Quick Connect Fitting Service
.
- Cap off the fuel supply pipe (2) on the engine with a ½ inch
rubber plug (3) and clamp.
- Disconnect the fuel return line (1) at the engine. Refer to
Metal Collar Quick Connect Fitting Service
.
- Install a J 23738-A
Mityvac on the fuel return pipe on the engine.
- Check the fuel system components on top of the engine for vacuum leaks.
Important: There is an orifice in the fuel injection pump between the fuel supply and fuel
return systems. This will delay the vacuum being pulled from the fuel supply lines.
| 11.1. | Apply at least 25 inches Hg of vacuum to the fuel return
pipe with the J 23738-A
and wait
more than 1 minute for the system to stabilize. |
| 11.2. | Repeat previous substep 6 times. |
| • | If the vacuum does not drop below 8 inches within 10 minutes,
go to step 12. |
| • | If the vacuum drops below 8 inches within 10 minutes, go to step 18. |
- Reconnect the fuel supply line and the return line at the engine.
- Install a transparent hose between the fuel injection control module (FICM)
outlet and the fuel filter inlet, with a vertical loop to observe the incoming fuel
for air bubbles.
- Install the generator. Refer to
Generator Replacement
in Engine Electrical.
- Prime the fuel system 30 times to remove the air from the fuel
hoses.
Important: If the engine does not start in the next step, go to step 23.
Important: The engine must be run for at least 10 minutes to allow the fuel system
to stabilize and remove all air from the fuel system.
- Start and run the engine.
- Observe the fuel in the transparent hose for air bubbles.
| • | If there are no air bubbles of any kind entering the transparent hose
with the incoming fuel, the fuel suction system is OK. Go to step 28. |
| • | If any air bubbles are entering the transparent hose with the incoming
fuel, stop the engine and go to step 19. |
- Check the fuel injection pump and the on-engine fuel suction system for
air leakage.
| 18.1. | Disconnect the fuel outlet hose (2)
from the outlet pipe (1) of the fuel filter assembly. |
| 18.2. | Open the drain on the fuel filter assembly and drain the fuel into a suitable
container. |
| 18.4. | Install a J 23738-A
on the outlet port (1) of the fuel filter assembly. |
| 18.5. | Apply 15 inches Hg of vacuum to the fuel pipe and observe
the J 23738-A
. |
| • | If the vacuum does not drop, connect the fuel supply line at the engine
and go to the next substep. |
| • | If the vacuum drops, repair the air leak between the fuel supply line
fitting and the fuel filter assembly. |
| 18.6. | Remove the J 23738-A
from the outlet port (1) of the fuel filter assembly and install
the J 23738-A
to the fuel outlet
hose (2). |
| 18.8. | Remove the supply hose (3) from the fuel
injection pump (4) and plug the hose. |
| 18.9. | Apply 15 inches Hg of vacuum and observe the reading. |
| • | If the vacuum drops, repair the leak between the fuel filter assembly
outlet and the fuel injection pump inlet. |
| • | If the vacuum does not drop, go to the next substep. |
| 18.10. | Disconnect the fuel injection pump return
hose (1). |
| 18.11. | Cap off the fuel return pipe on the fuel injection pump with a 5/16 inch
rubber plug, and clamp the plug. |
| 18.12. | Install a J 23738-A
to the fuel inlet pipe of the fuel injection pump. |
| 18.13. | Apply 20 inches of vacuum and observe the J 23738-A
. |
| • | If the vacuum does not drop, replace the fuel injection pump inlet supply
hose (3). Then go to step 28. |
- Check the fuel sender for air leakage.
| 19.2. | Remove the fuel sender from the fuel tank. |
| 19.3. | Remove the strainer from the fuel sender and plug the bottom end of the
pickup tube. |
| 19.4. | Apply 15 inches Hg of vacuum to the upper end of the pickup
tube and observe the J 23738-A
. |
| • | If the vacuum holds, inspect the O-ring sealing surfaces of the fuel sending
unit and the chassis fuel line for damage and correct as necessary. If the sealing
surfaces are not damaged, replace the fuel line between the chassis line and the fuel
sending unit. Then go to Step 20. |
| • | If the vacuum does not hold replace the fuel sender, reinstall the fuel
tank, and go to step 20. |
- Prime the fuel system 30 times or until fuel pressure is 10 psi
to remove the air from the fuel system. Air will be forced out of the system within
2 minutes.
- Start and run the engine.
- Observe the fuel for air bubbles.
| • | If there are no air bubbles of any kind entering the transparent hose
with the incoming fuel, the fuel suction system is OK. Go to step 28. |
| • | If any air bubbles are entering the transparent hose with the incoming
fuel, stop the engine and go to step 8. |
- Prime the fuel system 30 times or until fuel pressure is 10 psi
to remove the air from the fuel system. Air will be forced out of the system within
2 minutes.
- Remove the hose from the fuel filter assembly outlet fitting and plug
the hose.
- Verify that the J 44638
is installed.
- Remove the ignition 1 relay.
- Crank the engine 2-3 times in 15 second intervals
and observe the J 44638
.
| • | If the J 44638
indicates
5 inches Hg of vacuum or more, go to step 28. |
- Remove the transparent hose if necessary and attach any disconnected components
or fuel lines.
- Prime the fuel system 30 times to remove the air in the fuel hoses
- Clean any fuel spillage.
- Start the engine. If the engine starts and stalls, repeat step 29.
- Run the engine to check for fuel leakage.
- Verify that the customer concern is corrected. If the customer concern
is not corrected, go to
Symptoms - Engine Controls
.
