
| Subject: | New CNG High Pressure Lock-Off (HPL) Procedures |
| Models: | 1997-98 Chevrolet and GMC Bi-Fuel (CNG) C Truck Models. |
This bulletin is being issued to advise that the high pressure
lock-off (HPL) is now a serviceable part and provides a repair procedure for
the HPL in the Engine Controls section of the Service Manual.
Replacement parts and the special tool J 43602 are now available.
Please remove the HPL replacement procedure on page 6-287 in the
Engine Controls subsection of the Bi-Fuel C Pickup Supplement GMT/97/98-CK-NGV
and add the following new procedures.
Removal Procedure (1997 Models)
Tools Required
| • | J 42435 CNG Tank Venting Kit |
Caution: Do not install this part if you can not completely refill the vehicle
with Compressed Natural Gas (CNG) after a repair. Failure to properly leak-check
the system after the part replacement may result in serious personal injury
or damage to the vehicle or the part.
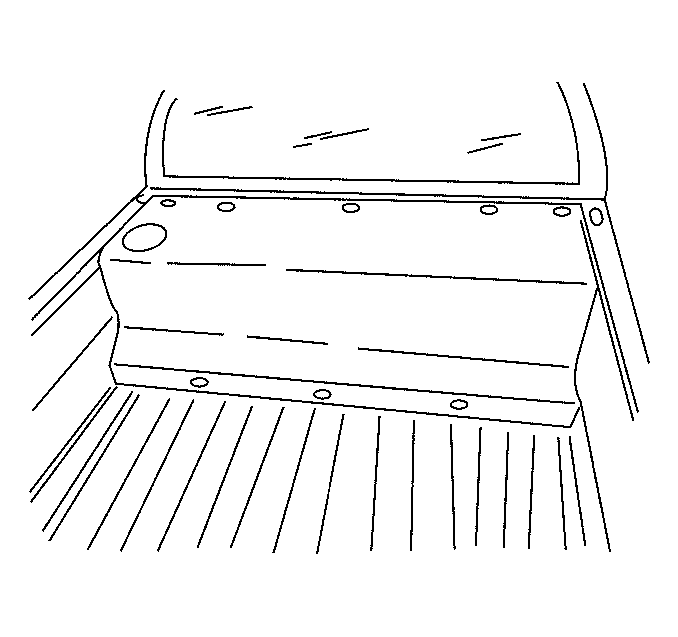
- Remove the fuel tank cover. Refer to CNG Fuel Tank Cover Replacement
in the Body Rear End subsection of the Bi-Fuel Supplement Service Manual.
- Relieve the CNG fuel system pressure. Refer to Fuel Pressure Relief
Procedure.
Caution: Before servicing any electrical component, the ignition key must be
in the OFF or LOCK position and all electrical loads must be OFF, unless instructed
otherwise in these procedures. If a tool or equipment could easily come in
contact with a live exposed electrical terminal, also disconnect the negative
battery cable. Failure to follow these precautions may cause personal injury
and/or damage to the vehicle or its components.
- Disconnect the negative battery cable.
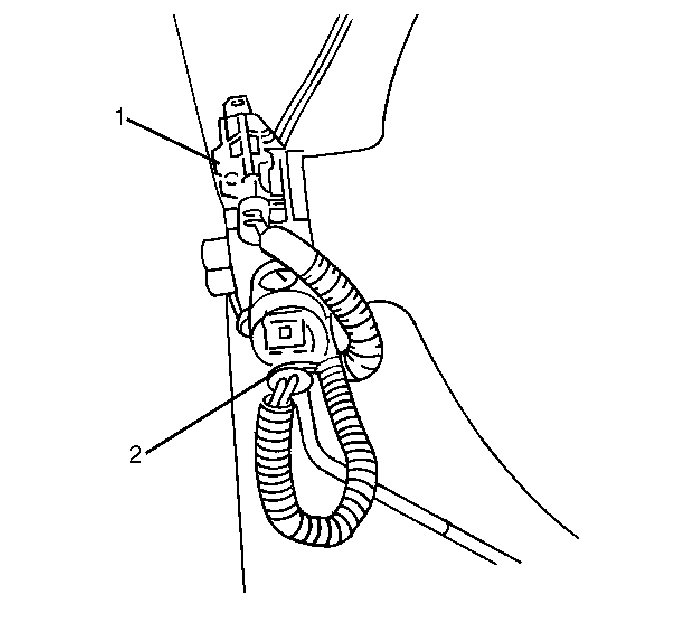
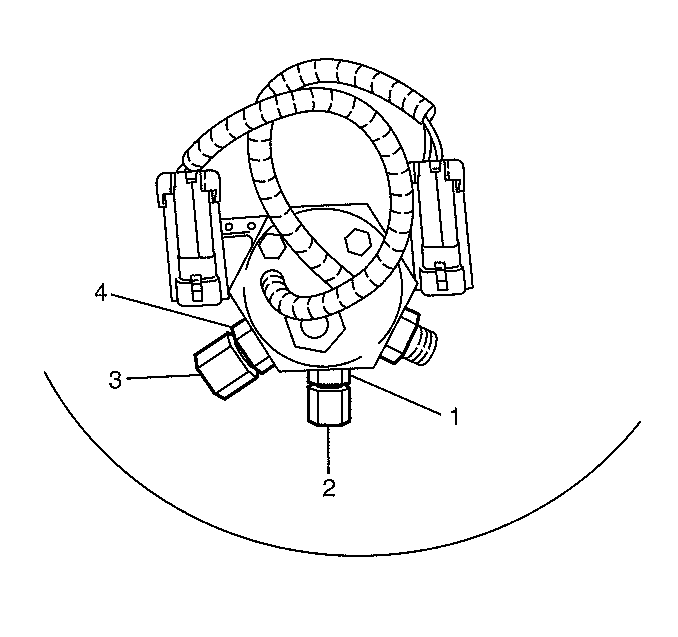
- Disconnect the following electrical connectors:
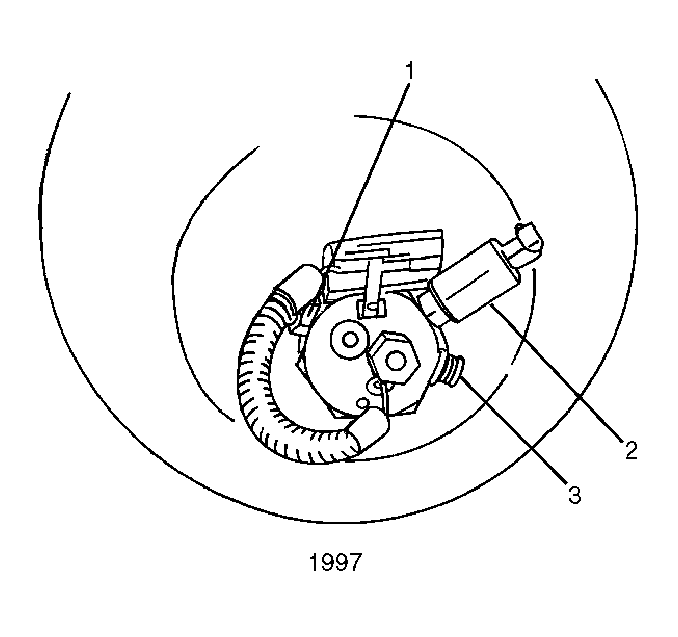
| • | High pressure lock-off (HPL) (1) |
| • | Fuel sending unit (FSU) (2) |
Notice: The manual valve opening tool may damage the main seat of
the high pressure lock-off (HPL) if used improperly. Use this tool only when
the HPL is not in operation.
Important: Venting of natural gas to the atmosphere may be prohibited in some areas.
Before venting the CNG fuel tank, contact the local gas company to assure
that all local, state and federal regulations are observed.
- In order to prevent freeze damage to the fill line and the FSU, the
tank fittings must be capped by performing the following steps:
| 5.1. | Remove the fuel sending unit (FSU). |
| 5.2. | Install a fitting and cap (4) supplied from the J 42435 CNG
Tank Venting Kit into the FSU port (3). |
| 5.3. | Disconnect the fill line. |
| 5.4. | Install a cap (1) supplied from the J 42435 onto the fill
line port fitting (2). |
| 5.5. | Disconnect the fuel outlet line. |
| 5.6. | Leave the relief port open. |
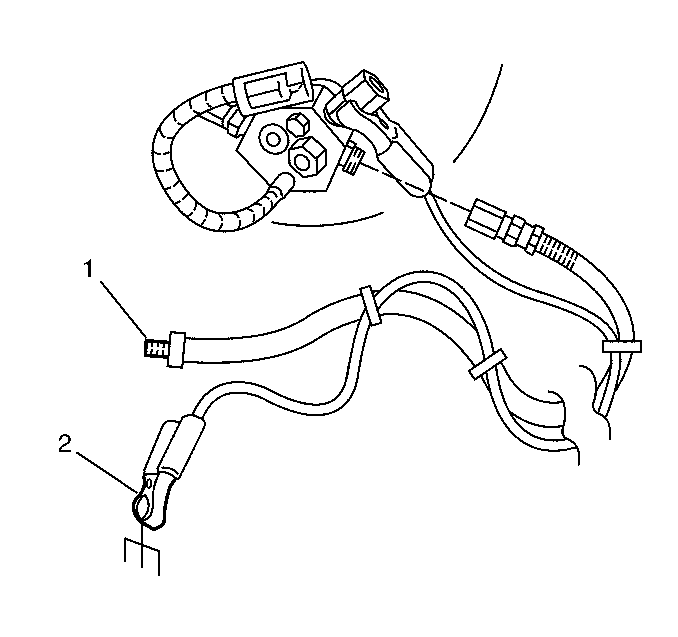
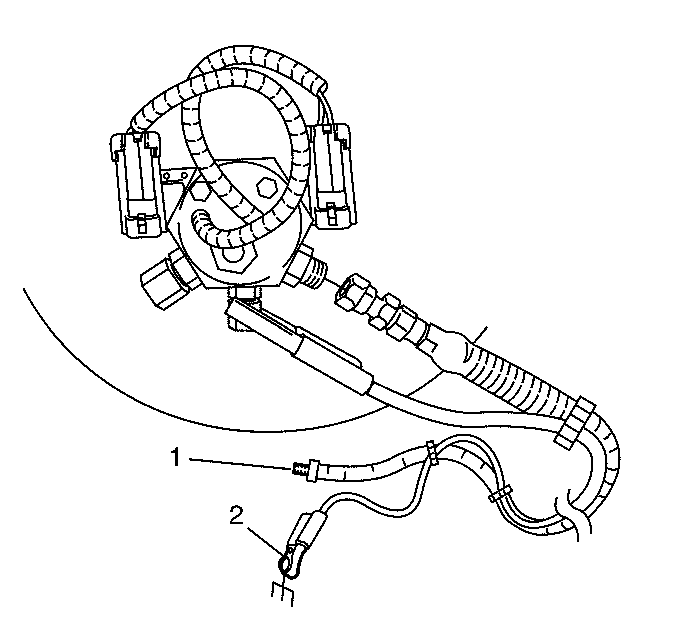
- Connect the vent hose (1) to the fuel
outlet fitting and to the vent stack.
Caution: When venting the Compressed Natural Gas (CNG) fuel tank, take the following
precautions in order to prevent fire and personal injury:
| • | Use the proper grounding procedure to an earth ground in order
to prevent a build-up of static electricity which can lead to an electrical
discharge. |
| • | Use the J 42435 CNG Tank Vent Kit with a vent stack. |
| • | Vent the CNG fuel tank in a well ventilated work area. |
| • | Keep sparks, flames, and smoking material away from the area. |
| • | Wear the appropriate hearing protection during the venting procedure.
A sudden pressure loss from an uncontrolled gas leak may cause hearing damage. |
- Connect the ground strap (2) (attached to the vent hose) to the HPL
and the vent stack (earth) ground.
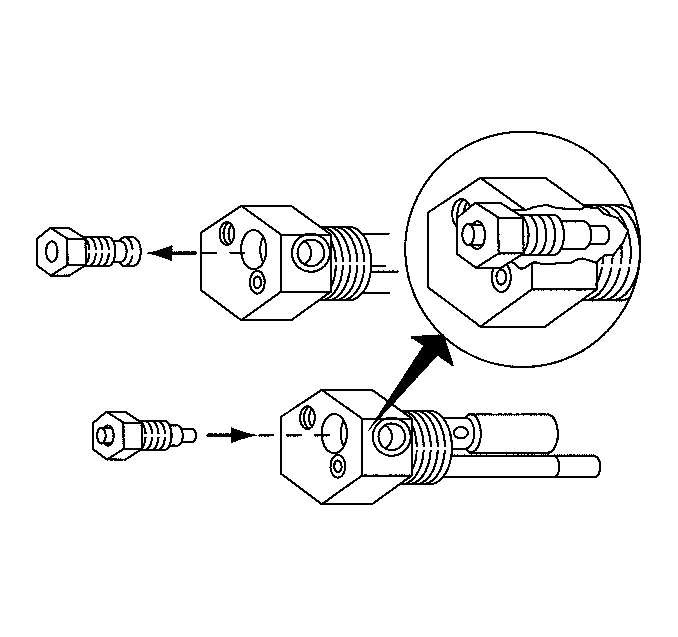
- Remove the manual shut-off fitting from
the HPL.
- Verify that the manual vent tool supplied from the J 42435
is in the non-venting position with the Allen screw fully seated counterclockwise.
- Install the manual vent tool into the HPL port.
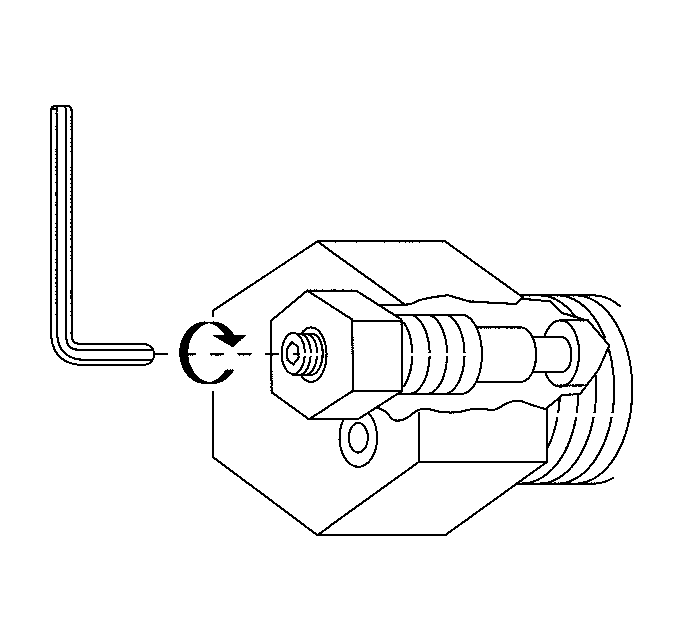
- Slowly turn the manual vent tool Allen
screw clockwise until natural gas begins to vent.
- Allow the CNG fuel tank to vent until the pressure gauge reads
0 kPa (0 psi). If the tank stops venting and pressure is indicated on the
J 42435 gauge, inspect the vent line for a frozen fitting. The fitting
will eventually thaw and fuel will again continue to vent.
Do not leave the tank unsupervised.
- Disconnect the vent hose (1) from the
HPL.
- Remove the manual vent tool and all fittings.
- Remove the fuel inlet fitting from the HPL and discard the O-rings.
- Remove the fuel outlet fitting from the HPL and discard the O-rings.
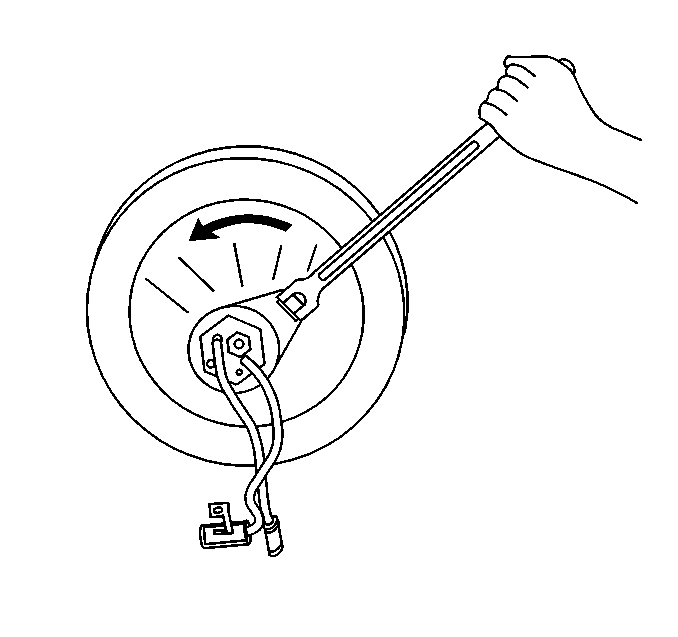
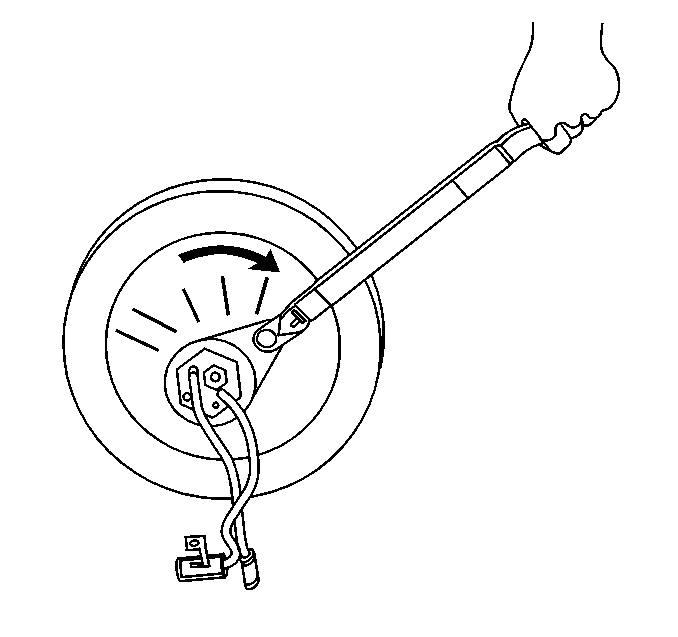
- Using the J 43602 HPL Crowfoot
removal tool, loosen the HPL.
- Mark the tank in two places approximately 180 degrees apart for
tank re-installment reference.
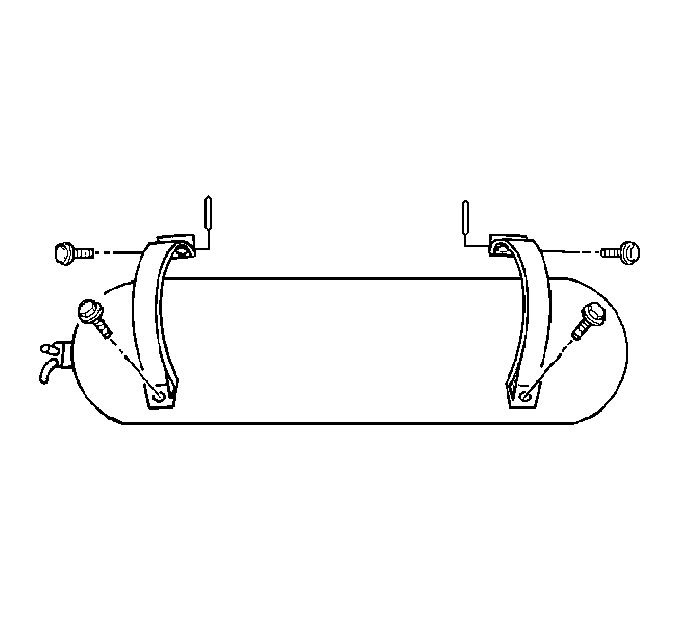
- Remove the upper mounting bracket nuts
and bolts and retain them.
- Remove the clevis and bridge pins.
- Remove the upper mounting brackets.
- Use the J 42309 CNG Tank Sling and a lifting device
in order to remove the tank from the vehicle enough to allow removal of the
HPL from the tank.
- Unscrew and remove the HPL and the O-ring from the tank.
Installation Procedure
Tools Required
| • | J 42435 CNG Tank Venting Kit |
- Install a NEW O-ring on the HPL.
- Lubricate the O-ring with petroleum jelly.
- Install the HPL in the tank and tighten hand-tight.
- Lower the tank onto the lower mounting brackets using a lifting
device and the J 42309 CNG Tank Sling.
- Roll the tank to the proper position using the orientation marks.
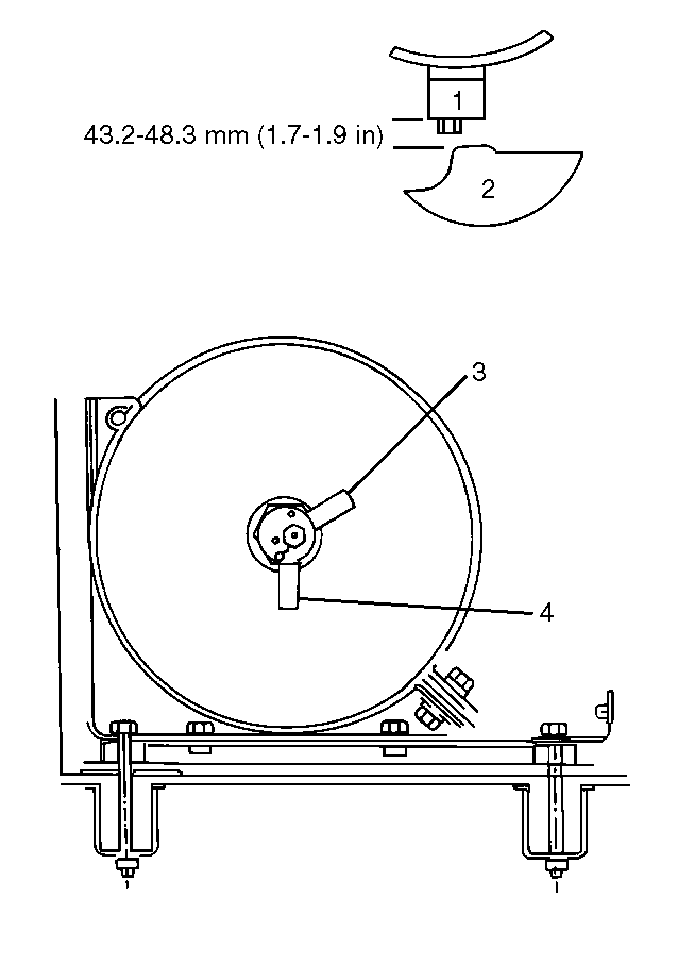
- Verify that the distance between the
tank (1) and the pickup box (2) is within specification.
- Verify that the FSU (3) is positioned as shown.
- Install the upper mounting brackets.
Important:
| • | Verify that the bridge pins do not contact the CNG fuel tank. |
| • | Verify that the rubber isolators are correctly positioned before
tightening the upper mounting bracket fasteners. |
- Install the bridge pins and clevis pins to the upper mounting brackets.
- Install the OLD mounting bracket nuts and bolts.
Tighten
Tighten the OLD mounting bracket nuts to 47 N·m (35 lb ft).
- Tighten the HPL as specified below.
Tighten
Tighten the HPL to a nominal torque of 305 N·m (225 lb ft)
at 0 degree. Refer to the formula below for compensation of your torque wrench.
Important: Ensure the J 43602 HPL Crowfoot removal tool is straight
(0 degree) on the torque wrench.
- To obtain your Dial reading, perform the following steps:
| 11.1. | Multiply your torque wrench length in inches by 305 (225)¹. |
| 11.2. | Add three to the length of your torque wrench². |
| 11.3. | Divide the first value¹ obtained by the second value²
obtained. The result³ will indicate the amount of torque your wrench
should tighten the HPL to. |
For example if your wrench were 18 inches long:
18 X 305 = 5490¹
18 + 3 = 21²
5490¹ divided by 21² = 261³
You would tighten the HPL to 261N·m (192 lb ft).
- Remove the OLD mounting bracket nuts
and bolts and discard them.
- Verify that the distance between the
tank (1) and the pickup box (2) is within specification.
- Verify that the FSU (3) is positioned as shown.
- Install NEW mounting bracket bolts and
nuts.
Tighten
Tighten the mounting bracket nuts to 47 N·m(35 lb ft).
- Install the fuel outlet fitting (3) into
the HPL using a NEW O-ring. Lubricate the O-ring with petroleum jelly.
Tighten
Tighten the fitting to 27 N·m (20 lb ft).
- Install the fuel inlet fitting (1) into the HPL using a NEW O-ring.
Lubricate the O-ring with petroleum jelly.
Tighten
Tighten the fitting to 48 N·m (35 lb ft).
- Install the FSU (2) into the HPL using a NEW O-ring. Lubricate
the O-ring with petroleum jelly.
Tighten
Tighten the fitting to 27 N·m (20 lb ft).
- Connect the fuel line to the outlet fitting (3) and the fill line
to the inlet fitting (1) using NEW O-ring face seals. Lubricate the O-rings
with petroleum jelly.
Tighten
| • | Tighten the fuel line fitting (3) to 24 N·m (18 lb ft). |
| • | Tighten the fill line fitting (1) to 37 N·m (27 lb ft). |
- Connect the following connectors:
| • | High pressure lock-off (HPL) (1) |
| • | Fuel sending unit (FSU) (2) |
Caution: The high pressure lock-off solenoid seal is more likely to leak at a
lower pressure. Always perform the fuel leak procedure exactly as specified.
Failure to follow the proper procedures may result in serious personal injury
or damage to the vehicle or part.
- Fuel the vehicle in three stages at the following pressures:
| 21.1. | 3,447 kPa (500 psi) |
| 21.2. | 10,342 kPa (1500 psi) |
| 21.3. | 20,685 kPa (3000 psi) |
- Using the J 41416 Ultrasonic Leak Detector, inspect
for fuel leaks at the HPL at EACH pressure.
- Connect the negative battery cable.
- Start and operate the engine on CNG.
- Inspect for fuel leaks at each serviced fitting using the J 41416.
- Attach the information label supplied with the replacement HPL
in a visible location on the head of the tank.
- Install the tank cover. Refer to Fuel Tank Cover Replacement in
Body Rear End subsection of the Bi-Fuel Supplement Service Manual.
Removal Procedure (1998 Models)
Tools Required
| • | J 42435 CNG Tank Venting Kit |
Caution: Do not install this part if you can not completely refill the vehicle
with Compressed Natural Gas (CNG) after a repair. Failure to properly leak-check
the system after the part replacement may result in serious personal injury
or damage to the vehicle or the part.
- Remove the fuel tank cover. Refer to CNG Fuel Tank Cover Replacement
in the Body Rear End subsection of the Bi-Fuel Supplement Service Manual.
- Relieve the CNG fuel system pressure. Refer to Fuel Pressure Relief
Procedure (1998).
Caution: Before servicing any electrical component, the ignition key must be
in the OFF or LOCK position and all electrical loads must be OFF, unless instructed
otherwise in these procedures. If a tool or equipment could easily come in
contact with a live exposed electrical terminal, also disconnect the negative
battery cable. Failure to follow these precautions may cause personal injury
and/or damage to the vehicle or its components.
- Disconnect the negative battery cable.
- Disconnect the following electrical connectors:
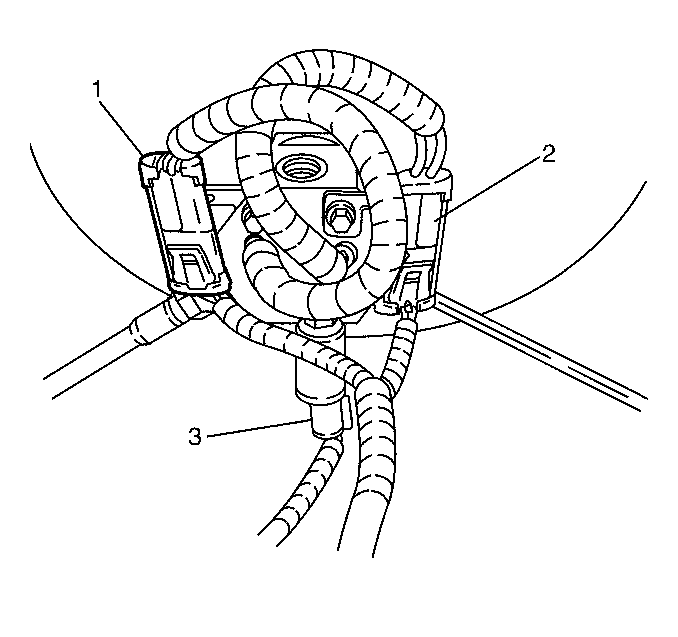
| • | High pressure lock-off (HPL) (1) |
| • | Fuel temperature sensor (FTS) (2) |
| • | Fuel pressure sensor (FPS) (3) |
Notice: The manual valve opening tool may damage the main seat of the high pressure
lock-off (HPL) if used improperly. Use this tool only when the HPL is not
in operation.
Important: Venting of natural gas to the atmosphere may be prohibited in some areas.
Before venting the CNG fuel tank, contact the local gas company to assure
that all local, state and federal regulations are observed.
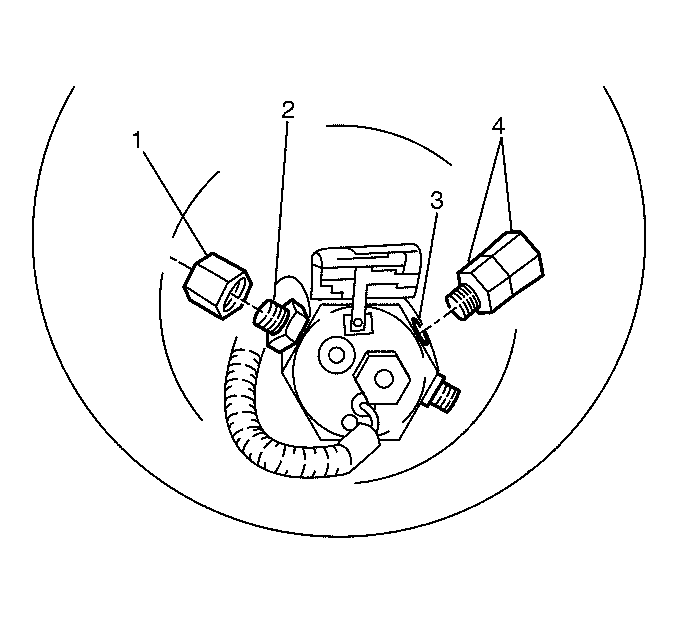
- In order to prevent freeze damage to the fill line and the FPS, the
tank fittings must be capped by performing the following steps:
| 5.1. | Remove the fuel pressure sensor (FPS). |
| 5.2. | Install a fitting and cap (2) supplied from the J 42435 CNG
Tank Venting Kit into the FPS port (1). |
| 5.3. | Disconnect the fill line. |
| 5.4. | Install a cap (3) supplied from the J 42435 onto the fill
line port fitting (4). |
| 5.5. | Disconnect the fuel outlet line. |
| 5.6. | Leave the relief port (top hole) open. |
- Connect the vent hose (1) to the fuel
outlet fitting and to the vent stack.
Caution: When venting the Compressed Natural Gas (CNG) fuel tank, take the following
precautions in order to prevent fire and personal injury:
| • | Use the proper grounding procedure to an earth ground in order
to prevent a build-up of static electricity which can lead to an electrical
discharge. |
| • | Use the J 42435 CNG Tank Vent Kit with a vent stack. |
| • | Vent the CNG fuel tank in a well ventilated work area. |
| • | Keep sparks, flames, and smoking material away from the area. |
| • | Wear the appropriate hearing protection during the venting procedure.
A sudden pressure loss from an uncontrolled gas leak may cause hearing damage. |
- Connect the ground strap (2) (attached to the vent hose) to the HPL
and the vent stack (earth) ground.
- Remove the manual shut-off fitting from
the HPL.
- Before installing the manual vent tool, count the number of turns
required to rotate the tool from fully retracted to fully extended. When venting
the CNG tank, ensure that you rotate the tool the same number of turns. This
will ensure that the HPL pilot valve is un-seated and the tank is vented.
Some pressure should always vent from the CNG tank.
Verify that the manual vent tool supplied from the J 42435 is
in the non-venting position with the Allen screw fully seated counterclockwise.
- Install the manual vent tool into the HPL port.
- Slowly turn the manual vent tool Allen
screw clockwise until natural gas begins to vent.
- Allow the CNG fuel tank to vent until the pressure gauge reads
0 kPa (0 psi). If the tank stops venting and pressure is indicated
on the J 42435 gauge, inspect the vent line for a frozen fitting. The
fitting will eventually thaw and fuel will again continue to vent.
Do not leave the tank unsupervised.
- Disconnect the vent hose (1) from the
HPL.
- Remove the manual vent tool and all fittings.
- Remove the fuel inlet fitting from the HPL and discard the O-rings.
- Remove the fuel outlet fitting from the HPL and discard the O-rings.
- Using the J 43602 HPL Crowfoot
removal tool, loosen the HPL.
- Mark the tank in two places approximately 180 degrees apart
for tank re-installment reference.
- Remove the upper mounting bracket nuts
and bolts and retain them.
- Remove the clevis and bridge pins.
- Remove the upper mounting brackets.
- Use the J 42309 CNG Tank Sling and a lifting device
in order to remove the tank from the vehicle enough to allow removal of the
HPL from the tank.
- Unscrew and remove the HPL and the O-ring from the tank.
Installation Procedure
Tools Required
| • | J 41416 Ultrasonic Leak Detector |
- Install a NEW O-ring on the HPL.
- Lubricate the O-ring with petroleum jelly.
- Install the HPL in the tank and tighten hand-tight.
- Lower the tank onto the lower mounting brackets using a lifting
device and the J 42309 CNG Tank Sling.
- Roll the tank to the proper position using the orientation marks.
- Verify that the distance between the
tank (1) and the pickup box (2) is within specification.
- Verify that the FPS (4) is positioned as shown.
- Install the upper mounting brackets.
Important:
| • | Verify that the bridge pins do not contact the CNG fuel tank. |
| • | Verify that the rubber isolators are correctly positioned before
tightening the upper mounting bracket fasteners. |
- Install the bridge pins and clevis pins to the upper mounting brackets.
- Install the OLD mounting bracket nuts and bolts.
Tighten
Tighten the OLD mounting bracket nuts to 47 N·m (35 lb ft).
- Tighten the HPL as specified below.
Tighten
Tighten the HPL to a nominal torque of 305 N·m (225 lb ft)
at 0 degree. Refer to the formula below for compensation of your torque wrench.
Important: Ensure the J 43602 HPL Crowfoot removal tool is straight
(0 degree) on the torque wrench.
- To obtain your Dial reading, perform the following steps:
| 11.1. | Multiply your torque wrench length in inches by 305 (225)¹. |
| 11.2. | Add three to the length of your torque wrench². |
| 11.3. | Divide the first value¹ obtained by the second value²
obtained. The result³ will indicate the amount of torque your wrench
should tighten the HPL to. |
For example if your wrench were 18 inches long:
18 X 305 = 5490¹
18 + 3 = 21²
5490¹ divided by 21² = 261³
You would tighten the HPL to 261 N·m (192 lb ft).
- Remove the OLD mounting bracket nuts
and bolts and discard them.
- Verify that the distance between the
tank (1) and the pickup box (2) is within specification.
- Verify that the FPS (4) is positioned as shown.
- Install NEW mounting bracket bolts and
nuts.
Tighten
Tighten the mounting bracket nuts to 47 N·m(35 lb ft).
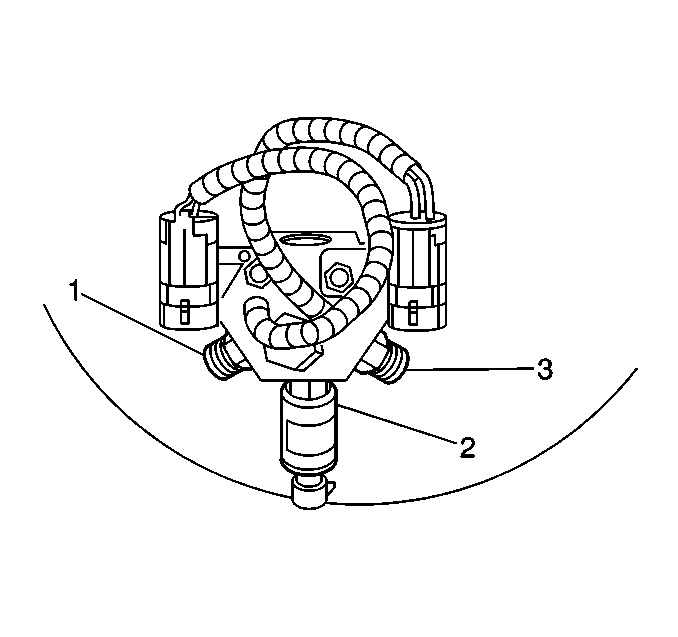
- Install the fuel outlet fitting (3) into
the HPL using a NEW O-ring. Lubricate the O-ring with petroleum jelly.
Tighten
Tighten the fitting to 27 N·m (20 lb ft).
- Install the fuel inlet fitting (1) into the HPL using a NEW O-ring.
Lubricate the O-ring with petroleum jelly.
Tighten
Tighten the fitting to 48 N·m (35 lb ft).
- Install the FPS (2) into the HPL using a NEW O-ring. Lubricate
the O-ring with petroleum jelly.
Tighten
Tighten the fitting to 27 N·m (20 lb ft).
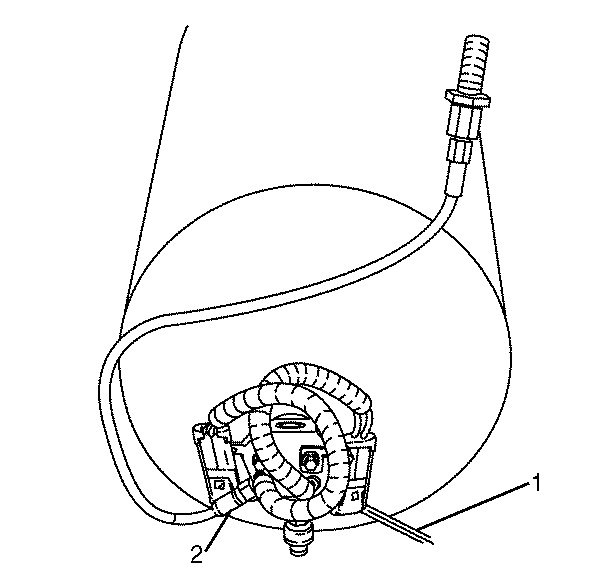
- Connect the fuel line (1) and the fill
line (2) using NEW O-ring face seals. Lubricate the O-rings with petroleum
jelly.
Tighten
| • | Tighten the fuel line fitting (1) to 24 N·m (18 lb ft). |
| • | Tighten the fill line fitting (2) to 37 N·m (27 lb ft). |
- Connect the following connectors:
| • | High pressure lock-off (HPL) (1) |
| • | Fuel temperature sensor (FTS) (2) |
| • | Fuel pressure sensor (FPS) (3) |
Caution: The high pressure lock-off solenoid seal is more likely to leak at a
lower pressure. Always perform the fuel leak procedure exactly as specified.
Failure to follow the proper procedures may result in serious personal injury
or damage to the vehicle or part.
- Fuel the vehicle in three stages at the following pressures:
| 21.1. | 3,447 kPa (500 psi) |
| 21.2. | 10,342 kPa (1500 psi) |
| 21.3. | 20,685 kPa (3000 psi) |
- Using the J 41416 Ultrasonic Leak Detector, inspect
for fuel leaks at the HPL at EACH pressure.
- Connect the negative battery cable.
- Start and operate the engine on CNG.
- Inspect for fuel leaks at each serviced fitting using the J 41416.
- Attach the information label supplied with the replacement HPL
in a visible location on the head of the tank.
- Install the tank cover. Refer to CNG Fuel Tank Cover Replacement
procedure in the Body Rear End subsection of the Bi-Fuel Supplement Service
Manual.
