Headlining Trim Panel Replacement TrailBlazer EXT, Envoy XL
Caution: Do not attempt to repair or alter the head impact energy-absorbing material glued to the headliner or to the garnish trims. If the material is damaged, replace the headliner and/or the garnish trim. Failure to do so could result in personal injury.
Notice: Use care when working around the head curtain inflator module. Sharp tools may puncture the curtain airbag. If the head curtain inflator module is damaged in any way, it must be replaced.
Notice: If a vehicle is equipped with a head curtain inflator module ensure that the inflator module and tether are undamaged. If tether or curtain airbag are damaged in any way, they must be replaced.
Removal Procedure
- Ensure the ignition switch is in the LOCK position.
- Remove the right sound insulator panel. Refer to Instrument Panel Insulator Panel Replacement - Right Side .
- Remove the front door sill plates. Refer to Front Side Door Sill Plate Replacement .
- Remove the rear door sill plates. Refer to Rear Side Door Sill Plate Replacement .
- Remove the center pillar trim panels. Refer to Center Pillar Garnish Molding Replacement .
- Remove the windshield garnish moldings. Refer to Windshield Pillar Garnish Molding Replacement .
- Remove the overhead console, If equipped . Refer to Roof Console Replacement .
- Remove the video display, if equipped. Refer to Video Display Replacement .
- Remove the sunshades from the headliner. Refer to Sunshade Replacement .
- Remove the sunshade retainer clips.
- Remove the third row seats, if equipped. Refer to Rear Number 2 Seat Replacement .
- Remove the second row seats. Refer to Rear Seat Replacement .
- Remove the left/right front body side window garnish molding. Refer to Body Side Rear Window Garnish Molding Replacement .
- Remove the left/right rear body side window garnish molding. Refer to Body Side Window Rear Garnish Molding Replacement .
- Remove the lift gate door sill plate. Refer to Liftgate Door Sill Plate Replacement .
- Remove the left rear quarter lower trim panel. Refer to Rear Quarter Trim Panel Replacement - Left Side .
- Remove the right rear quarter lower trim panel. Refer to Rear Quarter Trim Panel Replacement - Right Side .
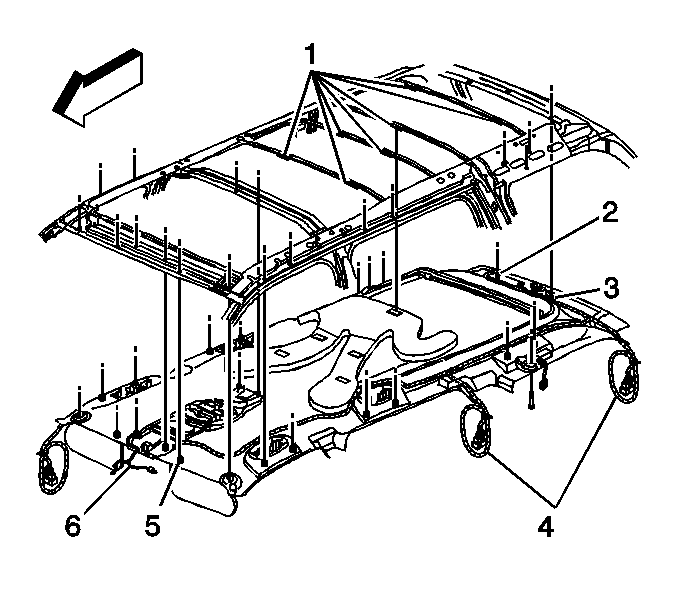
- Remove the bolts from the cargo tie-down loops.
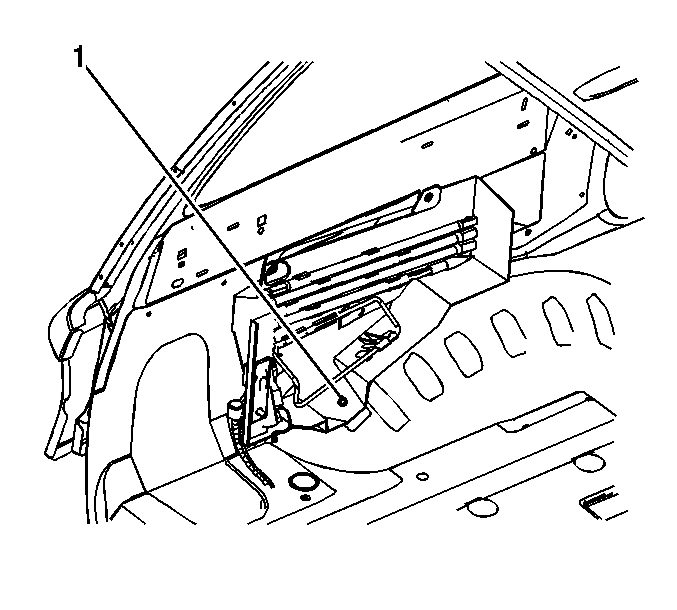
- Remove the nut (1), securing the stowage jack carrier to the wheelhouse panel.
- Loosen the three bolts that secure the jack carrier to the vehicle.
- Remove the carpet from around the wheel stud.
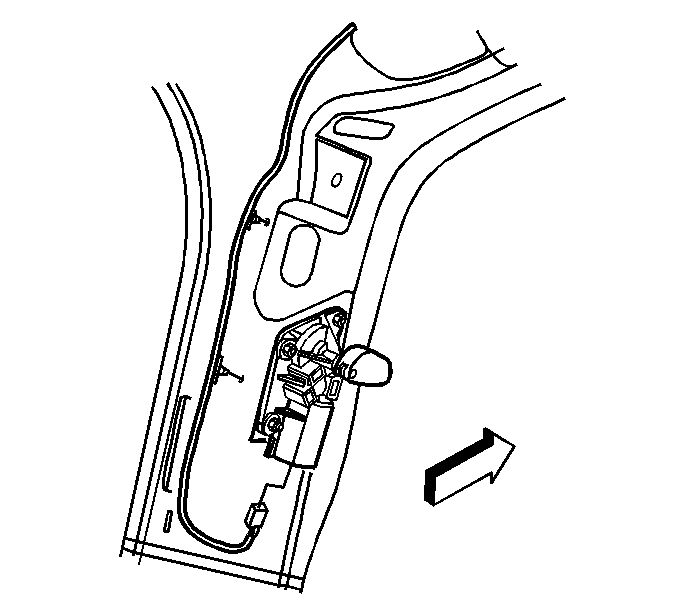
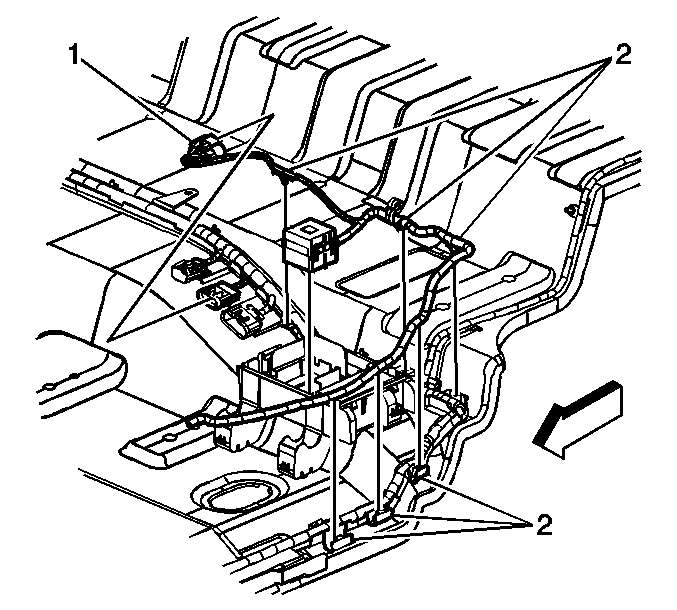
- Remove the body electrical block. Refer to Rear Electrical Center or Junction Block Replacement .
- Peel the carpet forward and up over the front seats.
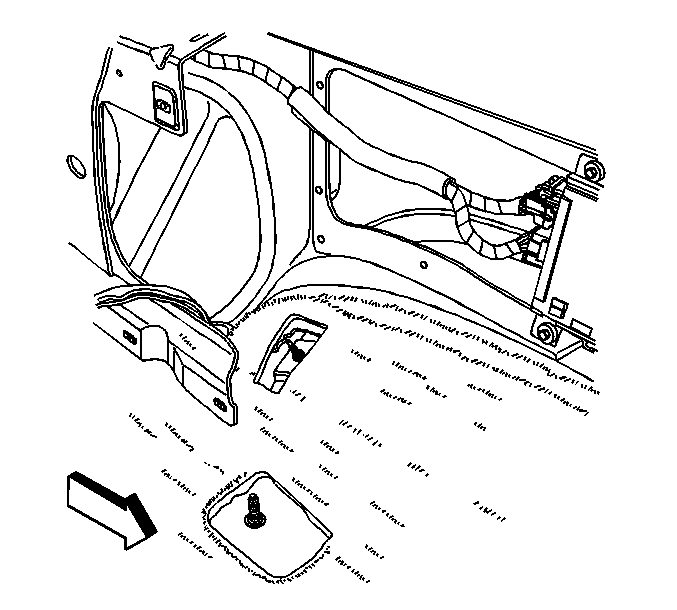
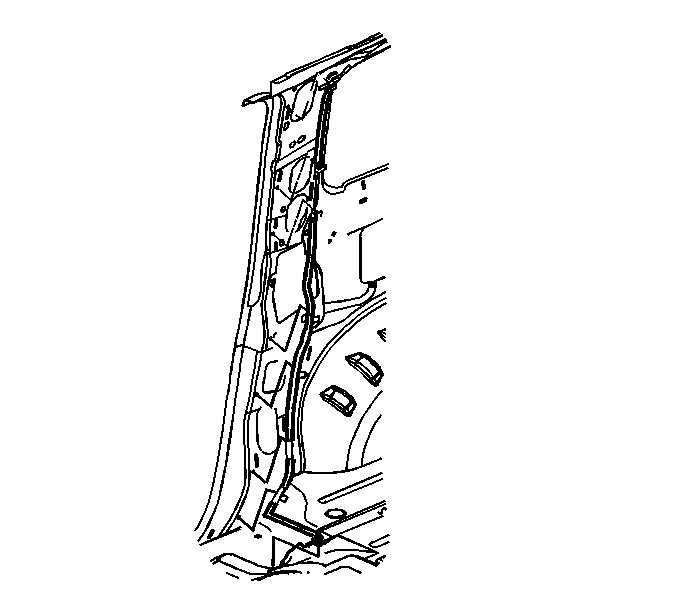
- Remove the headliner harness from the left-hand third pillar.
- Remove the headliner harness from the floor studs.
- Remove the third pillar headliner harness electrical connector from the body electrical block, and the block base from the floor panel. Refer to Rear Electrical Center or Junction Block Replacement .
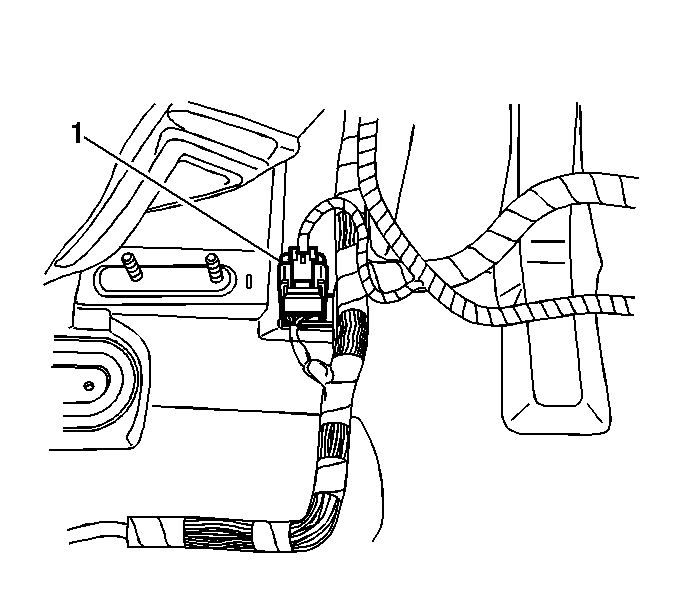
- Reach underneath the carpet and disconnect the 6-way headliner harness electrical connector (1) from the cross-body wire harness.
- Remove the navigational antenna cable from the right-hand third pillar.
- Remove the navigational antenna cable from the floor studs.
- Pull the communication interface module electrical connectors back through the hole in the carpet.
- Disconnect the electrical connector from the right-hand body side window actuator.
- Disconnect the electrical connector from the left-hand body side window actuator.
- Remove the windshield rearview mirror wire harness cover.
- Disconnect the inside rear view mirror electrical connector (3).
- Disconnect the rain sensor electrical connector (2), if equipped.
- Disconnect the coax cable (1) from the navigational antenna, if equipped.
- Remove the bolt securing the auxiliary air conditioning duct to the vehicle.
- Remove the 2 push pins (2, 3) from the rear of the headliner.
- Remove the 3 push pins from the rear of the headliner.
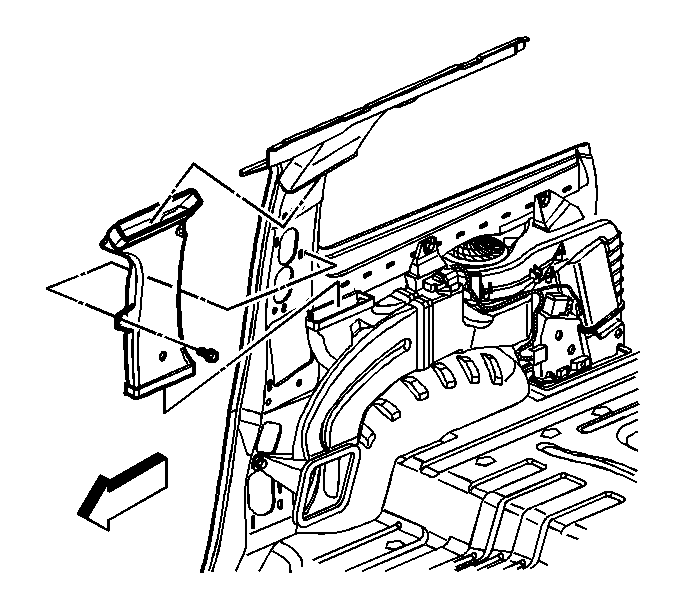
- Release the assist handles from the roof panel. Refer to Assist Handle Replacement .
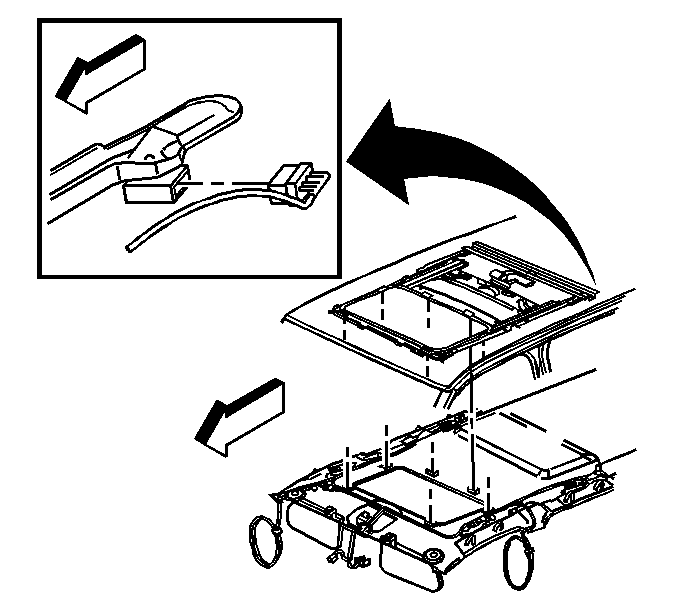
- With the aid of an assistant, lower the headliner to release the interlocking strips (1) that retain the headliner to the roof panel.
- If the vehicle is equipped with a sunroof, partially lower the headliner and disconnect the sunroof assembly electrical connector.
- With the aid of an assistant, remove the headliner from the vehicle.
Notice: Remove the headliner and the headliner harness as an assembly. Do NOT cut or splice the headliner harness. Cutting or splicing the harness may damage the coax cable, resulting in poor radio performance.
Note the carpet hooks around the wheelhouse panel stud.
Installation Procedure
- With the aid of an assistant, install the headliner into the vehicle.
- If the vehicle is equipped with a sunroof, partially raise the headliner and connect the sunroof assembly electrical connector.
- With the aid of an assistant, fully raise the headliner and ensure that the retaining strips (1) are engaged, and the headliner harnesses (4) hang free of the headliner.
- Install the assist handles to the roof panel. Refer to Assist Handle Replacement .
- Install the right rear push pin (2).
- Install the left rear push pin (3).
- Install the 3 push pins in the center of the headliner.
- Install the sunshades to the headliner. Refer to Sunshade Replacement .
- Install the left and right sunshade retaining clips (5).
- Install the auxiliary air conditioning duct to the vehicle with the bolt.
- Connect the coax cable (1) to the navigation antenna, if equipped.
- Connect the rain sensor electrical connector (2), if equipped.
- Connect the inside rear view mirror electrical connector (3).
- Install the windshield rearview mirror wire harness cover.
- Install the video display, if equipped. Refer to Video Display Replacement .
- If equipped, install the overhead console. Refer to Roof Console Replacement .
- Install the windshield garnish moldings. Refer to Windshield Pillar Garnish Molding Replacement .
- Install the center pillar trim panels. Refer to Center Pillar Garnish Molding Replacement .
- Install the front side door sill plates. Refer to Front Side Door Sill Plate Replacement .
- Install the right sound insulator panel. Refer to Instrument Panel Insulator Panel Replacement - Right Side .
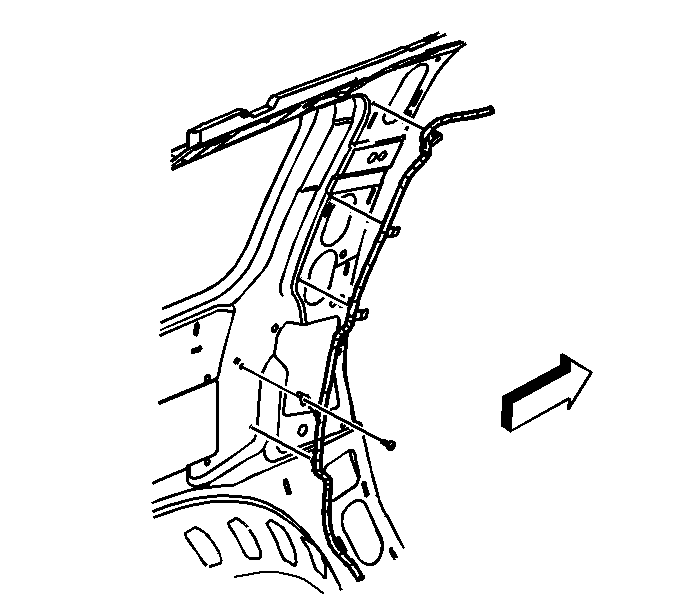
- Install the headliner harness to the left third pillar.
- Install the headliner harness to the floor studs.
- Install the ground terminals and the ground bolt to the left center pillar.
- Reach underneath the carpet and install the 6-way headliner harness electrical connector (1) to the cross-body wire harness.
- Pass the communication interface module electrical connectors through the small hole in the carpet.
- Install the headliner harness retaining clips to the rocker panel and the floor panel.
- If equipped with OnStar® perform the following procedure:
- Install the body electrical block. Refer to Rear Electrical Center or Junction Block Replacement .
- Install the rear carpet. Ensure that the carpet hooks over the left wheelhouse panel stud.
- Connect the electrical connector to the left-hand body side window actuator.
- Connect the electrical connector to the right-hand body side window actuator.
- Install the nut (1) securing the stowage jack carrier to the wheelhouse panel.
- Install the right rear quarter lower trim panel. Refer to Rear Quarter Trim Panel Replacement - Right Side .
- Install the left rear quarter lower trim panel. Refer to Rear Quarter Trim Panel Replacement - Left Side .
- Install the left/right rear body side trim rear window garnish molding. Refer to Body Side Window Rear Garnish Molding Replacement .
- Install the left/right front body side window garnish molding. Refer to Body Side Rear Window Garnish Molding Replacement .
- Install the lift gate door sill plate. Refer to Liftgate Door Sill Plate Replacement .
- Install the cargo tie-down loops.
- Install the rear side door sill plates. Refer to Rear Side Door Sill Plate Replacement .
- Install the second row seats. Refer to Rear Seat Replacement .
- Install the third row seats, if equipped.
Notice: Refer to Fastener Notice in the Preface section.
Tighten
Tighten the sunshade retaining clip screws to 10 N·m (89 lb in).
Tighten
Tighten the auxiliary air conditioning duct bolt to 10 N·m (89 lb in).
Tighten
Tighten the ground bolt to 10 N·m (89 lb in).
| 27.1. | Install the navigation antenna cable to the right 'C' pillar. |
| 27.2. | Install the navigation antenna cable to the floor studs. |
Tighten
Tighten the cargo tie-down loop bolts to 35 N·m (26 lb ft).
Headlining Trim Panel Replacement TrailBlazer, Envoy, Rainier
Caution: Do not attempt to repair or alter the head impact energy-absorbing material glued to the headliner or to the garnish trims. If the material is damaged, replace the headliner and/or the garnish trim. Failure to do so could result in personal injury.
Notice: Use care when working around the head curtain inflator module. Sharp tools may puncture the curtain airbag. If the head curtain inflator module is damaged in any way, it must be replaced.
Notice: If a vehicle is equipped with a head curtain inflator module ensure that the inflator module and tether are undamaged. If tether or curtain airbag are damaged in any way, they must be replaced.
Removal Procedure
- Ensure the ignition switch is in the LOCK position.
- Remove the cargo net, if equipped.
- Remove the luggage/cargo shelf assembly, if equipped.
- Remove the right sound insulator panel. Refer to Instrument Panel Insulator Panel Replacement - Right Side .
- Remove the front door sill plates. Refer to Front Side Door Sill Plate Replacement .
- Remove the rear door sill plates. Refer to Rear Side Door Sill Plate Replacement .
- Remove the center pillar trim panels. Refer to Center Pillar Garnish Molding Replacement .
- Remove the windshield garnish moldings. Refer to Windshield Pillar Garnish Molding Replacement .
- Remove the video display, if equipped. Refer to Video Display Replacement .
- If equipped, remove the overhead console. Refer to Roof Console Replacement .
- Remove the sunshades from the headliner. Refer to Sunshade Replacement .
- If equipped with OnStar®, perform the following procedure:
- Remove the following headliner harness clips from the left center pillar:
- Remove the center pillar harness ground bolt (2).
- Remove the harness from the left center pillar.
- Remove the rear seats. Refer to Rear Seat Number 1 Back Replacement , and to Rear Seat Cushion Replacement .
- Remove the headliner harness retaining clips (2) from the rocker panel and floor panel.
- Remove the center pillar headliner harness electrical connector from the bussed electrical center, and the block base from the floor panel. Refer to Rear Electrical Center or Junction Block Replacement .
- Reach underneath the carpet and remove the headliner harness electrical connector (1) from the instrument panel (I/P) wire harness.
- Disconnect the inside rear view mirror electrical connector (6).
- Disconnect the rain sensor electrical connector, if equipped.
- Disconnect the navigation antenna electrical connector, if equipped.
- Remove the upper rear quarter trim panels. Refer to Quarter Upper Trim Panel Replacement .
- Remove the coat hooks from the roof panel. Refer to Coat Hook Replacement .
- Remove the 2 push pins from the rear of the headliner.
- Release the assist handles from the roof panel. Refer to Assist Handle Replacement .
- Fully recline the bucket seats.
- With the aid of an assistant, release the interlocking strips (1) that retain the headliner to the roof panel.
- If the vehicle is equipped with a sunroof, partially lower the headliner and disconnect the sunroof assembly electrical connector.
- With the aid of an assistant, remove the headliner from the vehicle.
Notice: Remove the headliner and the headliner harness as an assembly. Do NOT cut or splice the headliner harness. Cutting or splicing the harness may damage the coax cable, resulting in poor radio performance.
| 12.1. | Disconnect the navigation antenna cable from the communication interface module. Refer to Navigation Control Processor Bracket Replacement . |
| 12.2. | Remove the navigation antenna cable from the right side door rocker panel attachments. |
| 12.3. | Remove the navigation antenna cable from the right center pillar. |
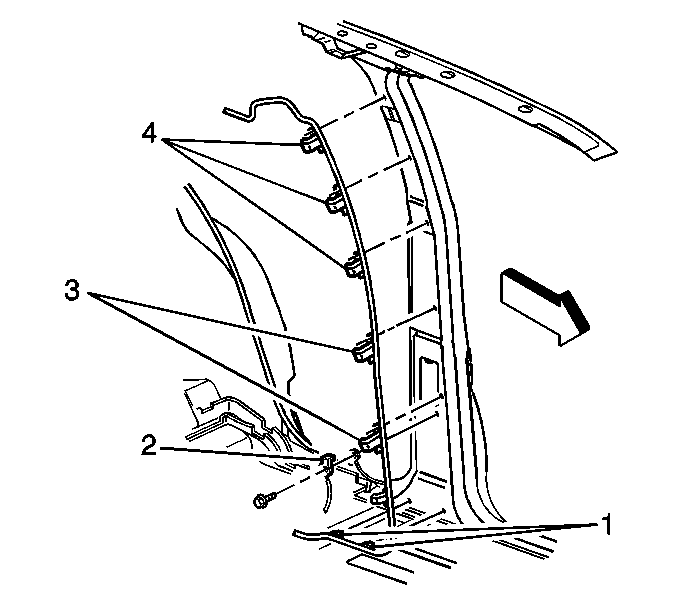
| • | The center pillar harness clips (4) |
| • | The center pillar harness clips (3) |
| • | The center pillar harness clips (1) |
Installation Procedure
- With the aid of an assistant, install the headliner into the vehicle.
- If the vehicle is equipped with a sunroof, partially raise the headliner and connect the sunroof assembly electrical connector.
- With the aid of an assistant, fully raise the headliner and install the left inboard sunshade retaining clip (5).
- Install the right rear push pin (2)
- Install the left rear push pin (3).
- Install the assist handles to the roof panel. Refer to Assist Handle Replacement .
- Install the coat hooks to the roof panel. Refer to Coat Hook Replacement .
- Install the upper rear quarter trim panels. Refer to Quarter Upper Trim Panel Replacement .
- Connect the navigation antenna electrical connector, if equipped.
- Connect the rain sensor electrical connector, if equipped.
- Connect the inside rear view mirror electrical connector (6).
- If the vehicle is NOT equipped with a sunroof, seat the 2 interlocking strips (1).
- If the vehicle is equipped with a sunroof, seat the 6 interlocking strips.
- Reach underneath the carpet and remove the headliner harness electrical connector (1) from the IP wire harness.
- Install the center pillar headliner harness electrical connector to the bussed electrical center, and the block base to the floor panel. Refer to Rear Electrical Center or Junction Block Replacement .
- Install the headliner harness retaining clips (2) to the rocker panel and the floor panel.
- Install the headliner harness to the left center pillar.
- Install the following headliner harness clips to the center pillar:
- Install the ground terminals and the ground bolt (2) to the center pillar.
- If equipped with OnStar® perform the following procedure:
- Install the sunshades to the headliner. Refer to Sunshade Replacement .
- If equipped, install the overhead console. Refer to Roof Console Replacement .
- Install the video display, if equipped. Refer to Video Display Replacement .
- Install the windshield garnish moldings. Refer to Windshield Pillar Garnish Molding Replacement .
- Install the center pillar trim panels. Refer to Center Pillar Garnish Molding Replacement .
- Install the rear side door sill plates. Refer to Rear Side Door Sill Plate Replacement .
- Install the front side door sill plates. Refer to Front Side Door Sill Plate Replacement .
- Install the right sound insulator panel. Refer to Instrument Panel Insulator Panel Replacement - Right Side .
- Install the rear seats. Refer to Rear Seat Number 1 Back Replacement and Rear Seat Cushion Replacement .
- Install the luggage/cargo shelf assembly, if equipped.
- Install the cargo net, if equipped.
| • | The center pillar harness clips (1) |
| • | The center pillar harness clips (3) |
| • | The center pillar harness clips (4) |
Notice: Refer to Fastener Notice in the Preface section.
Tighten
Tighten the bolt to 10 N·m (89 lb in).
| 20.1. | Install the navigation antenna cable to the right center pillar. |
| 20.2. | Install the navigation antenna cable to the right side door sill attachments. |
| 20.3. | Install the navigation antenna cable to the communication interface module. Refer to Navigation Control Processor Bracket Replacement . |
