Battery Electrical Drain/Parasitic Load Test Acadia or Enclave
Tools Required
J 38758 Parasitic Draw Test Switch
Diagnostic Aids
| • | Be sure to rule out any possible obvious influences, such as customer error or aftermarket equipment. |
| • | Customer driving habits, such as regular short trips. This does not allow enough time to properly charge the battery. Refer to Battery Description and Operation. |
| • | Verify that the battery and charging system are in proper working order. Refer to Battery Charging and Charging System Test. |
| • | A battery discharging for no apparent reason while the vehicle is parked can be caused by an intermittent draw, such as a module waking up, or a continuous draw, such as a dome light or stuck relay. |
| • | Some systems and modules, such as OnStar®, and regulated voltage control (RVC), are designed to wake-up, perform a task, and go back asleep at regular intervals. Refer to Body Control System Description and Operation for the system or modules description and operation. |
| • | Remote keyless entry (RKE) will wake up due to an outside input. Refer to Keyless Entry System Description and Operation for the system description and operation. |
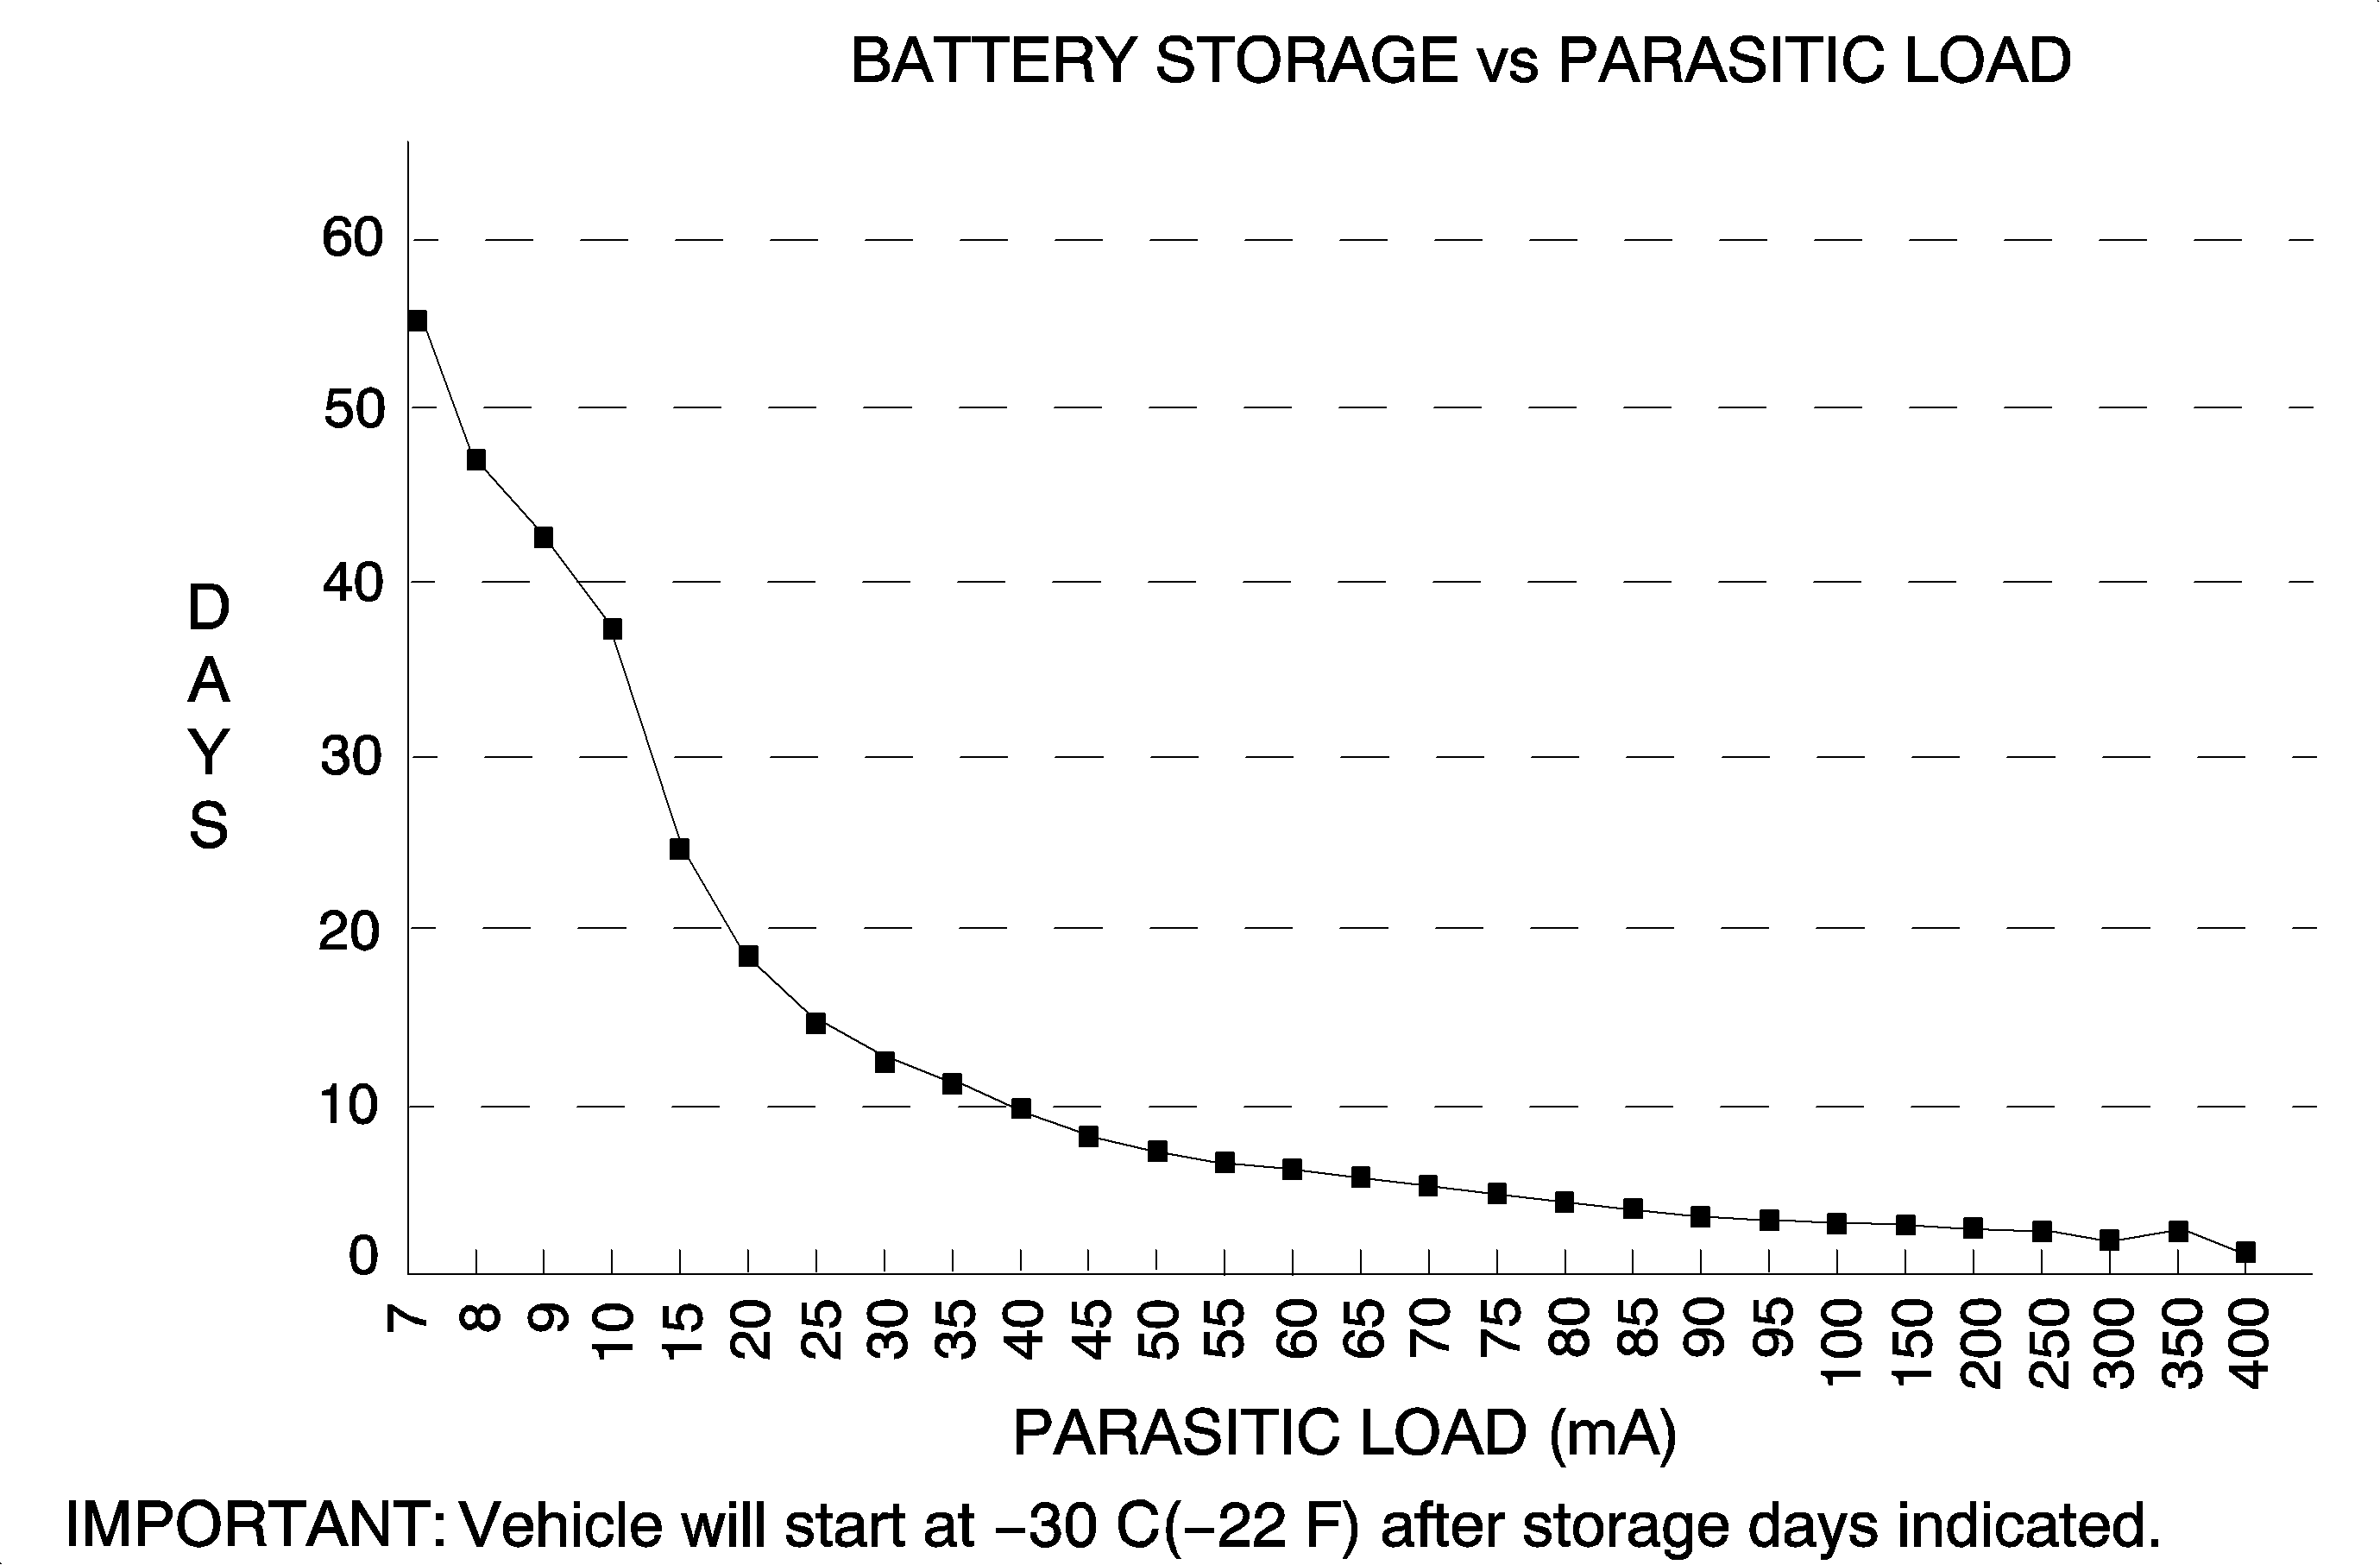
| • | The battery run down time will vary depending on cold cranking amperage (CCA) and reserve capacity (RC). If the CCA and RC are higher, then the battery run down time would be longer. If the CCA and RC are lower, then the battery run down time would be shorter. The graph below indicates roughly how many days a 730 CCA battery with at 100 min. RC (70 AH) starting at 80 percent state of charge will last with a constant current draw until it reaches 50 percent state of charge. Differences in battery rating and temperature will affect the results. |
Current Drain | Days |
|---|---|
25 mA | 35 |
50 mA | 17.5 |
75 mA | 11.5 |
100 mA | 8.75 |
250 mA | 3.5 |
500 mA | 1.75 |
750 mA | 1.15 |
1 A | 0.88 |
2 A | 0.44 |
Load Test
Warning: Refer to Battery Disconnect Warning in the Preface section.
Caution: Do not turn the parasitic draw test switch to the OFF position with the engine running. Damage will occur to the vehicle's electrical system.
Caution: The test switch must be in the ON position when removing the fuses in order to maintain continuity in the electrical system. This avoids damaging the digital multimeter due to accidental overloading, such as a door being opened to change a fuse.
Note: The test switch on the J 38758 is marked ON and OFF. When the test switch is in the ON position, the circuit is closed and electrical current will pass through the switch. When the test switch is in the OFF position, the circuit is open and electrical current will not pass through the switch.
- Disconnect the battery negative cable from the battery negative terminal. Refer to Battery Negative Cable Disconnection and Connection.
- Install the female top-post end of the J 38758 to the battery ground terminal.
- Turn the J 38758 test switch to the OFF position.
- Install the battery negative cable to the male end of the J 38758 .
- Turn the J 38758 test switch to the ON position.
- Road test the vehicle and activate ALL of the accessories, including the radio and air conditioning. This may take up to 30 minutes.
- Park the vehicle. Turn the ignition switch to the OFF position and remove the ignition switch key.
- Connect a 10 A fused jumper wire to the test switch tool terminals.
- Turn the J 38758 test switch to the OFF position. The current now flows through the jumper wire.
- Wait 1 minute. If the fuse opens, install an inductive ammeter to locate the current draw.
- Turn the test switch to ON and then remove the fused jumper wire.
- Set a digital multimeter to the 10 A scale.
- Connect the digital multimeter to the test switch tool terminals.
- Turn the J 38758 test switch to the OFF position. The current flows now through the digital multimeter.
- Wait 1 minute. Check and record the current reading.
- Turn the J 38758 test switch to the OFF position. Wait up to 45 minutes for most vehicles.
- Check and record the current reading.
- Note the battery reserve capacity, amp hour rating. Refer to Battery Usage.
- If excessive current drain is not found at this time and there are no other apparent causes, complete the following:
- Connect the battery negative cable to the battery negative terminal.
| 15.1. | When there is a current reading of 2 A or less, turn the J 38758 test switch to the ON position. The electrical current will now pass through the switch. |
| 15.2. | Then switch the digital multimeter down to the 2 A scale for a more accurate reading when the J 38758 test switch is turned OFF. |
| 18.1. | Divide the reserve capacity by 4, or the amp hour rating by 2.4. |
| 18.2. | Compare this to the multimeter milliampere reading taken in the previous step. The parasitic current drain should not exceed this number. Example: If a battery has a reserve capacity of 100 minutes, (60 A/H) the current drain should not exceed 25 mA. |
| 19.1. | Using the MIN/MAX function of the digital multimeter, monitor the parasitic drain overnight or during the day. This will determine if something has been activated during that time frame. |
| Caution: The test switch must be in the ON position when removing the fuses in order to maintain continuity in the electrical system. This avoids damaging the digital multimeter due to accidental overloading, such as a door being opened to change a fuse. |
| Note: Removing fuses, relays, and connectors to determine the failure area may wake up modules. You must wait for these modules to go to sleep or use the sleep function on the scan tool. |
| 19.2. | When the vehicle has an unacceptable amount of parasitic current drain, remove each fuse one at a time until the current drain falls to an acceptable level. This will indicate which circuit is causing the drain. Refer to Power Distribution Schematics to diagnose exactly which part of the suspect circuit is causing the parasitic drain. In some cases a non-fused circuit or component, such as a relay, is the cause of excessive parasitic current drain. |
| 19.3. | Repeat the parasitic current drain test procedure after any repair has been completed to make sure that the parasitic current drain is at an acceptable level. |
| 19.4. | When the cause of the excessive current drain has been located and repaired, remove the J 38758 . |
Battery Electrical Drain/Parasitic Load Test OUTLOOK
Safety Precautions
Warning: Batteries produce explosive gases, contain corrosive acid, and supply levels of electrical current high enough to cause burns. Therefore, to reduce the risk of personal injury when working near
a battery:
• Always shield your eyes and avoid leaning over the battery whenever possible. • Do not expose the battery to open flames or sparks. • Do not allow the battery electrolyte to contact the eyes or the skin. Flush immediately and thoroughly any contacted areas with water and get medical help. • Follow each step of the jump starting procedure in order. • Treat both the booster and the discharged batteries carefully when using the jumper cables.
Parasitic Load Testing
Small current drains, called parasitic drains, constantly draw current from the battery even with the ignition switch in the OFF position. These parasitic drains can discharge a battery in 4-6 weeks depending on the battery state of charge and when the vehicle went into storage.
For normal parasitic current drain, refer to individual component parasitic loads. When testing for parasitic current draw, inspect what types of equipment the customer may have had installed on the vehicle. A cellular phone, anti-theft system, navigation system, or any device added that requires constant voltage to retain a memory, will draw current at all times. Take these added accessories into account when testing for parasitic current drain.
Saturn Parasitic Load Test Device
The parasitic load test device (SA9130Z) is used with a DMM. The test device is used to measure parasitic current drain from the battery with the ignition and all accessories OFF. The load tester, constructed with 1 ohm resistance and built-in circuit protection device, opens when the current exceeds approximately 1 amp. When the circuit is opened, the user is alerted by a red light-emitting diode (LED) indicator. The parasitic load test device is put into the circuit between the negative battery terminal and the negative battery cable so it effectively becomes a load in series with all other vehicle loads.
Note: The ignition key must be removed from the cylinder before parasitic load testing. The key-minder circuit is activated by the key cylinder switch when the key is in the ignition cylinder, which adds 20 mA of current draw.
- Install parasitic load tester between negative cable and negative battery terminal so the 1 ohm resistor of the tester is in series with battery. A top/side post adaptor must be used.
- Touch the negative battery cable to the negative battery terminal, and hold them together for 20 seconds, then remove the cable from the battery. This will allow the modules on the vehicle to wake up. Verify that the LED indicator on the tester turns OFF and stays OFF.
- Set the multimeter to MILLIVOLT scale.
- Measure current across the tester by putting the multimeter probes in 2 terminals on the tester. The reading is obtained in volts. This reading is directly converted to milliampere. Should the parasitic load exceed 1 amp, the LED indicator on the tester will light. This may indicate that a vehicle accessory is ON.
- Wait 5 minutes for the modules on the vehicle to go to sleep. The current draw may be greater than 100 milliamps for the first 2-5 minutes, then it should drop to 10-30 milliamps.
| ⇒ | If the LED indicator does not stay off, verify that all vehicle accessories are OFF. Try holding the battery cable against the negative terminal again. If the LED indicator remains ON, something is drawing greater than 1 amp of current. |
| ⇒ | To find the source of excessive load, start removing fuses and modules in a systematic way. When voltage drops across the tester, the circuit or circuits protected by that fuse is the source of current drain. Also remove the fusible link from the generator to check for a voltage drop. If the voltage drop is greater than 2 volts, replace the generator. Repair the circuit and perform the parasitic load test again to verify the repair. |
Parasitic Current Drain Testing With an Ammeter
- Turn the ignition and all accessories OFF and remove the key from the ignition switch.
- Disconnect the cable from the negative battery terminal.
- Follow the manufacturers instructions for the multimeter or ampmeter being used. This could involve plugging leads into different locations on a multimeter and changing the scale to read amperage. On some testers you should start on the 10 amp scale setting, and after verifying that current drain is less than 2 mA, set the scale to 200 mA or 20 mA.
- Touch the negative battery cable to the negative battery terminal, and hold them together for 20 seconds. This will allow the modules on the vehicle to wake up.
- While still holding the cable against the battery, connect the ammeter between the negative cable and the negative battery terminal so that it will be in series. Then remove the cable from the battery. Read the parasitic current drain from the battery.
- Wait 5 minutes for the modules on the vehicle to go to sleep. The current draw may be greater than 100 milliamps for the first 2-5 minutes, then it should drop to 10-30 milliamps.
- To find the source of excessive load, start removing fuses and modules in a systematic way. When voltage drops across the tester, the circuit or circuits protected by that fuse is the source of current drain. Also remove the fusible link from the generator to check for a voltage drop. If the voltage drop is greater than 2 volts, replace the generator. Repair the circuit and perform the parasitic load test again to verify the repair.
Typical Parasitic Loads
Typical parasitic load for this vehicle is 10-15 mA. If the vehicle does not have one of the following components, then subtract the parasitic load of the component for typical parasitic load of the vehicle (10-15 mA) to determine the parasitic load range for the vehicle being tested.
BCM | 3.0 mA |
CD Changer | 3.0 mA |
EBCM | 1.0 mA |
ECM/TCM | 0-1.0 mA |
Generator | 0-1.0 mA |
HVAC Delayed Blower Control | 1.0 mA |
I/P Cluster w/Security Flashing "Security" Telltale | 1.2 mA |
On-Star | 0-1.0 mA |
Radio | 2.8-4.3 mA |
Note: During CD changer initialization, parasitic current draw will fluctuate between 3 mA to 1 A. The initialization period lasts up to a maximum of 90 seconds. After initialization, the CD changer parasitic current draw will stabilize at approximately 3 mA.
If the CD changer door is open and the light is illuminated, the parasitic current draw will be approximately 65 mA. The light will remain ON for 2 minutes. After the light goes out, the CD changer parasitic current draw will stabilize at approximately 3 mA.
Typical Undesired Parasitic Loads
| • | Cigar lighter ON |
| • | Headlamps ON |
| • | Parking lamps ON |
| • | Reading lamps ON |
| • | Radio ON |