Limited or Poor Transmitter Range When Using Remote Keyless Entry (RKE) and/or Remote Vehicle Start (RVS) (Add Shielding Foil Tape to Remote Control Door Lock Receiver Wire Harness)

| Subject: | Limited or Poor Transmitter Range When Using Remote Keyless Entry (RKE) and/or Remote Vehicle Start (RVS) (Add Shielding Foil Tape to Remote Control Door Lock Receiver Wire Harness) |
| Models: | 2008-2009 Buick Enclave |
| 2007-2009 GMC Acadia |
| 2007-2009 Saturn OUTLOOK |
| with OnStar® (RPO UE1) and |
| Remote Entry, Extended Range (RPO AP8) or Remote, Keyless Entry, Start (RPO AP3) |
This bulletin is being revised to add 2009 model year. Please discard Corporate Bulletin Number 08-08-52-003B (Section 08 -- Body and Accessories).
Condition
Some customers may comment on limited or poor transmitter range when using the remote keyless entry (RKE) and/or remote vehicle start (RVS).
Cause
This condition may be caused by radio frequency interference (RFI) with OnStar® because a section of the remote control door lock receiver (RCDLR) wire harness is missing the foil wrap shielding tape.
Correction
Notice: DAMAGE to the left rear quarter trim panel may result if the procedure for the Rear Quarter Lower Trim Panel Replacement is not followed in SI. Prior to removing the left rear quarter trim panel, make sure that the two hidden screws are removed and the speaker connector is disconnected from the panel.
Disconnect the OnStar® VCIM fuse and test the range for the RVS and RKE. If there is no change in range continue to diagnose the condition using SI. If the range improves, separate RCDLR circuits 1840, 560 and 650 from left rear body harness; then add shielding 3M™ Aluminum Foil Tape 425 Silver, or equivalent, to the RCDLR wire harness using the steps below.
- Open the rear liftgate and the rear doors.
- Position the second and third row seats to the flip up forward positions.
- Remove the rear storage compartment. Refer to Rear Storage Compartment Replacement in SI.
- Remove the rear liftgate door sill plate. Refer to Liftgate Door Sill Plate Replacement in SI.
- Remove the left rear door sill plate. Refer to Rear Carpet Retainer Replacement in SI.
- Remove the left body upper trim panel. Refer to Body Lock Pillar Upper Trim Panel Replacement in SI.
- Remove the left and right rear quarter upper trim panel. Refer to Quarter Upper Trim Panel Replacement in SI.
- Remove the left rear lower quarter trim panel. Refer to Rear Quarter Lower Trim Panel Replacement in SI. If the vehicle is equipped with a power liftgate, unbolt and reposition the liftgate actuator assembly to the side. Refer to Liftgate Actuator Replacement in SI.
- Lower the rear of the headliner panel to gain access to the RCDLR module (Rear center of roof, above the cargo lamp and headliner).
- Disconnect the RCDLR connector (Green in Color) from the RCDLR module.
- Unclip the left rear body harness retainers from the vehicle, starting at the roof panel working down to the left rear corner of the vehicle.
- Cut the RCDLR connector off, leaving enough wire to reattach the connector later in Step 14.
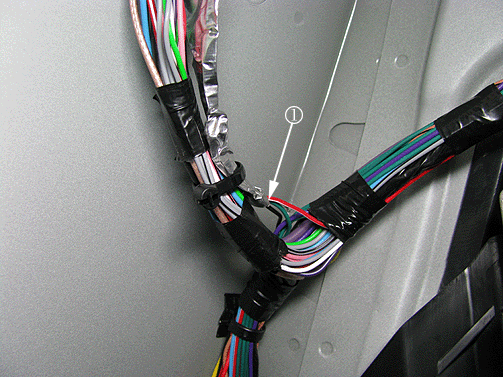
- Separate the RCDLR circuit wires: 1840 (Red/White), 5060 (Dark Green) and 650 (Black) from the left rear body harness, starting at the connector side of the harness until you get to the Y-section (1) of the rear body harness.
- Attach the RCDLR connector to the three wires using solder. Refer to Wiring Repairs in SI.
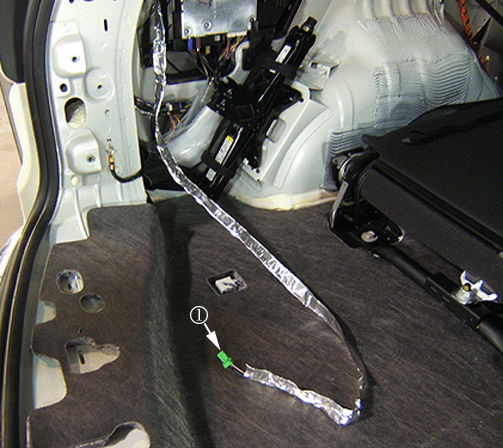
- Install 122 cm (4 ft) of shielding 3M™ Aluminum Foil Tape 425 Silver, or equivalent, to the RCDLR wire harness (1).
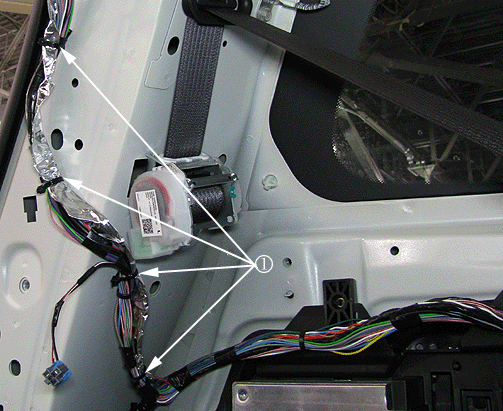
- Attach the left rear body harness back to the vehicle using the existing harness clip retainers.
- Route the RCDLR wiring harness along the side of the existing rear body harness with tie straps (1).
- Connect the RCDLR connector to the RCDLR module.
- Remove the block if used, reposition the headliner back to the roof panel and reposition the liftgate weatherstrip.
- If the vehicle is equipped with a power liftgate, install the liftgate actuator assembly. Refer to Liftgate Actuator Replacement in SI.
- Install the left body upper trim panel. Refer to Body Lock Pillar Upper Trim Panel Replacement in SI.
- Start to install the left rear lower quarter trim panel, connect the electrical connectors for the speaker and the outlet.
- Install the left rear lower quarter trim panel. Refer to Rear Quarter Lower Trim Panel Replacement in SI.
- Install the left and right rear quarter upper trim panel. Refer to Quarter Upper Trim Panel Replacement in SI.
- Install the rear storage compartment. Refer to Rear Storage Compartment Replacement in SI.
- Install the rear liftgate door sill plate. Refer to Liftgate Door Sill Plate Replacement in SI.
- Install the left rear liftgate door sill plate. Refer to Liftgate Door Sill Plate Replacement in SI.
- Position the second and third row seats to the down positions.
- Close the liftgate and doors.
- Reconnect the OnStar® VCIM fuse and test the range for the RVS and RKE to verify that the condition has been corrected.
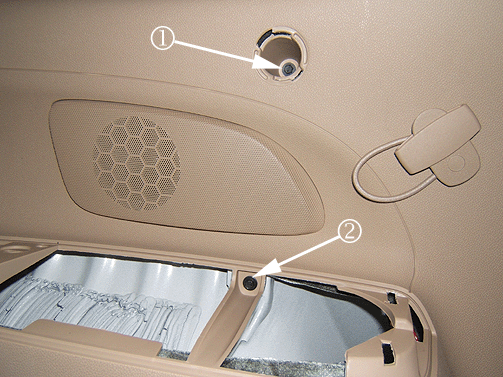
Important: There are two hidden screws, one screw (1) is behind the cargo screen retainer and the second screw (2) is under the armrest. The cargo retainer will need to be removed by turning, twisting and pulling outward to release the retainer. The electrical connector for the rear speaker and outlet will also need to be disconnected prior to removing the panel.
Tip
A small block may be placed between the headliner and the roof panel to gain access to the RCDLR module. Be careful not to crease the headliner panel.
Tip
You will need eight tie straps to properly secure the RCDLR harness back to the existing body harness.
Parts Information
3M™ Aluminum Foil Tape 425 Silver can be purchased locally from a 3M™ industry supplier or online at www.3mestore.com.
Part Number | Description | Qty | Material Allowance |
|---|---|---|---|
-- | 3M™ Aluminum Foil Tape 425 Silver (Dead-soft aluminum foil tape) | 1 | $1.25 per vehicle ($1.27 in Canada) |
12355066 | Strap, Nylon (Buick & GMC Only) | 8 | -- |
12337820 | Strap, Pull (Saturn Only) | 8 | -- |
Warranty Information
For vehicles repaired under warranty, use:
Labor Operation | Description | Labor Time |
|---|---|---|
R9743* | Add Shielding Foil Wrap Tape to RCDLR Harness to Address RFI Issue | 1.5 hrs |
* This labor operation number is for bulletin use only. This number will not be published in the Labor Time Guide. | ||
