Tools Required
| • | J 43600 ACR 2000 Air Conditioning Service Center |
| • | J 42220 R-134A A/C Tracer Dye - Box of 24 |
Important: Flushing with the
J 43600 is not intended to remove metal from the A/C system.
Flushing is intended to remove the following contaminants:
| • | Contaminated polyalkylene glycol (PAG) oil |
| • | Desiccant, following a desiccant bag failure |
| • | Refrigerant contamination |
Important: Warmer engine or ambient temperature decreases the refrigerant recovery time during the A/C flush procedure.
- Recover the refrigerant. Refer to
Refrigerant Recovery and Recharging .
- Remove the front thermal expansion valve (TXV). Refer to
Thermal Expansion Valve Replacement .
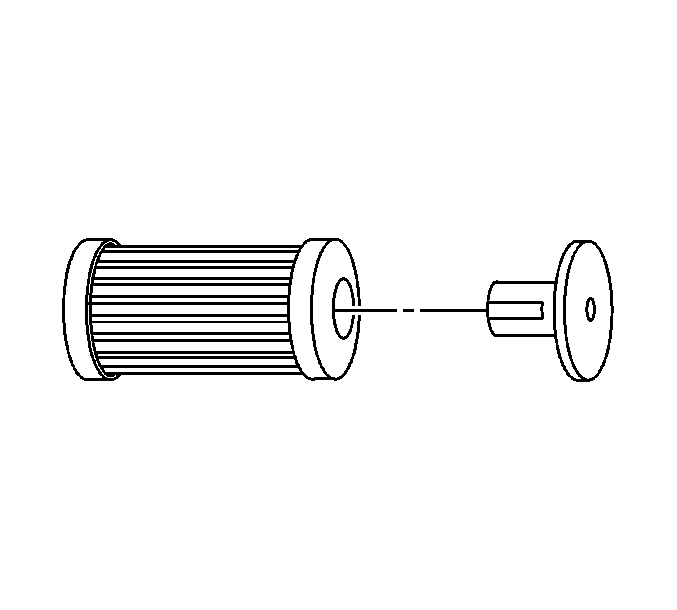
- Install the J 45268-121 in place of the TXV.
- Remove the A/C compressor. Refer to
Air Conditioning Compressor Replacement .
- Install J 45268-5 to the discharge hose.
- Install J 45268-4 to the suction hose.
- Forward flow refrigerant flushing is recommended for contaminated refrigerant or PAG oil.
Perform the following procedure:
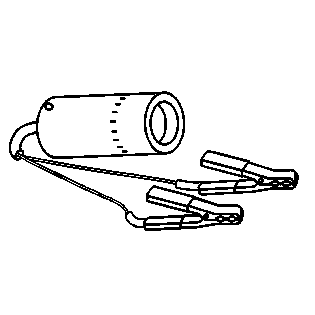
| | Important: The filter inside J 45268-1 is serviceable. Remove and discard the check valve from the filter.
|
| 7.1. | Service the filter with ACDelco P/N GF 470 before each flush. |
| 7.2. | Connect J 45268-1 to the suction port of J 45268-4. |
| 7.3. | Connect the blue hose from
J 43600 to J 45268-1 flush filter adapter. |
| 7.4. | Connect the red hose from
J 43600 to J 45268-5 flush adapter. |
- Reverse flow refrigerant flushing is recommended for desiccant failure. Replace the desiccant when the A/C flush is complete and perform the following procedure:
| | Important: The filter inside J 45268-1 is serviceable.
|
| 8.1. | Service the filter with ACDelco P/N GF 470 before each flush. |
| 8.2. | Connect J 45268-1 to the discharge port of J 45268-5. |
| 8.3. | Connect the blue hose from
J 43600 to J 45268-1 flush filter adapter. |
| 8.4. | Connect the red hose from
J 43600 to the suction port of J 45268-4 flush adapter. |
Important: Close the valve on the external refrigerant tank before starting the flush process.
- Flush the front A/C system. Follow the instructions supplied with the
J 43600 .
Important: Flush the front A/C system before flushing the auxiliary A/C system.
- If the vehicle is equipped with rear A/C, flush the auxiliary A/C system separately.
| 10.1. | Remove J 45268-121 from the front evaporator. |
| 10.2. | Inspect the front TXV for debris. Clean or replace as needed. |
| 10.4. | Install J 45268-121 in place of the auxiliary TXV. |
- Flush the auxiliary A/C system. Follow the instructions supplied with
J 43600 .
- Remove J 45268-5 from the discharge hose.
- Remove J 45268-4 from the suction hose.
Important: Flushing will remove all the PAG oil from the A/C system. The A/C system must be replenished with the correct amount of PAG oil.
- If the removed A/C compressor is being reinstalled, perform the following procedure:
| 14.1. | Drain the PAG oil from the A/C compressor. |
Rotate the compressor input shaft to assist in draining the PAG oil from the compressor.
- If you will replace the A/C compressor after flushing the system, perform the following procedure:
| 15.2. | If the service compressor is shipped with PAG oil, DO NOT drain the new PAG oil from the compressor. |
| 15.3. | Deduct the amount of PAG oil shipped with the service compressor from the amount of PAG oil listed in the capacities table. Refer to
Refrigerant System Capacities . |
Add the calculated amount to the compressor, as needed.
Important: Flushing will remove the fluorescent leak detection dye from the A/C system.
- Add one bottle of
J 41447 directly to the A/C compressor.
- Install the A/C compressor. Refer to
Air Conditioning Compressor Replacement .
- Remove J 45268-121.
- Inspect the auxiliary TXV for debris. Clean or replace as needed.
- Install the auxiliary TXV. Refer to
Auxiliary Air Conditioning Evaporator Thermal Expansion Valve Replacement .
- Evacuate and recharge the A/C system. Refer to
Refrigerant Recovery and Recharging .
- Leak test the fittings using
J 42220 .
