Oil Pan Replacement AT 6T45
Removal Procedure
- Raise vehicle by its full height. Refer to Lifting and Jacking the Vehicle.
- Remove the front compartment insulator. Refer to Front Compartment Insulator Replacement.
- Remove drivetrain and front suspension frame replacement. Refer to LINK.
- Remove the generator and air conditioning compressor and power steering pump belt. Refer to Generator and Air Conditioning Compressor and Power Steering Pump Belt Replacement.
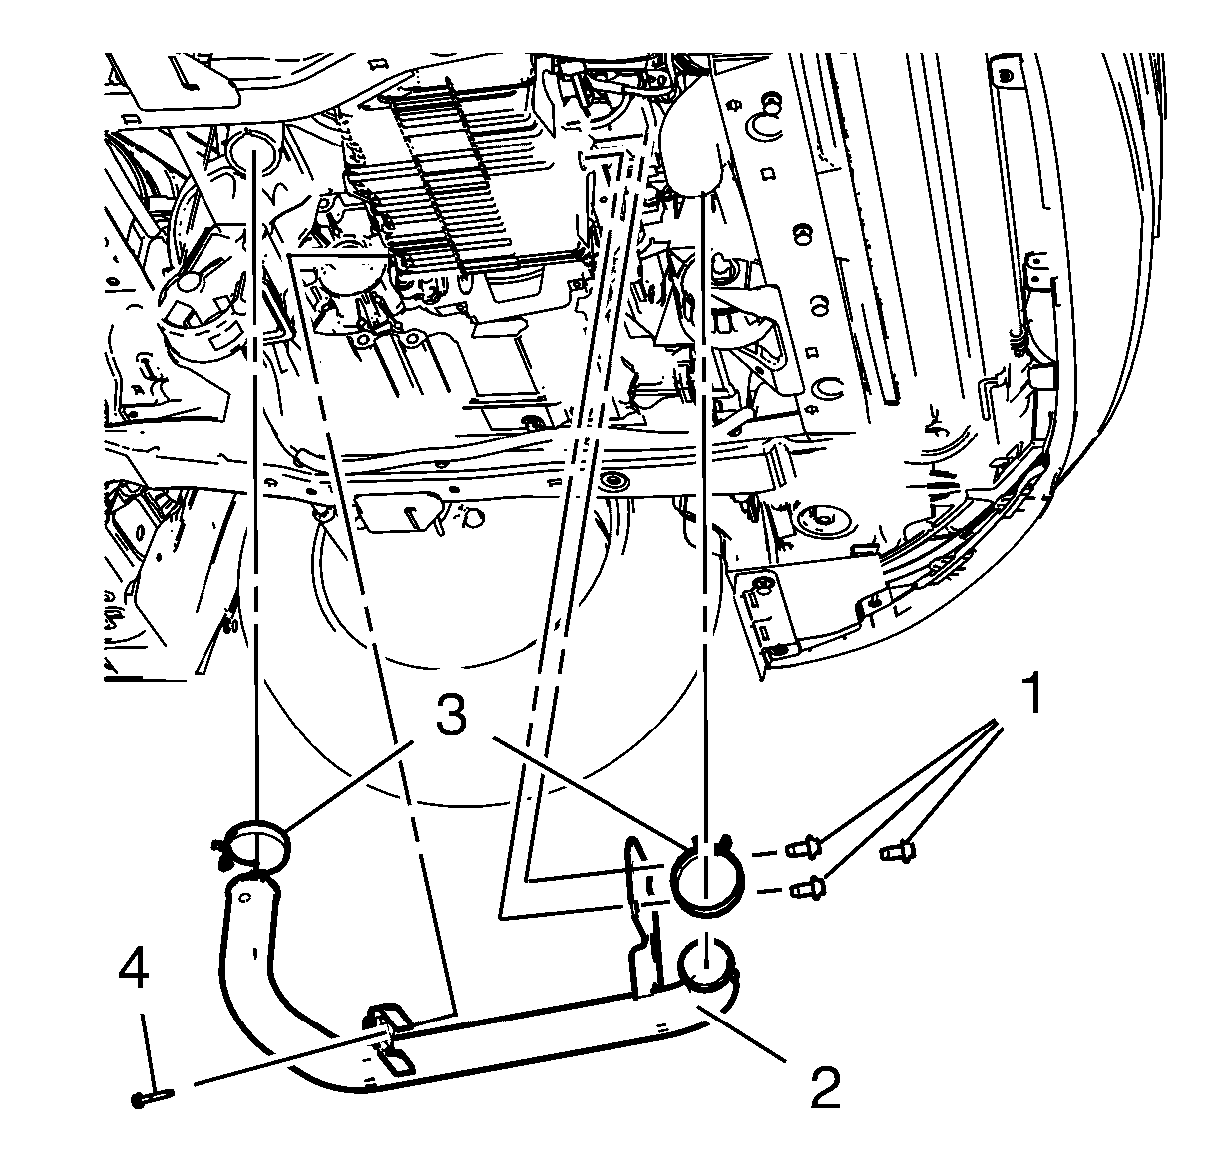
- Remove the charge air cooler inlet air tube bolt (4).
- Remove the 2 hose clamps (3).
- Remove the 3 air charge air cooler inlet air tube bolts (1).
- Remove the charge air cooler inlet air tube (2).
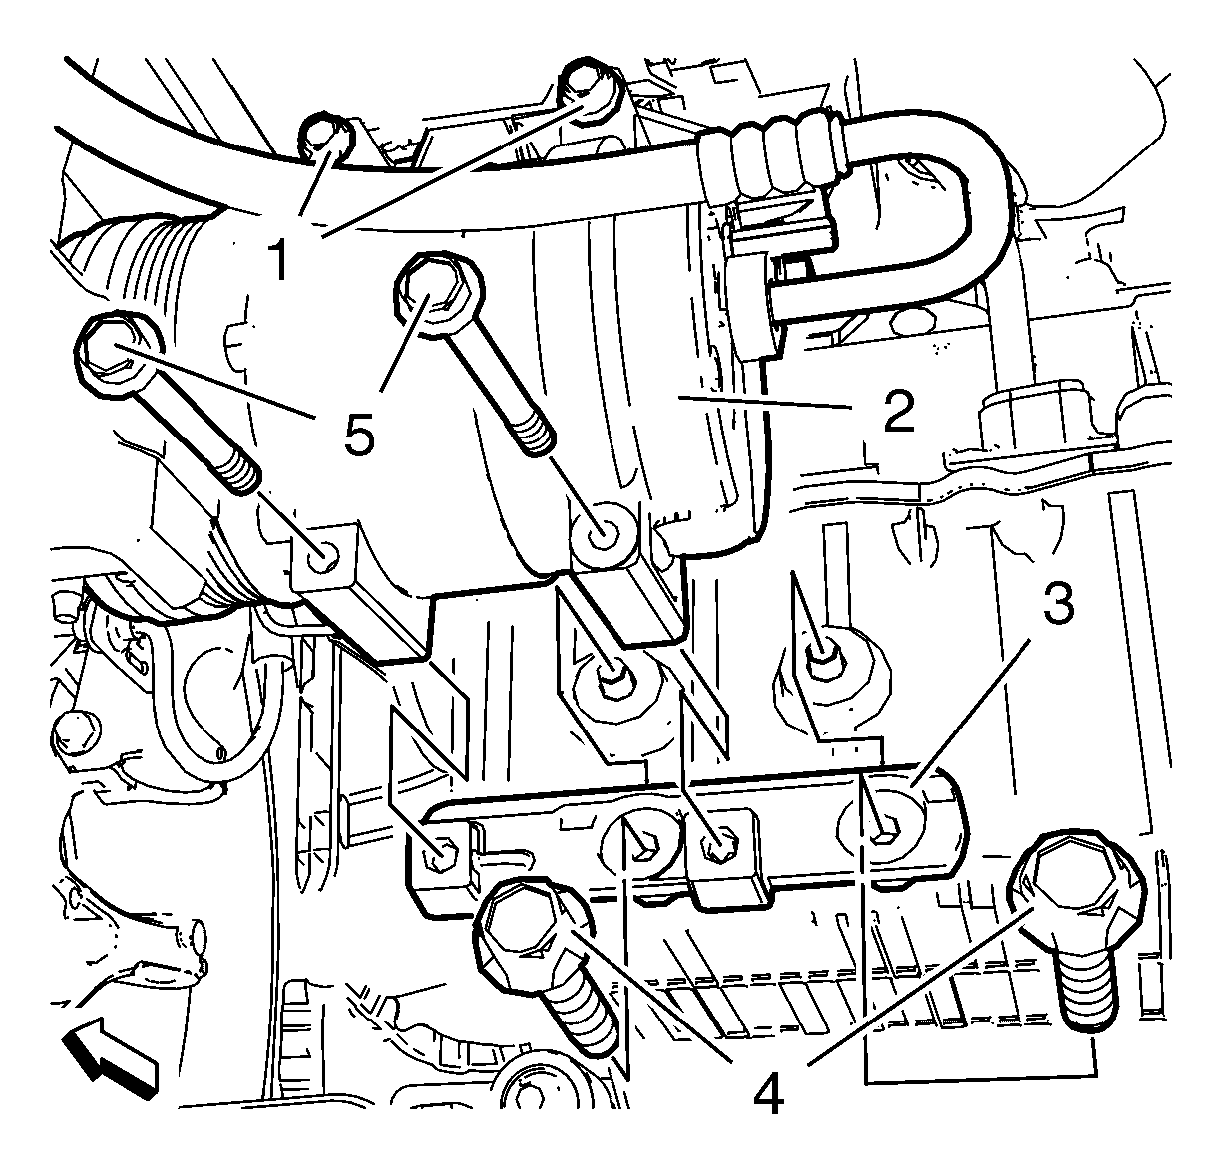
- Loosen the 2 air conditioning compressor upper bolts (1).
- Remove the 2 air conditioning compressor lower bolts (5)
- Pull the solved air conditioning compressor (2) forward.
- Remove the 2 air conditioning compressor bracket bolts (4).
- Remove the air conditioning compressor bracket (3).
- Remove the 3 oil pan to transmission bolts (1).
- Remove the 13 oil pan bolts (3).
- Remove the 2 oil pan bolts (2)
- Remove the oil pan.
Note: Do not remove the bolts.
Note: Pull carefully do not damage the air conditioning compressor.
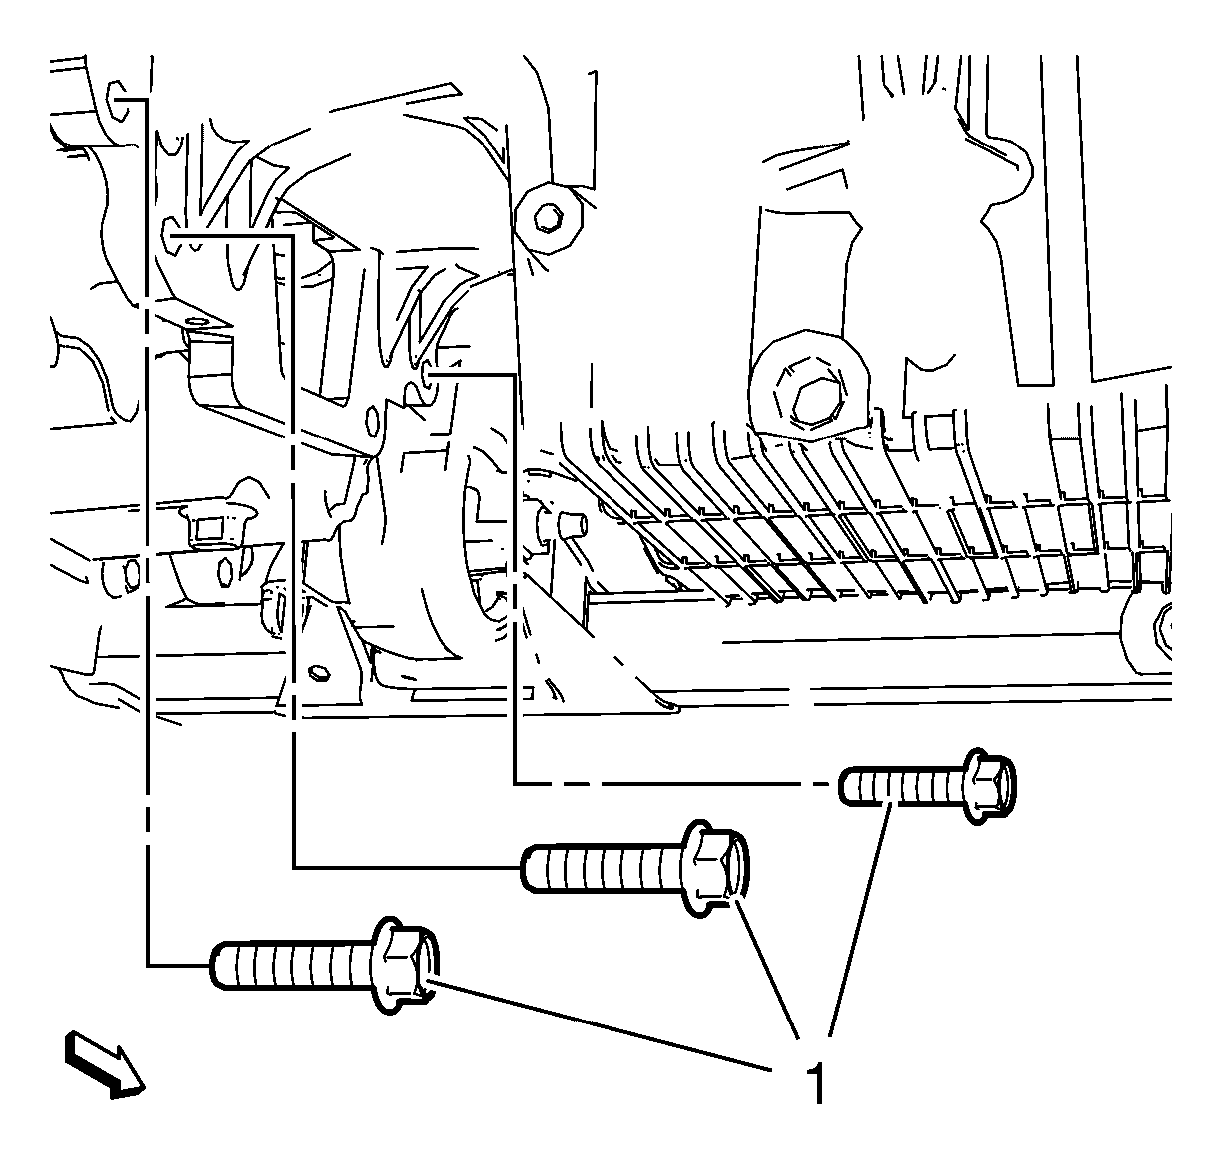
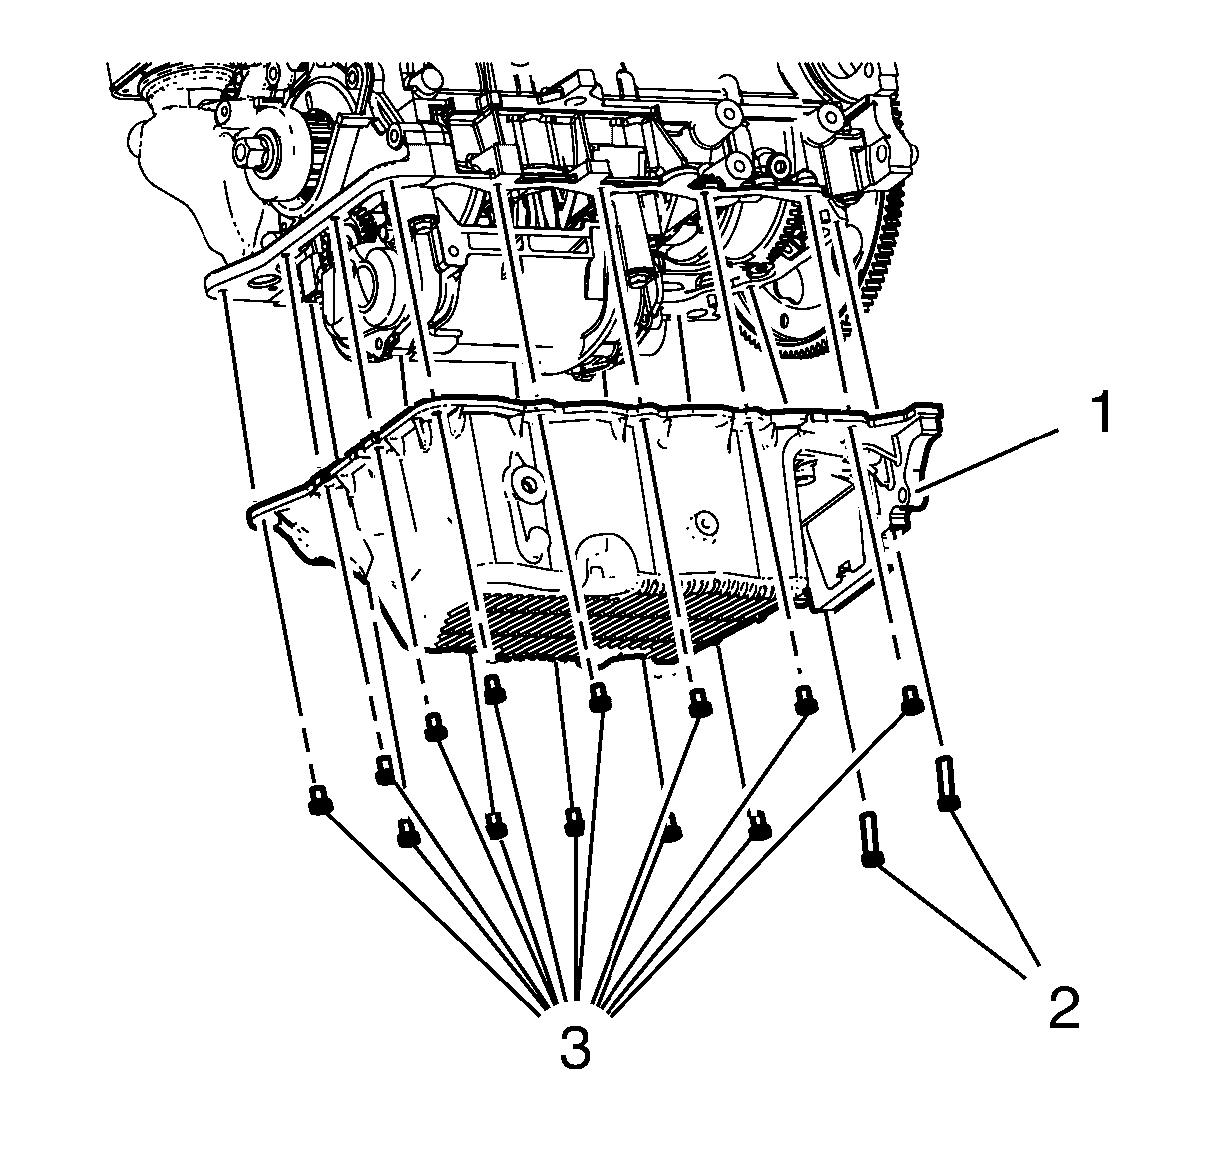
Note: Mark the positions of the oil pan bolts, because of different length.
Note:
• Use a suitable tool. • Be carefully do not damage the oil pan and oil pan sealing surface. Refer to
Separating Parts.
Installation Procedure
- Coat sealant on the oil pan sealing surface (1).
- Install the oil pan (1).
- Install the 2 oil pan bolts (2) and tighten to 11 N·m (98 lb in).
- Install the 13 oil pan bolts (3) and tighten in evenly sequence to 11 N·m (98 lb in).
- Install the 3 oil pan to transmission bolts (1) and tighten to 50 N·m (37 lb ft).
- Pull the solved air conditioning compressor (2) forward.
- Install the air conditioning compressor bracket (3).
- Install the 2 air conditioning compressor bracket bolts (4) 22 N·m (17 lb ft).
- Remove the 2 air conditioning compressor lower bolts (5) 22 N·m (17 lb ft).
- Tighten the 2 air conditioning compressor upper bolts (1) to 22 N·m (17 lb ft).
- Install the charge air cooler inlet air tube (2).
- Install the 3 charge air cooler inlet air tube bolts (1) and tighten to 10 N·m (89 lb in).
- Install the 2 hose clamps (3).
- Install the charge air cooler inlet air tube bolt (4) and tighten to 10 N·m (89 lb in).
- Install the generator and air conditioning compressor and power steering pump belt. Refer to Generator and Air Conditioning Compressor and Power Steering Pump Belt Replacement.
- Install drivetrain and front suspension frame replacement. Refer to LINK.
- Install the front compartment insulator. Refer to Front Compartment Insulator Replacement.
- Lower vehicle full height.
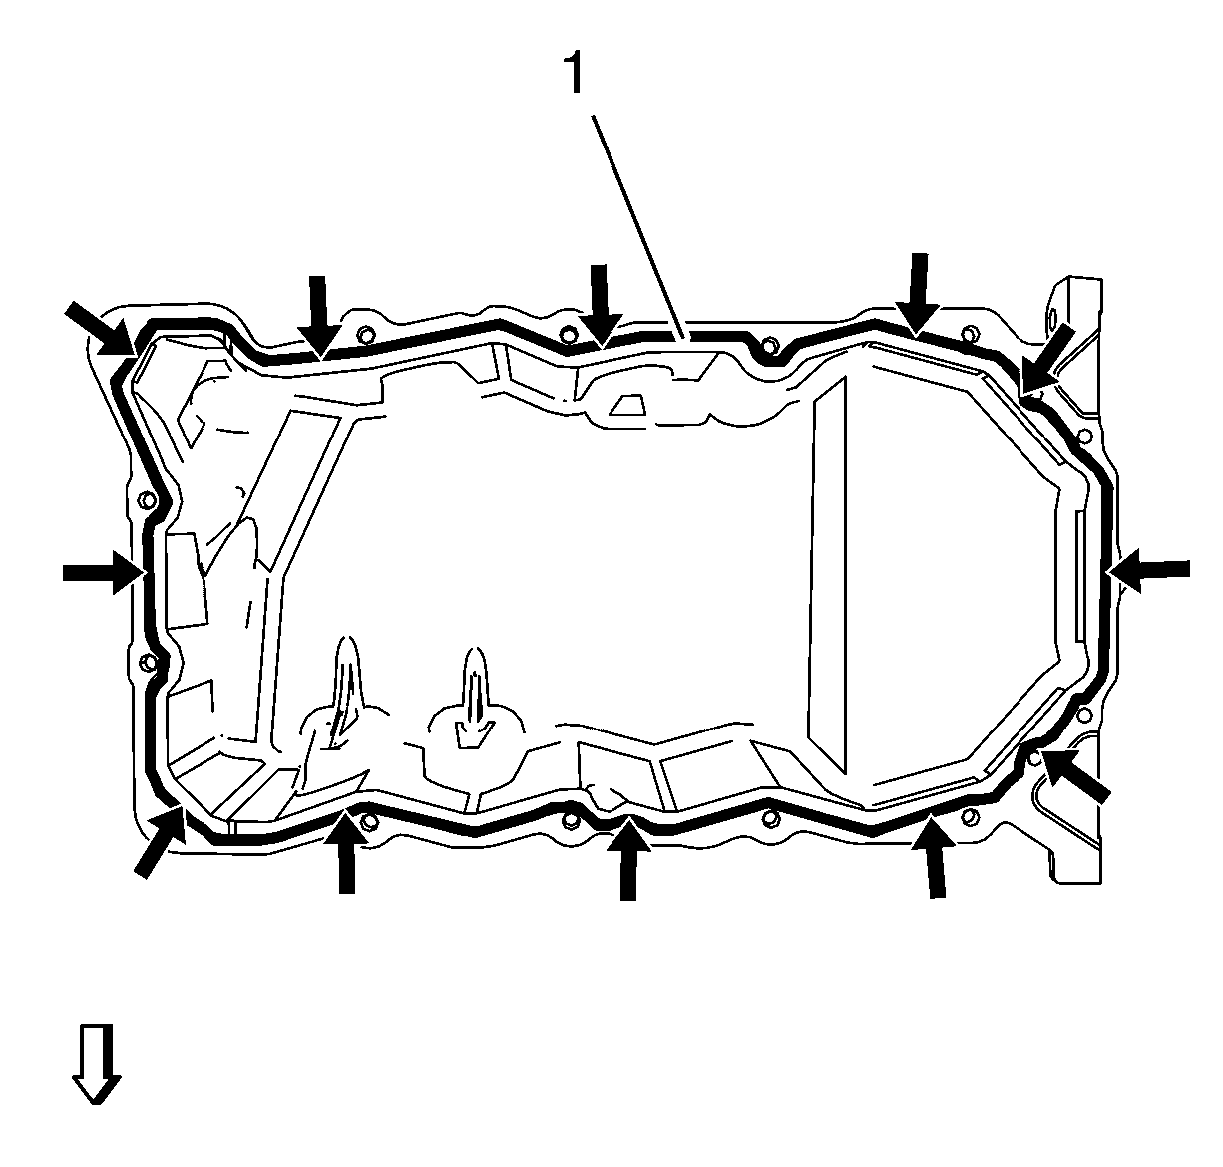
Note:
• Ensure that the oil pan sealing surface is clear of oil, grease and old gasket material. • Do not coat sealant on the oil pan bolt holes, it could damage the oil pan bolt threads or the engine block.

Caution: Refer to Fastener Caution in the Preface section.


Note: Pull carefully do not damage the air conditioning compressor.

Oil Pan Replacement MT D33
Removal Procedure
- Raise vehicle by its full height. Refer to Lifting and Jacking the Vehicle.
- Remove the front compartment insulator. Refer to Front Compartment Insulator Replacement.
- Remove drivetrain and front suspension frame. Refer to Drivetrain and Front Suspension Frame Replacement.
- Remove the generator and air conditioning compressor and power steering pump belt. Refer to Generator and Air Conditioning Compressor and Power Steering Pump Belt Replacement.
- Remove the charge air cooler inlet air tube bolt (4).
- Remove the 2 hose clamps (3).
- Remove the 3 air charge air cooler inlet air tube bolts (1).
- Remove the charge air cooler inlet air tube (2).
- Loosen the 2 air conditioning compressor upper bolts (1).
- Remove the 2 air conditioning compressor lower bolts (5).
- Pull the solved air conditioning compressor (2) forward.
- Remove the 2 air conditioning compressor bracket bolts (4).
- Remove the air conditioning compressor bracket (3).
- Remove the 4 oil pan to transmission bolts (1).
- Remove the 13 oil pan bolts (3).
- Remove the 2 oil pan bolts (2)
- Remove the oil pan.


Note: Do not remove the bolts.
Note: Pull carefully do not damage the air conditioning compressor.
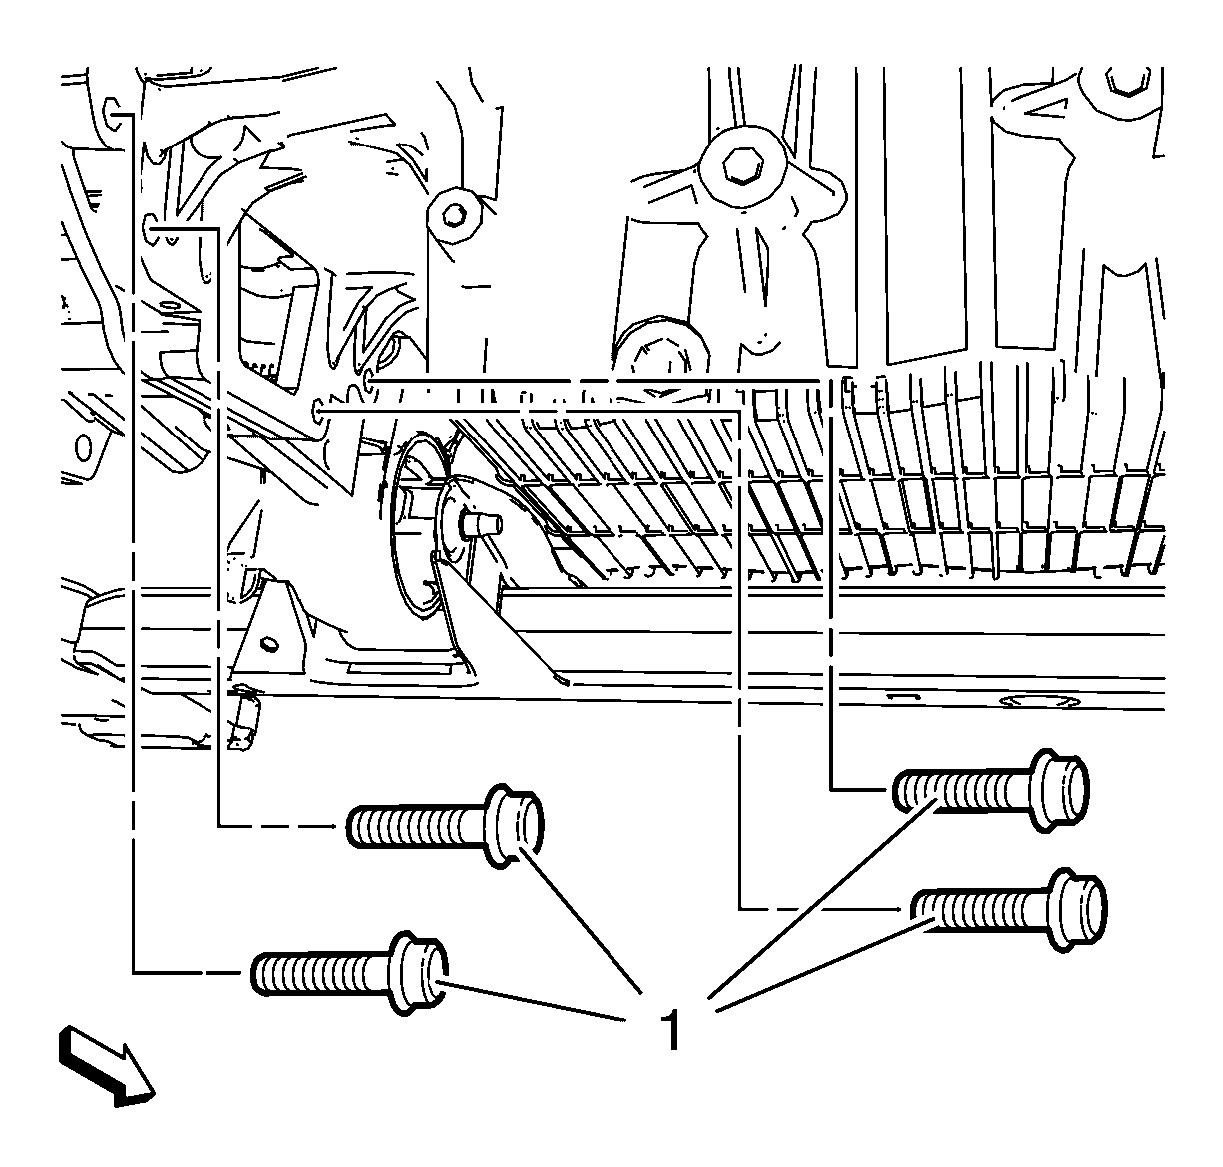

Note: Mark the positions of the oil pan bolts, because of different length.
Note:
• Use a suitable tool. • Be carefully do not damage the oil pan and oil pan sealing surface. Refer to
Separating Parts.
Installation Procedure
- Coat sealant on the oil pan sealing surface (1).
- Install the oil pan (1).
- Install the 2 oil pan bolts (2) and tighten to 11 N·m (98 lb in).
- Install the 13 oil pan bolts (3) and tighten in evenly sequence to 11 N·m (98 lb in).
- Install the 4 oil pan to transmission bolts (1) and tighten to 50 N·m (37 lb ft).
- Pull the solved air conditioning compressor (2) forward.
- Install the air conditioning compressor bracket (3).
- Install the 2 air conditioning compressor bracket bolts (4) 22 N·m (17 lb ft).
- Remove the 2 air conditioning compressor lower bolts (5) 22 N·m (17 lb ft).
- Tighten the 2 air conditioning compressor upper bolts (1) to 22 N·m (17 lb ft).
- Install the charge air cooler inlet air tube (2).
- Install the 3 charge air cooler inlet air tube bolts (1) and tighten to 10 N·m (89 lb in).
- Install the 2 hose clamps (3).
- Install the charge air cooler inlet air tube bolt (4) and tighten to 10 N·m (89 lb in).
- Install the generator and air conditioning compressor and power steering pump belt. Refer to Generator and Air Conditioning Compressor and Power Steering Pump Belt Replacement.
- Install drivetrain and front suspension frame. Refer to Drivetrain and Front Suspension Frame Replacement.
- Install the front compartment insulator. Refer to Front Compartment Insulator Replacement.
- Lower vehicle full height.

Note:
• Ensure that the oil pan sealing surface is clear of oil, grease and old gasket material. • Do not coat sealant on the oil pan bolt holes, it could damage the oil pan bolt threads or the engine block.

Caution: Refer to Fastener Caution in the Preface section.


Note: Pull carefully do not damage the air conditioning compressor.

