Circuit Description
The traction control system uses the antilock brake system in conjunction with the PCM fuel and ignition controls to limit drive wheel slippage during acceleration. The PCM controlled portion of the traction control system reduces engine torque by performing one or both of the following actions:
| • | Retarding the spark timing and alternating the air/fuel ratio |
| • | Shutting off up to three injectors |
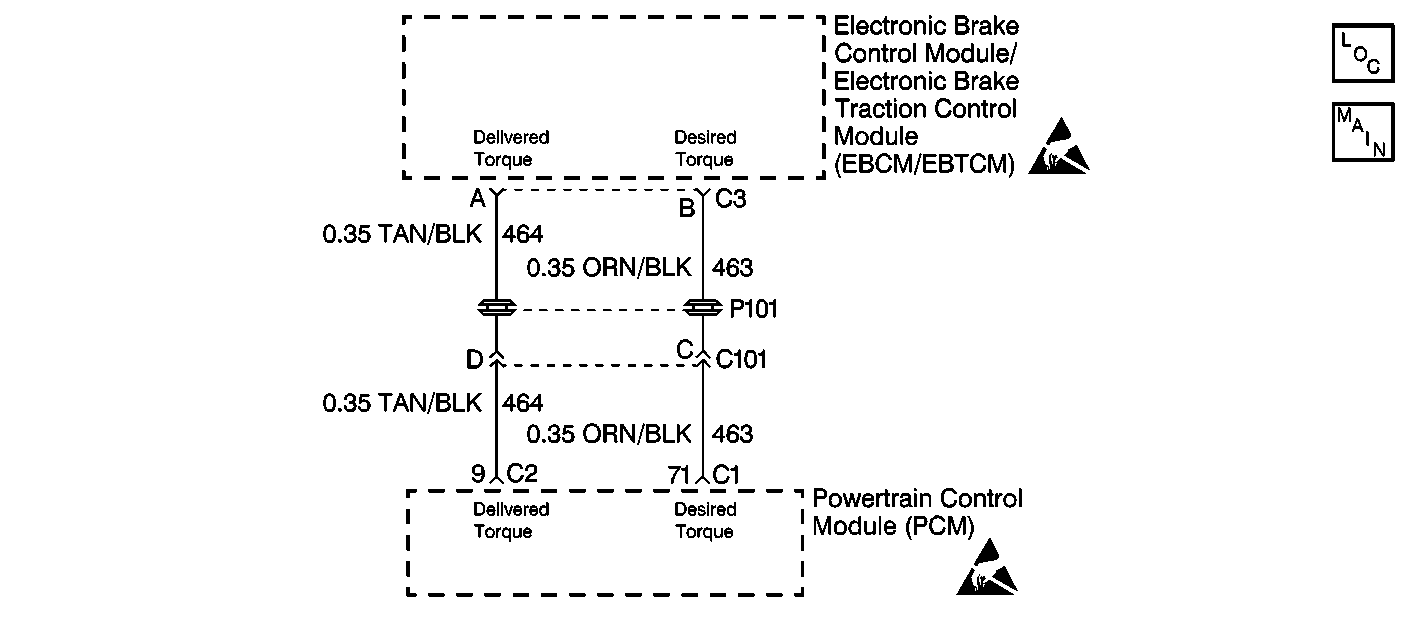
The EBCM/EBTCM sends a torque request to the PCM via a Pulse Width Modulated (PWM) signal requesting the desired torque level for proper traction control system operation (CKT 463). The PCM then provides a delivered torque PWM signal (CKT 464) informing the EBCM/EBTCM how much actual torque the engine produces.
Conditions for Setting the DTC
DTC C1323 will set when one of the following conditions occurs:
| • | A malfunction exists in the delivered torque circuit (CKT 464). |
| • | The signal is out of range. |
Action Taken When the DTC Sets
| • | A malfunction DTC stores. |
| • | The TCS disables. |
| • | The amber TCS indicator turns on. |
Conditions for Clearing the DTC
| • | The condition responsible for setting the DTC no longer exists and the Scan Tool Clear DTC function is used. |
| • | 100 drive cycles pass with no DTC detected. |
Diagnostic Aids
Use the enhanced diagnostic function of the Scan Tool in order to measure the frequency of the malfunction. Refer to the Scan Tool manual or Scan Tool Diagnostics located in this section for the procedure.
Thoroughly inspect any circuitry that may cause the intermittent complaint for the following conditions:
| • | Rubbed-through wire insulation |
| • | A broken wire inside the insulation |
| • | Backed out terminals |
| • | Improper mating |
| • | Broken locks |
| • | Improperly formed or damaged terminals |
| • | Poor terminal-to-wiring connections |
| • | Physical damage to the wiring harness |
Important: Zero the J 39200 test leads before making any resistance measurements.
Step
| Action | Value(s) | Yes | No | ||||
|---|---|---|---|---|---|---|---|---|
1 | Was the Diagnostic System Check performed? | -- | Go to Diagnostic System Check | |||||
2 |
Is the voltage close to the specified value? | 10.0-14.0 V | Go to Step 3 | Go to Step 6 | ||||
3 |
Does the current reading remain between the specified values? | 0.001-0.5A (1-500mA) | Go to Step 11 | Go to Step 4 | ||||
4 |
Is the voltage equal to the specified value? | 0V | Go to Step 10 | Go to Step 5 | ||||
5 | Locate and repair the short to voltage in the delivered torque control circuit. Is the repair complete? | -- | Go to Step 16 | -- | ||||
6 |
Is the fuse blown? | -- | Go to Step 7 | Go to Step 8 | ||||
7 |
Is the repair complete? | -- | Go to Step 16 | -- | ||||
8 |
Is the voltage near the specified value? | 10.0-14.0 V | Go to Step 9 | Go to Step 13 | ||||
9 |
Did you find and repair an open or short to ground? | Go to Step 16 | Go to Step 10 | |||||
10 |
Did you find and repair a poor connection? | -- | Go to Step 16 | Go to Step 14 | ||||
11 |
Is the frequency within the specified range? | 120-135Hz | Go to Diagnostic Aids | Go to Step 12 | ||||
12 |
Did you find and repair a poor connection? | -- | Go to Step 16 | Go to Step 15 | ||||
13 | Locate and repair an open in the ignition feed circuit to the EBTCM. Is the repair complete? | -- | Go to Step 16 | Go to Step 15 | ||||
14 | Replace the EBTCM. Go to Electronic Brake and Traction Control Module Replacement Is the repair complete? | -- | Go to Step 16 | -- | ||||
15 |
Is the repair complete? | -- | Go to Step 16 | -- | ||||
16 |
Does the scan tool indicate the DTC C1323 failed? | -- | Go to Step 2 | Go to Diagnostic System Check |
