For 1990-2009 cars only
Instrument Panel Cluster Trim Plate Bezel Replacement Chevrolet
Removal Procedure
- Tilt the steering wheel to the full down position.
- Remove the left closeout/insulator panel . Refer to Instrument Panel Insulator Panel Replacement - Left Side .
- Remove the knee bolster trim panel. Refer to Driver Knee Bolster Panel Replacement .
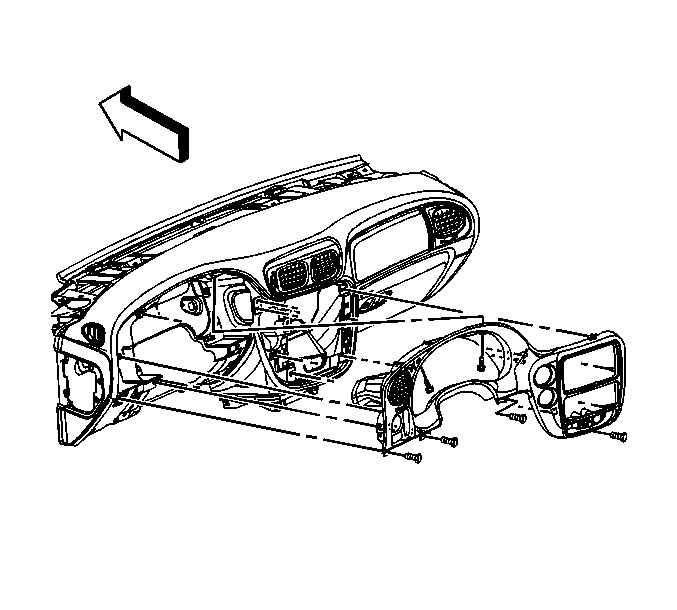
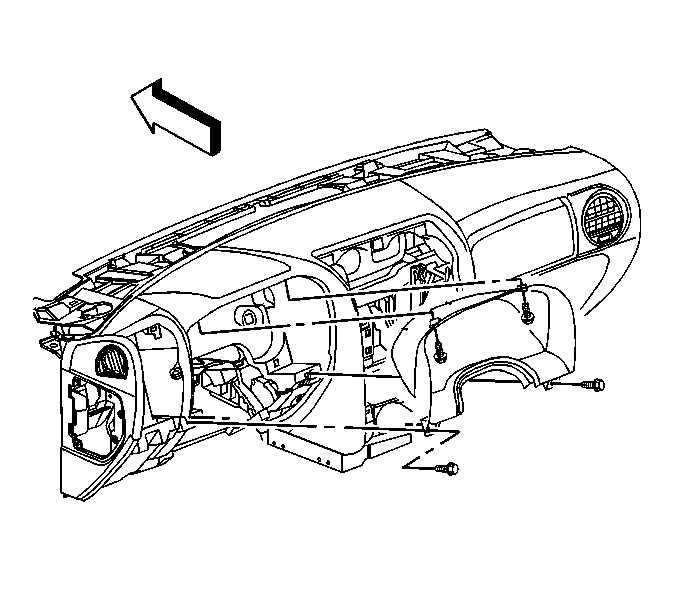
- Remove the screws retaining the bezel to the instrument panel.
- Remove the bezel from the instrument panel.
- If equipped, remove the transfer case shift control switch. Refer to Transfer Case Shift Control Switch Replacement in Transfer Case.
- Remove the rear wiper washer switch. Refer to Rear Window Wiper and Washer Switch Replacement in Wipers Washer Systems.
- If equipped, remove the cigar lighter or 12-volt power supply outlets. Refer to 12-Volt Accessory Power Receptacle Replacement in Power Outlets.
- Remove the bezel from the vehicle.
Installation Procedure
- If equipped, install the cigar lighter or 12-volt power supply outlets. Refer to 12-Volt Accessory Power Receptacle Replacement in Power Outlets.
- Install the rear wiper washer switch. Refer to Rear Window Wiper and Washer Switch Replacement in Wipers Washer Systems.
- If equipped, install the transfer case shift control switch. Refer to Transfer Case Shift Control Switch Replacement in Transfer Case.
- Install the bezel to the instrument panel.
- Install the screws retaining the bezel to the instrument panel.
- Install the knee bolster trim panel. Refer to Driver Knee Bolster Panel Replacement .
- Install the left closeout/insulator panel. Refer to Instrument Panel Insulator Panel Replacement - Left Side .
Notice: Refer to Fastener Notice in the Preface section.
Tighten
Tighten the screws to 2.5 N·m (22 lb in).
Instrument Panel Cluster Trim Plate Bezel Replacement GMC, Buick
Removal Procedure
- Tilt the steering wheel to the full down position.
- Remove the left closeout/insulator panel . Refer to Instrument Panel Insulator Panel Replacement - Left Side .
- Remove the knee bolster trim panel. Refer to Driver Knee Bolster Panel Replacement .
- Remove the screws that retain the bezel to the instrument panel.
- Remove the bezel from the instrument panel.
Installation Procedure
- Install the bezel to the instrument panel.
- Install the screws that retain the bezel to the instrument panel.
- Install the knee bolster trim panel. Refer to Driver Knee Bolster Panel Replacement .
- Install the left closeout/insulator panel. Refer to Instrument Panel Insulator Panel Replacement - Left Side .
Notice: Refer to Fastener Notice in the Preface section.
Tighten
Tighten the screws to 2.5 N·m (22 lb in).
