For 1990-2009 cars only
Rear Side Door Window Regulator Replacement TrailBlazer, Envoy, Bravada
Removal Procedure
- Remove the door trim panel. Refer to Rear Side Door Trim Panel Replacement .
- Remove the water deflector. Refer to Rear Side Door Water Deflector Replacement .
- Remove the speaker. Refer to Radio Rear Side Door Speaker Replacement in Entertainment.
- Loosen the regulator window carrier bolts.
- Raise and support the window.
- Disconnect the electrical connector from the regulator motor.
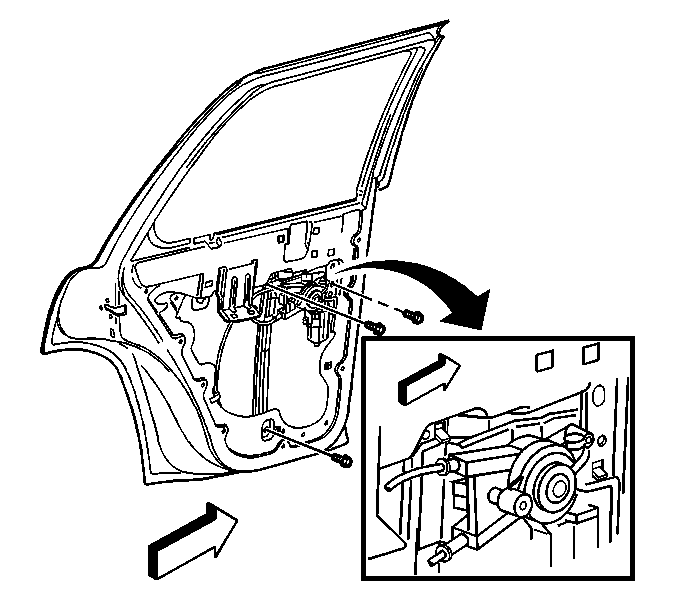
- Remove the 3 bolts that retain the window regulator assembly to the door.
- Remove the window regulator assembly from the door.

Installation Procedure
- Install the window regulator assembly to the door.
- Install the 3 bolts that retain the window regulator assembly to the door.
- Connect the electrical connector to the regulator motor.
- Remove the window support and lower the window onto the regulator window carrier.
- Loosely tighten the regulator window carrier bolts.
- Operate the window upward to the full up position, ensuring the window remains in the run channels.
- Install the speaker. Refer to Radio Rear Side Door Speaker Replacement in Entertainment.
- Install the water deflector. Refer to Rear Side Door Water Deflector Replacement .
- Install the door trim panel. Refer to Rear Side Door Trim Panel Replacement .

Notice: Refer to Fastener Notice in the Preface section.
Tighten
Tighten the bolts to 10 N·m (88 lb in).
Tighten
Tighten the regulator window carrier bolts to 10 N·m (88 lb in).
Rear Side Door Window Regulator Replacement TrailBlazer EXT, Envoy XL
Removal Procedure
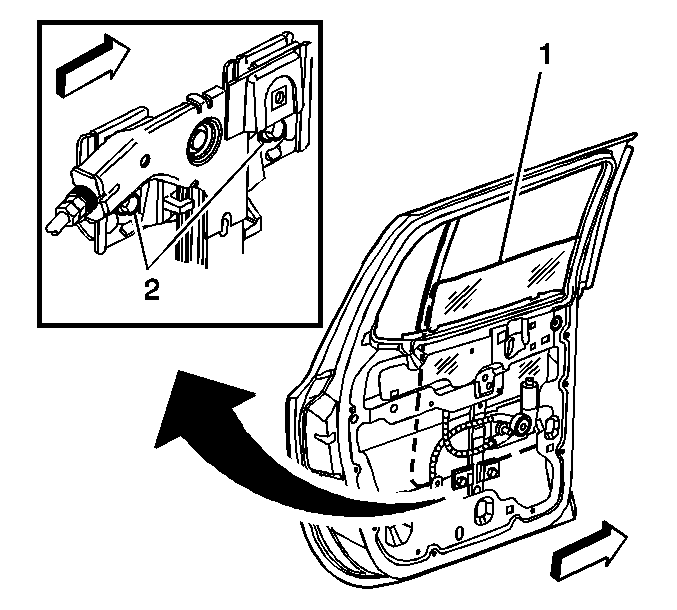
- Lower the window to the midway point (1), if possible.
- Remove the rear door trim panel. Refer to Rear Side Door Trim Panel Replacement .
- Remove the water deflector. Refer to Rear Side Door Water Deflector Replacement .
- Loosen the regulator glass carrier bolts (2).
- Slide the window to the full up position and tape it to the window frame.
- Disconnect the electrical connector from the window regulator motor.
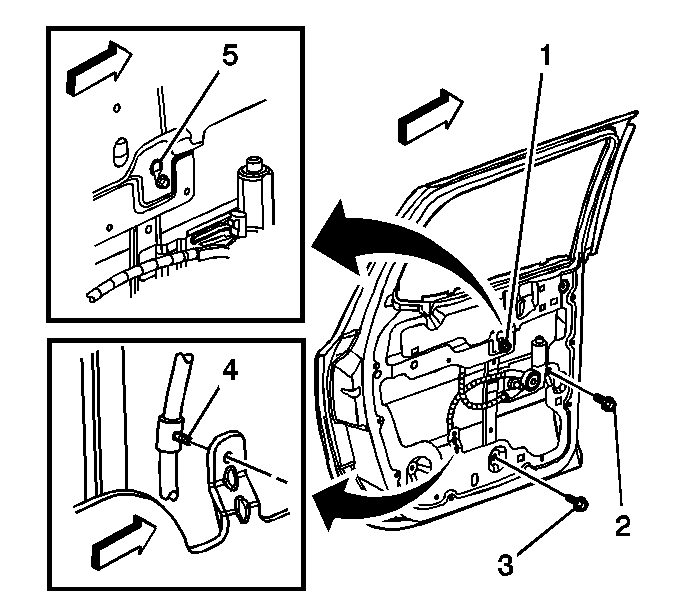
- Disconnect the retainer (4) securing the regulator cable to the door.
- Remove the 2 lower regulator retaining bolts (2, 3).
- Loosen the top regulator retaining bolt (1).
- Remove the window regulator, lifting up and out from the keyhole slot (5) on the rear door inner panel and through the access hole.


Important: If the regulator assembly will not operate, removing the top regulator retaining bolt (1) completely will allow the regulator to be removed.
Installation Procedure
- Install the regulator to the door through the access hole.
- Install the top regulator retaining bolt (1) through the keyhole slot (5) in the rear door inner panel.
- Install the 2 lower regulator retaining bolts (2, 3).
- Tighten the bolts in the following sequence.
- Tighten the lower regulator retaining bolt (3) to 10 N·m (89 lb in).
- Tighten the upper regulator retaining bolt (1) to 10 N·m (89 lb in).
- Tighten the middle regulator retaining bolt (2) to 10 N·m (89 lb in).
- Connect the regulator cable retainer (4) on the door.
- Connect the electrical connector to the rear window regulator motor.
- Remove the tape and position the rear window to the regulator glass carrier plate.
- Loosely tighten the regulator glass carrier bolts (2).
- Operate the window upward to the full up position, ensuring the window remains in the run channels.
- Install the water deflector. Refer to Rear Side Door Water Deflector Replacement .
- Install the trim panel. Refer to Rear Side Door Trim Panel Replacement .

Notice: Refer to Fastener Notice in the Preface section.
Tighten

Tighten
Tighten the regulator glass carrier bolts (2)
to 10 N·m (89 ft in).
