Exterior Lamps
The exterior lighting system consists of the following lamps:
| • | The daytime running lamps (DRL) |
| • | The park/turn signal lamps |
| • | The front side marker lamps |
| • | The stop lamps and center high-mounted stop lamp |
| • | The license plate lamps |
Headlamps
All models are equipped with composite headlamps. Each composite headlamp
consists of 1 halogen bulb, providing both high and low-beam operation,
and a headlamp assembly. The bulb is separate from the assembly. The headlamp
assembly does not need to be removed from the vehicle in order to replace
the bulb. It is not necessary to re-aim the headlamps when replacing only
the bulb.
The turn signal/headlamp switch lever is located on the left side of
the steering column. The switch lever controls both the low-beam and high-beam
headlamp operations. The lever is only serviceable as part of the combination
switch. For combination switch removal and installation procedures, refer
to
Inflatable Restraint Steering Wheel Module Coil Replacement
in SIR. A twist type knob on the end of the switch
lever controls the operation of the parking lamps and the headlamps. A solid
tone will sound as a reminder if you open the drivers door with the key
out of the ignition and the park lamps or the headlamps on. When either
the parking lamps or headlamps are activated, the following also illuminate:
| • | The rear license plate lamps |
| • | The instrument cluster assembly lamps |
| • | The heater control unit lamp |
| • | The manual selector lever lamp |
The TAIL fuse applies voltage to the coil and the contacts in the tail
lamp relay at all times. With the turn signal/headlamp switch lever in the
park lamp or headlamp position, the coil is provided a ground through the
turn signal/headlamp switch to G200. When the ambient light sensor senses
a low light condition, a path to ground is provided to the coil through
the sensor to G200. When the coil energizes, the contacts in the tail relay
close and voltage is applied to the lamps mentioned above. All of the lamps
illuminate because the lamps are grounded permanently.
Low Beam System Operation
The headlamps may be turned on two different ways. First, when the ignition
switch is turned to the ON position, voltage is applied to the ambient light
sensor through the DEF Fuse. The ambient light sensor permanently grounds
to G200. When the ambient light sensor senses a low light condition, a path
to ground is provided to the coil of the headlamp relay through the ambient
light sensor. This same signal is also provided to the DRL control module
and disables DRL operation. Voltage is provided from the H/L Fuses, through
the DRL diode to the coil of the headlamp relay. The relay contacts close
providing a ground to the headlamps. The headlamps illuminate at full intensity.
Second, when the end of the of the turn signal/headlamp switch lever is
turned to the second detent position, the headlamps illuminate.
The daytime running lamps (DRL) control module and the turn signal/headlamp
switch control the headlamps. The H/L, L and H/L, R Fuses supply voltage
to the headlamps, the high beam indicator and the headlamp relay through
the DRL diode at all times. With the switch in the HEAD position and the
dimmer switch in low, ground is provided to the low beam filaments through
the dimmer switch and the closed contacts of the Headlamp Relay to G200.
The low beam filaments illuminate when the ground is supplied.
High Beam System Operation
The high-beam headlamp operation is controlled using the turn signal/headlamp
switch lever on the steering column. In order to change headlamp operation
from low-beam to high-beam, push the switch lever toward the instrument
panel until the detent is felt and release. With the switch lever in the high
position, the high beam filaments in the headlamps ground through the dimmer
switch, through the closed contacts of the headlamp relay to G200. The high
beam filaments will light when the ground is supplied. The high-beam indicator-blue
in the instrument cluster will light during high-beam headlamp operation.
The ground path for the high beam indicator is the same as the high beam
filaments. In order to change headlamp operation back to low-beam operation,
pull the turn signal switch lever toward the driver until the detent is
felt and release.
Flash-to-Pass System Operation
The Flash-to-Pass feature allows the driver to signal the driver of
another vehicle of his intention to pass. This is achieved by pulling the
lever toward the driver, which will cause the high beam operation to illuminate
until the lever is released. The flash-to-pass feature will function with
the switch lever in either the OFF, the parklamp, or the low-beam headlamp
setting.
With the dimmer switch in the pass position, the high beam filaments
in the headlamps ground through the dimmer switch to G200. The high beam
filaments will light with ground supplied. The ground path for the high
beam indicator is the same as the high beam filaments.
Daytime Running Lamps (DRL)
Daytime running lamps (DRL) are standard equipment on all models. Operating
through the low beams at 80 percent intensity of the normal output, the DRL
system operates under the following conditions:
| • | When the engine is running. |
| • | When the parking brake is not applied. |
| • | When the turn signal/headlamp switch lever is in either the OFF
or the park lamp position. |
| • | When the ambient light sensor senses a bright light condition. |
The DRL control module receives voltage through the IG fuse when the
ignition switch is in the ON or START position and is permanently grounded
at G200.
The following will prevent DRL operation:
| • | When the parking brake is engaged, the parking brake switch closes,
providing a ground to the DRL control module, disabling the DRL operation. |
| • | When the generator is not running, a switch in the generator closes,
providing a ground to the DRL control module, disabling the DRL operation. |
| • | When the turn signal/headlamp switch is in the headlamp position,
providing a ground to the DRL control module, disabling the DRL operation. |
When all of the conditions for DRL operation are met, the DRL control
module provides a ground for the low beam filaments in the headlamps through
the DRL control module to G200. The H/L, L and H/L, R Fuses supply the voltage
to the headlamps at all times. The low beam filaments will light at 80 percent
intensity.
Park/Turn Signal Lamps
The front park/turn signal lamps are integrated into the headlamp assemblies.
The front lamp lens is clear. It contains one amber double filament bulb.
The rear turn signal lamps are integrated into the tail lamp. An amber lens
covers the rear turn signal lamp. It contains one clear single filament
bulb. The turn signal/headlamp switch lever is located on the left side
of the steering column. Turn the end of the switch lever to the first detent
position in order to turn on the park lamps. The parking lamp filament
illuminates when either the parking lamps or headlamps are activated.
When a turn is signaled, the appropriate front park lamp and rear turn
signal lamp flashes to signal a turn. The turn signals operate only with
the ignition switch in the ON position and will not operate during hazard
flasher operation. When making a partial turn, such as when changing lanes,
the driver has the option of moving the lever to a detent stop. The turn
signal lamps and the turn signal indicator will continue to flash as long
as the lever is held in this position and will cancel automatically when
the lever is released. The detent position allows a lane change or shallow
turn to be made without failing to cancel the turn signal lamp. Moving
the lever past the detent position to its furthest upward or downward
position will provide conventional turn signal operation. Turn signal
operation is controlled by the turn/hazard signal flasher that is located
on the back of the junction block and the turn signal/headlamp switch lever.
With the ignition switch in the ON or the START position, voltage applies
through the TURN fuse and the normally closed contacts of the hazard switch
and the turn/hazard flasher to the turn switch. When the switch lever is
moved to the left turn position, voltage applies to the left turn indicator
in the instrument cluster, the left front turn signal lamp, and the left
rear turn signal lamp. The lamps are ground permanently. The lamps light
immediately and start to flash 80-90 times a minute while the solid
state timing unit in the turn/hazard flasher operates.
The lamps operate similarly when the switch lever is moved to the right
turn position.
The turn signal lever is only serviceable as part of the combination
switch. For combination switch removal and installation procedures, refer
to
Inflatable Restraint Steering Wheel Module Coil Replacement
in SIR.
Front Side Marker Lamps
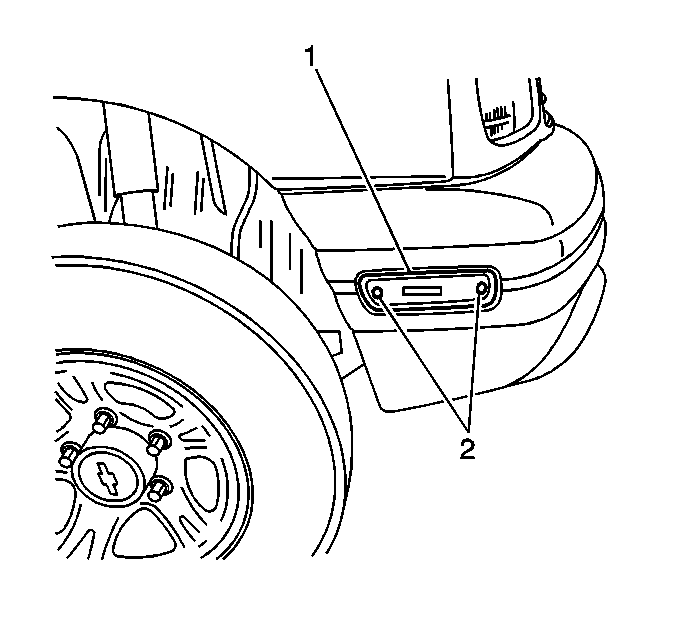
The front side marker lamps (1) are mounted in the front bumper
fascia. Each lamp consists of a single filament bulb covered by amber
colored lenses. They are operational any time the parking lamps or headlamps
are activated.
Hazard Lamps
The hazard switch is in the center of the instrument panel to the right
of the instrument panel cluster. The hazard switch controls the operation
of the hazard lamp circuit. Press the hazard switch in order to cause the
turn/hazard flasher to disengage the turn signal circuit. This will engage
the hazard lamp circuit. Voltage applies at all times through the HAZ fuse
to the normally open contacts of the hazard switch. With the hazard switch
pressed, the contacts close. When the contacts close voltage applies through
the turn/hazard flasher, back through the hazard switch, to the following
components:
| • | The turn indicators in the instrument panel cluster |
| • | The front turn signal lamps |
| • | The rear turn signal lamps |
The lamps are ground permanently. The lamps light immediately and start
to flash 80-90 times a minute while the solid state timing unit in
the turn/hazard flasher operates. The turn/hazard flasher is located on
the back of the junction block. The junction block is located beneath the
left side of the instrument panel and is mounted to the left front side
door hinge pillar. The hazard lamp circuit operates regardless of the position
of the ignition switch.
Press the hazard switch again in order to disengage the hazard lamp
circuit. This returns the turn/hazard flasher to the turn signal mode.
Refer to
Hazard and Turn Signal Flasher Replacement
for turn/hazard flasher removal and installation procedures.
Tail Lamps
The tail lamps are located on the vehicle body at each side of the endgate
on 2-door models or the rear door on 4-door models. Each tail
lamp consists of the following:
| • | A clear single filament turn signal bulb |
| • | A clear single filament backup lamp bulb |
| • | A clear double filament stop/tail lamp bulb |
The tail lamp lens is multi colored. A red lens covers the stop lamp,
an amber lens covers the turn signal lamp and a clear lens covers the backup
lamp.
Stop lamps and Center High-Mounted Stop lamp
The high-mounted stop lamp contains 1 bulb on 2-door models
and attaches to the top of the endgate. The high-mounted stop lamp
contains 5 bulbs on 4-door models and is located at the top
of the rear door window.
Each of the tail lamps also contains a double filament stop lamp bulb.
The stop lamp filament lights under the following conditions:
| • | The stop lamp switch is closed. The stop lamp is designed to operate
in conjunction with the tail lamps whenever the brake pedal is depressed. |
| • | The parking lamps are activated. |
| • | The headlamps are activated. |
Voltage applies at all times through the STOP fuse to the normally open
contacts of the stop lamp switch. When the brake pedal is depressed, the
contact in the stop lamp switch close. The voltage applies to the tail/stop
lamps in the left and right tail lamps and the center high-mounted stop
lamp. The lamps are grounded to G400 and G401. The stop lamps will operate
even with the tail lamps on.
Backup Lamps
The backup lamps are incorporated into the tail lamps. The backup lamps
operate with the ignition switch in the ON position. Placing the transmission
in the reverse (R) position closes the backup lamps circuit and turns the
backup lamps on. Voltage applies through the TURN fuse to one of the following
components:
| • | The backup lamp switch on manual transmissions. |
| • | The park/neutral position (PNP) switch on 3-speed automatic
transmissions. |
| • | The transmission range switch on 4-speed automatic transmissions. |
The voltage applies to the backup lamps in the tail lamps. Since the
tail lamps are ground permanently at G400, the lamps will light.
License Plate Lamps
There are 2 license plate lamps located in the rear license plate
housing directly over the license plate. Each license plate lamp contains
1 clear, single filament bulb. The license plate lamp bulb filament
illuminates when either the parking lamps or the headlamps are activated.
