Tools Required
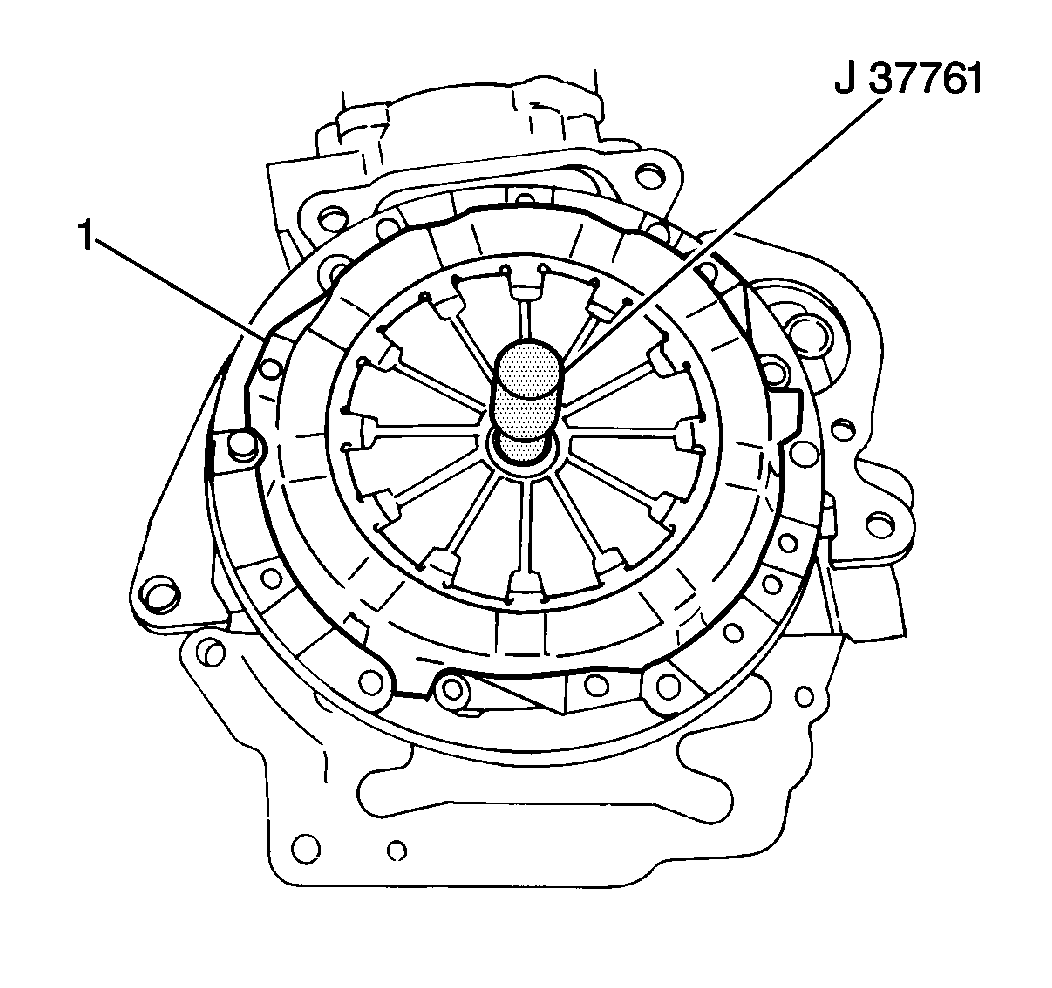
J 37761 Clutch Alignment Arbor
Removal Procedure
- Disconnect the negative battery cable (1).
- Remove the center console from the vehicle. Refer to Front Floor Console Replacement in Instrument Panel, Gages and Console.
- Remove the shifter boot from the shift lever.
- Remove the gearshift control lever from the gearshift lever case. Refer to Gearshift Control Lever Replacement .
- Raise and support the vehicle. Refer to Lifting and Jacking the Vehicle in General Information.
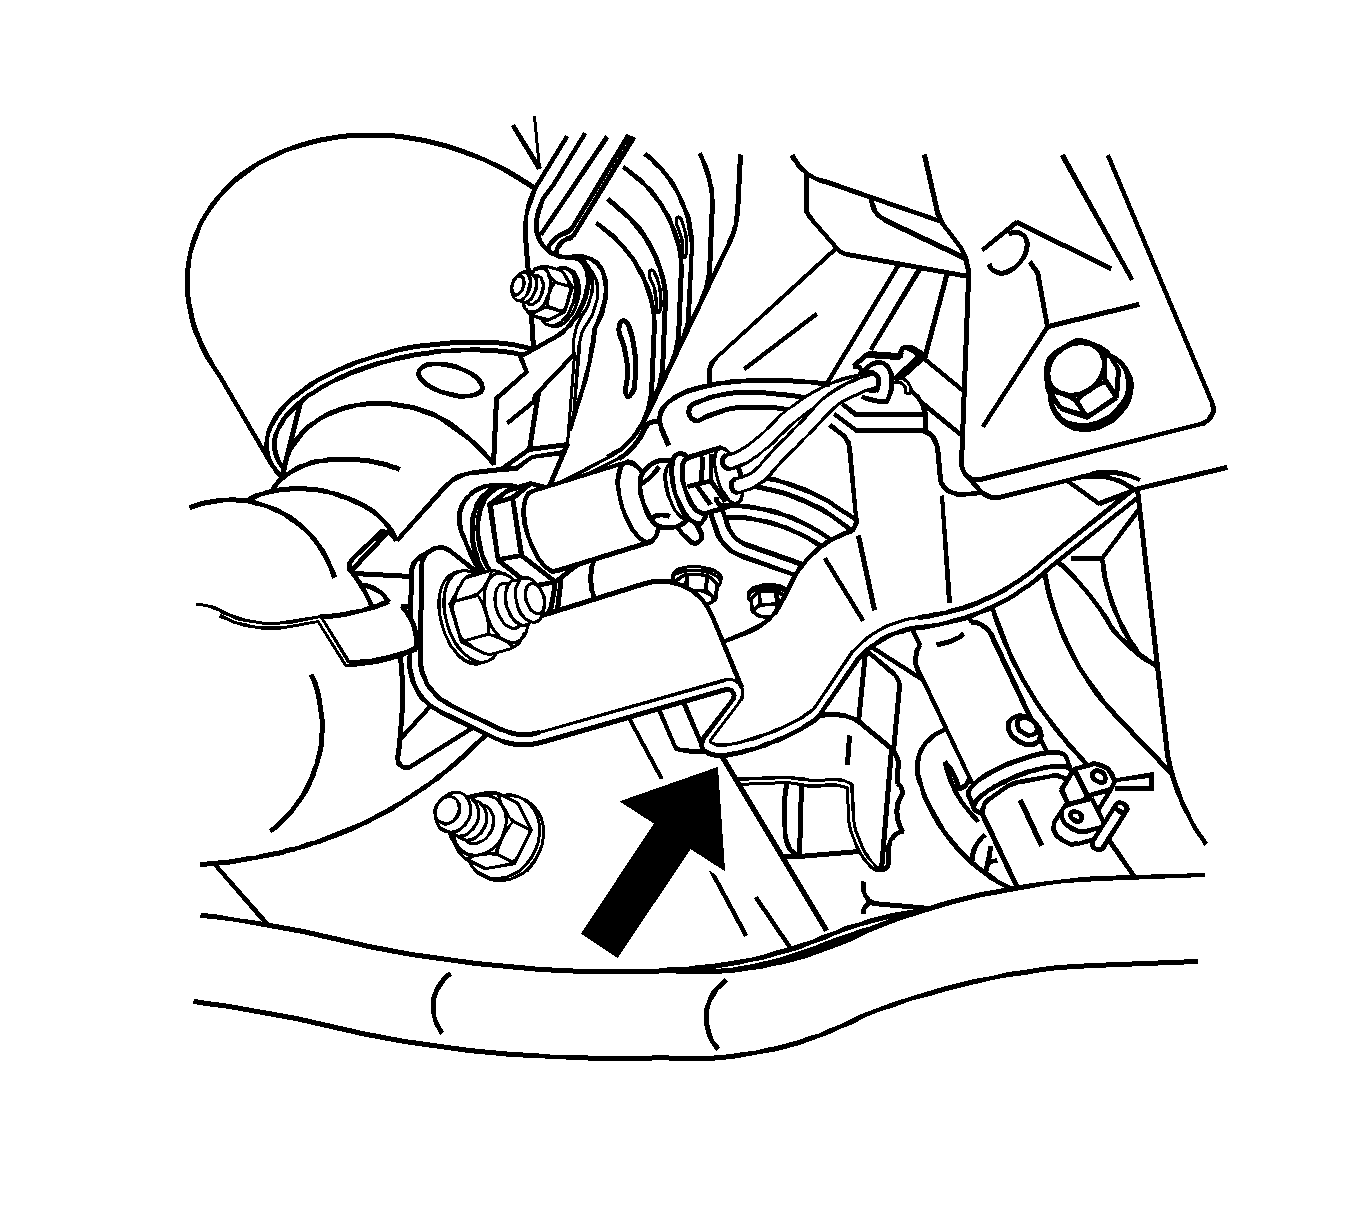
- Disconnect the vehicle speed sensor (VSS) switch electrical connector.
- Remove the VSS retaining bolt (1), then disconnect the ground strap from the transmission.
- Loosen the wire harness retainer on the right side of the transmission, then position harness out of the way.
- Remove the engine exhaust support from the transmission.
- Place a drain pan or a suitable container under the transmission tail housing.
- Place index marks on the propeller shaft pinion flange yoke and the differential pinion flange to ensure correct installation.
- Remove the following items from the vehicle:
- Remove the 2 bolts from the flywheel inspection cover, then remove the cover from the transmission.
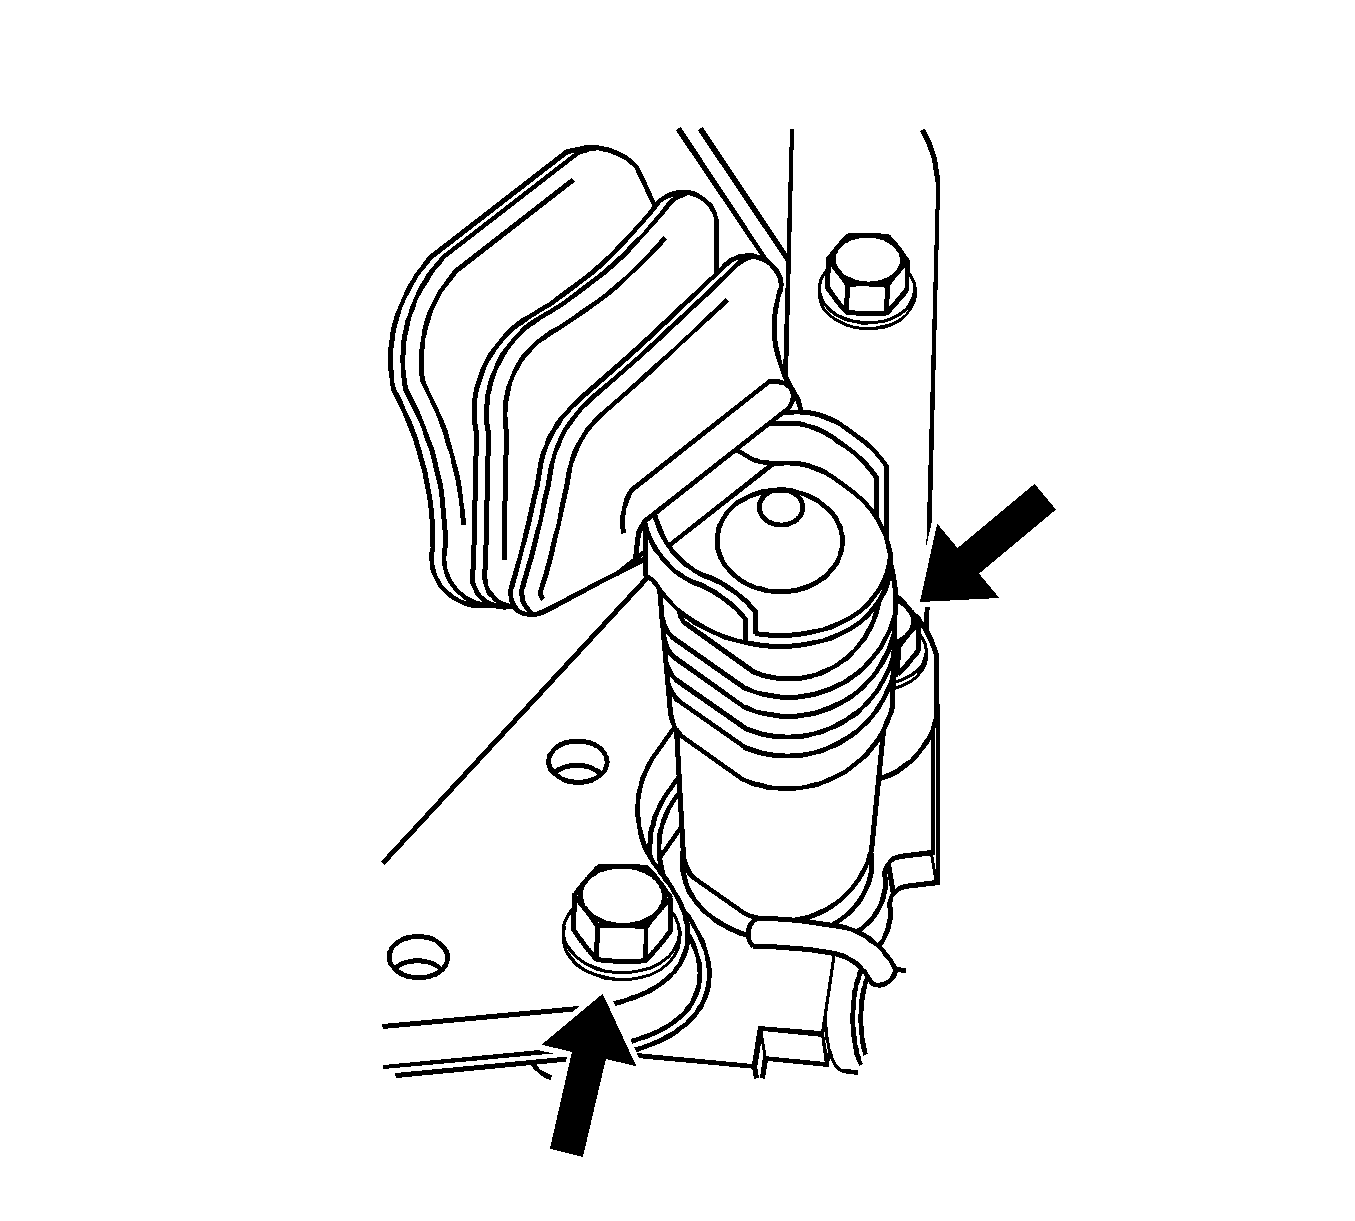
- Remove the 2 hydraulic slave cylinder retaining bolts from the transmission, then position the slave cylinder aside.
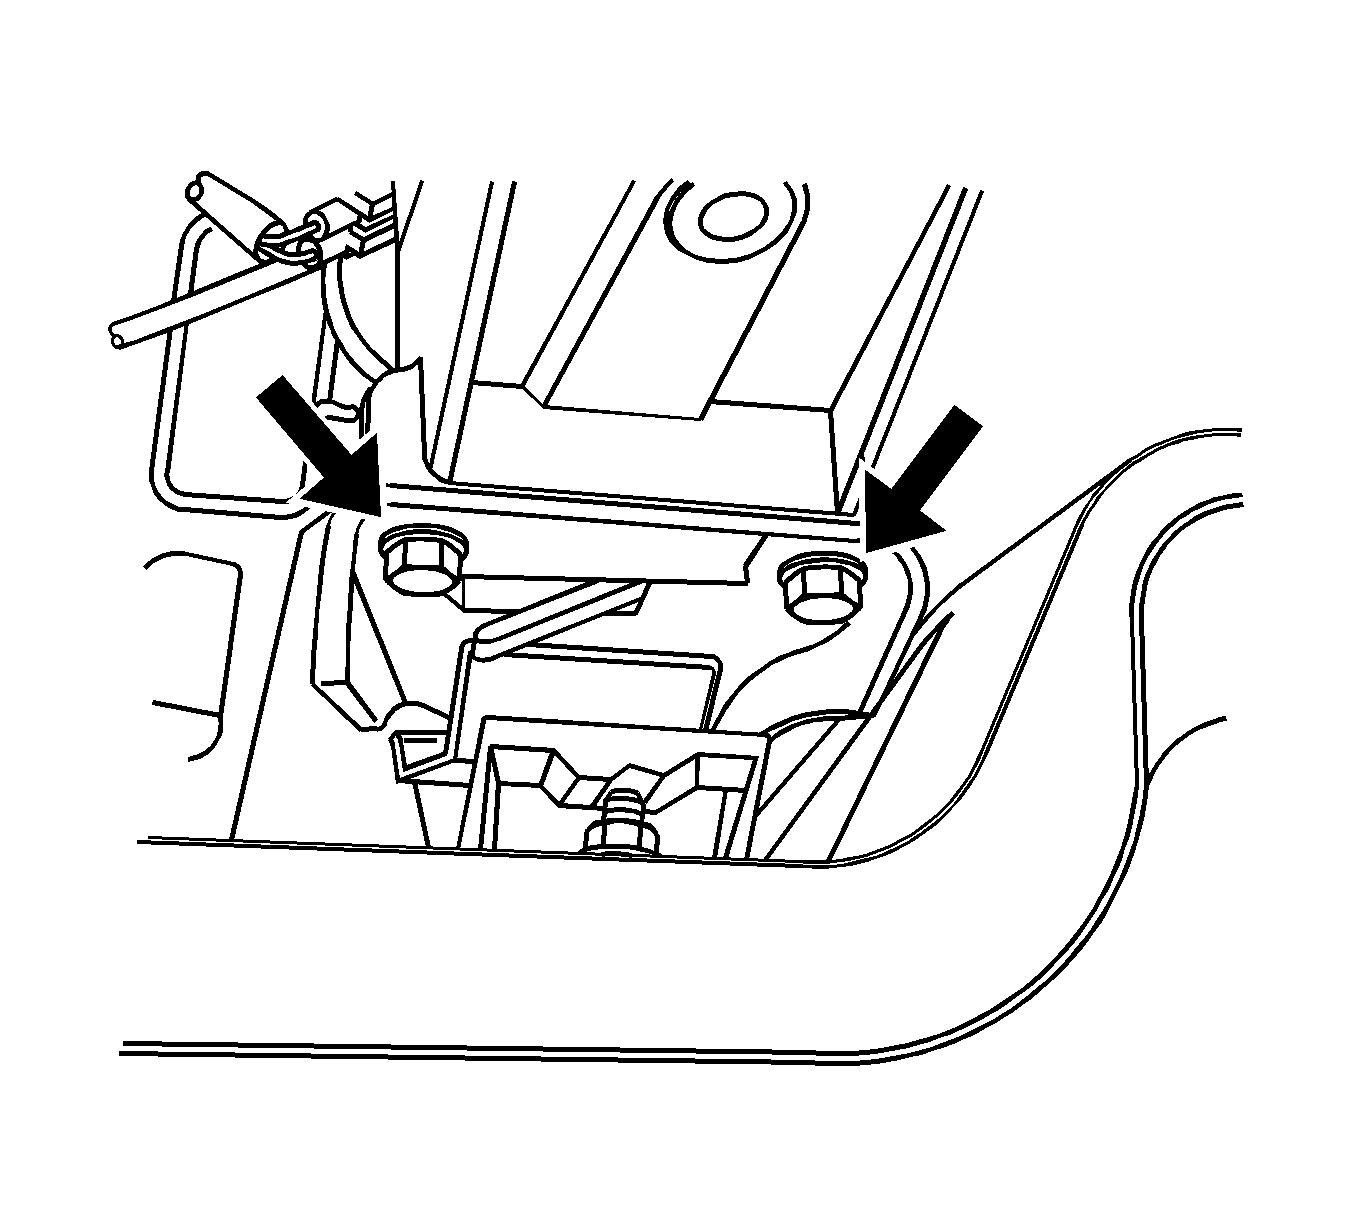
- Remove the 2 bolts from the rear transmission mount.
- Support the transmission with a suitable hydraulic jack.
- Support the front of the engine assembly with a suitable jack and a block of wood.
- Remove the transmission crossmember from the vehicle
- Remove the 2 right side transmission to engine bolts.
- Position the transmission ground strap aside.
- Remove the right upper transmission to engine bolt.
- Remove the upper left transmission retaining nut.
- Remove the 2 lower transmission retaining nuts.
- Remove the drain pan from under the vehicle.
- Disconnect the backup light switch connector from the switch.
- Inspect the transmission. For disassembly and inspection procedures, refer to Transmission Unit Repair Manual.
Caution: Unless directed otherwise, the ignition and start switch must be in the OFF or LOCK position, and all electrical loads must be OFF before servicing any electrical component. Disconnect the negative battery cable to prevent an electrical spark should a tool or equipment come in contact with an exposed electrical terminal. Failure to follow these precautions may result in personal injury and/or damage to the vehicle or its components.
Important: To ease the removal of the shifter boot, push the boot down slightly to expose the inner shaft then lube the shaft and boot with Synthetic Multi-Purpose Lubricant GM P/N 12346241 (Canadian P/N 10953474) or equivalent.


| • | The 4 bolts |
| • | The 4 nuts |
| • | The rear propeller shaft |
Important: Slightly lower the transmission to gain access to the backup lamp switch connector and breather tube.
Disconnect the breather hose from the transmission.
Remove the transmission from the vehicle by carefully moving the transmission away from the engine toward the rear of the vehicle until the input shaft is clear of the clutch pressure plate cover. Then slowly lower the transmission jack making sure there are no obstructions.
Installation Procedure
- Inspect the clutch alignment by inserting the J 37761 through the clutch disc and into the crankshaft pilot bearing. If the J 37761 does not fit through the clutch disc and into the pilot bearing assembly smoothly, the clutch disc may be misaligned. For clutch disassembly and inspection procedures, refer to Clutch Assembly Replacement in Clutch and align if necessary.
- Install the transmission to the engine by raising the transmission into position and moving the transmission toward the engine while simultaneously inserting the transmission input shaft through the pressure plate cover and the clutch disc into the crankshaft pilot bearing.
- Install the 2 lower transmission-to-engine nuts onto the transmission alignment studs.
- Install the 1 top left transmission-to-engine nut onto the transmission alignment stud.
- Install the top right transmission-to-engine bolt into the transmission.
- Install the upper right transmission-to-engine bolt into the transmission with the ground strap.
- Install the lower right transmission-to-engine bolt into the transmission.
- Install the rear transmission crossmember to the vehicle and secure with the 8 bolts.
- Install the crossmember ground strap and bolt.
- Install the 2 bolts into the flywheel inspection cover.
- Install the exhaust support bracket to the transmission and exhaust pipe.
- Install the clutch slave cylinder to the transmission.
- Install the 2 slave cylinder retaining bolts.
- Install the 2 bolts into the rear transmission mount .
- Remove the hydraulic jack from the transmission.
- Remove the jack stand from the front of the engine.
- Connect the vehicle speed sensor (2).
- Install the rear propeller shaft into the vehicle aligning the index marks made during removal and secure with the 4 nuts and the 4 bolts.
- Position the wire harness into the right transmission harness retainer.
- Lower the vehicle.
- Install the gearshift control lever into the gearshift lever case. Refer to Gearshift Control Lever Replacement .
- Install the shifter boot on the shift lever.
- Install the center console in the vehicle. Refer to Front Floor Console Replacement in Instrument Panel, Gages and Console.
- Connect the negative battery cable.
- Inspect the transmission fluid. Refer to Transmission Fluid Inspection .
Important: Raise the transmission to a position where the backup light switch connector can be connected and the breather tube can be installed before installing the transmission to the engine assembly.
Notice: Use the correct fastener in the correct location. Replacement fasteners must be the correct part number for that application. Fasteners requiring replacement or fasteners requiring the use of thread locking compound or sealant are identified in the service procedure. Do not use paints, lubricants, or corrosion inhibitors on fasteners or fastener joint surfaces unless specified. These coatings affect fastener torque and joint clamping force and may damage the fastener. Use the correct tightening sequence and specifications when installing fasteners in order to avoid damage to parts and systems.
Tighten
Tighten the 2 lower transmission-to-engine
nuts to 100 N·m (72 lb ft).
Tighten
Tighten the transmission-to-engine nut to 100 N·m
(72 lb ft).
Tighten
Tighten the top right transmission-to-engine bolt
to 100 N·m (72 lb ft).
Tighten
Tighten the transmission-to-engine bolt to 100 N·m
(72 lb ft).
Tighten
Tighten the transmission-to-engine bolt
to 100 N·m (72 lb ft).
Tighten
Tighten the rear transmission crossmember bolts
to 60 N·m (44 lb ft).
Tighten
Tighten the bolt to 10 N·m (89 lb in).
Tighten
Tighten the flywheel inspection cover bolts to 10 N·m
(89 lb in).
Tighten
Tighten the support bracket nut and bolt to 20 N·m
(15 lb ft).
Tighten
Tighten the 2 slave cylinder bolts to 37 N·m
(28 lb ft).
Tighten
Tighten the rear transmission mount bolts to 60 N·m
(44 lb ft).
Tighten
Tighten the rear propeller shaft nuts and bolts
to 50 N·m (37 lb ft).
Important: To ease the installation of the shifter boot, lube the shaft and boot with Synthetic Multi-Purpose Lubricant GM P/N 12346241 (Canadian P/N 10953474) or equivalent.
Caution: Unless directed otherwise, the ignition and start switch must be in the OFF or LOCK position, and all electrical loads must be OFF before servicing any electrical component. Disconnect the negative battery cable to prevent an electrical spark should a tool or equipment come in contact with an exposed electrical terminal. Failure to follow these precautions may result in personal injury and/or damage to the vehicle or its components.
