Radio/Audio System Description
The entertainment system consists of an AM/FM stereo with a compact disc player and a clock, 4 speakers, and an antenna.
The ignition switch must be in the ACC or ON position in order to operate any of the sound systems. The front speakers are located on the front doors. The rear speakers are located beneath the rear quarter lower trim panel on each side of the vehicle.
FM Radio Reception
The FM tuner operates on a band from 87.7-107.9 MHz. Optimum FM radio reception range is usually limited to a maximum of 16-64 km (10-40 mi) depending on terrain, atmospheric conditions, station power, antenna height and distance from the transmitter. Tall buildings, hills or other objects can case signal flutter or noise. Eliminate the noise by tuning to a stronger station.
AM Radio Reception
The AM tuner operates on a band from 530-1710 kHz. The range of most AM stations is greater than FM, especially at night. AM signals can interfere with each other due to the longer range of the AM band. AM reception is subject to noise interference from storms and power lines. Reduce the treble in order to reduce noise.
Circuit Operation
Battery voltage is applied at all times for the radio clock and memory circuitry through the DOME fuse. The clock and memory functions need to be reset if the voltage source is interrupted for any reason.
The battery voltage is applied through the CIG fuse to the radio with the ignition switch in the ACC or the ON position. Voltage is applied through the switch to power all electronic radio functions when the radio ON/VOL control is turned to the ON position. The radio is permanently grounded at G200.
AM/FM Stereo With A CD Player Operation
Radio Display Illumination
Turning the headlamps or the park lamps on will give the IP lamp dimmer control of the illumination of the display. The dimmer is located on the instrument panel to the left of the steering wheel. If the headlamps or the parking lamps are off, the intensity of the display's illumination is 100 percent. The display is not adjustable.
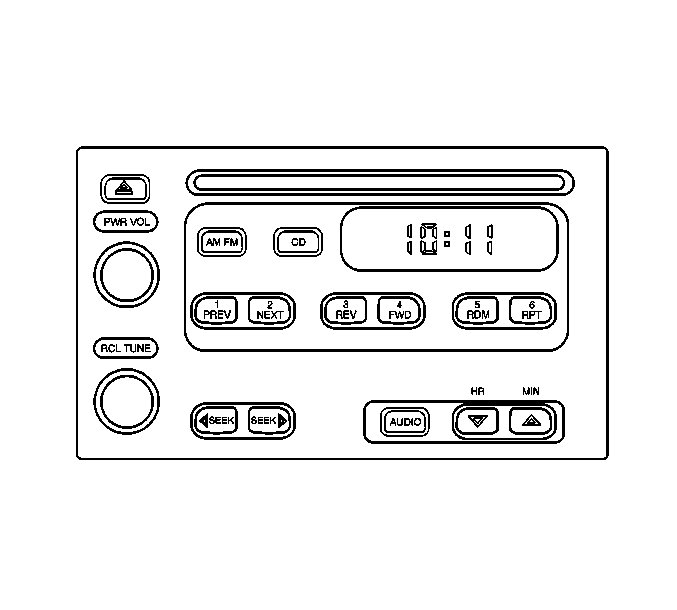
PWR/ VOL
The ignition switch must be in the ACC position or in the ON position in order to operate the radio. If the ignition is in the OFF position, press the RCL/TUNE knob in order to display the time for 5 seconds. If the ignition switch is in the ACC position or in the ON position and the radio is turned off, the time will display. In this instance, all controls, except for the eject button and for the controls that are required to set the clock, will deactivate. The eject button has an up arrow and a line at the bottom.
Press the PWR/ VOL knob in order to turn the radio on. Turn the knob clockwise in order to increase the sound. In order to decrease the sound, turn the knob counterclockwise. Press the PWR/ VOL knob again in order to turn the radio off.
Recall
Press the RCL/TUNE knob with the radio on in order to toggle the display between the following:
- The clock
- The band
- The radio frequency
Pressing the knob once will change the display from the clock to the band mode. Pressing the knob a second time within approximately 2 seconds will change the display from the band to the radio frequency mode. If the knob is not pressed a second time, the display will change from the band to the radio frequency within 2 seconds automatically. After approximately 5 seconds, the display will return to the clock.
AM/FM
Press this button in order to move between the AM band and the FM band. AM or FM will appear on the display, depending on the band that you select. The radio will automatically go to the frequency that played when that band was last used.
SEEK
Press the right end of the SEEK button to automatically tune to the next higher station within range. Press the left end of the SEEK button to automatically tune to the next lower station within range. Upon reaching the end of the band, the seek function will continue in the same direction at the opposite end of the band.
TUNE
Turn the RCL/TUNE knob clockwise in order to manually tune the radio frequency forward. Turn the RCL/TUNE knob counterclockwise in order to manually tune the radio frequency backward. On the AM band, the frequency advances in increments of 10 kHz in either direction. On the FM band, the frequency advances in increments of 0.2 MHz in either direction. Upon reaching the end of the band, the tune function will continue in the same direction at the opposite end of the band.
Radio Frequency Preset Buttons
The radio has six preset buttons. The buttons are numbered 1 through 6. The buttons permit you to preset 6 stations on the AM band and 12 stations on the FM band. In order to set a station preset button:
- Select the AM band or the FM band.
- Tune the radio to the desired station.
- Press and hold the desired preset button. Press and hold the button for approximately three seconds.
- When a beep sounds, release the button.
- The button is now set to the desired station. The radio will now automatically tune the selected station when the button is pressed.
If power to the radio unit is interrupted, the memory of the preset buttons will be lost. Reset the preset buttons if the buttons' memory is lost.
The preset buttons control different functions if a compact disc is playing. Refer to Compact Disc Player Operation for details on these other functions.
Setting the Tone
In order to adjust the bass, press the audio button until BAS appears on the display. The radio is now in the bass mode. Press the down arrow in order to decrease the bass. Press the up arrow in order to increase the bass. In order to adjust the treble, press the audio button until TRE appears on the display. The radio is now in the treble mode. Press the down arrow in order to decrease the treble. Press the up arrow in order to increase the treble. After either adjustment, the radio display will return to the clock after approximately 5 seconds.
Adjusting the Speaker Balance
In order to adjust the balance, press the audio button until BAL appears on the display. The radio is now in the balance mode. Press the down arrow in order to move the sound to the left speakers. Press the up arrow in order to move the sound to the right speakers. In order to adjust the fade mode, press the audio button until FAD appears on the display. The radio is now in the fade mode. Press the down arrow in order to move the sound to the rear speakers. Press the up arrow in order to move the sound to the front speakers. After either adjustment, the radio display will return to the clock after approximately 5 seconds.
Clock Operation
The clock function of this radio does not have a memory function. If power to the radio is interrupted, you will have to reset the clock.
Setting the Clock
In order to set the clock, the ignition switch must be in the ACC position or in the ON position. The radio may be turned on or off.
In order to set the hour:
- Press and hold the down arrow button (HR). After approximately 5 seconds a beep will sound, and the hour will advance.
- Release the button when the correct hour appears.
In order to set the minutes:
- Press and hold the up arrow button (MIN). After approximately 5 seconds a beep will sound, and the minutes will advance.
- Release the button when the correct minute appears.
Compact Disc Player Operation
This CD player plays only 120-mm (4.75-in) discs. Only use CDs with this symbol: COMPACT DISC DIGITAL AUDIO. If you insert any other disc, you may damage the CD player or the disc. Do not use 76-mm (3-in) discs. The discs are called CD singles.
Compact Disc Player Errors
ERR indicates an error, and the compact disc cannot play temporarily. The following conditions could cause the error:
| • | The road is too rough. Play the disc when the road is smoother. |
| • | The disc is dirty, scratched, or wet. |
| • | The disc is upside down. |
| • | The air is very humid. If the air is humid, wait an hour. |
Recall
Press the RCL/TUNE knob with a disc playing in order to toggle the following displays:
- The clock
- The CD message
- The track that is currently playing
- The elapsed time of the track that is playing
Pressing the knob once will change the display from the clock to the CD mode. Pressing the knob a second time within 2 seconds will change the display from the CD to the track number that is currently being played. Pressing the knob a third time within approximately 2 seconds will change the display again. The display changes from the track number that is currently being played to the elapsed time of that track number. If the knob is not pressed an additional time in 2 seconds, the display automatically will change modes. After approximately 5 seconds, the display will return to the clock.
Previous Track
If you press preset button 1 (PREV) once, the following actions will occur:
- The sound will mute.
- The CD player will move to the beginning of the previous track. For the correct operation of the previous selection function, the current track must have been playing for more than 10 seconds. If the current track has been playing for less than 10 seconds, then the CD will move to the beginning of the current track.
If you hold the button, or if you press the button more than once, the CD player will proceed through further tracks. The CD player will cycle backward if you hold the button. Each time you press and release the button, the CD player will move forward one track. The track number will appear on the display.
Next Track
If you press preset button 2 (NEXT) once, the following actions will occur:
- The sound will mute.
- The CD player will move to the beginning of the next track. For the correct operation of the next selection function, the current track must have been playing for more than 10 seconds. If the current track has been playing for less than 10 seconds, then the CD will move to the beginning of the current track.
If you hold the button, or if you press the button more than once, the CD player will proceed through further tracks. The CD player will cycle backward if you hold the button. Each time you press and release the button, the CD player will move forward one track. The track number will appear on the display.
Reverse
If you press preset button 3 (REV) once, the disc will rapidly return to a favorite passage. The current selection will remain audible at a lower sound level during the reverse mode. If you release the button, the CD player will play the passage at that point at normal sound. If you reach the beginning of the current selection, the previous selection will start.
Forward
If you press preset button 4 (FWD) once, the disc will advance quickly within a track. The current selection will remain audible at a lower sound level during the forward mode. If you release the button, the CD player will play the passage at that point at normal sound. If you reach the end of the current selection, the next selection will start.
Random Play
If you press preset button 5 (RDM) once, the CD player will play tracks in a random order. This feature will cancel if you press any of the following buttons:
| • | The preset button 1 (PREV) that will play the previous selection to the track which was playing before the random mode began |
| • | The preset button 2 (NEXT) that will play the next selection to the track which was playing before the random mode began |
| • | The preset button 5 (RDM) |
| • | Preset button 6 (RPT) |
The letters RND will appear on the display if this feature is active.
Repeat
If you press preset button 6 (RPT) once, the CD player will repeat a selection after the selection is finished playing. This feature will cancel if you press any of the following buttons:
| • | The preset button 1 (PREV) |
| • | The preset button 2 (NEXT) |
| • | The preset button 5 (RDM) |
| • | The preset button 6 (RPT) |
| • | The AM/FM button |
The letters RPT will appear on the display if this feature is active.
Cancel CD and Play Radio
If you press the AM/FM button while in the CD mode, you will cancel the CD operation. The unit will return to radio operation. In order to return to the CD mode, press the CD button.
Eject
The eject button has an up arrow and a line at the bottom. Press the eject button with the ignition switch in the ACC position or in the ON position in order to perform the following functions:
- Eject the CD.
- Change the sound to the radio, if the radio is turned on.
The CD player will start playing track 1 if the disc is inserted again. If the ignition switch is turned off, the eject function will still operate. The radio will remain off.
