The numbers below refer to the step numbers in the diagnostic table.
Step
| Action
| Value(s)
| Yes
| No
|
1
| Did you perform the Diagnostic System Check-Engine Controls?
| --
|
Go to Step 2
| Go to
Diagnostic System Check - Engine Controls
|
2
| Was the Fuel Injector
Coil Test performed?
| --
|
Go to Step 3
| Go to
Fuel Injector Solenoid Coil Test - Engine Coolant Temperature Between 10-35 Degrees C (50-95 Degrees F)
|
3
| Is the engine coolant temperature (ECT) more than the specified
value?
| 94°C (201°F)
|
Go to Step 4
|
Go to Step 5
|
4
| Allow the engine to cool to less than the specified value.
Is the engine coolant temperature less than the specified value?
| 94°C (201°F)
|
Go to Step 5
| --
|
5
|
Caution: Wrap a shop towel around the fuel pressure connection in order to reduce
the risk of fire and personal injury. The towel will absorb any fuel leakage
that occurs during the connection of the fuel pressure gage. Place the towel
in an approved container when the connection of the fuel pressure gage
is complete.
- Install the J 34730-1A
Fuel Pressure Gage. Refer to
Fuel Pressure Gage Installation and Removal
.
- Turn the ignition switch ON and then OFF in order to energize
the fuel pump.
- Place the bleed hose of the fuel pressure gage into an approved
gasoline container.
- Bleed the air out of the fuel pressure gage.
- Turn the ignition switch ON and then OFF in order to energize
the fuel pump again.
- Observe the reading on the fuel pressure gage.
Is the fuel pressure within the specified range?
| 270-310 kPa
(39-45 psi)
|
Go to Step
6
| Go to
Fuel System Diagnosis
|
6
| Turn OFF the fuel pump.
Does the fuel pressure reading remain constant?
| --
|
Go to Step 7
| Go to
Fuel System Diagnosis
|
7
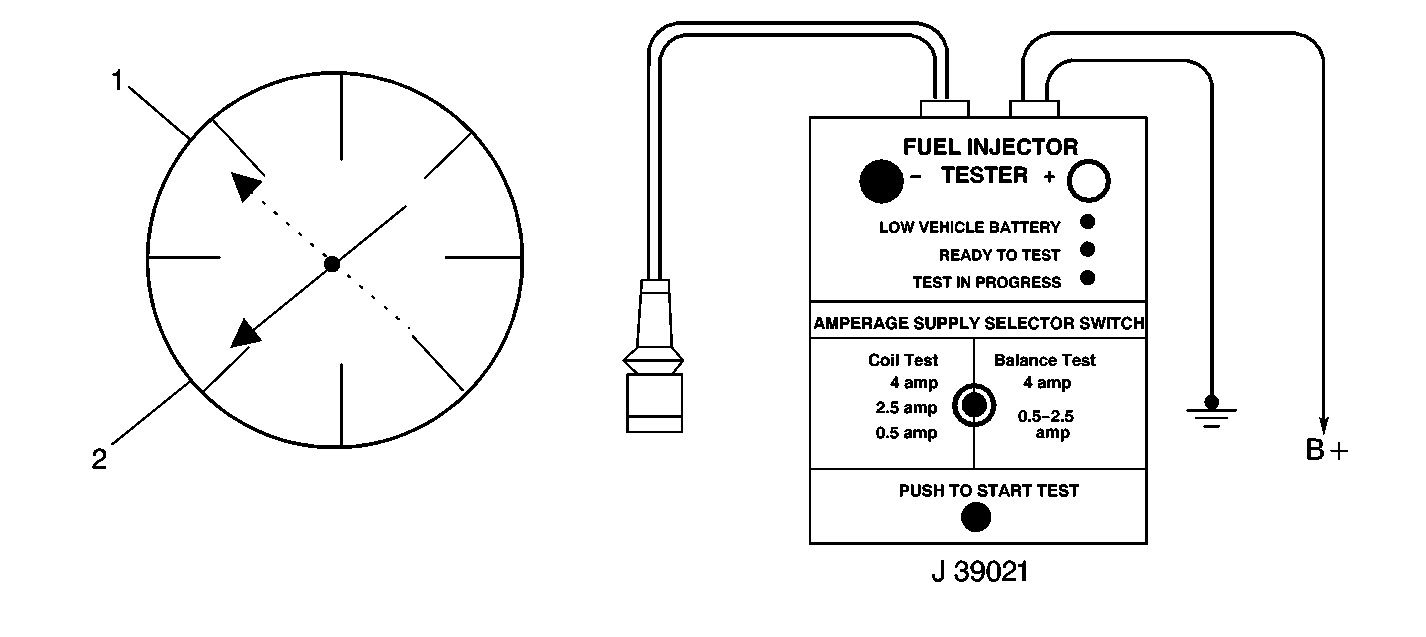
|
- Disconnect the fuel injector electrical connectors.
- Connect the J 39021
Fuel Injector Tester power leads to B+ and ground.
- Set the amperage supply selector switch on the fuel injector tester
to the Balance Test 0.5-2.5 amp position.
- Connect the refer to J 39021
to a fuel injector.
- Turn the ignition switch ON and then OFF, in order to energize
the fuel pump.
- Record the fuel pressure indicated by the fuel pressure gage after
the fuel pressure stabilizes. This is the 1st pressure reading.
- Energize the fuel injector by depressing the Push to Start Test
button on the fuel injector tester.
- Record the fuel pressure indicated by the fuel pressure gage after
the fuel pressure gage needle has stopped moving. This is the 2nd pressure
reading.
- Repeat Step 4 through Step 8 for each fuel injector.
- Subtract the 2nd pressure reading from the 1st pressure reading
for one fuel injector. The result is the pressure drop value.
- Obtain a pressure drop value for each fuel injector.
- Add all of the individual pressure drop values. This is the total
pressure drop.
- Divide the total pressure drop by the number of fuel injectors.
This is the average pressure drop.
Does any fuel injector have a pressure drop value that is higher or
lower than the average pressure drop by the specified value?
| 10 kPa
(1.5 psi)
|
Go to Step 8
| Go to
Symptoms - Engine Controls
|
8
|
Notice: Do Not repeat any portion of this test before running the engine in
order to prevent the engine from flooding.
Re-test any fuel injector that does not meet the specification.
Follow the procedures in Step 7.
Does any fuel injector still have a pressure drop value that is higher
or lower than the average pressure drop by the specified value?
| 10 kPa
(1.5 psi)
|
Go to Step 9
| Go to
Symptoms - Engine Controls
|
9
| Replace any faulty fuel injectors. Refer to
Fuel Injector Replacement
.
Did you complete the replacement?
| --
|
Go to Step
10
| --
|
10
| Does an engine performance concern still exist?
| --
| Go to
Symptoms - Engine Controls
| System OK
|