Tools Required
J 43631 Ball Joint Remover
Removal Procedure
- Raise and support the vehicle. Refer to Lifting and Jacking the Vehicle in General Information.
- Remove the tire and wheel assembly. Refer to Tire and Wheel Removal and Installation in Tires and Wheels.
- Remove the following components on both sides of the vehicle in order to separate the stabilizer shaft links from the lower control arms:
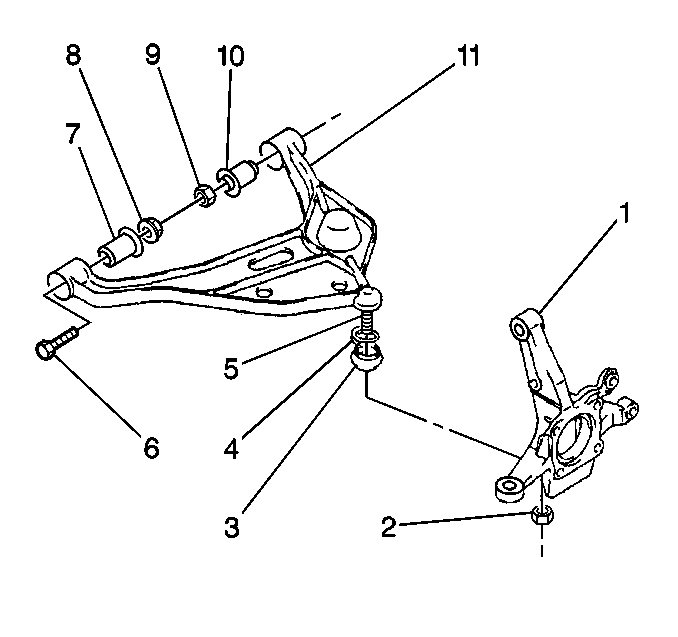
- Support the lower control arm (11) with a jack.
- Remove the ball stud nut (2).
- Use the J 43631 , or equivalent, in order to separate the lower control arm ball stud (3) from the knuckle (2).
- Use the jack in order to raise the control arm and disconnect the ball joint from the knuckle.
- Move the knuckle and disc brake assembly away from the control arm.
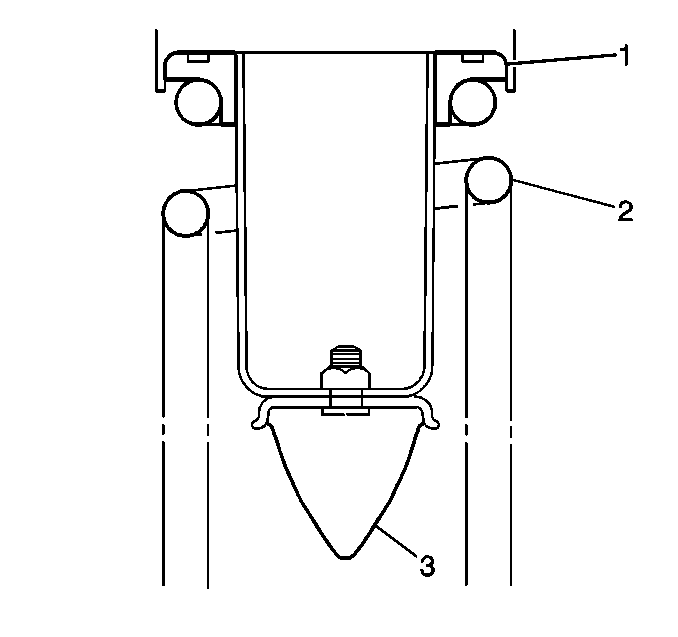
- While lowering the floor jack, remove the coil spring (2).
- Remove the spring seat (1) and the spring bumper (3). Inspect and replace the components if necessary. Refer to Spring Bumper Replacement .
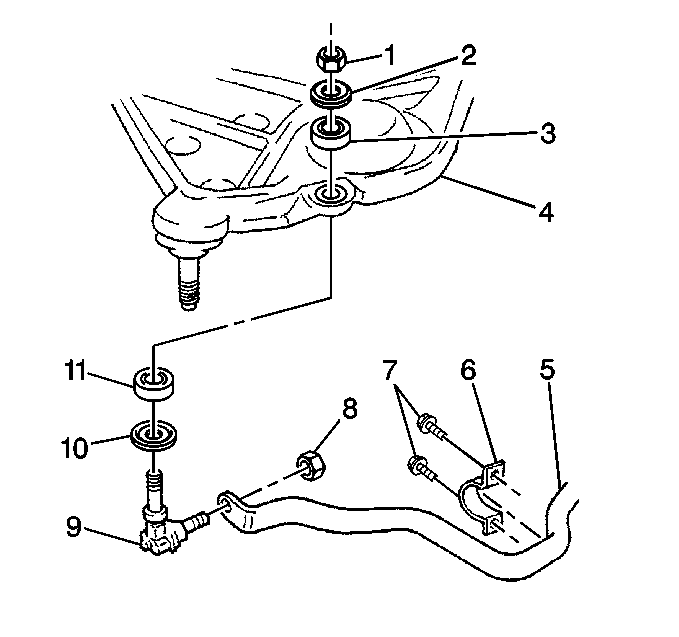
| • | The stabilizer shaft nut (1) |
| • | the washer (2) |
| • | The bushing (3) |
Caution: To prevent personal injury and/or component damage, use the proper tools to support the lower control arm when removing the coil spring. The coil spring is under extreme pressure and can become a projectile should the spring separate from the lower control arm before all of the tension is relieved.

Installation Procedure
- Install the spring bumper (3) and the spring seat (1). Refer to Spring Bumper Replacement .
- Install the coil spring (2).
- Raise the lower control arm (11) with a jack.
- Lower the jack in order to install the ball stud (5) to the knuckle (1).
- Install a NEW ball stud nut (2).
- Remove the jack.
- Install the following components on both sides of the vehicle in order to connect the stabilizer shaft links to the lower control arms:
- Install the tire and wheel assembly. Refer to Tire and Wheel Removal and Installation in Tires and Wheels.
- Lower the vehicle.
- Verify the stabilizer shaft is centered, side-to-side. Verify that the stabilizer shaft links are set at a neutral position, as seen from above.
Notice: Care should be taken to avoid chipping or scratching the coating when handling the suspension coil spring. Damage to the coating can cause premature failure.
Important: The top of the coil spring is narrower than the bottom of the coil spring.
Install the narrower diameter end to the upper spring seat (1) and the larger diameter end to the lower control arm.
Notice: Refer to Fastener Notice in the Preface section.
Tighten
Tighten the nut to 60 N·m (43.5 lb ft).
Important: DO NOT tighten the stabilizer shaft link nuts and bolts completely. The weight of the vehicle must be on the wheels and tires before tightening the nuts and bolts.
| • | The stabilizer shaft nut (1) |
| • | The washer (2) |
| • | The bushing (3) |
Tighten
Tighten the stabilizer shaft link nut (1) to 29 N·m (21.0 lb ft).
