Backup Lamps
The backup lamps are incorporated into the tail lamps. The backup lamps operate with the ignition switch in the ON position. Placing either the manual selector lever on automatic transmission equipped vehicles or the gearshift control lever on manual transmission equipped vehicles in R (reverse) closes the backup lamps circuit. When the backup lamps circuit is closed, the backup lamps turn on. On manual transmission equipped vehicles, the backup lamp switch turns on the backup lamps. On 3-speed automatic transmission equipped vehicles, the park/neutral position (PNP) turns on the backup lamps. On 4-speed automatic transmission equipped vehicles, the transmission range switch turns on the backup lamps.
High-Mounted Stoplamp
The high-mounted stoplamp consists of 5 bulbs on 4-door models. The high-mounted stoplamp on 4-door models is located at the top of the rear door window. The high-mounted consists of 1 bulb on 2-door models. The high-mounted stoplamp on 2-door models attaches to the top of the rear door.
The high-mounted stoplamp operates in conjunction with the stoplamps when you press the brake pedal.
Daytime Running Lamps (DRL)
Daytime running lamps (DRL) are standard equipment on all models. There is a DRL indicator on the instrument panel cluster assembly. Operating through the low beams at a lower than normal output, the DRL system operates under the following conditions:
| • | When the engine is running |
| • | When the parking brake is not applied |
| • | When the light switch is in either the OFF or the parklamp position. |
For DRL system diagnosis, refer to Headlights/Daytime Running Lights (DRL) Schematics .
Headlamps
All models are equipped with composite headlamps. Each composite headlamp consists of 1 halogen bulb, providing both high and low-beam operation, and a headlamp assembly. The bulb is separate from the assembly. It is not necessary to re-aim the headlamps when replacing only the bulb. The headlamp assembly does not need to be removed from the vehicle in order to replace the bulb.
The headlamp relay controls the headlamp operation. The headlamp relay is located behind the instrument panel compartment near the blower motor.
For information on headlamp aiming procedures, refer to Headlamp Aiming .
License Plate Lamps
There are 2 license plate lamps in the rear license plate housing directly over the license plate. Each license plate lamp contains 1 clear, single filament bulb. The license plate lamp bulb filament illuminates when either the parking lamps or the headlamps are activated.
Park/Turn Lamp
The park/turn lamp is integrated into the headlamp assembly. Each lamp consists of a clear lens over an amber colored, dual filament bulb. The turn signal filament illuminates when the turn signals are operating. The parking lamp filament illuminates when either the parking lamps or headlamps are activated.
Tail Lamps
The tail lamps are on each side of the back door. Each tail lamp consists of a clear, dual filament stoplamp/taillamp bulb and a clear, single filament turn signal and backup bulb. The stoplamp filament lights whenever the stoplamp switch closes. Depressing the brake pedal closes the stoplamp switch. The taillamp filament lights when either the parking lamps or headlamps are activated. The turn signal filament lights during the turn signal operation.
Front Side Marker Lamps
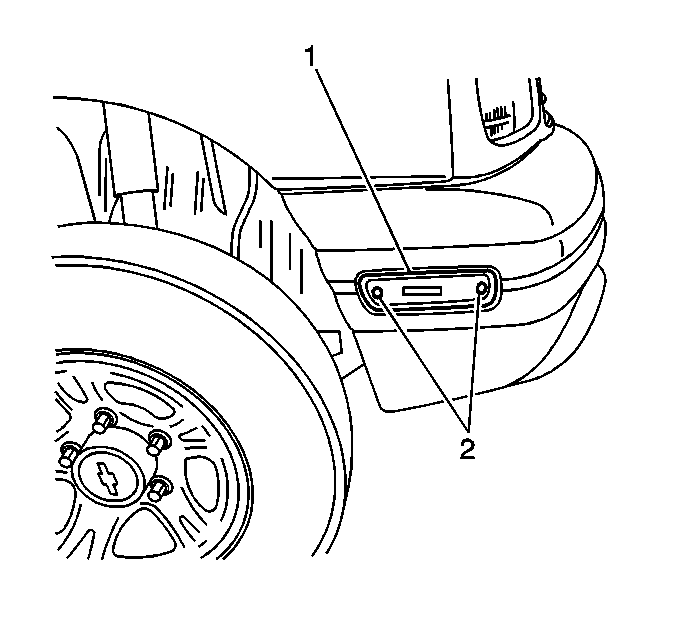
The front side marker lamps (1) are mounted in the front bumper fascia. Each lamp consists of a single filament bulb covered by amber colored lenses. They are operational any time the parking lamps or headlamps are activated.
Ashtray Illumination Lamp
The ashtray illumination lamp lights whenever the parking lamps or the headlamps are activated.
Cigar Lighter Illumination Lamp
The cigar lighter illumination lamp lights whenever the parking lamps or the headlamps are activated. The cigar lighter illumination lamp bulb socket attaches to the rear of the cigar lighter.
Dome Lamp
The front dome lamp is centered on the roof above the front seat backs.
The front dome lamp consists of a clear lens, the dome lamp bulb, and a 3 position slide switch. The slide switch has the following 3 detent positions:
| • | The left or OFF position |
| • | The center or DOOR position |
| • | The right or ON position |
The front dome lamp will not light with the switch in the left position, regardless of whether any door jamb switch opens or closes.
The front dome lamp lights with the dome lamp switch in the center position when any door is open, and the door jamb switch is closed. The lamp remains on until all doors are closed and the door jamb switches are open.
The front dome lamp lights with the switch in the right position, regardless of whether any door jamb switch is opened or closed.
The front dome lamp has a courtesy feature in which the dome lamp stays on for about 15 seconds and fades out after all the doors are closed and the door jamb switches are open.
The rear dome lamp on 4-door models is centered on the roof in front of the rear door opening.
The rear dome lamp consists of a clear lens and a dome lamp bulb.
The rear dome lamp lights and remains on until all doors are closed and the door jamb switches are open.
Reading Lamps
The reading lamps are on the bottom of the inside rear view mirror.
Each reading lamps consist of a clear lens, a reading lamp bulb and a ON/OFF switch. The ON/OFF switches are on the front of the inside rearview mirror near the bottom of the mirror. The lamps will light only when the switch is flipped to the right (the ON position).
The reading lamp ON/OFF switch is replaceable only as part of the inside rearview mirror assembly.
Combination Switch
The combination switch is on the steering column. The combination switch consists of 2 levers.
The combination switch and levers are replaced only as a assembly. For combination switch removal and installation procedures, refer to Inflatable Restraint Steering Wheel Module Coil Replacement in SIR.
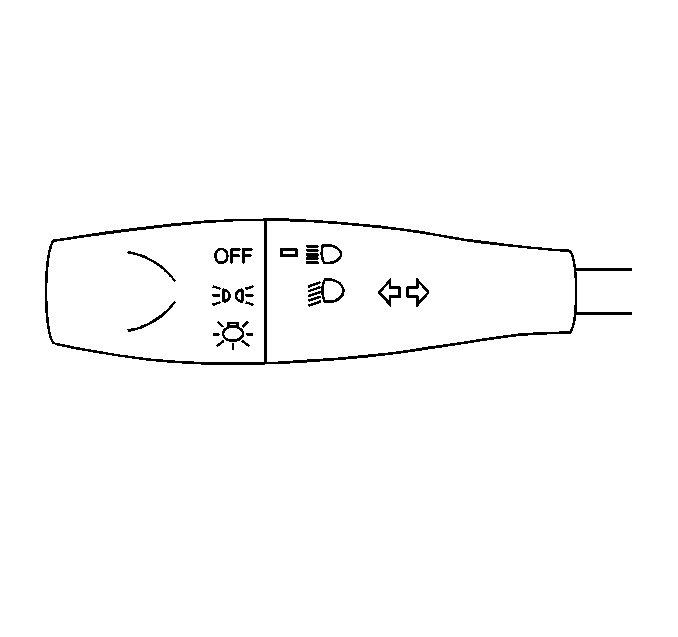
The first lever is the light/turn signal switch which is on the left side of the steering column.
A twist type knob on the end of the light/turn signal switch controls the operation of the parking lamps and the headlamps.
When the parking lamps or the headlamps are activated, the following exterior lamps illuminate:
| • | The tail lamps |
| • | The side marker lamps |
| • | The license plate lamps |
When either the parking lamps or headlamps are activated, the following interior component lamps illuminate:
| • | The instrument panel cluster assembly |
| • | The heater control unit |
| • | The radio |
| • | The cigar lighter |
| • | The ashtray |
| • | The manual selector |
The light/turn signal switch (combination lever) controls both the low-beam and high-beam headlamp operations.
Activate the headlamps and push the light/turn signal switch lever rearward into the detent position in order to change the headlamps from low-beam to high-beam operation. Pull the lever back to the center position in order to return the headlamps to the low-beam operation.
With the lighting system in either the OFF, the parklamp, or the low-beam headlamp setting, pull the light/turn signal switch lever forward in order to illuminate the high-beam headlamps. Release the lever to the center position in order to return the system to the previous setting. This is the flash-to-pass feature.
Move the lever up and down in order to control the turn signals.
The second lever is the windshield wiper/washer switch and the cruise control mode switch, if equipped. This lever is located on the right side of the steering column. For a description of the windshield wiper/washer combination lever, refer to Wiper/Washer System Description in Wiper/Washer Systems.
Hazard Lamps
The hazard switch is in the center of the instrument panel to the right of the instrument cluster. The hazard switch controls the operation of the hazard lamp circuit.
Press the hazard switch to the ON position in order to cause the turn/hazard relay to disengage the turn signal circuit. This will engage the hazard lamp circuit. The turn/hazard relay is located on the back of the junction block. The junction block is located beneath the left side of the instrument panel and is mounted to the left front side door hinge pillar. Engaging the hazard lamp circuit causes both turn indicators in the instrument panel cluster assembly along with all exterior turn signal lamps to flash on and off. The hazard lamp circuit operates regardless of the position of the ignition switch.
Press the hazard switch again in order to return the switch to the OFF position and disengage the hazard lamp circuit. This returns the turn/hazard relay to the turn signal mode.
Refer to Hazard and Turn Signal Flasher Replacement for turn/hazard relay removal and installation procedures.
IP Dimmer Control
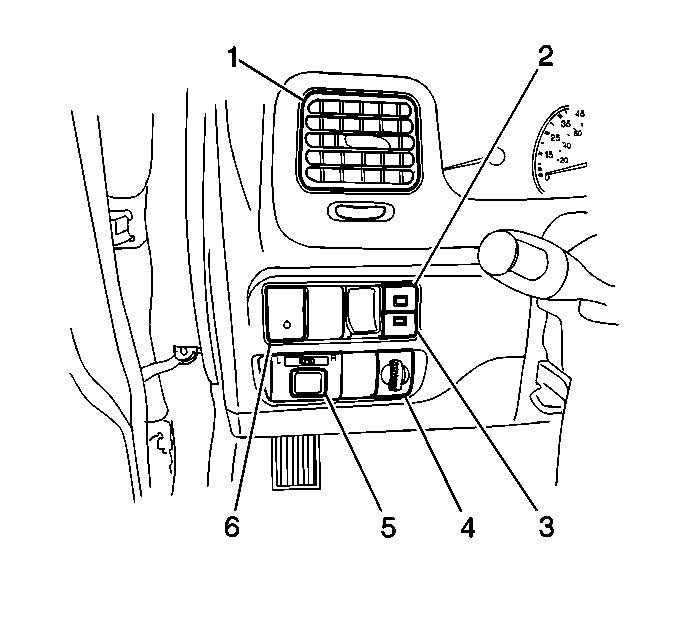
The intensity of the instrument panel and the instrument panel cluster assembly illumination lamps is adjusted by the IP dimmer control (4). The control is on the left side of the instrument panel.
Rotate the IP dimmer control (4) upward in order to brighten the following component lamps:
| • | The instrument panel cluster assembly |
| • | The heater control unit |
| • | The radio |
| • | The cigar lighter |
| • | The ashtray |
Rotate the IP dimmer control (4) downward in order to dim the following component lamps:
| • | The instrument panel cluster assembly |
| • | The heater control unit |
| • | The radio |
| • | The cigar lighter |
| • | The ashtray |
Activate the parking lamps or headlamps in order for the instrument panel and instrument panel cluster assembly illumination lamps to illuminate.
For information on IP dimmer control (4) removal and installation procedures, refer to Instrument Panel Lamp Dimmer Switch Replacement in Instrument Panel, Gauges and Console.
Turn Signal Operation
The turn/hazard relay and the combination (light/turn signal) switch control the turn signal operation.
The turn/hazard relay is located on the back of the junction block. The junction block is located beneath the left side of the instrument panel and is mounted to the left front side door hinge pillar.
The light/turn signal switch lever is on the left side of the steering column. Turn the ignition switch to the ON position in order to allow the turn signals to operate.
When making a partial turn, such as when changing lanes, the driver has the option of moving the lever to a detent stop. The turn signal indicator continues to flash while the lever occupies this position. The flashing will cancel automatically when the lever is released. The detent position allows the driver to make a lane change or a shallow turn without failing to cancel the turn signal lamp. Move the lever past the detent position to either the upward or downward position in order provide conventional turn signal operation.
The combination switch and levers are replaced only as a assembly. For combination switch removal and installation procedures, refer to Inflatable Restraint Steering Wheel Module Coil Replacement in SIR.
