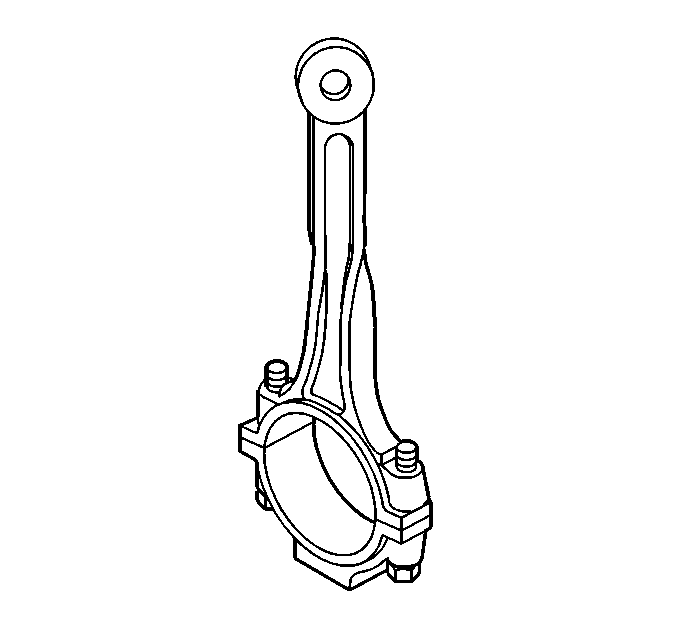
Connecting Rod Measurement
- Measure the connecting rod side clearance. If the side clearance is greater than the maximum replace the connecting rod.
- Clean the connecting rods in solvent and dry with compressed air.
- Inspect the connecting rods for signs of being twisted, bent, bowed, nicked, or cracked
- Inspect the connecting rods for scratches or abrasion on the rod bearing seating surface. If the connecting rod bores contain minor scratches or abrasions, clean the bores by sanding in a circular direction with a light emery paper. Do not scrape the rod or rod cap.
- If the connecting rod bores cannot be cleaned by sanding, or if the bow or twist exceeds specifications, replace the connecting rod.
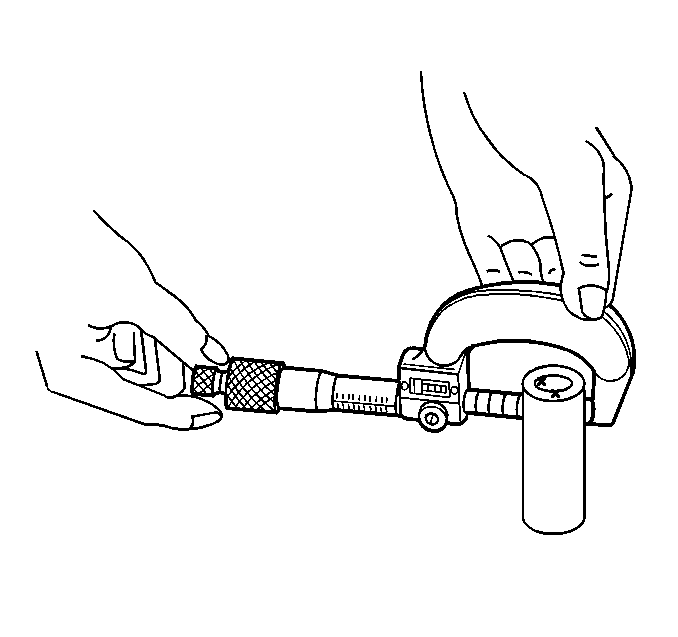
- Measure the piston pin to connecting rod bore.
- Measure the piston pin diameter in the area of connecting rod contact using an outside micrometer.
- Measure the connecting rod piston pin bore using an inside micrometer.
- Subtract the piston pin diameter from the piston pin bore diameter.
- If there is excessive clearance replace the piston pin.
- If there is still excessive clearance, replace the connecting rod.
Standard Connecting Rod Side Clearance
0.25-0.40 mm (0.0099-0.0157 in)
Maximum Connecting Rod Side Clearance
0.45 mm (0.0177 in)
Caution: Wear safety glasses in order to avoid eye damage.
Maximum Connecting Rod Bow
0.05 mm (0.0020 in)
Maximum Connecting Rod Twist
0.10 mm (0.0039 in)
Piston Pin-to-Piston Pin Bore Clearance
0.003-0.014 mm (0.0001-0.0005 in)
Piston Pin Diameter
20.997-21.000 mm (0.8267-0.8268 in)
Piston Pin Bore Diameter
21.003-21.011 mm (0.8269-0.8272 in)
Piston Measurement
- Clean the piston skirts and the pins with a cleaning solvent. Do not wire brush any part of the piston.
- Clean the piston ring grooves with a ring groove cleaner. Make sure the oil ring holes and slots are clean.
- Inspect the pistons for the following conditions:
- Replace pistons and piston pins that show any signs of damage or excessive wear.
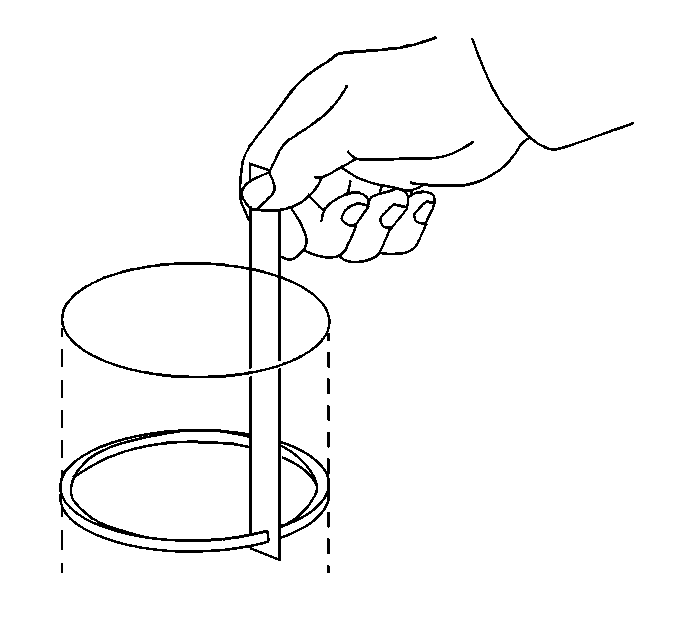
- Measure the piston ring end gap.
- Square the ring in the cylinder bore by positioning the ring with an inverted piston head.
- Measure the piston ring end gap with feeler gages. If the end gap is greater than specifications replace the piston ring.
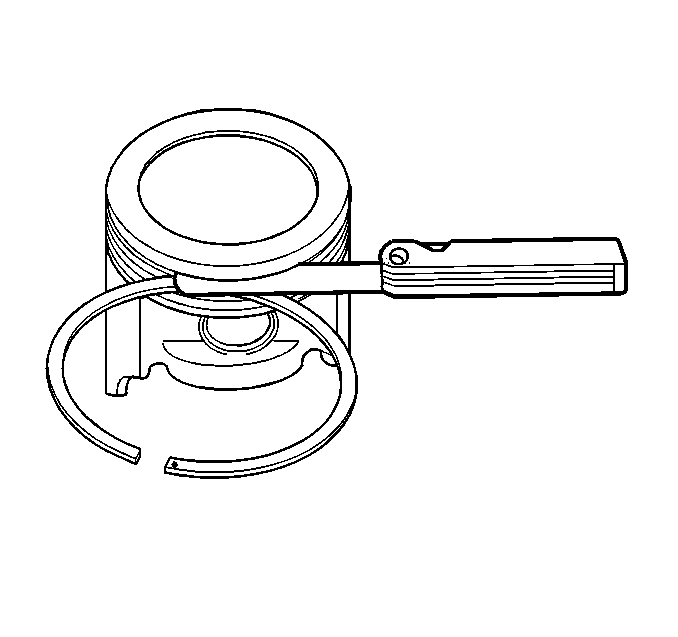
- Measure the piston ring side clearance.
- With the piston ring on the piston, use feeler gages to check clearance at multiple locations.
- If the clearance is greater than specifications, replace the piston ring.
- If the new ring does not produce the correct side clearance, replace the piston.
- Measure piston-to-cylinder bore clearance.
- Subtract the measured piston diameter from its original cylinder bore diameter.
- If the clearance obtained through measurement is greater than specifications and the cylinder bores are within specification, replace the piston. If the cylinder bores are not within specification, rebore all 4 cylinders and fit with oversize pistons. Select the smallest available oversize pistons.
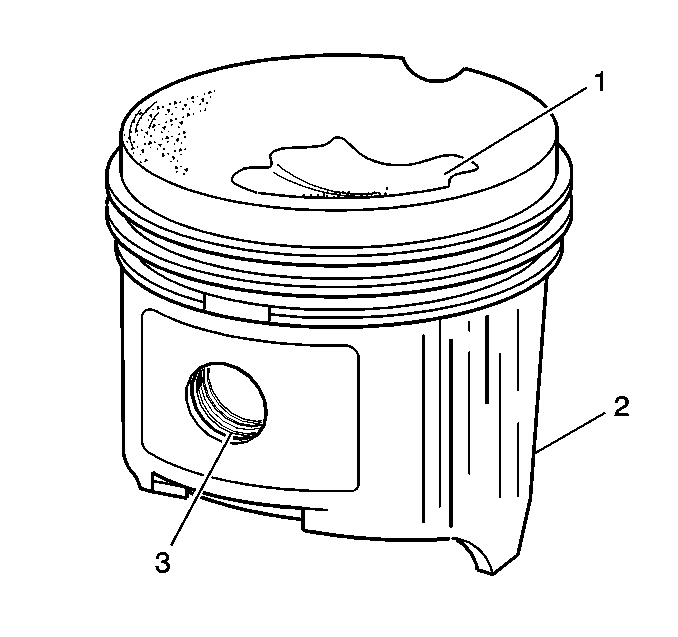
| • | Cracked ring lands, skirts, or pin bosses |
| • | Ring grooves for nicks and burrs that may cause binding |
| • | Warped or worn ring lands |
| • | Eroded areas at the top of the piston (1) |
| • | Scuffed or damaged skirts (2) |
| • | Worn or scuffed piston pin bores (3) |
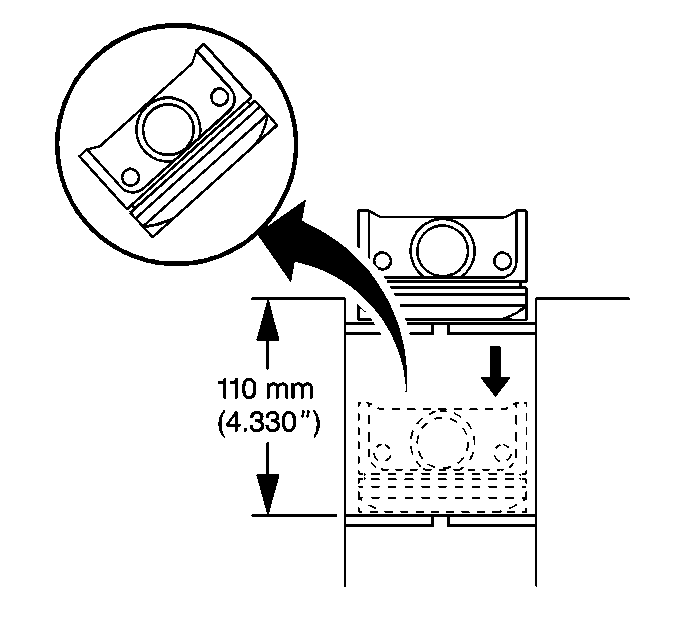
Place the piston ring in the area of the bore where the piston ring will travel (approximately 120 mm or 4.72 inches down from the deck surface).
Top Compression Ring End Gap
0.20-0.35 mm (0.0079-0.0137 in)
Maximum Top Compression Ring End Gap
0.70 mm (0.0276 in)
Second Compression Ring End Gap
0.35-0.50 mm (0.0138-0.0196 in)
Maximum Second Compression Ring End Gap
0.70 mm (0.0276 in)
Oil Ring End Gap
0.20-0.70 mm (0.0079-0.0275 in)
Maximum Oil Ring End Gap
1.8 mm (0.0709 in)
Roll the top 2 piston rings entirely around the piston ring groove. If any binding is caused by the ring groove, dress the groove with a fine file. If any binding is caused by a distorted piston ring, replace the ring.
Top Compression Ring Side Clearance
0.030-0.070 mm (0.0012-0.0027 in)
Second Compression Ring Side Clearance
0.020-0.060 mm (0.0008-0.0023 in)
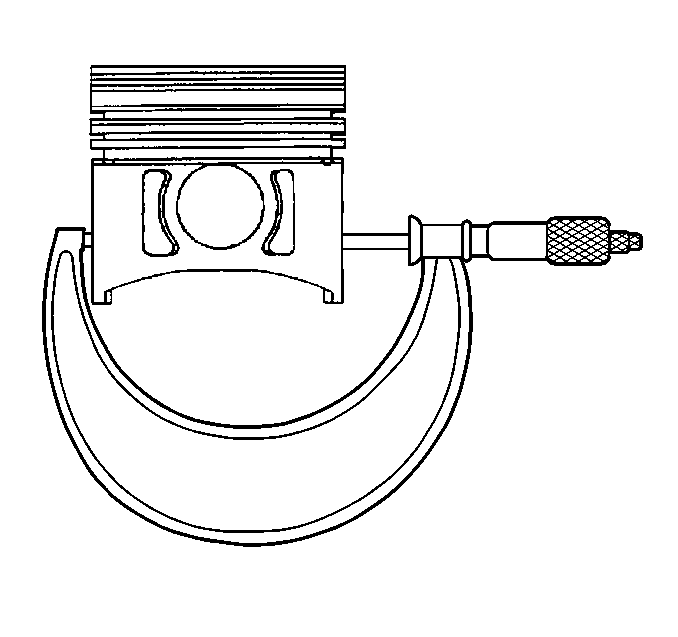
Using an outside micrometer, measure the width of the piston 26.5 mm (1.04 in) below the top of the piston at the thrust surface perpendicular to the centerline of the piston pin.
Piston-to-Cylinder Bore Clearance
0.02-0.04 mm (0.0008-0.0015 in)
Standard Size Pistons
83.970-83.990 mm (3.3059-3.3066 in)
0.25 mm (0.0098 in) Oversize Pistons
84.220-84.240 mm (3.3157-3.3165 in)
0.50 mm (0.0196 in) Oversize Pistons
84.470-84.490 mm (3.3256-3.3263 in)
Connecting Rod Bearing Selection
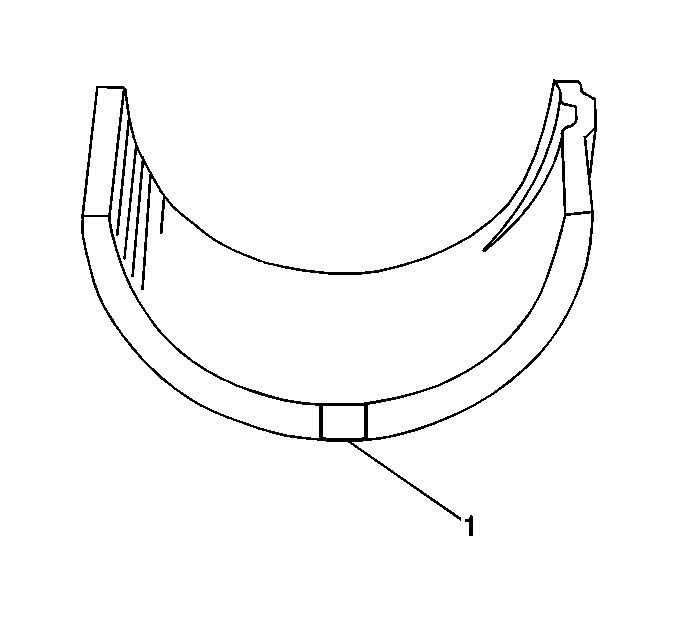
- The connecting rod bearings are of the precision insert type. The connecting rod bearings are available in standard and 0.25 mm (0.0098 in) undersized. Undersized refers to crankshaft diameter. The undersized bearings are marked with red paint (1).
- Measure the connecting rod journal for taper (3 minus 4) and out-of-round (1 minus 2).
- Regrind or replace the crankshaft if the taper or out-of-round exceeds specifications.
- Install the connecting rod cap to the rod and tighten the nuts to 45 N·m (33 lb ft).
- Measure the connecting rod bearing bore for taper and out-of-round.
- No taper or out-of-round should exist. If taper or out-of-round exists, replace the connecting rod.
- Starting with the number one connecting rod, remove the connecting rod cap nuts.
- Remove the connecting rod cap by wiggling the connecting rod cap left and right.
- Lay a piece of gaging plastic across the crankshaft connecting rod journal (avoiding the oil hole).
- Carefully place the connecting rod cap onto the connecting rod. The arrow on the rod cap should point towards the front of the engine.
- Install the 2 connecting rod cap nuts.
- After reaching the proper torque, remove the two crankshaft connecting rod cap nuts.
- Carefully remove the connecting rod cap from the connecting rod.
- Measure the gaging plastic at its widest point.
- If the oil clearance exceeds the maximum replace the bearing with a new standard size bearing.
- If the oil clearance exceeds the maximum with a new standard size bearing replace the crankshaft or regrind the crankshaft.
- Regrind the crankshaft.
- Install the connecting rod cap and torque the nuts to 45N·m (33 lb ft).
- Measure the connecting rod bore diameter with the undersized bearing installed.
- Measure the crankpin diameter.
- Ensure that the oil clearance is within specifications.
Important: If crankshaft bearing failure is due to other than normal wear, investigate the cause. Inspect the crankshaft and the connecting rod bearing bores.
Notice: Do not shim, scrape, or file bearing inserts. Do not touch the bearing surface of the insert with bare fingers. Skin oil and acids will etch the bearing surface.
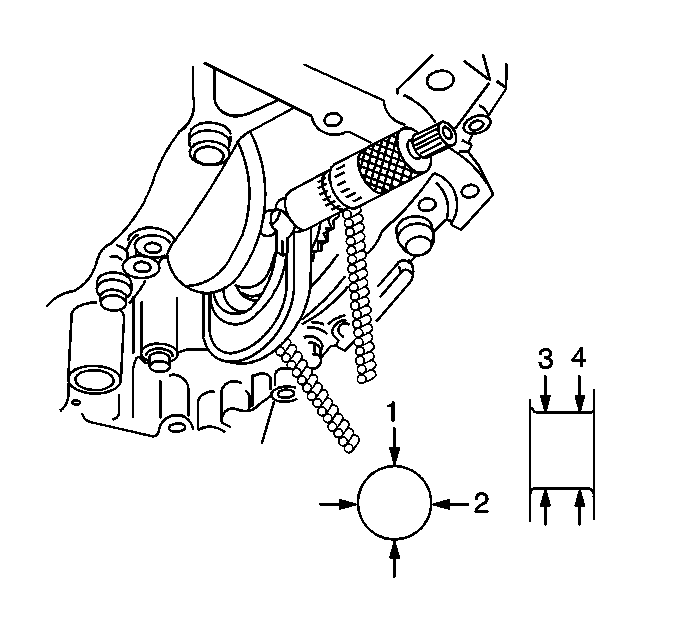
Maximum Crankshaft Taper
0.01 mm (0.0004 in)
Maximum Crankshaft Out-of-Round
0.01 mm (0.0004 in)
Notice: Use the correct fastener in the correct location. Replacement fasteners must be the correct part number for that application. Fasteners requiring replacement or fasteners requiring the use of thread locking compound or sealant are identified in the service procedure. Do not use paints, lubricants, or corrosion inhibitors on fasteners or fastener joint surfaces unless specified. These coatings affect fastener torque and joint clamping force and may damage the fastener. Use the correct tightening sequence and specifications when installing fasteners in order to avoid damage to parts and systems.
Important: The crankshaft and the lower crankcase assembly must be installed and properly torqued before measuring the connecting rod clearances.
Important: Do not turn the crankshaft while the gaging plastic is installed.
Tighten
Tighten the connecting rod cap nuts to 45 N·m (33 lb
ft).
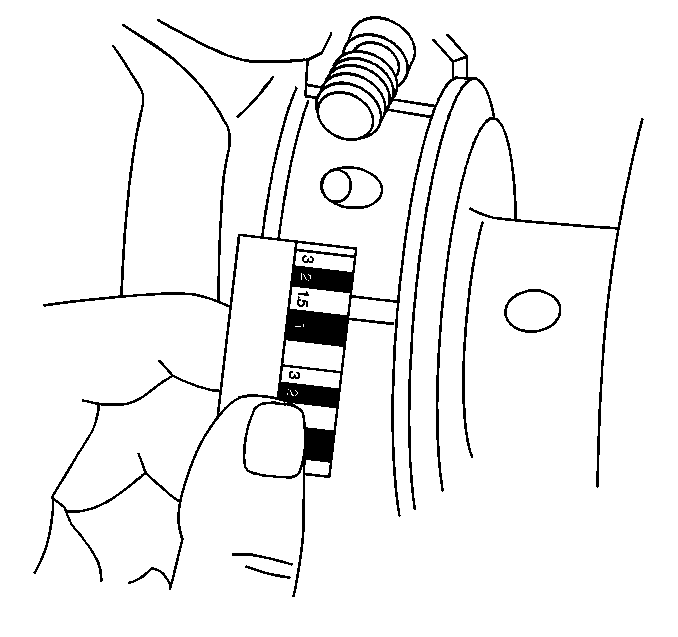
Standard Oil Clearance
0.045-0.063 mm (0.0018-0.0025 in)
Maximum Oil Clearance
0.08 mm (0.0031 in)
Regrind the crankshaft so that the finished crankpin diameter equals the measured connecting rod bore diameter minus 0.054 mm (0.0021 in).
Install a new 0.25 mm (0.0098 in) undersized bearing to the connecting rod.
