Refer to
Power and Ground
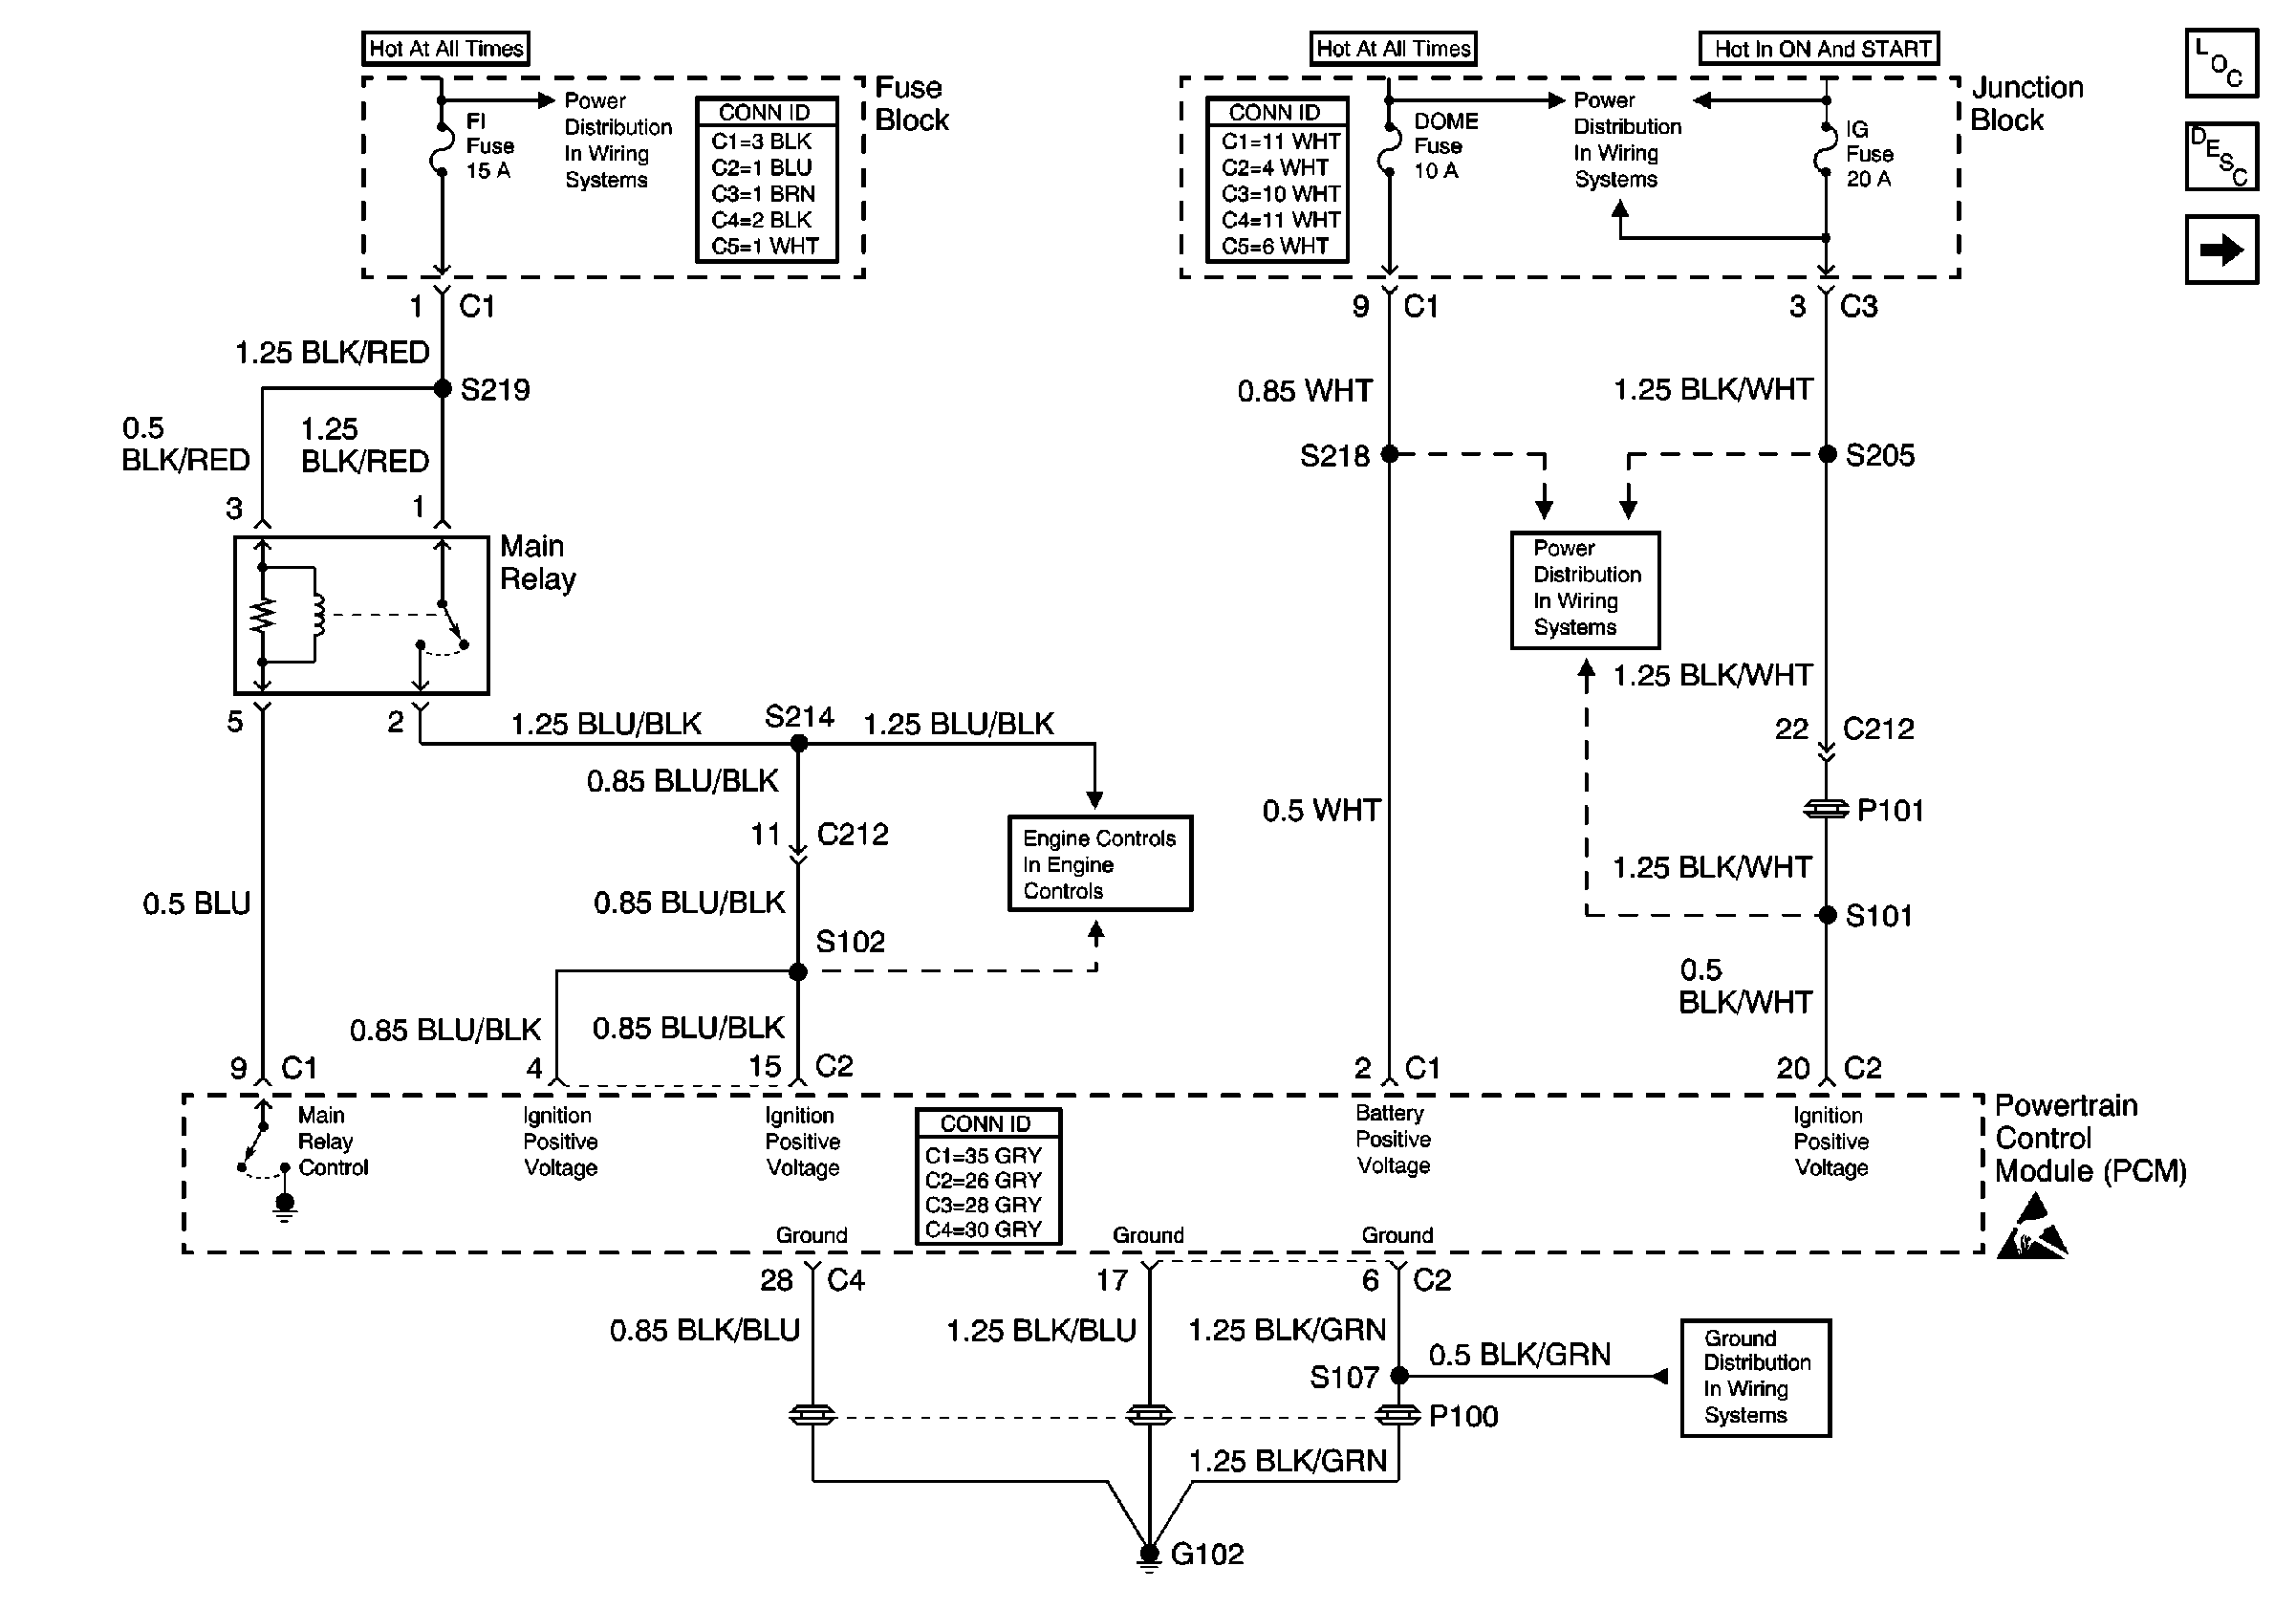
and
MIL and DLC

.
Circuit Description
The provision for communicating with the powertrain control module (PCM) is the data link connector (DLC). The DLC is located under the instrument panel. The DLC is used to link a scan tool to the PCM serial data stream. Some common uses of the scan tool are listed below:
| • | Identifying the stored diagnostic trouble codes (DTCs) |
| • | Reading the serial data stream |
| • | Clearing the DTCs |
| • | Storing the Freeze Frame data |
Diagnostic Aids
Some scan tools may require an external power supply. Make sure that your scan tool is using the correct power feed.
Check that the correct application (model year, carline, VIN code) has been selected on the scan tool. If communications are still not established, try the scan tool on another vehicle in order to ensure that the scan tool or the connecting cables are not the cause of the malfunction.
Any circuitry that is suspect to an intermittent complaint should be thoroughly inspected for any of the following conditions:
| • | Backed out terminals |
| • | Improper mating of terminals |
| • | Broken electrical connector locks |
| • | Improperly formed or damaged terminals |
| • | Faulty terminal to wire connections |
| • | Physical damage to the wiring harness |
| • | Broken conductor inside the wire insulation |
| • | Corrosion of electrical connections, splices, or terminals |
Test Description
The numbers below refer to the step numbers in the diagnostic table.
-
The Powertrain OBD System Check prompts the technician to complete some basic checks and to store the Freeze Frame data on the scan tool if applicable. This creates an electronic copy of the data taken when the fault occurred. The information is then stored in the scan tool for later reference.
-
This step checks whether the scan tool is able to turn ON.
-
This step checks if the scan tool can establish communication on the PCM serial data line.
-
This step checks for B+ at the DLC.
-
This step checks the ground circuits at the DLC.
-
This step checks for an open/shorted to ground serial data circuit, a shorted to battery positive serial data circuit, or for a faulty scan tool.
-
The PCM supplies a low current voltage on the serial data circuit. The normal circuit low current will NOT illuminate a test lamp. If the circuit is shorted to battery positive the higher current will illuminate the test lamp.
-
The scan tool may be damaged by high current flow on the serial data circuit at DLC terminal 7. Check the scan tool for proper operation on a known good vehicle that uses terminal 7 of the DLC for serial data communication.
-
This step checks for voltage in the ignition positive voltage circuit that supplies the PCM. An open in this circuit will disable the PCM and the main relay. The PCM will not provide serial data if the circuit is open.
Step | Action | Value(s) | Yes | No | ||||||
|---|---|---|---|---|---|---|---|---|---|---|
Did you perform the Powertrain On-Board Diagnostic (OBD) System Check? | -- | |||||||||
Does the scan tool power-up? | -- | |||||||||
Attempt to establish communication with the powertrain control module (PCM). Does the scan tool display PCM data? | -- | System OK | ||||||||
4 |
Does the scan tool display engine data? | -- | System OK | |||||||
Is the voltage near the specified value? | B+ | |||||||||
Probe the DLC terminals 4 and 5 (ground circuit terminals) with a test lamp connected to B+. Did the test lamp illuminate for both circuits? | -- | |||||||||
7 | Repair the open in the DLC ground circuits. Refer to Wiring Repairs in Wiring Systems. Is the action complete? | -- | -- | |||||||
8 | Repair the open or short in the battery positive voltage circuit to the DLC. Refer to Wiring Repairs in Wiring Systems. Is the action complete? | -- | -- | |||||||
Measure the voltage from terminal 7 of the DLC to ground with a DMM. Is the voltage measured the same or more than the specified value? | 11 volts | |||||||||
Connect a test lamp between the DLC connector terminal 7 and ground. Does the test lamp illuminate? | -- | |||||||||
Repair the short to battery positive voltage in the serial data circuit. Scan tool damage may have occurred. Refer to Wiring Repairs in Wiring Systems. Is the action complete? | -- | -- | ||||||||
12 |
Was a repair necessary? | -- | ||||||||
Does the test lamp illuminate? | -- | |||||||||
14 | Repair the open in the ignition positive voltage circuit between the IG fuse and the PCM. Refer to Wiring Repairs in Wiring Systems. Is the action complete? | -- | -- | |||||||
15 |
Did the test lamp illuminate at each terminal? | -- | ||||||||
16 |
Was a repair necessary? | -- | ||||||||
17 |
Does the test lamp illuminate at each terminal? | -- | ||||||||
18 | Repair the open in the PCM ground circuits between the PCM and the G102 ground. Refer to Wiring Repairs in Wiring Systems. Is the action complete? | -- | -- | |||||||
19 |
Important: The replacement PCM must be programmed. Replace the PCM. Refer to Powertrain Control Module Replacement/Programming . Is the action complete? | -- | -- | |||||||
20 |
Was a repair necessary? | -- | ||||||||
21 |
Is the action complete? | -- | -- |
