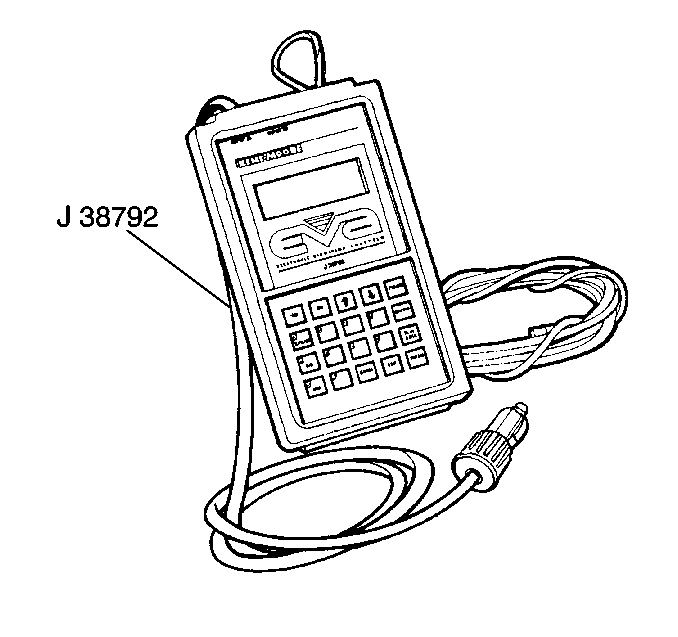
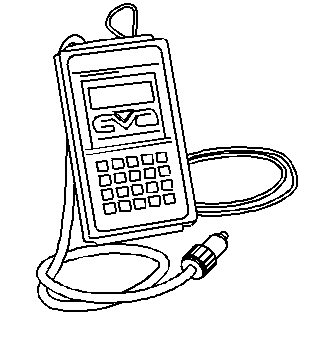
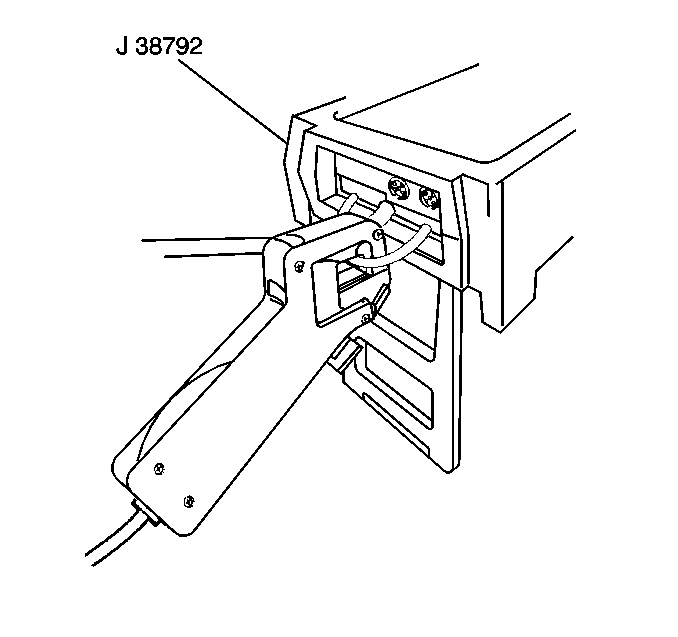
The J 38792 Electronic Vibration Analyzer (EVA) is specifically designed to diagnose vibrations. This hand-held device is similar to a scan tool. A standard 12-volt power feed supplies the power. The vibration sensor, or the accelerometer, is at the end of a 6 m (20 ft) cord. The vibration sensor can be mounted virtually anywhere on the vehicle where a vibration is felt.
EVA Basic Hookup
- Verify that the software cartridge is correctly inserted at the bottom of the unit. (The cartridge usually remains there at all times.)
- Connect the vibration sensor cord into either input A or B.
- Line up the connector so that the release button is at the bottom.
- Push the connector into the input until the connector clicks and locks in place.
- Plug the power cord into a 12-volt power feed in order to turn the EVA on. (The EVA is not equipped with an ON-OFF switch.)
Important: Do not twist the connector. The sensor should remain plugged into the unit at all times.
To disconnect the sensor, press the release button and gently pull the connector straight out.
EVA Sensor Placement
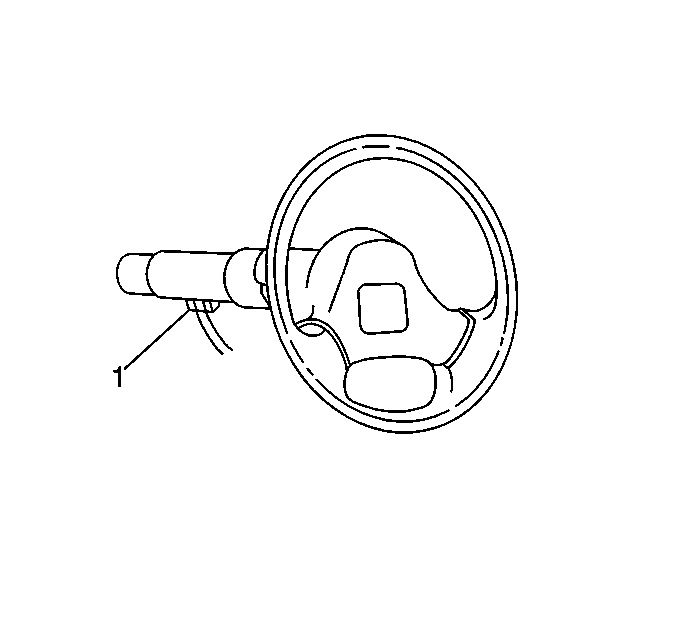
Proper EVA sensor placement is critical in order to take proper vibration readings. You can place the sensor anywhere on the vehicle where vibrations are felt. Use putty or a hook and loop fastener in order to hold the sensor in place on non-ferrous surfaces, such as the surface of the steering column.
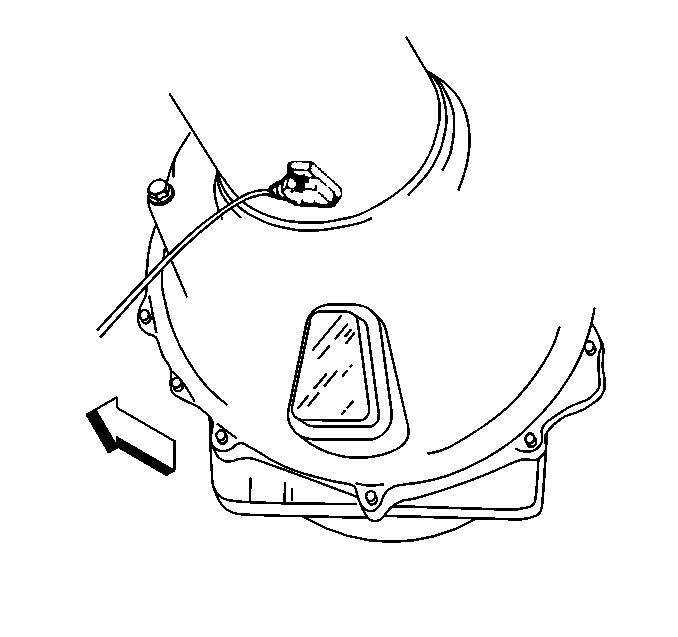
A magnet holds the sensor to ferrous surfaces.
Vibrations are typically felt in an up-and-down direction. The sensor is directionally sensitive. Therefore, place the sensor as flat as possible with the side marked UP facing upward. Place the UP side of the sensor in the exact position every time for consistent results when repeating the tests or making a comparison.
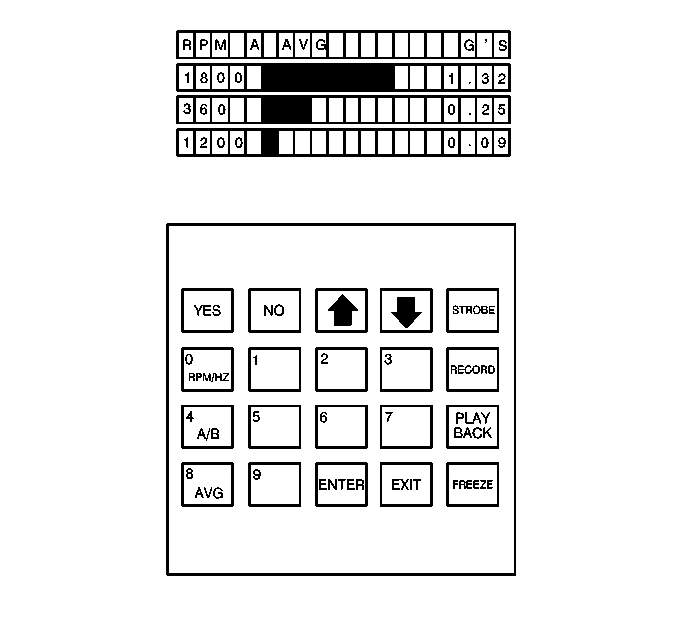
EVA Display
Up to 3 dominant vibration frequencies are displayed on the EVA's liquid crystal screen. On the left is the frequency reading, followed by a bar graph representation of the vibration's relative strength. The actual strength, or amplitude, is shown in acceleration force (G's) at the right side of the screen.
Frequencies can be displayed in revolutions per minute (RPM) or in Hertz (Hz). Switch between the two readings by pressing the RPM/Hz button on the keypad.
Next to the frequency data on the top line of the screen is the letter A or B. This letter indicates which input is activated. Press the A/B button on the keypad in order to switch between the two inputs.
Important: Verify that the letter on the display matches the correct sensor input.
The EVA offers the following main display features, all of which are described below:
| • | Freeze |
| • | Record/Playback |
| • | Averaging/Non-averaging modes |
| • | Strobe Balancing |
Freeze
Pressing the FREEZE button on the keypad activates the freeze function, which locks the display of data. The display shows FRZ at the top. The freeze function is useful when conducting an acceleration/deceleration test in which the significant amount of vibration registers only for a very short time. Pressing EXIT or the FREEZE button again deactivates the freeze function.
Record/Playback
The displayed vibration information can be recorded for later playback. The EVA retains stored data for about 70 hours after the unit has been unplugged from a power source. Data is recorded as snapshots of vibration information. Each snapshot consists of 10 different frames. Up to 10 snapshots can be recorded.
Press RECORD in order to record a snapshot. The screen will display R? in order to request a tag number between 0-9. These tag numbers are the individual frames of the snapshot recording. New data will replace the existing data when a number is chosen that has already been used in order to tag a snapshot.
Pressing PLAYBACK plays back the recorded data. The screen shows P? in order to request the tag number for the wanted snapshot. Once the number is entered, the snapshot data displays the letter P followed by the tag number. Then the screen displays the letter F followed by 0-9 in order to indicate which frame of the snapshot is being displayed.
Use the freeze function in order to freeze the display at any point in the sequence during playback. You can view individual frames in a forward or backward sequence using the up and down arrow keys.
The display returns to the active screen when the recording or playback of a snapshot is finished, or when EXIT is pressed.
Averaging/Non-Averaging Modes
The EVA normally operates in an averaging mode that averages multiple vibration samples over a period of time. The averaging mode minimizes the effects of a sudden vibration that is not related to the problem (such as form potholes or uneven road surfaces). Most tests use the averaging mode.
The EVA is more sensitive to vibrations in the non-averaging mode. The display is more instantaneous and not averaged over a period of time. The non-averaging mode is used when measuring a vibration that exists for only a short period of time, and during acceleration/deceleration tests.
Pressing the AVG button switches between the averaging and non-averaging modes. During averaging mode, the screen will display AVG.
Strobe Balancing
The EVA can strobe balance a rotating component. A trigger wire is located on the top of the EVA, which is used with an inductive pick-up light strobe. The EVA triggers the strobe light at the same frequency as the vibration. The timing light clips on to the trigger wire. The vibration sensor must be attached to input A. Input B does not provide the strobe function.
Pressing STROBE starts the strobe balancing function. The EVA will ask a series of questions in order to determine the correct filter range: full, low, or high.
The low and high ranges prevent other vibrations from interfering with the operation of the strobe light. Use the full range as a last resort only. Press YES in order to select a range. Press NO in order to go on to the next range. The vibration/strobe frequency must fall within the selected range.
The EVA will display the strobe frequency, amplitude, and filter range. The EVA is now ready to begin the strobe balance procedure.
EVA Calibration
The EVA features the following two built-in calibration procedures:
| • | Sensor calibration |
| • | Phase shift calibration |
Calibrate a replaced or an added sensor in order to function properly with the EVA unit. The phase shift calibration is performed at the factory. Do NOT repeat this calibration under normal use.
Sensor Calibration
- Lay the sensor on a flat stationary surface with the UP side facing upward.
- Plug the sensor into either input A or B.
- Plug the EVA into a 12-volt power supply.
- After the display initializes, select the proper input.
- Press the up arrow key.
- Press the number 2 three times on the keypad. The message BURNING will appear, followed by a request to turn the sensor over.
- Turn the sensor over.
- Press any key in order to commence calibration:
| • | Calibration will take about 20 seconds. |
| • | The display will return to the active mode when calibration is complete. |
Phase Shift Calibration
- Plug the EVA into a 12-volt power supply.
- Press the down arrow key on the EVA keypad.
- Press the number 2 three times in order to begin calibration:
- Press any key in order to return to the active mode.
| • | Do not press any key until the message ANY KEY TO CONTINUE appears. Pressing a key will cancel the calibration process. |
| • | The display will flash numbers for 5-6 minutes. (If the numbers flash for more than 10 minutes, the EVA is defective.) |
| • | The message BURNING PHASE SHIFT CONSTANTS will appear for one minute. |
| • | The BURNING CENTER FREQUENCIES LOW=39 HIGH=48 message will appear. |
| • | The ANY KEY TO CONTINUE message should appear. |
Keypad Reference
A/B: Switches the display between the B input and the B input. You must use Input A when strobe balancing.AVG: Switches the display between the non-averaging mode and the averaging mode. The non-averaging mode is more sensitive to sudden vibration variations. When in the averaging mode, the word AVG appears at the top of the display.
RPM/HZ: Switches the frequency display between RPM and Hz.
FREEZE: Locks the display on the data at that moment and displays the word FRZ at the top of the screen. This key operates in the active display or during playback. Pressing the FREEZE key again or pressing the EXIT key unlocks the display.
RECORD: Places the EVA in the record mode. Pressing the EXIT key will return the screen to the active display.
PLAYBACK: Places the EVA in the playback mode in order to view vibration information that was previously recorded. Pressing the EXIT key will return the key screen to the active display.
Numeric Keys (0-9): The numbered keys are used in order to select one of 10 snapshot tag numbers (0-9) when recording or playing back information.
Arrow Keys: The arrow keys are used in order to move through the individual frames of a snapshot during a freeze in the playback mode. Pressing the UP arrow moved forward one frame, pressing the DOWN arrow moves backward one frame.
ENTER: Once the EVA is in the record mode and you have selected a snapshot tag number, press ENTER in order to start recording.
STROBE: Places the EVA in the strobe mode for driveshaft balancing and diagnosis. Pressing the EXIT key will return the screen to the active display.
YES and NO: Used in order to select a filter range when in the strobe balancing mode.
EXIT: Returns the screen to the active display when in freeze mode, in record mode, in playback mode or in strobe mode.
