Diagnostic Instructions
| • | Perform the Diagnostic System Check - Vehicle prior to using this diagnostic procedure. |
| • | Review Strategy Based Diagnosis for an overview of the diagnostic approach. |
| • | Diagnostic Procedure Instructions provides an overview of each diagnostic category. |
DTC Descriptor
DTC P0106: Manifold Absolute Pressure (MAP) Sensor PerformanceDiagnostic Fault Information
Circuit | Short to Ground | High Resistance | Open | Short to Voltage | Signal Performance |
|---|---|---|---|---|---|
5-Volt Reference | P0107, P0698, P2564 | P0106 | P0107 | P0106, P0401, P0699, P2565 | P0106 |
MAP Sensor Signal | P0107 | P0106 | P0107 | P0108 | P0106 |
Low Reference | -- | P0106 | P0108 | -- | P0106 |
Typical Scan Tool Data
Circuit | Short to Ground | Open | Short to Voltage |
|---|---|---|---|
Operating Conditions: Engine running at idle in Park Parameter Normal Range: BARO varies with altitude | |||
5-Volt Reference | 43 kPa | 43 kPa | 200 kPa |
MAP Sensor Signal | 43 kPa | 43 kPa | 366 kPa |
Low Reference | -- | 258 kPa | -- |
Circuit/System Description
The manifold absolute pressure (MAP) sensor measures the pressure inside the intake manifold. Pressure in the intake manifold is affected by turbocharger output, engine speed, accelerator pedal input, air temperature, and barometric pressure (BARO). A diaphragm within the MAP sensor is displaced by the pressure changes that occur from the varying load and operating conditions of the engine. The engine control module (ECM) supplies a regulated 5 volts to the sensor on the 5-volt reference circuit. The ECM supplies a ground on the low reference circuit. The MAP sensor provides a signal voltage to the ECM, relative to the pressure changes, on the MAP sensor signal circuit. The ECM converts the signal voltage input to a pressure value. Under normal operation, the lowest pressure that can exist in the intake manifold is equal to the BARO. This occurs when the vehicle is operating at idle or when the ignition is ON, while the engine is OFF. The ECM uses the MAP sensor to aid in diagnosis of the turbocharger performance. The highest manifold pressures occur when the turbocharger output is high. Manifold pressure can range from 58 kPa (8 psi) when pressure are low, to more than 240 kPa (34 psi) when pressures are high, depending on the BARO. The MAP sensor has a range of 43-255 kPa (6-36 psi).
Conditions for Running the DTC
| • | DTCs P0107, P0108, P2228, P2229 are not set. |
| • | The engine speed is less than 760 RPM. |
| • | The exhaust gas recirculation (EGR) valve is not commanded ON. |
| • | This DTC runs continuously when the above enabling conditions are met. |
Conditions for Setting the DTC
The ECM detects that the BARO and MAP sensors disagree by greater than 14 kPa with the ignition ON, for greater than 10 seconds.
Action Taken When the DTC Sets
| • | DTC P0106 is a Type A DTC. |
| • | DPF Regeneration is inhibited. |
| • | The ECM commands reduced engine power mode. |
| • | A message center or an indicator may display Reduced Engine Power. |
Conditions for Clearing the DTC
DTC P0106 is a Type A DTC.
Diagnostic Aids
| • | A slight resistance of 20-30 ohms on the 5-volt reference or low reference circuits may cause this DTC to set. |
| • | Verify that any electrical aftermarket devices are properly connected and grounded. Refer to Checking Aftermarket Accessories. |
Reference Information
Schematic Reference
Connector End View Reference
Description and Operation
Turbocharger System Description
Electrical Information Reference
DTC Type Reference
Powertrain Diagnostic Trouble Code (DTC) Type Definitions
Scan Tool Reference
Control Module References for scan tool information
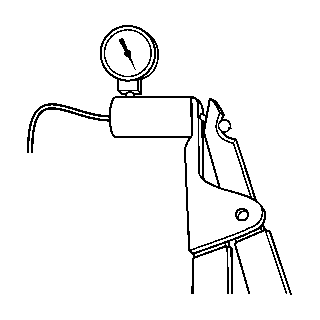
Special Tools
| • | J 23738-A Mityvac |
| • | J 35555 Metal Mityvac |
Circuit/System Verification
- Verify that DTCs P0698 or P0699 are not set.
- Verify that restrictions do not exist in the exhaust system. Refer to Restricted Exhaust.
- Verify that the engine is in good mechanical condition before continuing with this diagnostic. Refer to Symptoms - Engine Mechanical.
- Ignition OFF for 90 seconds, determine the current vehicle testing altitude.
- Ignition ON, observe the scan tool MAP Sensor parameters. Compare the parameter to the Altitude Versus Barometric Pressure. The BARO sensor pressure parameter should be within the specified range indicated in the table.
- Ignition ON, observe the scan tool MAP and BARO parameters. The MAP and BARO sensor parameters should be within 14 kPa of each other.
- Engine running, observe the scan tool MAP Sensor parameter. Slowly increase the engine speed to 2,000 RPM, then allow the engine speed to return to a stable idle. The MAP Sensor parameter should increment to a higher value at 2,000 RPM and then return to near BARO at idle speed.
- Operate the vehicle within the Conditions for Running the DTC to verify that the DTC does not reset. You may also operate the vehicle within the conditions that you observed from the Freeze Frame/Failure Records data.
| ⇒ | If any of the DTCs are set, refer to DTC P0698 or P0699. |
Circuit/System Testing
Important: You must perform the Circuit/System Verification before proceeding with the circuit/system testing.
Important: You must perform the Repair Verification after completing the circuit/system testing.
- Verify the integrity of the entire air induction system by inspecting for the following conditions:
- Ignition ON, engine OFF, observe the scan tool BARO parameter. Compare the BARO parameter to the range specified in the Altitude Vs. Barometric Pressure table. Refer to Altitude Versus Barometric Pressure.
- Ignition OFF, disconnect the harness connector at the MAP sensor.
- Ignition OFF and scan tool disconnected for 90 seconds, test for less than 5 ohms between the low reference circuit terminal A and ground.
- Ignition ON, test for the 4.8-5.2 volts between the 5-volt reference circuit terminal C and ground.
- Verify the scan tool MAP parameter is less than 45 kPa.
- Install a 3A fused jumper wire between the signal circuit terminal B and the 5-volt reference circuit terminal C. Verify the scan tool MAP parameter is greater than 253 kPa.
- If all circuits test normal, test or replace the MAP sensor.
| • | Damaged components |
| • | Loose or improper installation |
| • | An air flow restriction or leak |
| • | Any snow or ice build-up in the air cleaner or MAF Sensor |
| • | Any ice, water, coking, or restrictions at the MAP Sensor Port |
| ⇒ | If the BARO parameter is outside the range specified, replace the ECM. |
| ⇒ | If greater than the specified range, test the low reference circuit for an open/high resistance. If the circuit tests normal, replace the ECM. |
| ⇒ | If less than the specified range, test the 5-volt reference circuit for a short to ground or an open/high resistance. If the circuit tests normal, replace the ECM. |
| ⇒ | If greater than the specified range, test the 5-volt reference circuit for a short to voltage. If the circuit tests normal, replace the ECM. |
| ⇒ | If greater than the specified range, test the signal circuit terminal B for a short to voltage. If the circuit tests normal, replace the ECM. |
| ⇒ | If less than the specified range, test the signal circuit for a short to ground or an open/high resistance. If the circuit tests normal, replace the ECM. |
Component Testing
Important: You must perform the Circuit/System Testing in order to verify the integrity of the MAF sensor circuits before proceeding with the Component Testing.
- Ignition OFF, remove the MAP sensor.
- Install a 3A fused jumper wire between the 5-volt reference terminal C and the corresponding terminal of the MAP sensor
- Install a jumper wire between the low reference terminal A of the MAP sensor and ground.
- Install a jumper wire at the signal terminal B of the MAP sensor.
- Connect a DMM between the jumper wire from terminal B of the MAP sensor and ground.
- Ignition ON, with the J 23738-A or J 35555 , slowly apply vacuum to the sensor while observing the voltage on the DMM. The voltage should vary between 4.9-0.02 volts, without any spikes or dropouts.
| ⇒ | If the voltage is erratic, replace the MAP sensor. |
Repair Instructions
| • | Control Module References for ECM replacement, setup, and programming |
Repair Verification
- Install any components or connectors that have been removed or replaced during diagnosis.
- Perform any adjustment, programming, or setup procedures that are required when a component or module is removed or replaced.
- Clear the DTCs.
- Turn OFF the ignition for 90 seconds.
- Duplicate the Conditions for Running the DTC and use the freeze Frame/Failure Records, if applicable, in order to verify the DTC does not reset. If the DTC resets or another DTC is present, refer to the Diagnostic Trouble Code (DTC) List - Vehicle and perform the appropriate diagnostic procedure.
- Ignition ON, engine OFF, observe the scan tool MAP and BARO parameters. The MAP and BARO sensor parameters should be within 5 kPa of each other.
- Engine running, observe the scan tool Soot Mass parameter.
| ⇒ | If the Soot Mass value is less than 30 grams, perform the Diesel Particulate Filter (DPF) Regeneration Enable. |
| ⇒ | If the Soot Mass value is greater than 30 grams, perform the Diesel Particulate Filter (DPF) Service Regeneration. |
