HYDRA-MATIC 6L50 (MYB), 6L80 (MYC) and 6L90 (MYD) Rear Wheel Drive Automatic Transmission Control Valve Body Assembly Reconditioning

| Subject: | HYDRA-MATIC® 6L50 (MYB), 6L80 (MYC) and 6L90 (MYD), Rear Wheel Drive Automatic Transmission Control Valve Body Assembly Reconditioning |
| Models: | 2006-2008 Cadillac STS-V, XLR-V |
| 2007-2008 Cadillac Escalade, Escalade ESV, Escalade EXT, STS, SRX, XLR |
| 2008 Cadillac CTS |
| 2006-2008 Chevrolet Corvette |
| 2007-2008 Chevrolet Silverado |
| 2008 Chevrolet Suburban |
| 2007-2008 GMC Sierra, Denali, Yukon Denali, Yukon XL Denali |
| 2008 GMC Yukon XL |
| 2008 HUMMER H2 |
| with 6L50, 6L80 or 6L90 HYDRA-MATIC® Rear Wheel Drive Automatic Transmission (RPOs MYB, MYC, MYD) |
The information outlined in this bulletin is designed to provide easy to follow control valve body reconditioning instructions using the new illustrations to simplify reassembly of the 6L50, 6L80 and/or 6L90 automatic transmission control valve body assembly.
Caution: Valve springs can be tightly compressed. Use care when removing retainers and plugs. Personal injury could result.
Notice: After cleaning the transmission components, allow to air dry. Do not use cloth or paper towels in order to dry any transmission components. Lint from the towels can cause component failure.
Notice: Do not reuse cleaning solvents. Previously used solvents may deposit sediment, which may damage the component.
Inspection Procedure for Shift Concerns
- Using the exploded view, inspect each bore for freedom of valve(s) movement and evidence of debris. Pay particular attention to those valves related to the customer’s concern. IF VALVE BODY CLEANING IS NOT REQUIRED, DO NOT DISASSEMBLE THE BORES UNLESS IT IS NECESSARY TO VERIFY MOVEMENT.
- Verify movement of the valves in their normal installed position. Valves may become restricted during removal or installation. This is normal due to small tolerances between the valves and bores.
- If a valve is restricted and cannot be corrected by cleaning the valve and bore, replace the valve body. Describe the restricted valve on the repair order.
Disassembly/Reassembly for Cleaning Debris
- If a valve is restricted by a metal burr from machining that bore, remove the valve and burr. Inspect the movement in the valve’s normal position. If no other debris or restrictions are found, reassemble the valve body and install in the transmission.
- If the valve body has been contaminated with debris from another transmission component failure, disassemble all bores for complete cleaning of all valve body components. Keeping individual bore parts separated will make reassembly easier. Use the following illustrations for positive identification and location of individual parts.
- Using GM Brake Clean, or equivalent, in a safe and clean environment (clean aluminum pan), clean the valve body and dry it with compressed air. Use appropriate eye protection.
- Clean individual valve body components with GM Brake Clean, or equivalent. Coat each valve with clean ATF and reassemble in each bore. Check each valve for free movement during assembly of each bore.
Important: Position the valve body as shown in the following illustrations for positive identification and location of individual parts.
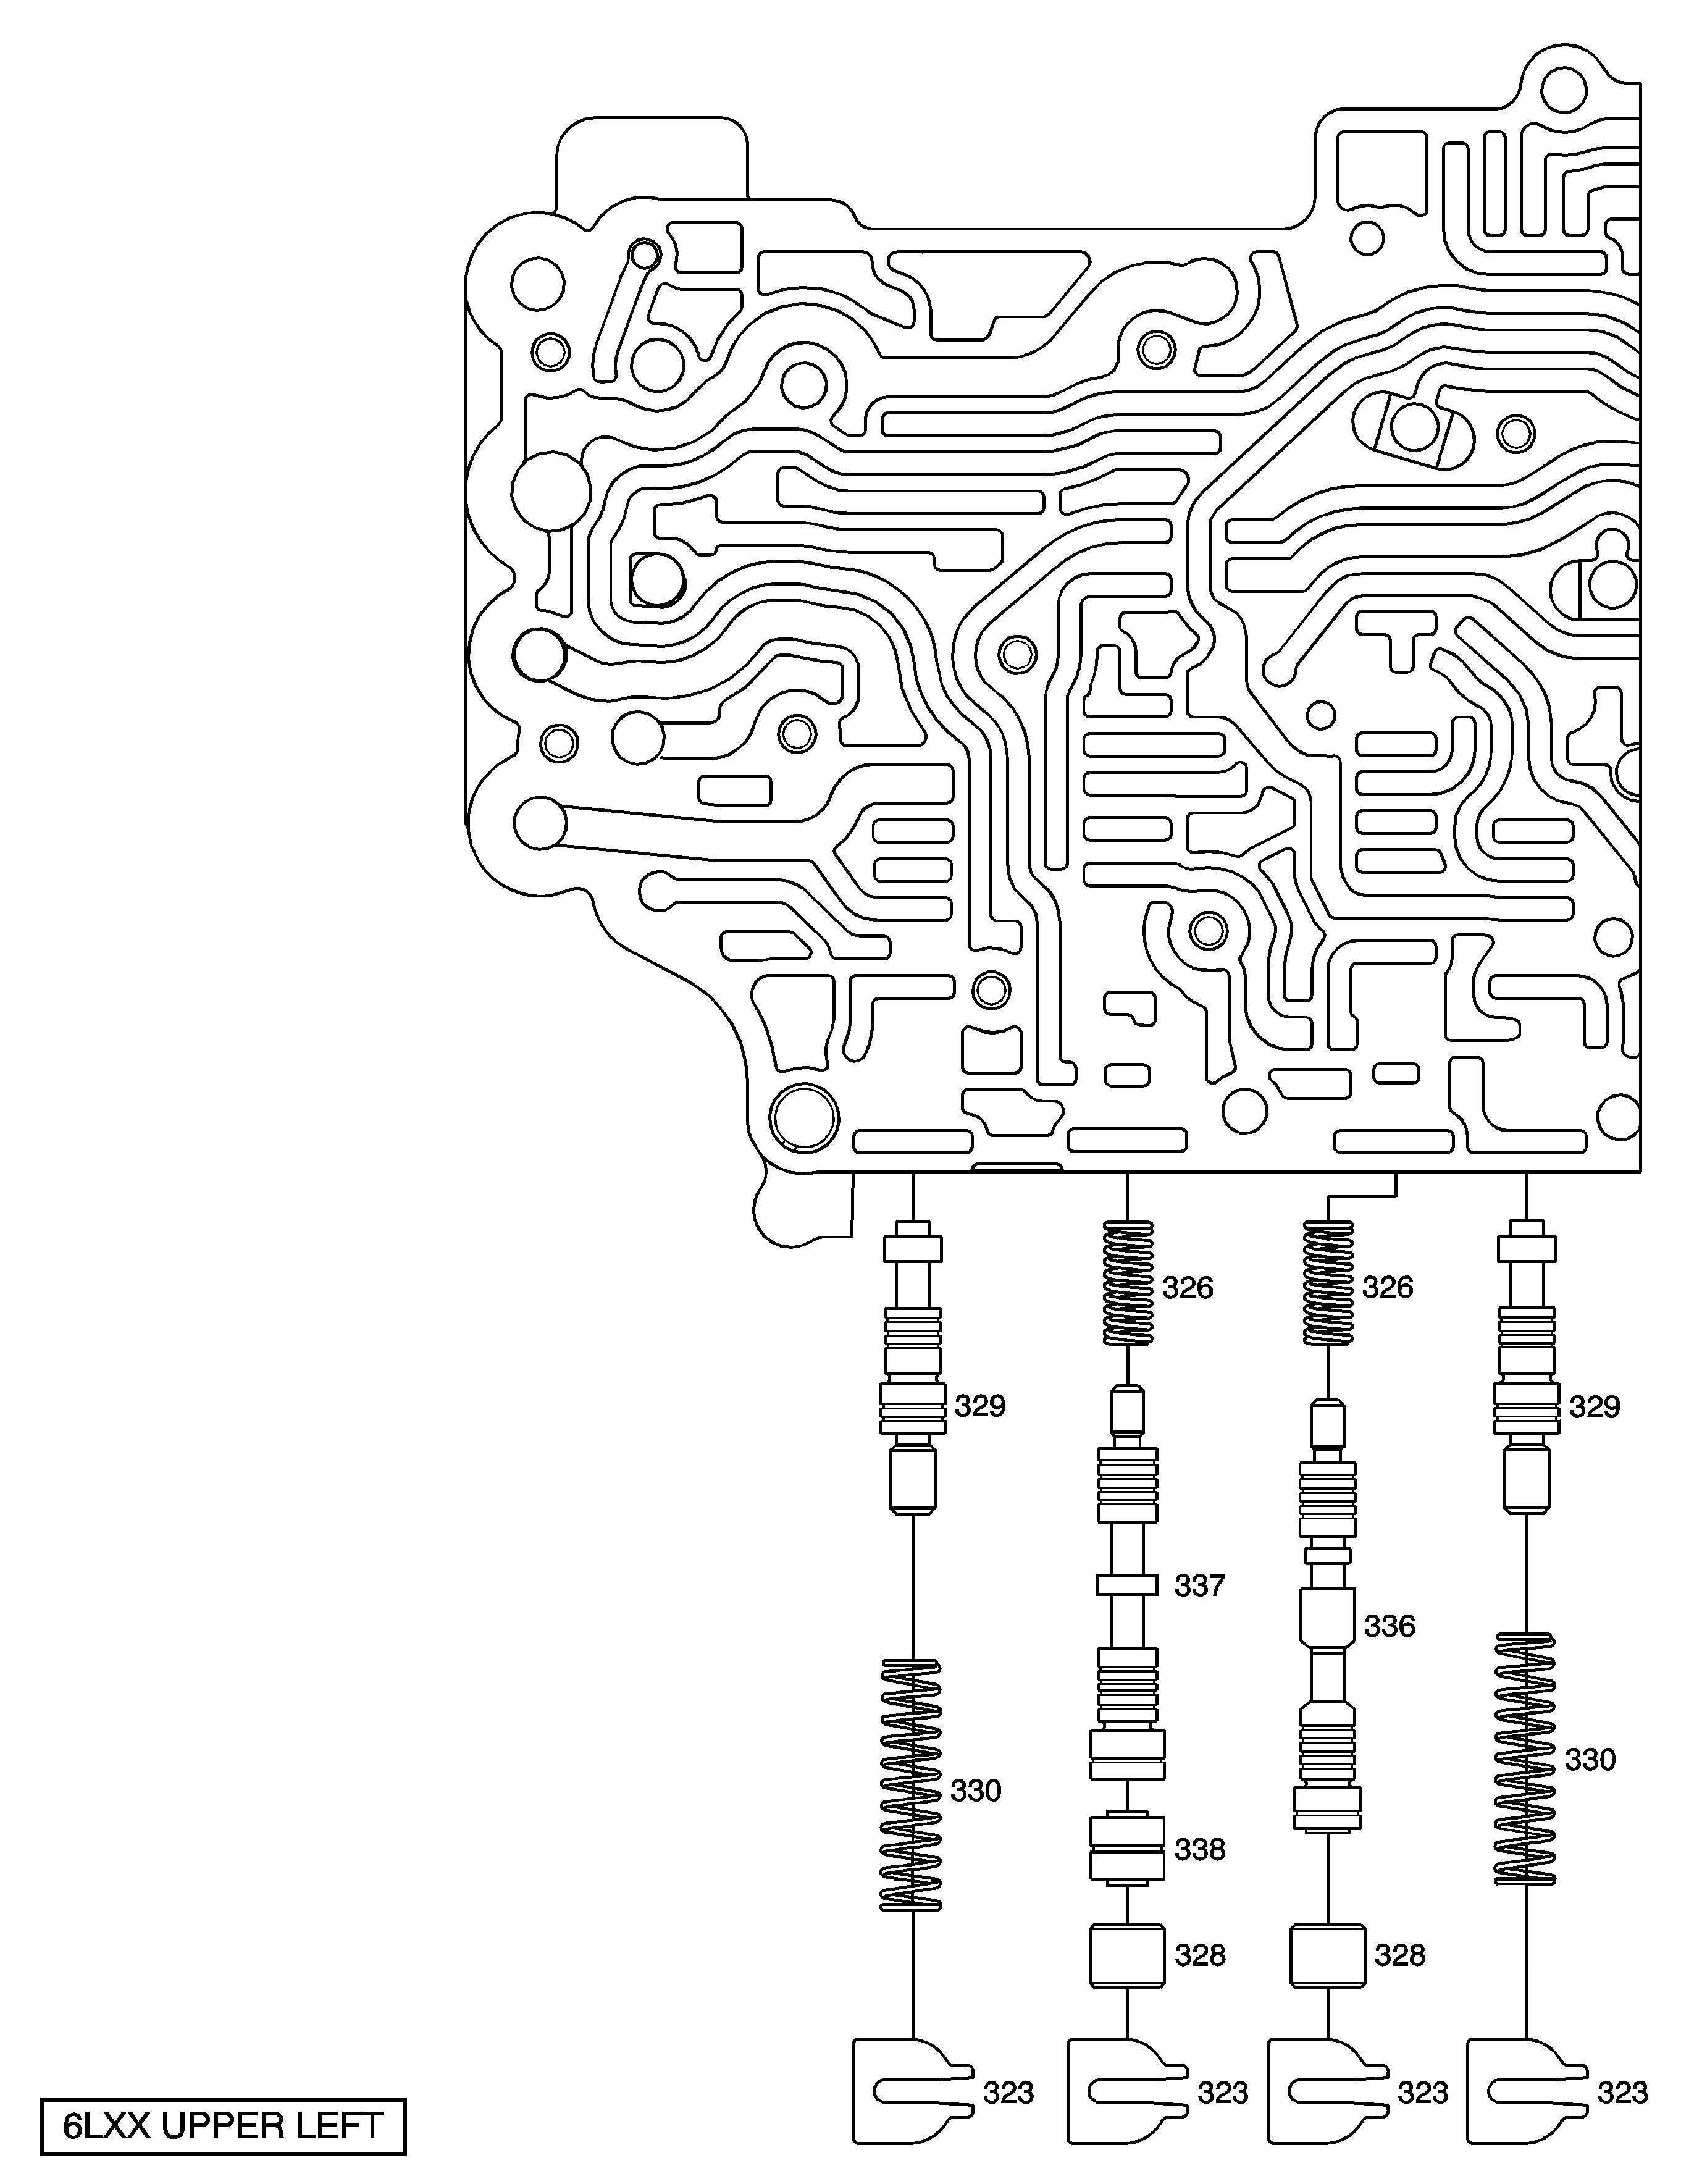
Call Out Number | Description |
|---|---|
323 | Retainer |
326 | Clutch Regulator Valve Spring |
328 | Bore Plug |
329 | Clutch Boost Valve |
330 | Clutch Boost Valve Spring |
336 | 3-5 Reverse Clutch Regulator Valve |
337 | 1-2-3-4 Clutch Regulator Valve |
338 | Shuttle Valve |
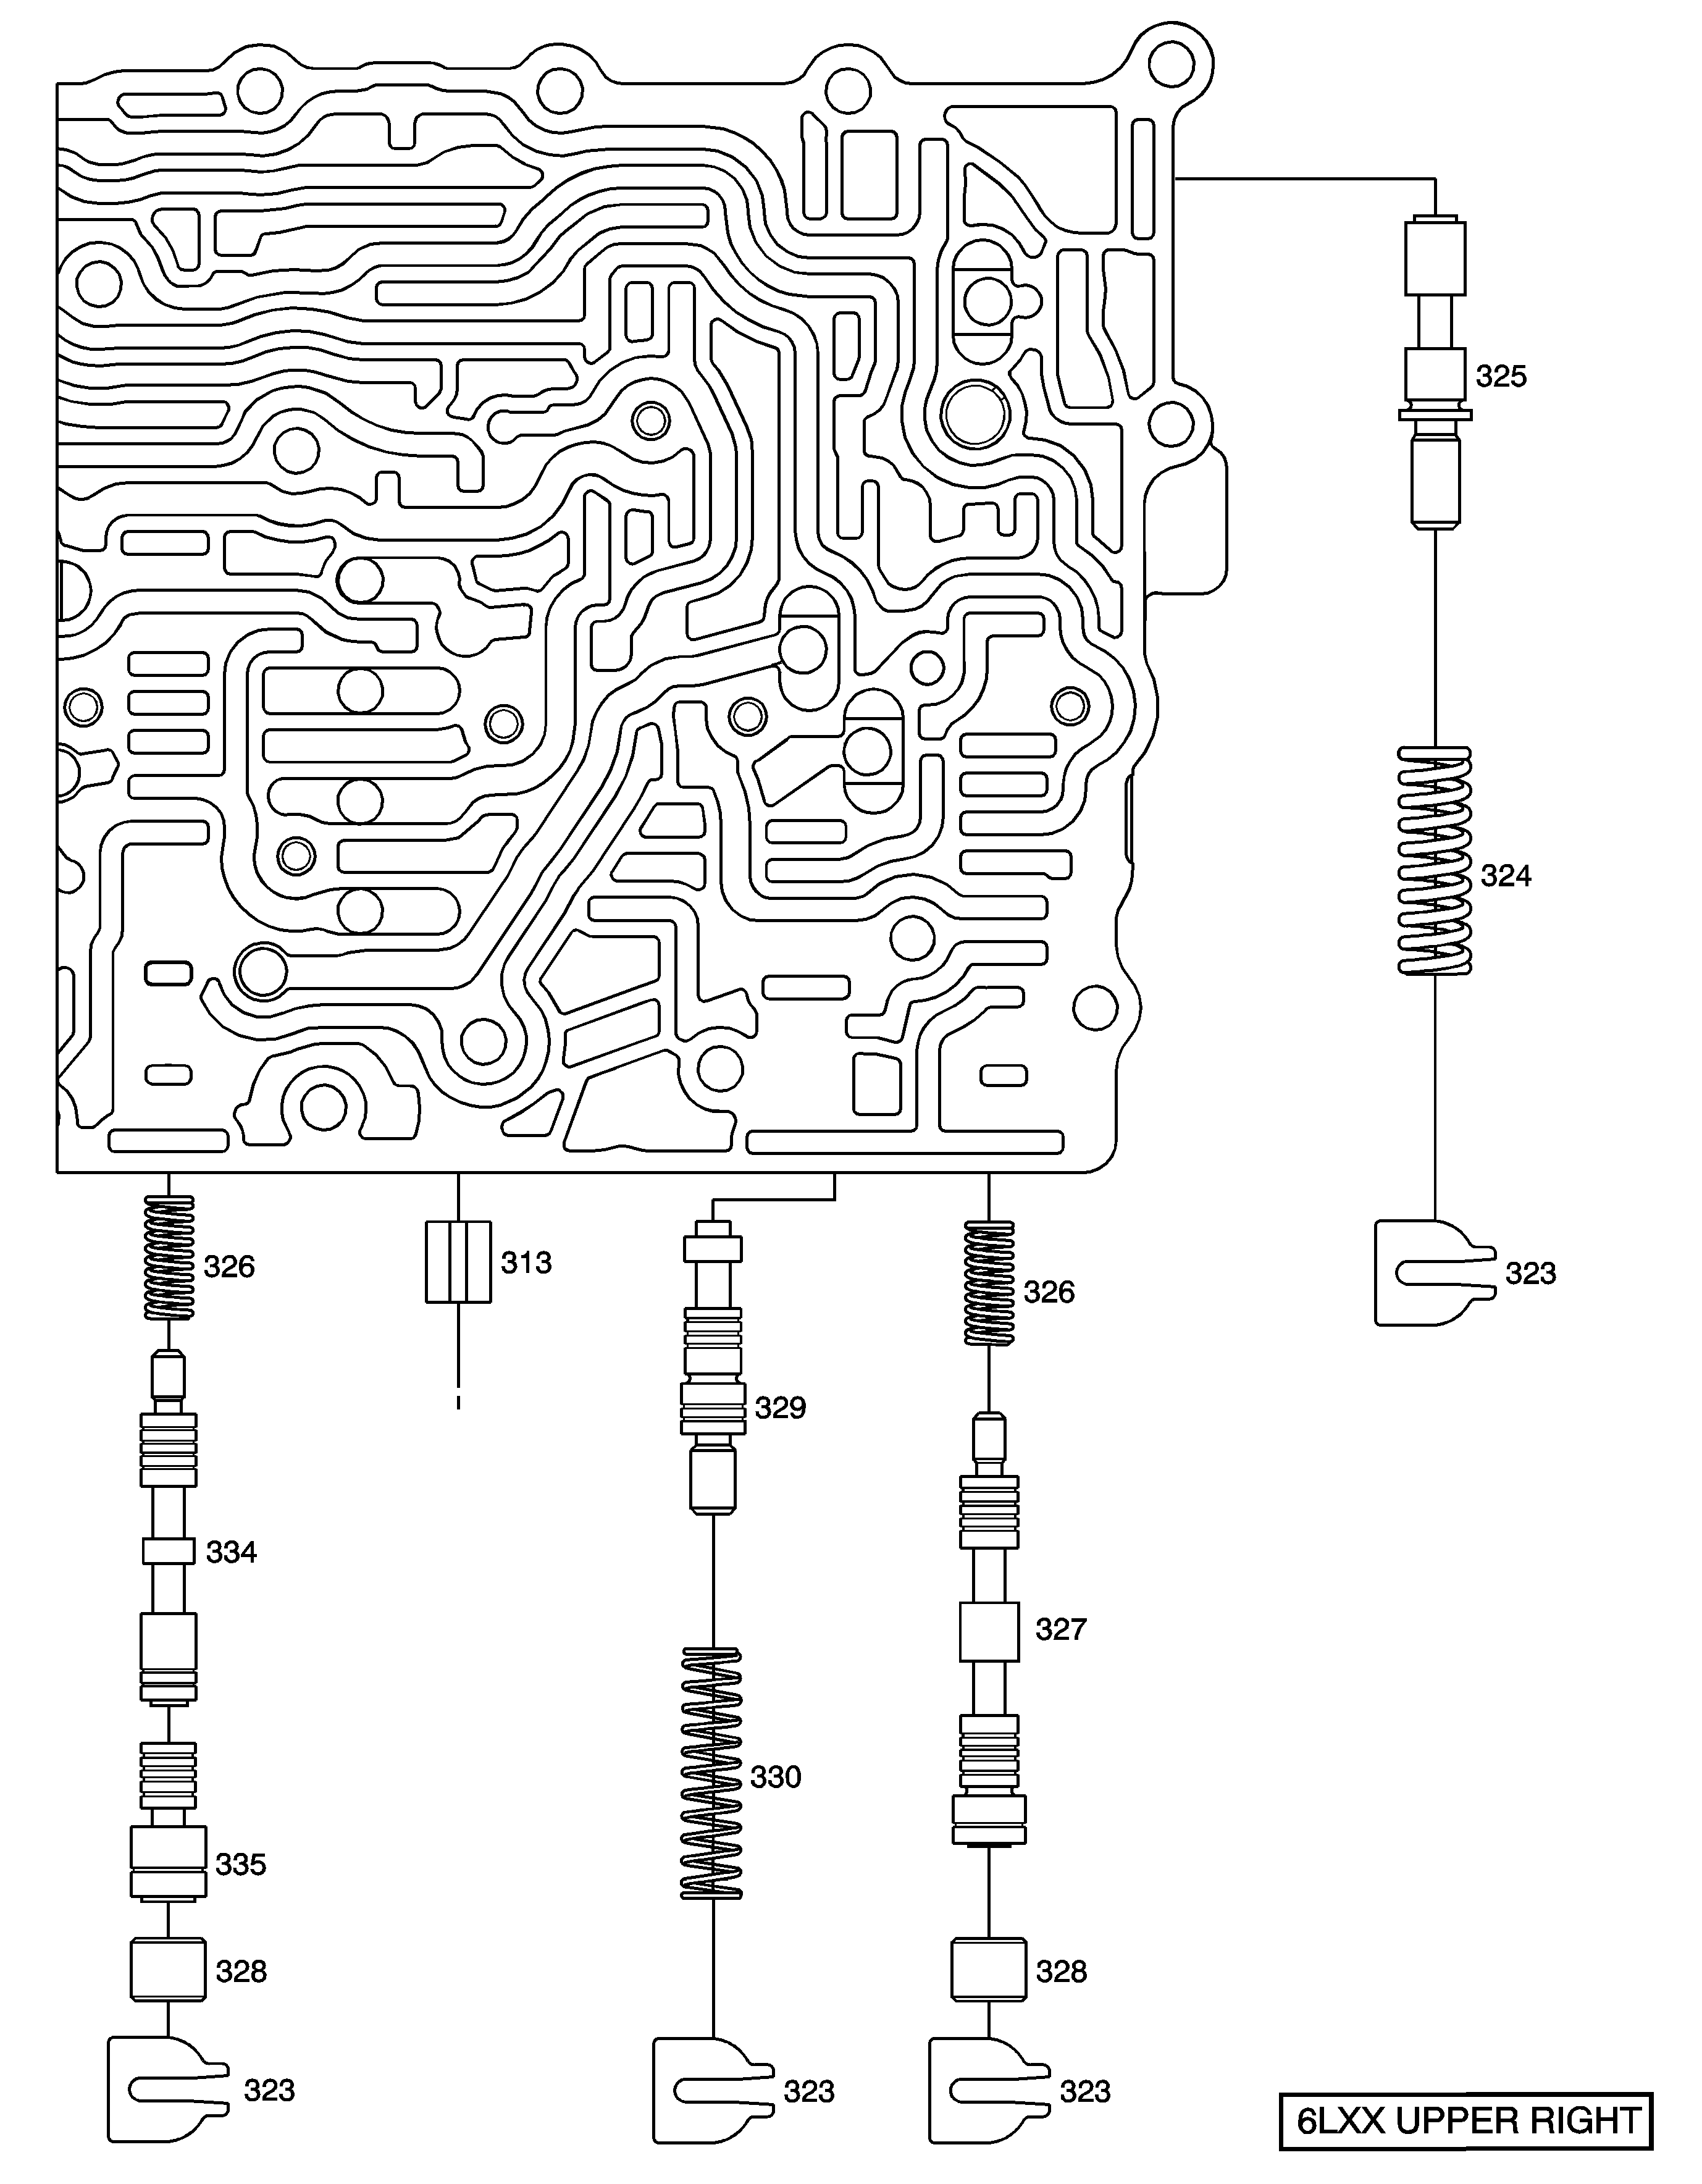
Call Out Number | Description |
|---|---|
323 | Retainer |
324 | Actuator Feed Limit Valve Spring |
325 | Actuator Feed Limit Valve |
326 | Clutch Regulator Valve Spring |
327 | 1st/Reverse Band and 4-5-6 Clutch Regulator Valve |
328 | Bore Plug |
329 | Clutch Boost Valve |
330 | Clutch Boost Valve Spring |
313 | Control Valve Body Locator Pin |
334 | 2-6 Clutch Regulator Valve |
335 | 2-6 Clutch Regulator Valve Gain Valve |
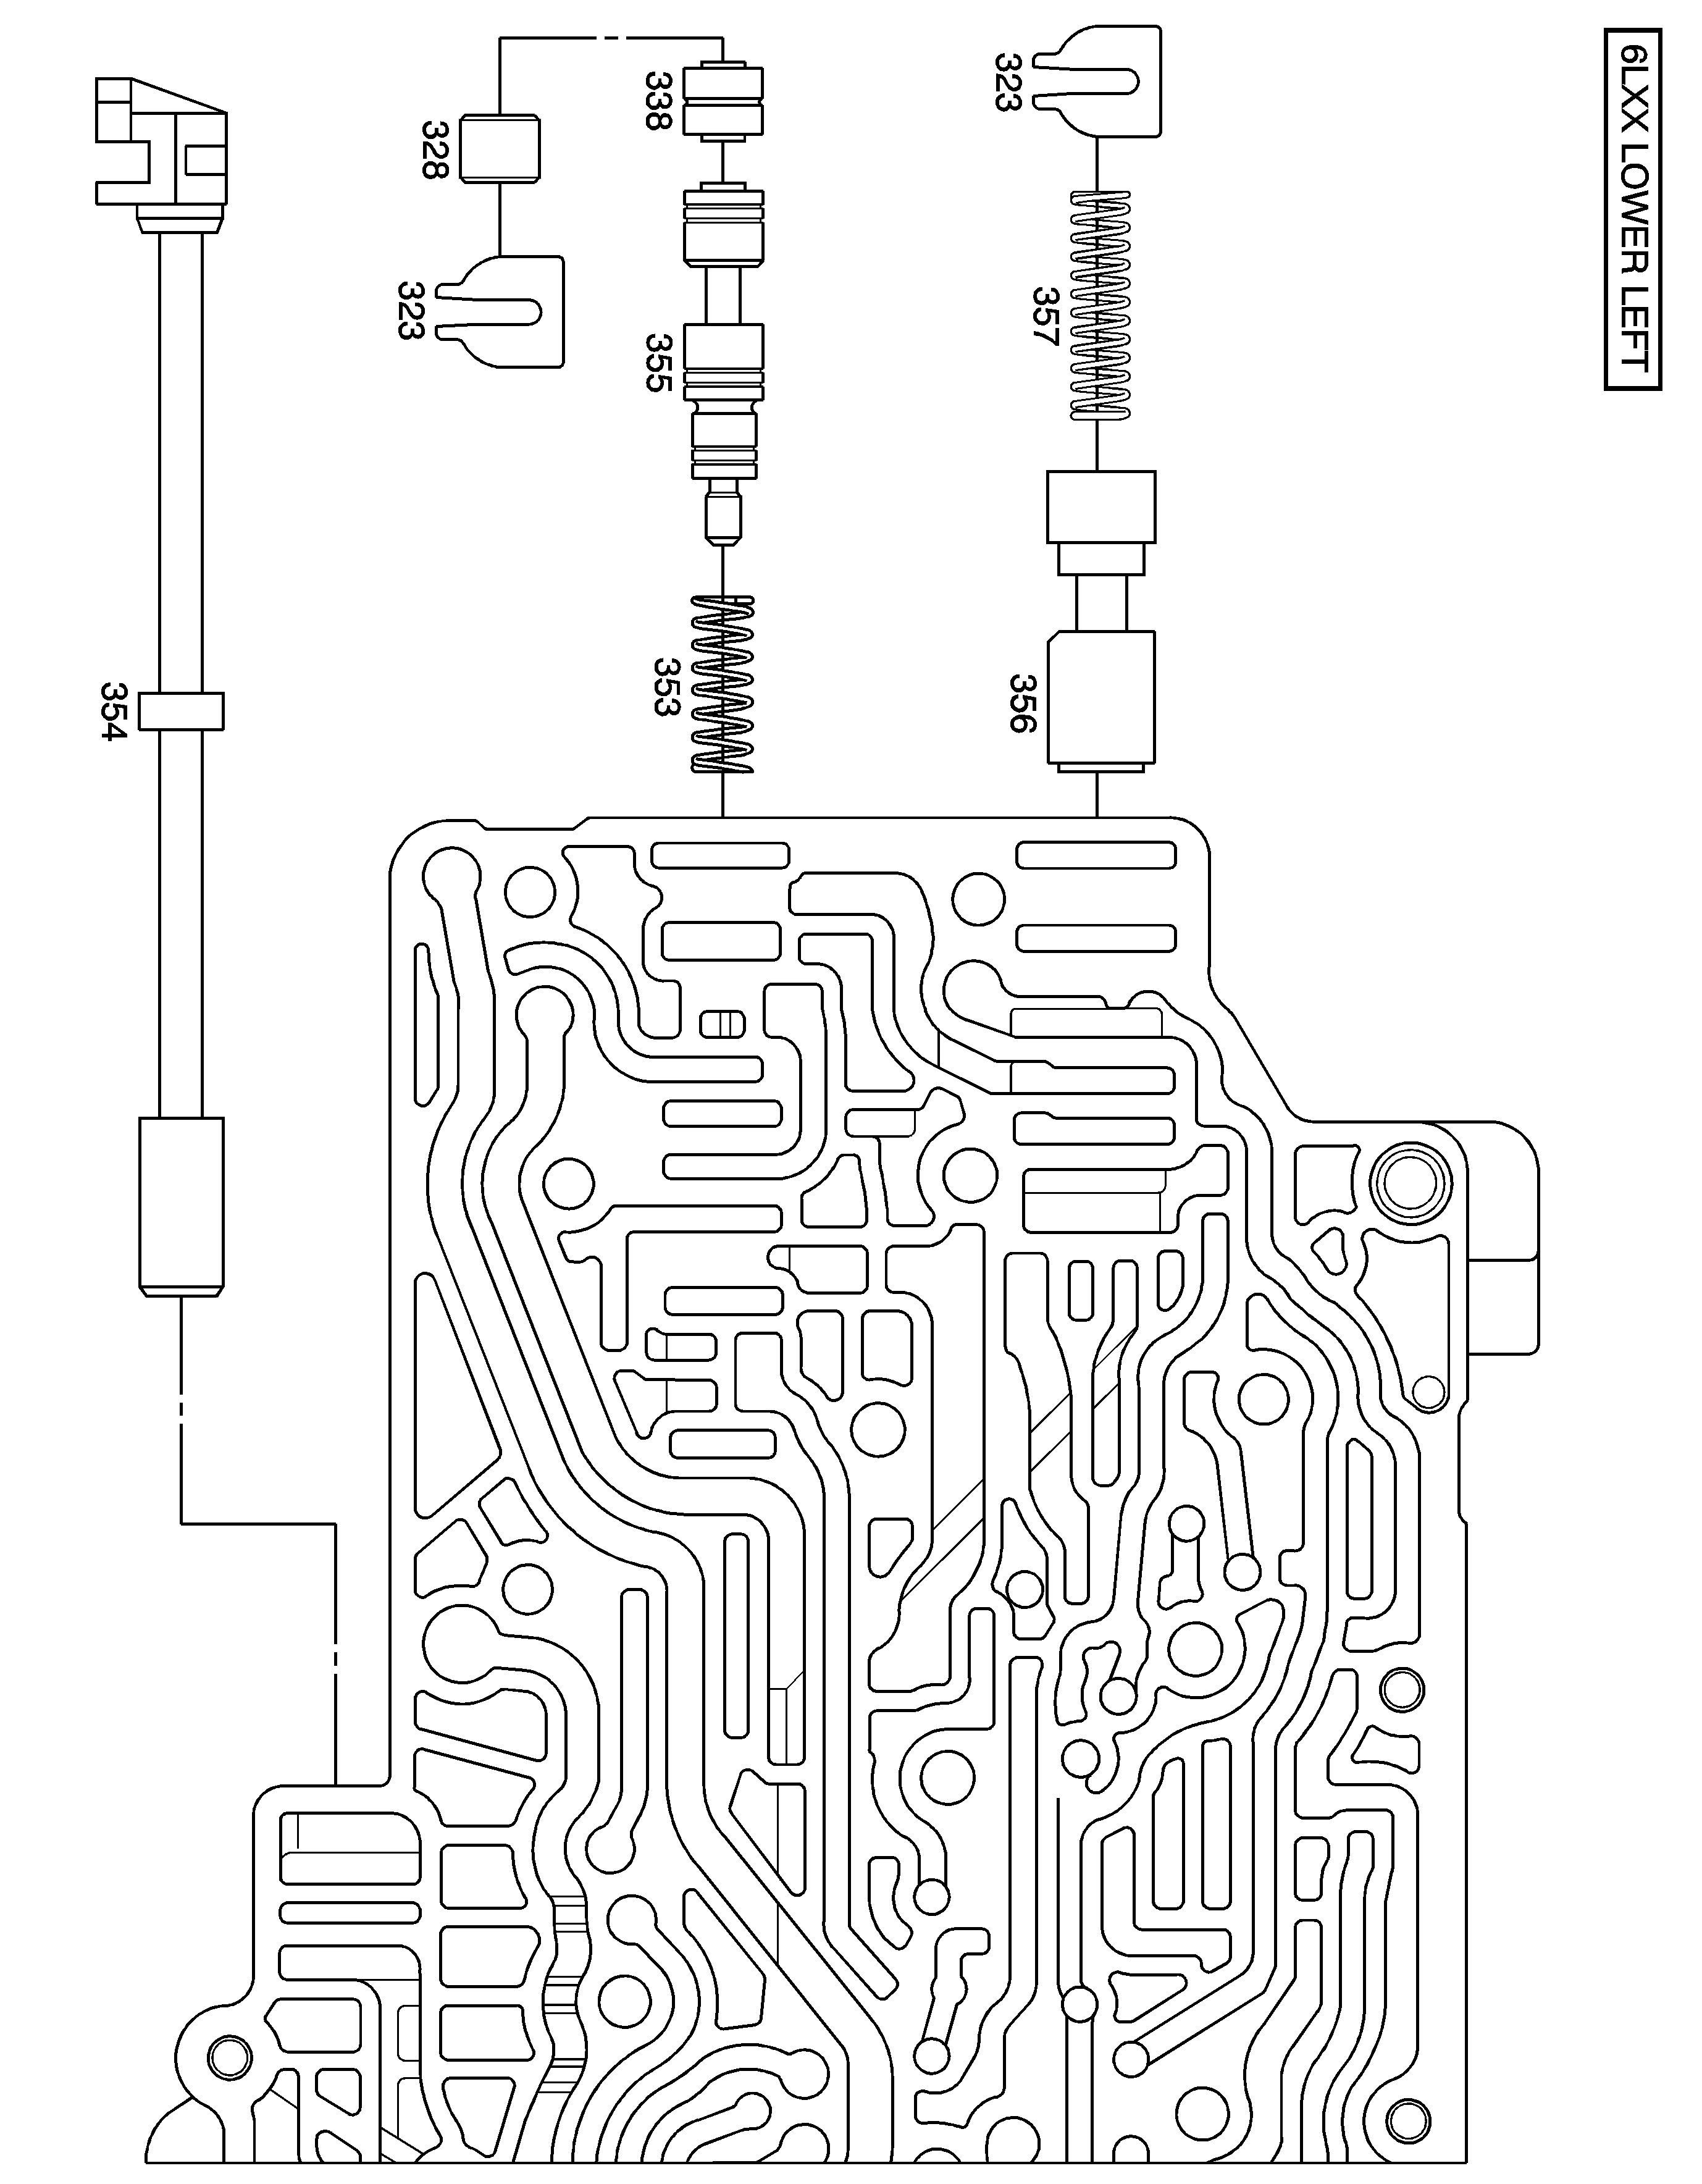
Call Out Number | Description |
|---|---|
323 | Retainer |
328 | Bore Plug |
338 | Shuttle Valve |
353 | Clutch Select Solenoid Valve Spring |
354 | Manual Valve |
355 | TCC Regulator Apply Valve |
356 | Clutch Piston Dam Feed Regulator Valve |
357 | Clutch Piston Dam Feed Regulator Valve Spring |
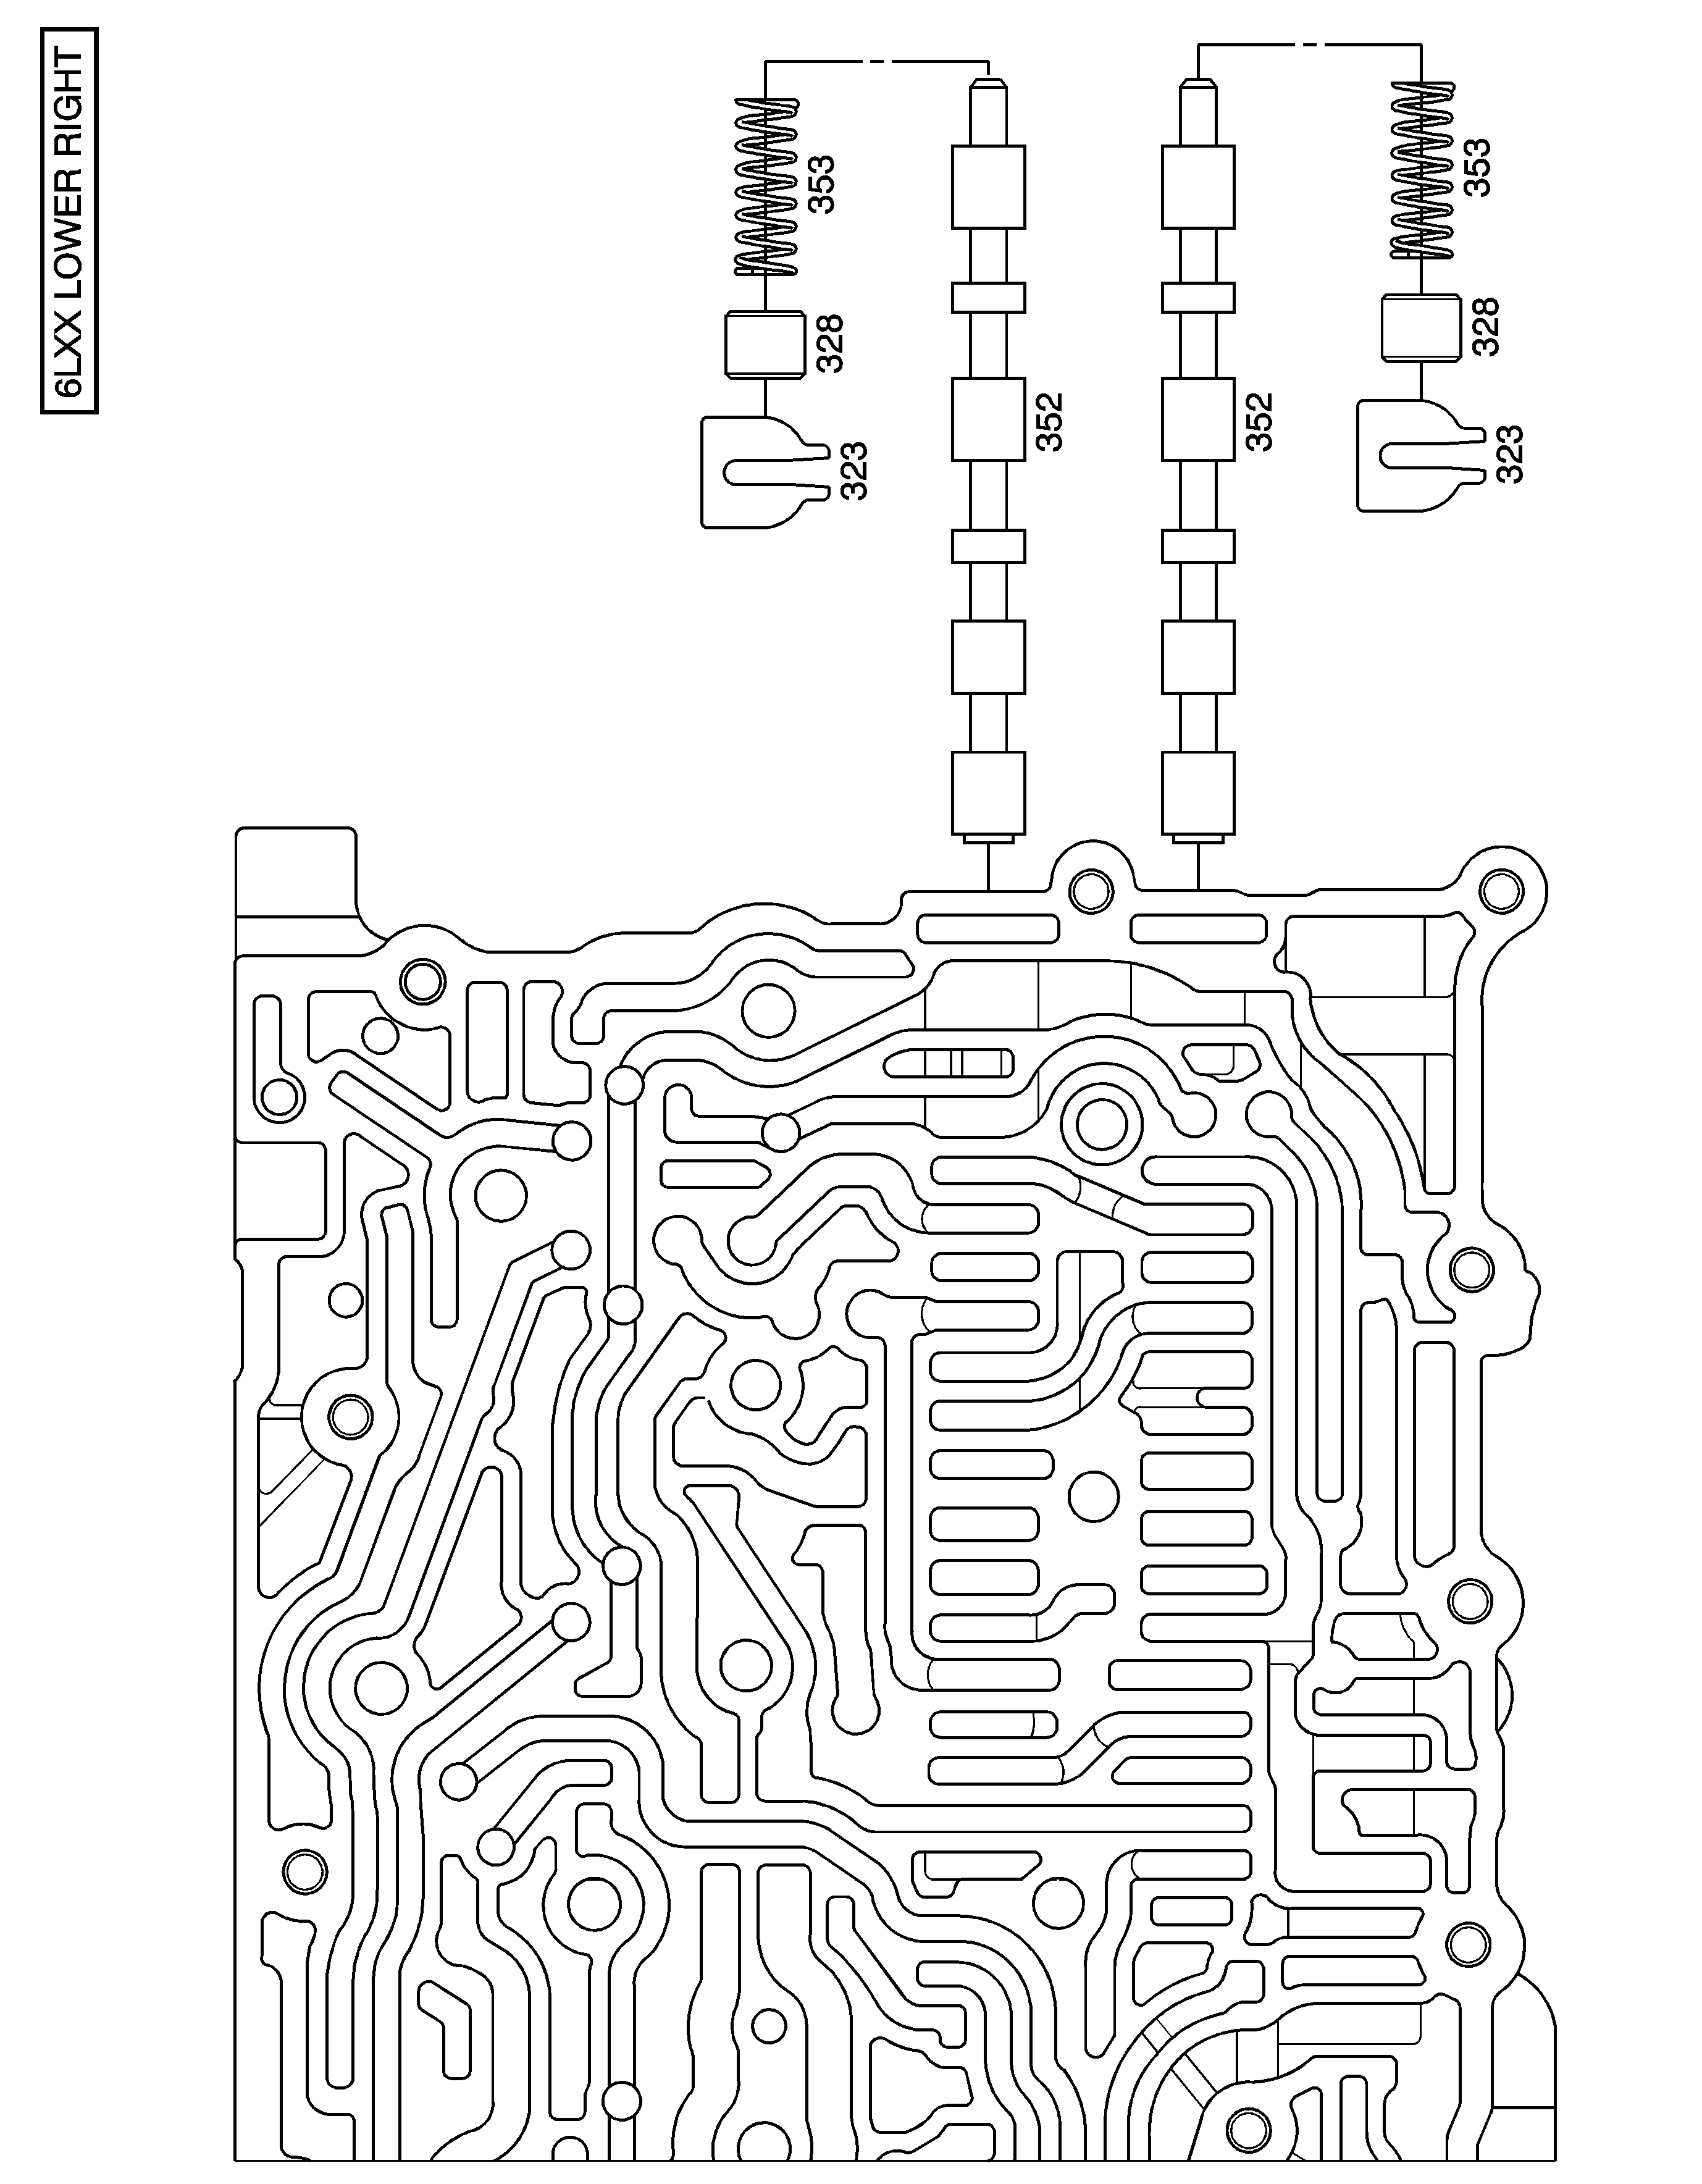
Call Out Number | Description |
|---|---|
323 | Bore Plug |
328 | Retainer |
352 | Clutch Select Solenoid Valve |
353 | Clutch Select Solenoid Valve Spring |
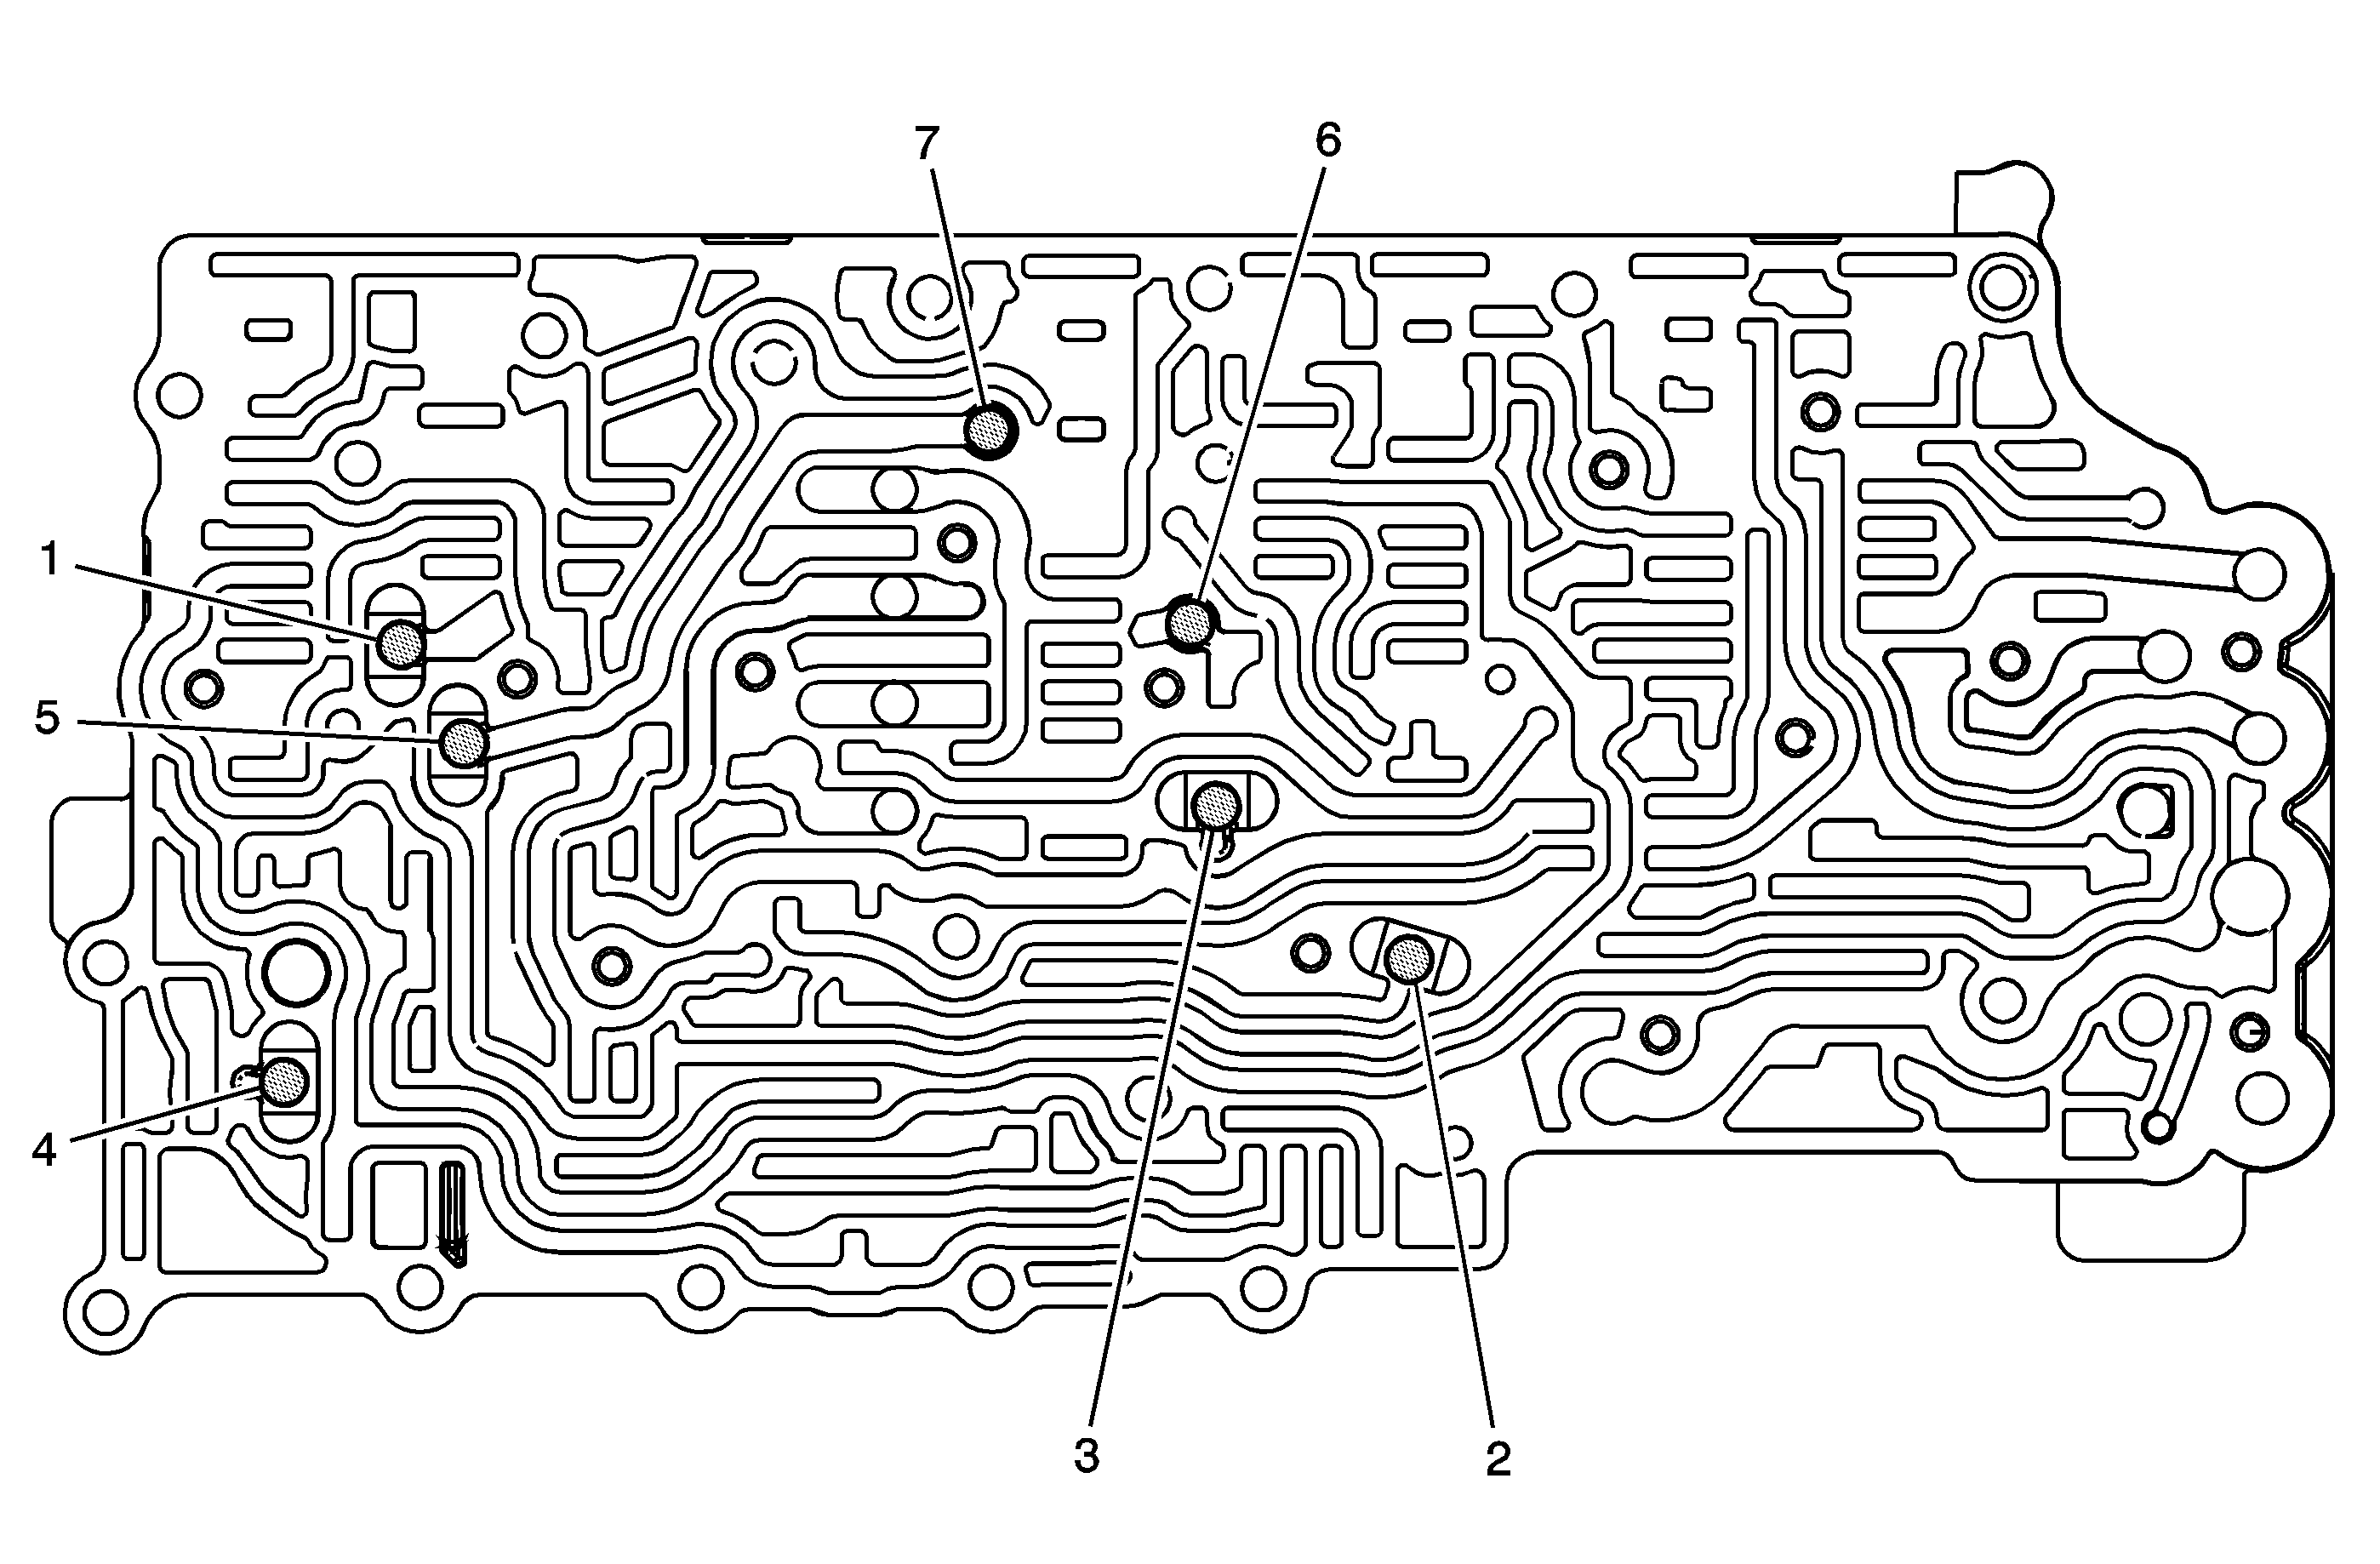
I.D | Input Oil | Input Oil | Output Oil |
|---|---|---|---|
1 | Drive 1-6 | DRV B | CB26/C1234 FD |
2 | Sol 1 | Reverse (Park) | CSV2 Enable |
3 | Sol 2 | C456 | CSV3 Enable |
4 | PS4 | C456 | CSV2 Latch |
5 | Drive 1-6 | C35R Rev FD | C35R Supply |
6 | CB26/C1234 FD | -- | C1234 FD |
7 | C35R Supply | -- | C35R FD |
Control Valve Body Spring, Bolt, Bore Plug and Retainer Identification Chart (Metric)
Control Valve Body Spring, Bolt, Bore Plug and Retainer Identification Chart (Inch)

