Circuit Description
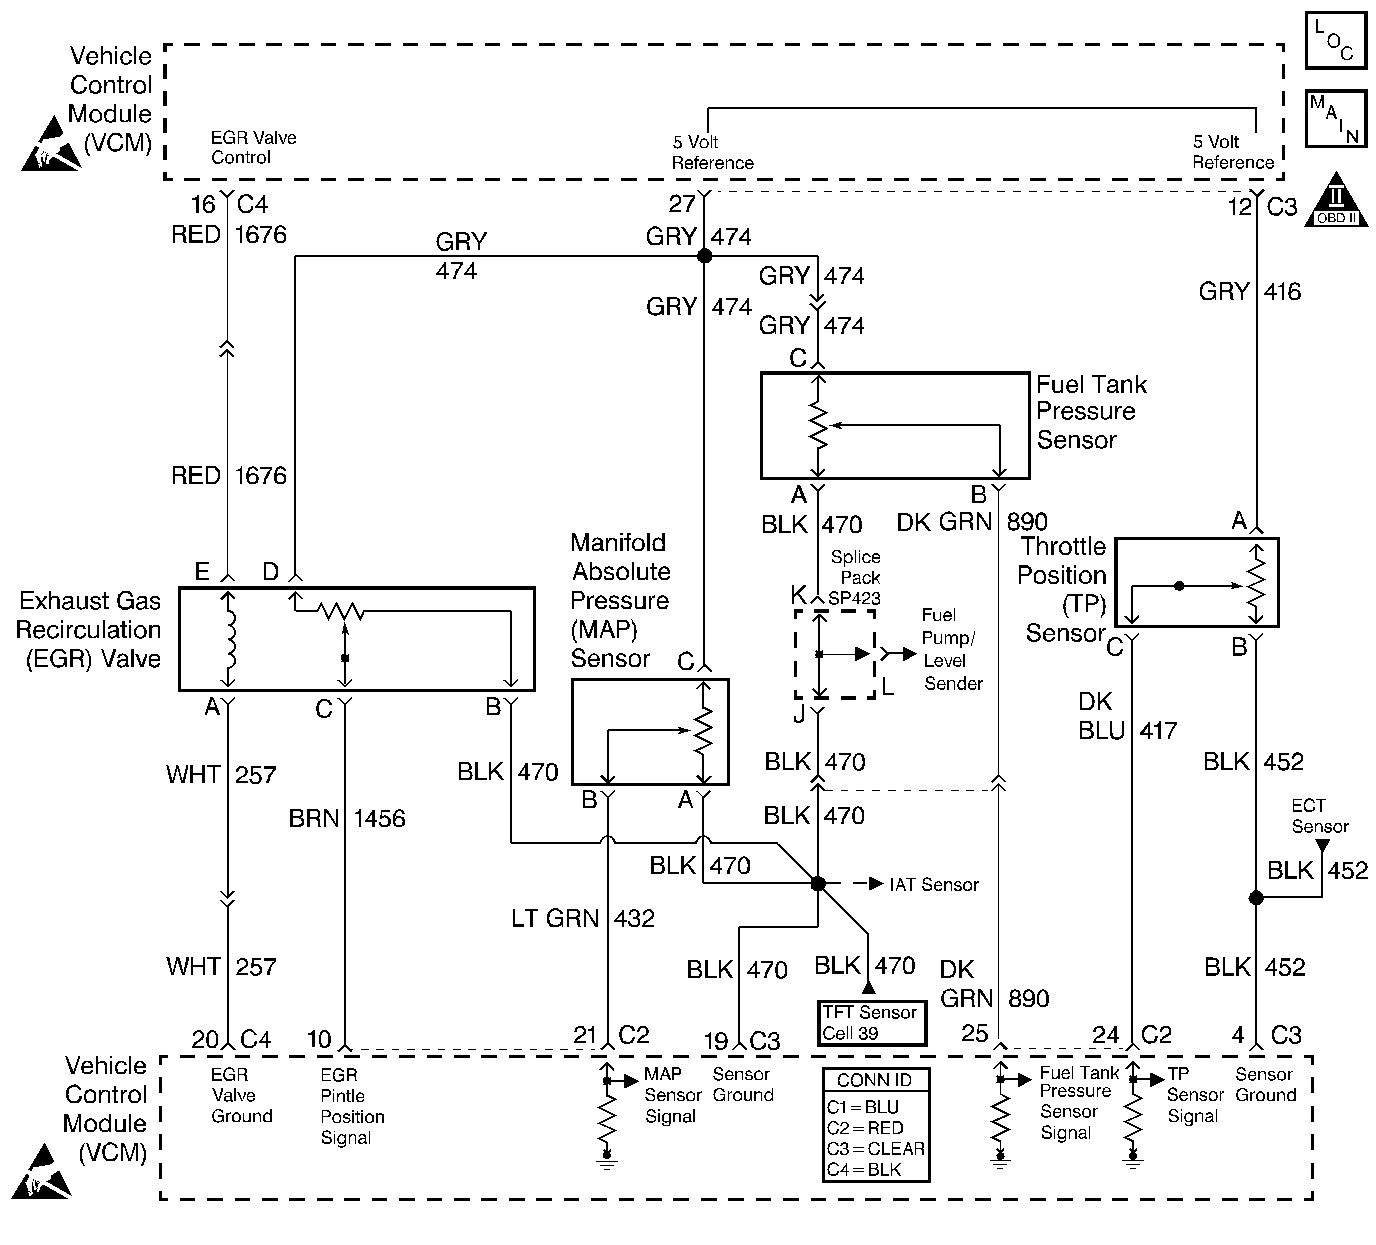
The manifold absolute pressure (MAP) sensor is a pressure sensor. The control module supplies the MAP sensor a reference voltage, signal, and ground circuits. When manifold vacuum is low, the MAP sensor signal voltage rises to a value near the reference voltage, and the MAP sensor signal voltage decreases when the manifold vacuum increases. The control module monitors the MAP sensor signal circuit voltage in order to calculate the vacuum within the intake manifold.
Certain vehicle models will also use the MAP sensor in order to calculate the barometric pressure (BARO) when the ignition switch is turned ON and the engine is NOT cranked. This BARO reading may also be updated whenever the engine is operated at wide open throttle (WOT).
This DTC is designed to detect MAP sensor signal voltages higher than possible in a normally operating MAP sensor.
Conditions for Running the DTC
| • | No active TP sensor DTCs |
| • | The engine is running |
| • | The throttle position is less than 0.4 percent when engine speed is less than 1200 RPM |
| OR |
| The throttle position is less than 20 percent when engine speed is more than 1200 RPM |
| • | The MAP is more than or equal to 4.9 volts. |
Conditions for Setting the DTC
The MAP voltage is more than 4.4 volts for more than 1 second.
Action Taken When the DTC Sets
| • | The control module illuminates the malfunction indicator lamp (MIL) if a failure is detected during 2 consecutive key cycles. |
| • | The control module sets the DTC and records the operating conditions at the time the diagnostic failed. The failure information is stored in the scan tool Freeze Frame/Failure Records. |
Conditions for Clearing the MIL or DTC
| • | The control module turns OFF the MIL after 3 consecutive drive trips when the test has run and passed. |
| • | A history DTC will clear if no fault conditions have been detected for 40 warm-up cycles. A warm-up cycle occurs when the coolant temperature has risen 22°C (40°F) from the startup coolant temperature and the engine coolant reaches a temperature that is more than 70°C (158°F) during the same ignition cycle. |
| • | Use a scan tool in order to clear the DTCs. |
Diagnostic Aids
An intermittent ground in the MAP sensor signal circuit or the 5 volt reference circuit could result in other DTCs. Also an intermittent short to voltage in the 5 volt reference circuit could result in a DTC.
With the ignition ON and the engine OFF, the manifold pressure is equal to atmospheric pressure with the signal voltage high. The VCM uses this information as an indication of the vehicle's altitude. Comparison of this reading with a known good vehicle using the same sensor is a good way to check accuracy of a suspect sensor. Readings should be the same kPa.
Refer to Symptoms .
Important: After removing the MAP sensor from the intake manifold, replace the MAP sensor to the intake manifold seal.
An intermittent may be caused by any of the following conditions:
| • | A poor connection |
| • | Rubbed through wire insulation |
| • | A broken wire inside the insulation |
Thoroughly check any circuitry that is suspected of causing the intermittent complaint. Refer to Intermittents and Poor Connections Diagnosis in Wiring Systems.
If a repair is necessary, refer to Wiring Repairs or Connector Repairs in Wiring Systems.
Test Description
The numbers below refer to the step numbers on the diagnostic table.
Important: Be sure to use the same diagnostic equipment for all measurements.
-
Disconnecting the MAP sensor harness could set other MAP related DTCs.
-
This step checks for a stuck TP sensor which could set a MAP sensor code. Even though DTC P0121 did not set, this DTC is more comprehensive and may aid in diagnosis.
-
Even though DTC P0102 did not set, this DTC is more comprehensive and may aid in diagnosis.
-
This step checks for a short to voltage on the 5 volt reference circuit.
-
This step checks the integrity of the MAP sensor ground circuit.
-
The VCM terminals C3 12 and C3 27 are spliced together inside the VCM. When checking the 5 volt reference for a short to ground, both the 5 volt reference circuits and all of the components on the 5 volt reference circuits must also be checked.
Step | Action | Value(s) | Yes | No |
|---|---|---|---|---|
1 |
Important: Before clearing the DTCs, use the scan tool Capture Info to save the Freeze Frame and Failure records for reference. The control module's data is deleted once the Clear Info function is used. Did you perform the Powertrain On-Board Diagnostic (OBD) System Check? | -- | ||
2 |
Does the scan tool display a MAP sensor voltage more than the specified value? | 15 in Hg 4.4 V | ||
Does the scan tool display a voltage less than the specified value? | 1.0 V | |||
Is the throttle angle less than the specified value? | 2 % | |||
Is the throttle angle at the specified value? | 100 % | |||
6 | The DTC is intermittent. Are any additional DTCs stored? | -- | Go to the applicable DTC table | Go to Diagnostic Aids |
Probe the 5 volt reference circuit at the MAP sensor harness connector with a J 39200 DMM connected to a ground. Is the voltage more than the specified value? | 5.2 V | |||
Probe the MAP sensor ground circuit at the MAP sensor connector with a test lamp connected to B+. Is the test lamp ON? | -- | |||
9 | Replace the MAP sensor. Refer to Manifold Absolute Pressure Sensor Replacement . Is the action complete? | -- | -- | |
10 | Check for a short to voltage in the MAP sensor signal circuit. Did you find a problem? | -- | ||
Is the voltage more than the specified value? | 0 V | |||
12 | Measure the voltage on the 5 volt reference circuit to the TP sensor at the VCM C3 connector with a J 39200 DMM connected to ground. Is the voltage more than the specified value? | 0 V | ||
13 | Check for an open MAP sensor ground circuit. Did you find a problem? | -- | ||
14 | Check for a poor connection at the VCM. Did you find a problem? | -- | ||
15 | Repair the circuit as necessary. Refer to Wiring Repairs or Connector Repairs in Wiring Systems. Is the action complete? | -- | -- | |
16 | Repair the short to voltage on the 5 volt reference circuit. Refer to Wiring Repairs in Wiring Systems. Is the action complete? | -- | -- | |
17 |
Is the action complete? | -- | -- | |
18 |
Does the scan tool indicate the diagnostic Passed? | -- | ||
19 | Does the scan tool display any additional undiagnosed DTCs? | -- | Go to the applicable DTC table | System OK |
