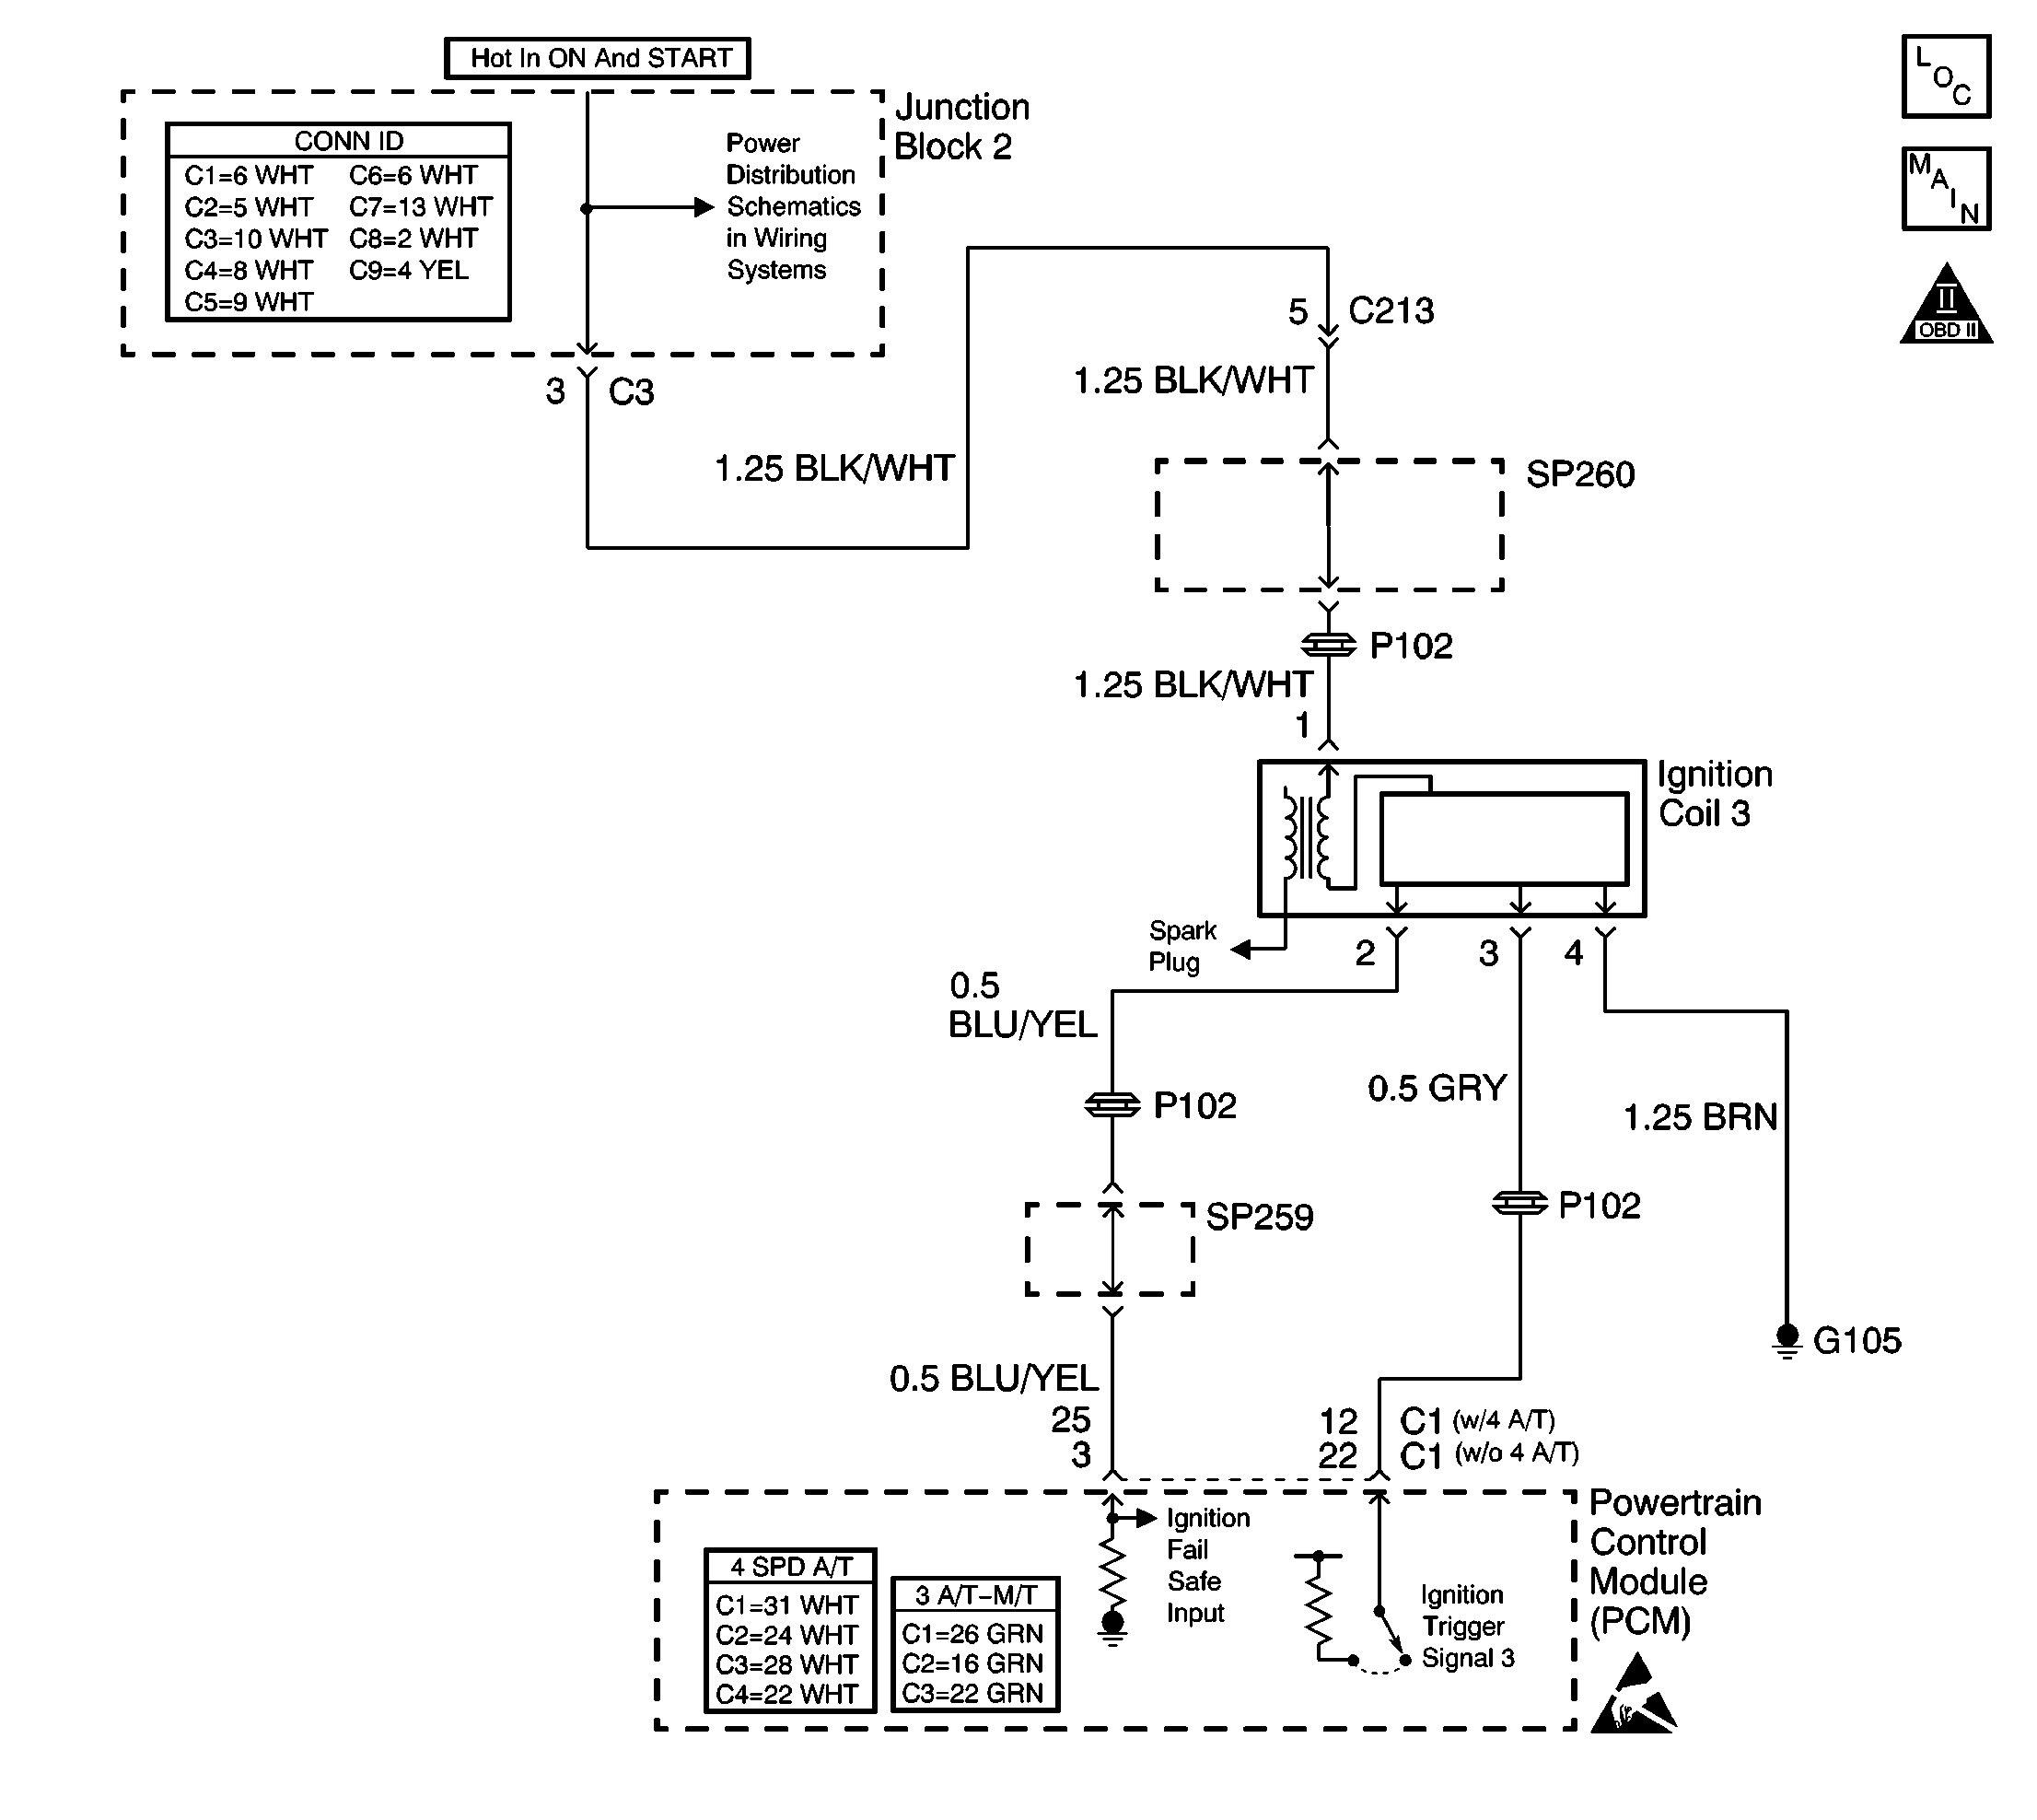
Circuit Description
The ignition trigger signal and ignition fail safe signal provide crucial information in the control of ignition system timing and fail safe activation. Based on an initial timing angle calculated from the crankshaft and the camshaft position signals the PCM calculates the ignition trigger signal. The ignition trigger signal is then sent to the ignition control circuitry located in each ignition coil. The ignition control circuitry initiates the ignition dwell period by commanding the power transistor ON. When the PCM determines the proper time to provide spark, the PCM turns OFF the ignition trigger signal. In response to the PCM signal, the ignition coil control circuitry turns OFF the power transistor, producing a spark. After the spark has occurred, the control circuitry sends an ignition failsafe signal back to the PCM, confirming that an ignition event has taken place. If the ignition failsafe signal is not received by the PCM, a Fuel Cut-off mode is activated and fuel injector operation is ceased. The suspension of fuel injection is a failsafe function that protects the catalytic converter from damage by overheating.
Conditions for Running the DTC
The ignition is ON.
Conditions for Setting the DTC
No ignition coil 3 failsafe input signal is sent to the PCM for 2 consecutive ignition trigger signal cycles, while the engine is cranking or running.
Action Taken When the DTC Sets
| • | The PCM illuminates the malfunction indicator lamp (MIL). |
| • | The PCM stores the conditions that were present when the DTC set as Freeze Frame data. |
| • | The PCM enters the Fail Safe Function and begins fuel cut mode operation (terminates fuel delivery). |
Conditions for Clearing the MIL/DTC
| • | The PCM turns OFF the MIL on the third consecutive trip cycle during which the diagnostic has been run and the fault condition is no longer present. |
| • | The DTC clears after 40 consecutive warm-up cycles have occurred without a fault. |
| • | A DTC can be cleared by using the scan tool Clear DTC Information function. |
Diagnostic Aids
Check for the following conditions:
| • | Check the ignition coil grounds at G105 for a clean and tight connection. |
| • | An interruption of the ground circuit or voltage supply to the ignition coil will prevent a proper ignition event from taking place. A DTC P1310 will set if there is a fault in any of the ignition coil circuits. |
| • | If DTCs P1300, P1305, and P1315 are present, the fault is located in the shared electrical circuits or shared components of the ignition coils. |
| • | Check the noise filter for an internal short or low resistance. The ignition coil may not receive adequate voltage during high load conditions if the noise filter is faulty. A good noise filter will indicate infinite resistance (OL) with a DMM after the capacitor within the filter is charged up. |
| • | Unless the ignition key is cycled or DTCs are cleared, the PCM waits to receive ignition failsafe signals before providing fuel injector operation. |
An intermittent malfunction may be caused by a fault in the ignition coil electrical circuit. Inspect the wiring harness and components for an intermittent condition. Refer to Intermittent Conditions .
Repair any electrical circuit faults that were found. Refer to Wiring Repairs in Wiring Systems.
The information included in the Freeze Frame data can be useful in determining the vehicle operating conditions when the DTC first set.
Test Description
The numbers below refer to the step numbers in the diagnostic table.
-
The OBD System Check prompts the technician to complete some basic checks and store the freeze frame data on the scan tool if applicable. This creates an electronic copy of the data taken when the fault occurred. The information is then stored in the scan tool for later reference.
-
If DTCs P1300, P1305, P1310, and P1315 are present, the fault is located in the shared electrical circuits or shared components of the two ignition coils.
-
This step checks for an open or a short in the ignition trigger signal circuit. The voltage on the ignition trigger signal circuit will fluctuate very quickly when cranking the engine. The DMM voltage reading on the ignition trigger signal circuit should indicate 0.2 to 1.0 volts. Using the min/max feature on the DMM may indicate a maximum voltage as high as 3.5 volts.
-
This step checks for a fault in the ignition failsafe input circuit. If the cause of the DTCs P1300, P1305, P1310, and P1315 is a fault in the ignition failsafe input circuit, the engine will start and run for less than 2 seconds. Without the failsafe signal the PCM will initiate fuel cutoff.
-
This step checks for a short in the ignition positive voltage supply to the ignition coils or for a faulty noise filter. A shorted noise filter may pull down the ignition coil primary voltage.
Step | Action | Values | Yes | No | ||||||
|---|---|---|---|---|---|---|---|---|---|---|
Did you perform the Powertrain On-Board Diagnostic (OBD) System Check? | -- | Go to Step 2 | ||||||||
Are DTCs P1300, P1305, and P1315 also set? | -- | Go to Step 10 | Go to Step 3 | |||||||
3 |
Does the test lamp illuminate? | -- | Go to Step 4 | Go to Step 6 | ||||||
Is the voltage within the specified range? | 0.2-1.0 V | Go to Step 5 | Go to Step 7 | |||||||
5 | Probe terminal 4 of the ignition coil connector on the harness side with a test lamp connected to B+. Does the test lamp illuminate? | -- | Go to Step 8 | Go to Step 9 | ||||||
6 | Repair the open or the short in the ignition power circuit between ignition coil 3 and SP260. Refer to Wiring Repairs in Wiring Systems. Is the action complete? | -- | Go to Step 17 | -- | ||||||
7 |
Was a repair necessary? | -- | Go to Step 17 | Go to Step 16 | ||||||
8 |
Was a repair necessary? | -- | Go to Step 17 | Go to Step 15 | ||||||
9 | Repair the open in the ignition ground circuit between ignition coil 3 and G105. Refer to Wiring Repairs in Wiring Systems. Is the action complete? | -- | Go to Step 17 | -- | ||||||
Did the engine start and then quickly stall? | -- | Go to Step 13 | Go to Step 11 | |||||||
11 |
Does the test lamp illuminate? | -- | Go to Step 14 | Go to Step 12 | ||||||
Is the action complete? | -- | Go to Step 17 | -- | |||||||
13 |
Was a repair necessary? | -- | Go to Step 17 | Go to Step 16 | ||||||
14 | Repair the faulty ignition coil ground circuits at G105. Refer to Wiring Repairs in Wiring Systems. Is the action complete? | -- | Go to Step 17 | -- | ||||||
15 | Replace ignition coil 3. Refer to Ignition Coil Replacement . Is the action complete? | -- | Go to Step 17 | -- | ||||||
16 | Replace the PCM. Refer to Powertrain Control Module Replacement . Is the action complete? | -- | Go to Step 17 | -- | ||||||
17 |
Are any DTCs displayed on scan tool? | -- | System OK |
