CONTROL VALVE ASSEMBLY CLEANING/SERVICING - ALL A/T

ALL THM TRANSMISSION/TRANSAXLE ASSEMBLIES CONTROL VALVE ASSEMBLY CLEANING/SERVICING PROCEDURES
Model and Year: ALL MODELS WITH THM TRANSMISSIONS
GENERAL CONTROL VALVE ASSEMBLY CLEANING/SERVICING PROCEDURE
The following information is provided as a recommended procedure for cleaning/servicing all automatic transmission/transaxle control valve assemblies when:
o Diagnosis indicates a stuck or sticking valve(s).
o A Transmission/transaxle pump or torque converter malfunction requires a complete unit overhaul.
EQUIPMENT AND WORK AREA
WORKBENCH
o Must be clean and free of any foreign material (dirt, grease or other contaminants).
o Work area should be large enough to allow for the disassembly of the control valve assembly and the layout of each valve train.
TOOLS
o Should be cleaned with solvent before and during the disassembly procedures to ensure they are free of any grease or dirt that may contaminate the control valve assembly.
SOLVENT AND PARTS CLEANING TANK
o Must be clean and free of contamination from engine or other components.
o Must be cleaned and filtered if solvent is recirculated.
SAFETY EQUIPMENT
o Safety glasses and rubber gloves are the minimum requirements to ensure personal safety,
CLEANING PROCEDURES
Tools Required
- Appropriate Service Manual - Awl - Micro fine lapping compound - Tapered #49 drill bit - Pencil type magnet - Small flat blade screwdriver - Small non-abrasive parts cleaning brush
Cleaning And Disassembly
1. Remove the control valve assembly from the transmission/transaxle following the procedures contained in the appropriate Service Manual.
2. Inspect the attaching bolts and bolt holes. Remove metal chips or foreign material that may be present.
3. Place the control valve assembly in a clean tank and with clean solvent thoroughly wash the entire outer surfaces of the valve body.
4. Remove the control valve assembly from the solvent and dry it using compressed air.
5. Inspect the casting and fluid passages for foreign materials that may have accumulated in pockets. Remove the foreign material with a small screwdriver or an awl. (Refer to Figure 1)
6. As necessary, repeat the washing and drying procedures as described in Steps #3 and #4 until all foreign materials are removed.
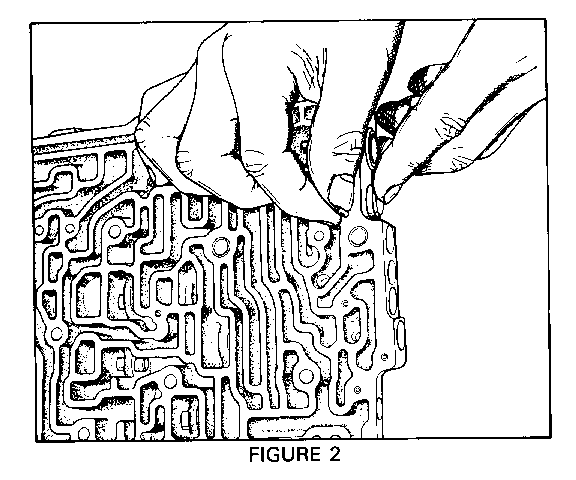
7. While applying a slight pressure with your finger against spring force in the valve train, remove the coiled spring pin, sleeve or clip that retains the valve trains. (Refer to Figure 2).
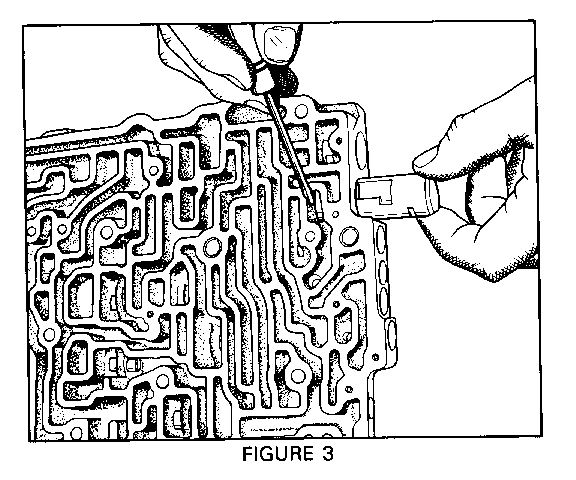
8. Slowly release pressure on the valve train and remove it from the valve body. A small flat blade screwdriver may be sued to remove the bushing from the bore. (Refer to Figure 3)
DO NOT USE EXCESS FORCE TO REMOVE VALVES OR BUSHINGS
9. Place the valve train on a clean surface in the exact sequence as it was removed from the valve body. Follow the procedures in steps #7, #8 and #9 to remove all valves and bushings from the valve body. (Layout of the valves, springs and bushings on a clean, lint free towel will help to keep parts organized.)
10. Remove pressure switches, pipe plugs and T.C.C. solenoid, if applicable.
11. Clean one valve train at a time by washing the valves, springs and bushings in clean solvent and drying with compressed air.
12. Clean the valve body casting with clean solvent and dry with compressed air.
Inspection Of Control Valve Assembly Components
1. Inspect the valve body casting for:
o Cracks o Porosity o Damaged machined surfaces o Nicks or burrs in valve bores o Flatness of valve body to case mating surface (using a straight edge or by inspecting the gaskets for uniform compression)
2. Inspect valves for:
o Burrs o Nicks o Scratches o Scoring
3. Inspect valve bushings for:
o Porosity o Burrs o Nicks o Scratches o Scoring
4. Inspect springs for:
o Damaged or distorted coils
STUCK VALVE SERVICING
If during disassembly of the control valve assembly a valve is found to be sticking in a bushing or bore, use the following procedure to service the valve and bushing or bore:
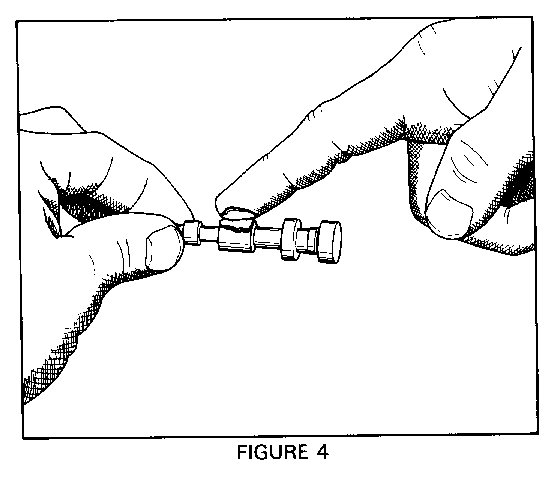
1. Apply a small amount of "micro fine" lapping compound to the valve lands. (The lapping compound should be 900 grit or finer.) Reinsert the valve into the bushing (or bore in the valve body). (Refer to Figure 4)
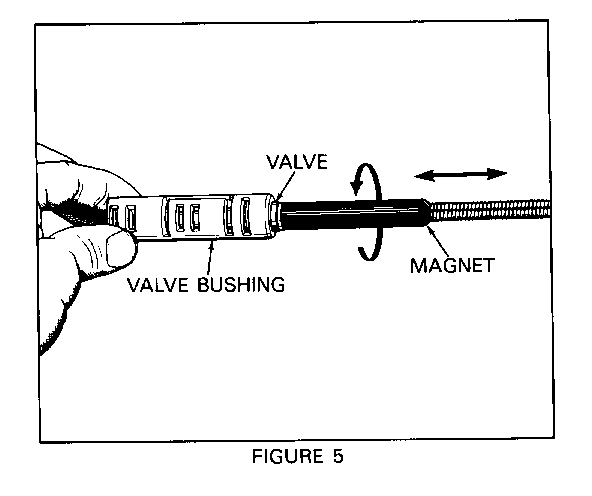
2. A. Steel Valves ------------
o Using a pencil type magnet, rotate the valve while moving it back and forth in the bore. (Refer to Figure 5)
B. Aluminum Valves ---------------
o Using a small flat blade screwdriver, move the valve back and forth in the bore.
IMPORTANT: Too much "lapping" of a valve will cause excessive clearances and increase the chance of a valve not operating. Clearances between a valve and it's sleeve or bore are normally .028 - .04mm (.001 - .0015").
3. After lapping a steel valve with a magnet check for magnetism in the valve by holding it near some steel filings or chips. If the valve can pick up the filings, you must demagnitize it by using a "demagnetizing" tool (different types are available at most tool stores).
4. Again check the valve for magnetism, and if necessary, demagnetize it following the procedure in step #3. Repeat this procedure until the magnetism has been removed.
5. Thoroughly clean the valve and bushing (or bore in the valve body) with solvent and dry using compressed air.
6. Place the valve in its bushing (or bore. in the valve body) and check for freeness of movement by rocking the bushing (or valve body) back and forth. The valve should travel freely in its bore. If the valve still tends to stick, repeat the lapping procedure.
NOTE: The use of a honing stone, fine sandpaper or crocus cloth is not recommended for servicing stuck valves. All valve lands have sharply machined corners that are necessary for "cleaning" the bore. If these corners are rounded, foreign material could wedge between the valve and bore causing the valve to stick.
Reassembly
1. Make sure the valve body casting, valves and bushings are completely dry and free of cleaning solvent.
2. Lubricate all springs, valves and bushings with clean transmission fluid.
3. Reassemble the valve trains in the valve body casting and check for freedom of movement using a small screwdriver or awl.
4. Install the control valve assembly into the transmission/transaxle following procedures as outlined in the appropriate Service Manual.
5. Tighten the control valve assembly to case attaching bolts by starting from the center of the control valve assembly and moving outward.
IMPORTANT: Control valve assembly to case attaching bolts must be hand torqued to the specifications given in the appropriate Service Manual. Improper torque can cause a control valve assembly to not operate properly.

General Motors bulletins are intended for use by professional technicians, not a "do-it-yourselfer". They are written to inform those technicians of conditions that may occur on some vehicles, or to provide information that could assist in the proper service of a vehicle. Properly trained technicians have the equipment, tools, safety instructions and know-how to do a job properly and safely. If a condition is described, do not assume that the bulletin applies to your vehicle, or that your vehicle will have that condition. See a General Motors dealer servicing your brand of General Motors vehicle for information on whether your vehicle may benefit from the information.
